Back to Contents Page
Speakers
Dell™ Inspiron™ XPS Service Manual
Removing the Speakers
Replacing the Speakers
Removing the Speakers
1.
Follow the instructions in "
Before Working Inside Your Computer
."
2.
Remove the
center control cover
.
3.
Remove the
keyboard
.
4.
Remove the
display assembly
.
5.
Remove the
palm rest
.
6.
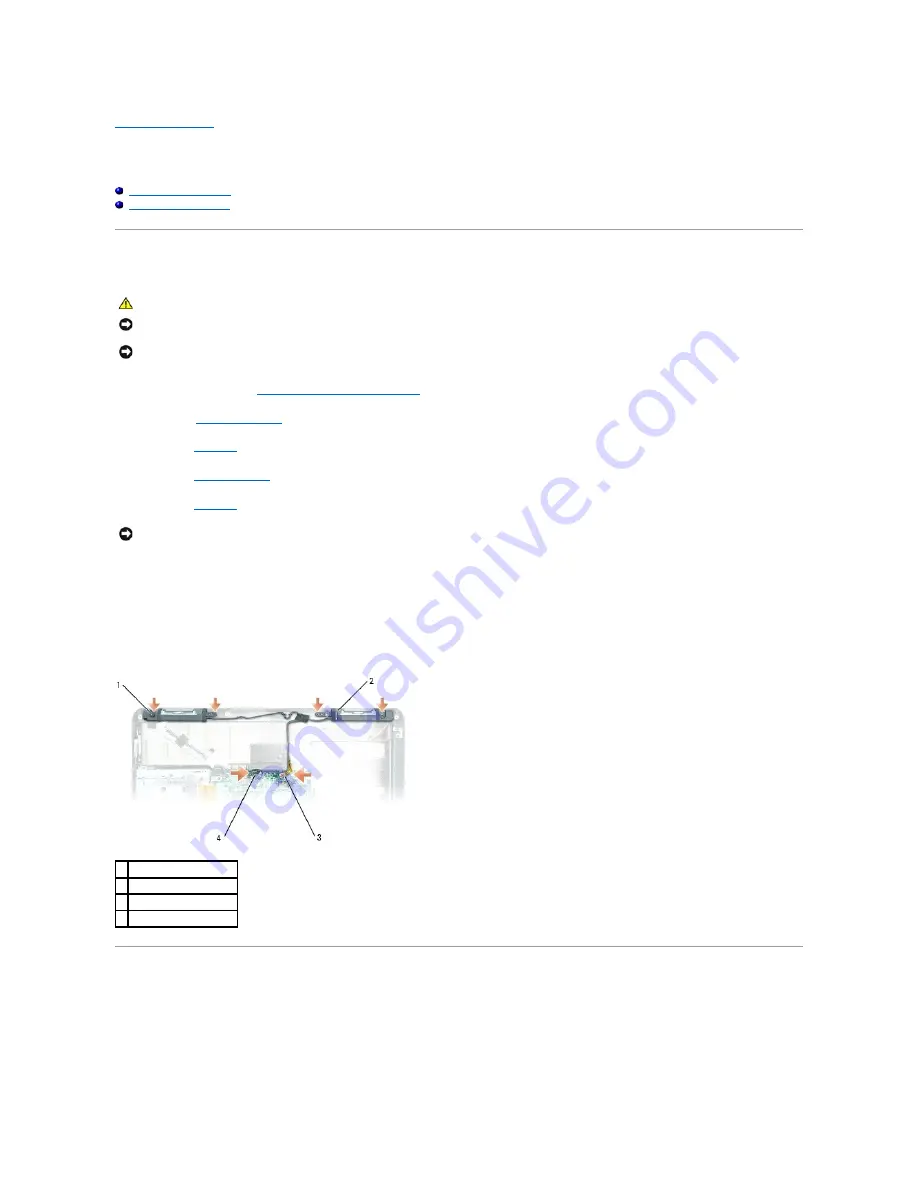
Disconnect the two speaker connectors from the system board connector.
7.
Lift the tape securing the speaker cable to the computer base.
8.
Remove the four M2.5 x 5-mm screws from the speakers (two on each speaker).
9.
Gently remove the speakers.
Replacing the Speakers
1.
Connect the speaker connectors to the system board connectors.
2.
Gently align the speakers on the screw holes for securing the speakers to the computer base.
3.
Replace the four M2.5 x 5-mm screws to secure the speakers in place (two on each speaker).
CAUTION:
Before you begin any of the procedures in this section, follow the safety instructions located in the
Product Information Guide
.
NOTICE:
To avoid electrostatic discharge, ground yourself by using a wrist grounding strap or by periodically touching an unpainted metal surface (such
as the back panel) on the computer.
NOTICE:
To avoid damaging the system board, you must remove the main battery before you begin working inside the computer.
NOTICE:
Handle the speakers with care to avoid damaging them.
1 M2.5 x 5-mm screws (4)
2 speakers
3 speaker LED connector
4 speaker connector
Содержание Inspiron XPS
Страница 11: ...Back to Contents Page ...
Страница 25: ......
Страница 33: ...Back to Contents Page ...
Страница 52: ......
Страница 57: ...3 Replace the cover Back to Contents Page 1 antenna cables 2 ...
Страница 75: ...Back to Contents Page ...
Страница 80: ...2 Tighten the four captive screws on the video card thermal cooling assembly Back to Contents Page ...
Страница 82: ...Back to Contents Page ...
Страница 90: ......
Страница 95: ...3 Replace the cover Back to Contents Page 1 antenna cables 2 ...
Страница 101: ...8 Replace the display assembly 9 Replace the keyboard 10 Replace the center control cover Back to Contents Page ...
Страница 110: ...Back to Contents Page ...
Страница 113: ...Back to Contents Page ...
Страница 118: ...2 Tighten the four captive screws on the video card thermal cooling assembly Back to Contents Page ...
Страница 120: ...Back to Contents Page ...


