A-Class
77
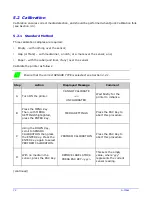
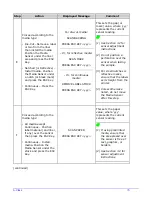
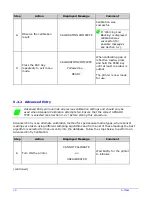
Step
Action
Displayed Message
Comment
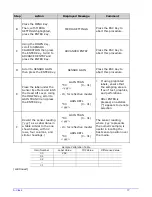
B
Press the MENU Key.
Then, with MEDIA
SETTINGS highlighted,
press the ENTER Key.
MEDIA SETTINGS
Press the ESC Key to
abort this procedure.
C
Using the DOWN Key,
scroll to SENSOR
CALIBRATION then press
the ENTER Key. Scroll to
ADVANCED ENTRY and
press the ENTER Key.
ADVANCED ENTRY
Press the ESC Key to
abort this procedure.
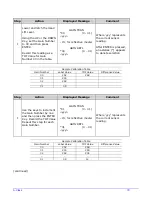
D Scroll to SENSOR GAIN
then press the ENTER Key.
SENSOR GAIN
Press the ESC Key to
abort this procedure.
E
Place the label under the
Sensor Eye Mark and latch
the Head Lift Lever. Using
the DOWN Key, scroll to
GAIN TRAN 00 and press
the ENTER Key.
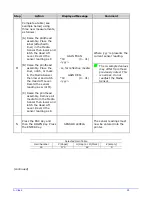
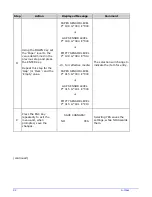
GAIN TRAN
*00 (0 – 31)
<yyy>
- Or, for reflective media:
GAIN REFL
*00 (0 – 31)
<yyy>
•
If using preprinted
labels, ensure that
the sampling area is
free of text, graphics,
and perforations.
•
After ENTER is
pressed, an asterisk
(*) appears to denote
selection.
F
Record the sensor reading
(‘yyy’) as a Label Value in
a table similar to the one
shown below, with 32
rows, four columns, and
similar headings.)
GAIN TRAN
*00 (0 – 31)
<yyy>
- Or, for reflective media:
GAIN REFL
*00 (0 – 31)
<yyy>
The sensor reading,
where ‘yyy’ represents
the numeric sample, is
useful in locating the
best sensor position over
the media.
Sample Calibration Table
Gain Number
Label Value
TOF Value
Difference Value
00 252
01
02
…
31
(continued)
Содержание A-Class Mark II
Страница 1: ...Operator s Manual ...
Страница 2: ......
Страница 5: ......
Страница 20: ...10 A Class Peel Point Dimension See Appendix C for the PE Series printer s dimension Peel Bar ...
Страница 80: ...70 A Class ...
Страница 113: ...A Class 103 ...
Страница 115: ...A Class 105 ...
Страница 126: ...116 A Class ...
Страница 134: ...124 A Class ...
Страница 138: ...128 A Class ...
Страница 142: ...132 A Class ...
Страница 156: ...146 A Class ...
Страница 158: ...148 A Class ...
Страница 164: ...154 A Class ...

