background image

22

s

ectiOn

 5— O

peratiOn

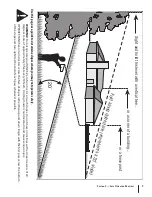
Driving On Slopes

Refer to the slope gauge in the Safe Operation Section to heLPG 

determine slopes where you may not operate safely.

WARNING! 

Do not operate on inclines with a slope 

in excess of 20 degrees (a rise of approximately 3 

feet every 10 feet). The tractor could overturn and 

cause serious injury.

Always drive across slopes, never up and down. 

1. 

Avoid turning downhill if possible. Start at the bottom of a 

2. 

slope and work upward. Always slow down before turning.
Use extra care and go slowly when turning downhill.

3. 

Operating The PTO 

Operate the PTO clutch as follows:

Move the throttle control lever to approximately the mid 

1. 

throttle position.

Pull the PTO switch upward to the “EnGAGED” position. 

2. 

Advance the throttle lever to the operating speed (full 

3. 

engine speed).
The operator must remain in the tractor seat at all times. If 

4. 

the operator should leave the seat without turning off the 

power take-off switch, the tractor’s engine will shut off.

Using the Mower Deck

WARNING! 

Make certain the area to be mowed is 

free of debris, sticks, stones, wire or other objects 

that can be thrown by the rotating blades.

NOTE: 

Do not engage the mower deck when lowered in grass. 

Premature wear and possible failure of the ‘V” belt and PTO 

clutch will result. Fully raise the deck or move to a non grassy 

area before engaging the mower deck.

Mow across slopes, not up and down. If mowing a slope, 

1. 

start at bottom and work upward to ensure turns are made 

uphill.

On t

2. 

he first pass pick a point on the opposite side of the 

area to be mowed.
En

3. 

gage the PTO clutch using the PTO switch and move the 

throttle control to the fast position. 
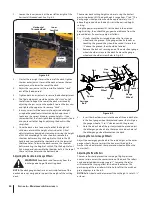
Remove the clevis pin and hitch pin, raise the deck to the 

4. 

highest (transport) position and place the clevis pin in the 

desired position and secure with the hitch pin. Lower the 

mower deck to the desired height setting using the power 

implement lift.

Slow

5. 

ly push the forward speed control pedal forward to 

move the tractor forward, and keep the tractor headed 

directly toward the alignment point.

NOTE: 

The speed of the tractor will affect the quality of 

the mower cut. Mowing at full speed will adversely affect 

the cut quality. Control the ground speed with the speed 

control pedals.
W

6. 

hen approaching the other end of the strip, slow down 

or stop before turning. A U-turn is recommended unless a 

pivot or zero turn is required.

Align the mower with an edge of the mowed strip and 

7. 

overlap approximately 3”.

Direct the tractor on each subsequent strip to align with a 

8. 

previously cut strip.
To prevent rutting or grooving of the turf, if possible, 

9. 

change the direction that the strips are mowed by 

approximately 45° for the next and each subsequent 

mowing.

WARNING! 

Be careful when crossing gravel paths 

or driveways. Disengage the PTO and raise the deck 

to the highest position before crossing.

NOTE: 

When stopping the tractor for any reason while on a grass 

surface, always:

Make sure the speed control pedals are in neutral. 

• 

Engage the parking brake.

• 

Shut engine off and remove the key. 

• 

Doing so will minimize the possibility of having your lawn 

• 

‘‘browned’’ by hot exhaust from your tractor’s running 

engine.

Checking the Safety Interlock Circuits

Periodically check the safety interlock circuits to ensure they are 

working properly. If a safety circuit is not working as designed, 

contact you Cub Cadet dealer to have the tractor inspected. DO 

nOT operate the tractor if any safety circuit is not functioning 

properly. To check the safety circuits, proceed as follows:

Sitting in the tractor seat with both speed control pedals 

1. 

in the neutral position, disengage the parking brake and 

momentarily turn the ignition switch to the start position. 

The engine should not crank.

Engage the parking brake and pull the PTO switch upward 

2. 

to the engaged position. Momentarily turn the ignition 

switch to the start position; the engine should not crank.

Push the PTO switch downward to the disengaged position 

3. 

and move both speed control pedals to the neutral 

position and disengage the parking brake; then lift upward 

from the operator’s seat. The engine should stop.

With both speed control pedals in the neutral position and 

4. 

the parking brake engaged, engage the PTO. Lift upward 

from the operator’s seat; the engine should stop.

Содержание Tank S S7237

Страница 1: ...s Set Up Operation Maintenance Service Troubleshooting Warranty WARNING READ AND FOLLOW ALL SAFETY RULES AND INSTRUCTIONS IN THIS MANUAL BEFORE ATTEMPTING TO OPERATE THIS MACHINE FAILURE TO COMPLY WITH THESE INSTRUCTIONS MAY RESULT IN PERSONAL INJURY Form No 769 05599 March 4 2010 Tank S S7237 Liquid Propane Gas ...

Страница 2: ...range of product specifications for various models Characteristics and features discussed and or illustrated in this manual may not be applicable to all models We reserve the right to change product specifications designs and equipment without notice and without incurring obligation If you have any problems or questions concerning the machine phone your local Cub Cadet dealer or contact us directl...

Страница 3: ...are of the mower and attachment discharge direction and do not point it at anyone Do not operate the mower without the discharge cover or entire grass catcher in its proper place Do n 10 ot put hands or feet near rotating parts or under the cutting deck Contact with the blade s can amputate hands and feet A missin 11 g or damaged discharge cover can cause blade contact or thrown object injuries St...

Страница 4: ...o not stop or park machine over dry leaves grass debris 32 etc that could be combustible Do not operate machines that have been damaged or have 33 not been properly maintained If the machine has been damaged then have it repaired When looking for oil leaks never run your hand over 34 hydraulic hoses lines or fittings Never tighten or adjust hydraulic hoses lines or fittings while the system is und...

Страница 5: ...ay cause 5 loss of traction and loss of control Travel slowly and allow extra distance to stop 6 Do not shift to neutral and coast downhill 7 Transporting Machines Consult the National Fire Protection Association code 58 1 NFPA 58 for safe storage and handling of LPG The owner operator is responsible for transporting the LPG 2 cylinder s in accordance with local state and federal laws Ensure that ...

Страница 6: ...ental overturn occurs In order for the ROPS to be effective the seat belt must be securely fastened around the operator at all times when the operator is on the machine Contact with the ROPS during an overturn could cause serious injury or death The ROPS will not prevent the machine from upsets or roll 11 overs Only approved attachments should be used on this 12 machine Hydraulic Devices and Syste...

Страница 7: ... machine for any damage Repair the damage before starting and operating Never attempt to make adjustments or repairs to the 10 machine while the engine is running Grass catcher components and the discharge cover are 11 subject to wear and damage which could expose moving parts or allow objects to be thrown For safety protection frequently check components and replace immediately with original equi...

Страница 8: ...NING THROWN OBJECTS This machine may pick up and throw and objects which can cause serious personal injury WARNING THROWN OBJECTS This machine may pick up and throw and objects which can cause serious personal injury BYSTANDERS Keep bystanders helpers children and pets at least 75 feet from the machine while it is in operation MAX WARNING SLOPE OPERATION Do not operate this machine on a slope grea...

Страница 9: ...approximately 3 feet every 10 feet A riding mower could overturn and cause serious injury Operate TANK S zero turn tractors across the face of slopes rather than up and down Begin with the first pass across the bottom of the slope and turn uphill at the end of each pass whenever possible Sight and hold this level with a vertical tree or a corner of a building or a fence post F o l d a l o n g d o ...

Страница 10: ...packing material Bypass Valve Left Side Pump Figure 3 1 Install Roll Over Protective System ROPS The Roll Over Protective System ROPS has not been installed on your unit for shipping purposes Using the hardware found in the Roll Over Protective System container install it on your unit as follows Insert each of the lower section ROPS tubular posts into 1 the brackets welded to the unit main frame S...

Страница 11: ...ion and 8 insert the locking pins with their retainer hairpin clips See Fig 3 5 Position Steering Wheel The steering wheel of the tractor has been left off for shipping purposes Using the hardware found in the manual bag the steering wheel must be secured to operate the tractor To install the steering wheel for operation proceed as follows Slide steering wheel over the steering shaft See Fig 3 6 1...

Страница 12: ...ety coupler Typical forklift cylinders withdraw liquid propane and have right handed safety couplers The different safety couplers prevent users from installing cylinders on the wrong equipment The LPG tank is shipped separately and will need to be purged before the initial fill up It is important to properly purge new propane cylinders before the first fill The authorized LP Gas filler should fol...

Страница 13: ...ical system The seat has several adjustments to meet the individual needs of the operator Refer to Fig 3 11 for the following adjustments Seat Position To adjust the position of the seat pull forward and hold the 1 seat adjustment lever Slide the seat forward or rearward to the desired position then release the adjustment lever Make sure seat is locked into position before operating the tractor Ar...

Страница 14: ...ve the plastic cover if present from the positive 2 battery terminal and attach the red cable to the positive battery terminal with the bolt and hex nut See Fig 3 12 Remove the plastic cover if present from the negative 3 battery terminal and attach the black cable to the negative battery terminal with the bolt and hex nut See Fig 3 12 Position the red rubber boot over the positive battery 4 termi...

Страница 15: ...SLOPES AND ON ROUGH SLICK OR M UDDY SURFACES STAY OFF SLOPES T OO STEEP FOR SAFE OPERATION WATCH WHERE YOU ARE GOING ESPECIALLY ON SLOPES WHEN T URNING AND MANEUVERING AROUND OR UNDERNEATH OBSTACLES STARTING INSTRUCTIONS To START PARK BRAKE must be set push down to latch P T O switch in OFF down position Foot pedals in NEUTRAL Throttle set properly CHOKE position if cold Turn key to ON then START ...

Страница 16: ...pedals are located on the right side of the traction unit The speed control pedals must be in the neutral position to start the tractor engine Pushing the forward pedal causes the mower to move forward Pushing the reverse pedal causes the mower to move backward Consequently these pedals control all of the movements of the tractor Driving and steering utilizing these control pedals is quite differe...

Страница 17: ... transmissions Roll Over Protection System ROPS The roll over protection system is an integral part of you zero turn tractor It is designed to create a crush resistant space for the operator in the event of a roll over DANGER The Roll Over Protection System should not be tampered with modified or removed If the system is damaged it must be replaced prior to operator use Failure to us the Roll Over...

Страница 18: ... grass will reduce traction Mow only in daylight or good artificial light Watch for holes sprinkler heads and other hidden hazards Avoid dr iving too close to trees creeks ponds lakes rivers ditches sand traps and other obstacles Slow down bef ore turning and come to a complete stop before any zero turn maneuver If yo u hit a solid object while mowing turn off the PTO place the speed control pedal...

Страница 19: ...with the speed 2 control pedals in the neutral start position Engage the parking brake 3 Make certain the PTO switch is in the disengaged down 4 position Set the throttle in the slow position slightly faster for cold 5 temperatures Turn the ignition key clockwise to the START position 6 and release it as soon as the engine starts however do not crank the engine continuously for more than 15 second...

Страница 20: ...body if needed safety eye glasses gloves earplugs boots hats etc WARNING Hearing Protection is required for all operator exposure exceeding two 2 hours Ensure that the area is free of animals and bystanders 2 especially children Survey the area where the equipment is to be used to 3 make sure it is free of debris sticks stones wires bones and other foreign objects which could cause injury to bysta...

Страница 21: ... the neutral position engage the parking brake move the throttle control lever to the fast position turn the ignition switch to OFF and remove the key from the switch Warning Do not leave the seat of the tractor without disengaging the PTO moving speed control pedals to the neutral position and engaging the parking brake If leaving the tractor unattended turn the ignition key off and remove key Tu...

Страница 22: ...e alignment point NOTE The speed of the tractor will affect the quality of the mower cut Mowing at full speed will adversely affect the cut quality Control the ground speed with the speed control pedals W 6 hen approaching the other end of the strip slow down or stop before turning A U turn is recommended unless a pivot or zero turn is required Align the mower with an edge of the mowed strip and 7...

Страница 23: ...equired for these blades when compared to others and they generally produce the highest noise levels Medium lift These blades require less horsepower than the hi lift and they generally work well in wider leaf grasses and some mulch applications Low lift These blades require less horsepower than hi lift and medium lift blades and they generally work best with wide leaf grasses sparse grass growth ...

Страница 24: ...lift High 1 to 2 1 2 Low 3 to 5 High 1 to 2 1 2 Low 3 to 5 High 1 to 2 1 2 Low 3 to 5 Table Notes This table is a general outline of suggested settings mowing conditions may vary Front Skirts When the front skirt is set to low the grass lift is increased for precision cutting When the skirt is set to high the grass can rebound and higher volumes of grass can be cut Inner Baffle The inner baffle re...

Страница 25: ...k engine intake screen cover P Clean mower P Lubricate wear points see chart P P Clean and re oil air filter s foam precleaner P Grease three spindle bearings P Replace air filter element P Change engine oil and replace oil filter P Check battery s electrolyte level P Clean engine cooling fins external surfaces P Lubricate all grease fittings see chart P Check spark plug condition gap P Change hyd...

Страница 26: ...pivot points Wipe off any excess Start engine and operate mower briefly to insure that oil spreads evenly Engine Oil Rimula 15W40 recommended or 10W40 engine oil rated SJ or higher Hydrostatic Fluid Rimula 15W40 recommended and 1 5 ounces of Ornite additive Spindle Lubricant Use only Shell Alvania RL 2 grease This grease is an amber colored grease designed for high speed bearing applications It ha...

Страница 27: ...ricant Use only Shell Alvania RL 2 grease This grease is an amber colored grease designed for high speed bearing applications It has a base oil viscosity that reduces running losses has been formulated for low noise has excellent corrosion protection and has excellent bearing lubrication General Purpose Lubrication Use any NLGI grade 2 multi purpose grease Shell Albida EP2 is recommended Shell Alb...

Страница 28: ...oil Remove the oil fill cap dipstick from the oil fill tube While holding the free end of the oil drain hose over the oil 4 collection container unscrew the square head hose plug from the end of the hose See Fig 6 1 Drain the engine oil into the collection container After draining the oil wipe any residual oil from the oil 5 drain hose Thread the square head plug into the drain hose fitting and fu...

Страница 29: ...d Filter NOTE Used hydraulic oil must be disposed of properly Do not pour it down a drain or sewer or dump it on open land this creates an environmental hazard Please be aware of the environment when disposing of used oil Place the tractor on a level surface and engage the parking 1 brake Stop the engine and remove the key from the ignition 2 switch Raise the seat forward to expose the hydraulic o...

Страница 30: ...contain sulfuric acid and may emit explosive gases Use extreme caution when handling batteries Keep batteries out of the reach of children Battery Maintenance The battery is filled with battery acid and then sealed at the factory However every 50 operating hours remove the fill caps and check the level of the liquid electrolyte in the battery If the level in any of the six cells has dropped below ...

Страница 31: ...be inflated to 20 psi and the wheel placed in a large bucket of water Carefully inspect the tire rim and valve for escaping air bubbles which indicate a leak Mark each leak with a yellow marking crayon and then deflate the tire to 8 psi and repeat the inspection If the leaks you find are pin hole size to 1 16 diameter the tire can be repaired If the leaks are larger than 1 16 diameter the tire can...

Страница 32: ... longer in cold temperatures than hot Refer to chart below Specific Gravity Freezing Temp F 1 265 71 1 250 62 1 200 16 1 150 5 1 100 16 Recharge battery when ever the specific gravity value is 4 less than 1 225 Tractor Storage If your tractor is not going to be operated for an extended period of time thirty days to approximately six months the tractor should be prepared for storage Store the tract...

Страница 33: ...bearings or the engine The use of water will result in shortened life and reduce serviceability Sharpen the blades so that the mower will be ready to use 5 when needed Protect the metal surfaces Repair scratches with the 6 appropriate touch up spray paint Brush a rust preventive oil on any unpainted surfaces including the pulleys and blades Be careful not to get any oil on the drive belts Clean an...

Страница 34: ...tting deck Inner Jam Nut Outer Jam Nut Horizontal Threaded Rod Figure 6 8 The mower deck cutting height can be set using the tractor s power implement lift The deck heights range from 1 to 4 The deck gauge wheel position should be approximately 1 4 to 1 2 above the ground when the deck is set in the desired height setting Using the power implement lift set the deck in the desired height setting th...

Страница 35: ...e full turn and check parking capacity Repeat if parking brake does not hold The mower is equipped with drum brakes and will not normally require maintenance If they are not working properly please contact your service center Adjusting the Front Skirt The front skirt can be raised or lowered depending on the mowing conditions The skirt has three settings low medium and high See the table on page 2...

Страница 36: ...d of the red jumper cable to the 2 positive terminal of the low charge battery Attach the end of the black jumper cable to the negative 3 terminal of the charged battery Attach the other end of the black jumper cable to the 4 frame of the unit with the low charge battery Servicing Electrical System Fuse There is one fuse located in the wiring between the ignition start switch and other electrical ...

Страница 37: ... the lowest position Apply the parking brake Remove ignition key and both 2 spark plug caps Remove tension off the PTO belt by moving the belt 3 tensioning rod See Fig 7 2 NOTE There is a certain amount of spring tension due to the weight of the deck When removing the lift linkage from the deck the tension of the springs will go from the deck to the deck lift pedal Not capturing the deck lift peda...

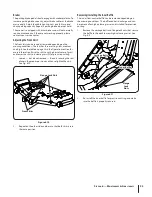
Страница 38: ...e to sharpen the blades Replace any blade with severe nicks or dents that cannot 4 be removed by filing Check the balance of the blade after sharpening by placing 5 it on a blade balancer Do not use un balanced blades If the blade dips on one end file stock off of the cutting 6 surface on that end NOTE Replace any blades that cannot easily be balanced Replacing the Blades Warning Before performing...

Страница 39: ...a wrench or socket ratchet remove flange lock 6 nuts and the four hex flange bolts Remove the spindle assembly See Fig 7 6 Reverse the process to install the spindle assembly 7 Tractor Creeping Creeping is the slight forward or backward movement of the mower when the throttle is on and the speed control pedals are in the neutral position If your mower creeps see an authorized service dealer Spindl...

Страница 40: ... Engine oil level low 1 Air flow restricted 2 Fill crankcase with proper amount and 1 weight of oil Clean grass clippings and debris from around 2 the engine s cooling fins and blower housing Engine hesitates at high RPM Spark plug s gap too close 1 Remove spark plug s and reset the gap 1 Engine Idles rough Spark plug s fouled faulty or gap too wide 1 Dirty air filter 2 Replace spark plug s Set pl...

Страница 41: ... Filter KM 49065 2078 Oil Filter 01007937 Deck Belt 954 04223 Drive Belt 02004377 PTO Belt 02000568 Blade 25 0 02000920P Deck Spindle Phone 800 800 7310 to order replacement parts or a complete Parts Manual have your full model number and serial number ready Parts Manual downloads are also available free of charge at www mtdproducts com ...

Страница 42: ...ttle Control 725 1341B Ignition Key 01009705P Discharge Chute Assembly 02002668 Wheel Assembly 02003396 Wheel Assembly Phone 800 800 7310 to order replacement parts or a complete Parts Manual have your full model number and serial number ready Parts Manual downloads are also available free of charge at www mtdproducts com ...

Страница 43: ...0021150 12 Volt Outlet Kit 59A30018150 Caster Wheel Kit 59A30031150 72 Mulch Kit 590 488 150 All Trail Tires 590 851 150 Discharge Restrictor Kit 59A30011150 Light Kit 02000568 25 Bahia Blades Low Lift The following attachments and accessories are compatible with your TANK S tractor See your dealer or the retailer from which you purchased your tractor for information regarding price and availabili...

Страница 44: ...ht adjustment at 1 4 increments Cutting Height 1 to 5 No of Blades 3 belt driven power take off from engine Controls Engine ignition and start switch throttle choke speed control pedals electric blade clutch switch parking brake mower deck lift Steering 14 diameter steering wheel coupled to hydraulic steering valve and cylinder Parking Brake Mechanical linkage brake to internal drum brakes Front W...

Страница 45: ...Notes 12 45 ...

Страница 46: ...at cause the failure of a warranted part to be identical in all material respects to that part as described in MTD Consumer Group Inc s application for certification The warranty period begins on the date the outdoor equipment engine is delivered to an ultimate purchaser or first placed into service The warranty period is two years Subject to certain conditions and exclusions as stated below the w...

Страница 47: ...till eligible for warranty coverage Further the coverage under this warranty extends only to parts that were present on the off road engine and equipment purchased The following emission warranty parts are covered if applicable 1 Fuel Metering System Cold start enrichment system soft choke Carburetor and internal parts or fuel injection system Fuel pump Fuel tank 2 Air Induction System Air cleaner...

Страница 48: ... will void your warranty as to any resulting damage In addition Cub Cadet may deny warranty coverage if the hour meter or any part thereof is altered modified disconnected or otherwise tampered with HOW TO OBTAIN SERVICE Warranty service is available WITH PROOF OF PURCHASE AND APPLICABLE MAINTENANCE RECORDS through your local authorized service dealer To locate the dealer in your area In the U S A...

Отзывы: