19
s
ectiOn
5 — O
peratiOn
Examine the belts for cuts, fraying, and excessive
c.
wear. Replace if any of these are detected.
Replace the deck cover.
d.
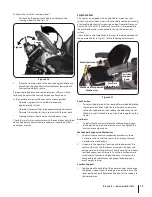
Check if deck is level. When correctly adjusted the mower
9.
deck should be level side to side, and the front of the deck
should be approximately 1⁄4
” lower than the rear of deck.
If deck needs to be leveled, refer to the Maintenance &
Adjustments section.
Lubricate all pivot points listed in the Maintenance &
10.
Adjustments section.
Adjust the seat for operator’s maximum comfort, visibility
11.
and for maintaining complete control of the tractor. Refer
to the Assembly & Set-Up section for instructions on
adjusting the seat.
Safety Interlock System
This tractor is equipped with a safety interlock system for the
protection of the operator. If the interlock system should ever
malfunction, do not operate the tractor. Contact your authorized
Cub Cadet Dealer.
The safety interlock system prevents the engine from
•
cranking or starting unless the speed control pedals are in
the neutral position, the parking brake is engaged, and the
PTO is disengaged.
To avoid sudden movement when disengaging the parking
•
brake, the safety interlock system will shut off the engine
if the speed control pedals are moved to a position other
than the neutral position when the parking brake is
engaged.
The safety interlock system will shut off the engine if the
•
operator leaves the seat before engaging the parking
brake.
The safety interlock system will shut off the engine if the
•
operator leaves the seat with the PTO engaged, regardless
of whether the parking brake is engaged.
NOTE:
The PTO switch must be moved to the “OFF”
position to restart the engine.
Starting the Engine
WARNING!
This tractor is equipped with a safety
interlock system designed for the protection of the
operator. Do not operate the tractor if any part of
the interlock system is malfunctioning. Periodically
check the functions of the interlock system for
proper operation.
WARNING!
For personal safety, the operator must
be sitting in the tractor seat when starting the
engine.
Open the fuel supply valve.
1.
Operator must be sitting in the tractor seat with the speed
2.
control pedals in the neutral/start position.
Engage the parking brake.
3.
Make certain the PTO switch is in the disengaged (down)
4.
position.
Set the throttle in the slow position (slightly faster for cold
5.
temperatures).
Turn the ignition key clockwise to the “START” position
6.
and release it as soon as the engine starts; however, do not
crank the engine continuously for more than 15 seconds
at a time. If the engine does not start within this time, turn
the key to “OFF” and wait at least 30 seconds to allow the
engine’s starter motor to cool.
Cold Weather Starting
When starting the engine at temperatures near or below
freezing, ensure the correct viscosity motor oil is used in the
engine and the battery is fully charged. Start the engine as
follows:
Be sure the battery is in good condition. A warm battery
1.
has much more starting capacity than a cold battery.
NOTE:
Battery should provide 11.0 VDC during cranking
for shut-off valve to function correctly. This also provides
desired engine cranking speed.
Set the throttle slightly faster than the slow position.
2.
Crank engine for about 5 seconds and stop.
3.
Wait about 10 seconds, then crank for 15 seconds or until it
4.
starts running.
Repeat if necessary.
5.
Using Jumper Cables To Start Engine
WARNING!
Batteries contain sulfuric acid and
produce explosive gasses. Make certain the area is
well ventilated, wear gloves and eye protection, and
avoid sparks or flames near the battery.
If the battery charge is not sufficient to crank the engine,
recharge the battery. If a battery charger is unavailable and
the tractor must be started, the aid of a booster battery will be
necessary. Connect the booster battery as follows:
Connect the end of one cable to the disabled tractor
1.
battery’s positive terminal; then connect the other end of
that cable to the booster battery’s positive terminal.
Connect one end of the other cable to the booster
2.
battery’s negative terminal; then connect the other end of
that cable to the frame of the disabled tractor, as far from
the battery as possible.
Start the disabled tractor following the normal starting
3.
instructions previously provided; then disconnect
the jumper cables in the exact reverse order of their
connection.
Have the tractor’s electrical system checked and repaired
4.
as soon as possible to eliminate the need for jump starting.
Содержание Tank S S7237
Страница 45: ...Notes 12 45 ...

