3. Hardware Setup
12
User’s Manual
Hardware Setup
Removing the Left-side Cover and HDD Bracket
-
Before you start, be sure that the power is turned off.
-
Remove only those screws that are explained. Do not move any other screw.
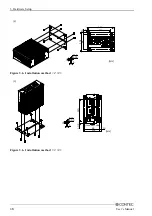
(1) Remove the screws from the left-side cover and open the cover.
(2)
Remove the hard disk bracket.
Figure 3.1. Removing the HDD bracket
(3) Connect the hard disk (silicon disk) to the HDD bracket.
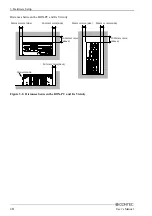
(4) Insert the hard disk unit (silicon disk drive) as illustrated below and attach the left-side cover.
Attachment position adjustment hole *1
HDD or SDD
Figure 3.2. Removing and attaching the left-side cover, HDD bracket
*1 A connector attachment position change with HDD(SDD). Please adjust HDD(SDD) attachment
position adjustment hole after checking a side cover attachment.
CAUTION
Do not plug the HDD (SDD) with its pins bent.
Doing so may break the pins.
To remove the hard disk (silicon disk) unit, open the left-side
cover, hook the lower end of the cover on the chassis to lever the
unit out toward you.


