


8
Rear Hubs
WHEELS, TIRES AND HUBS
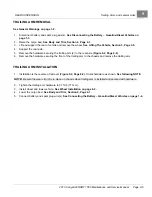
2.4. Use a rod or bar (8) larger than the inner race diameter of the bearing (7) and press the bearing onto the
hub until it bottoms out against the shoulder of the hub shaft.
3.
The hub shaft should be approximately 3/32 inch (2.38 mm)
below the bearing inner race surface
2033
Figure 8-6
Upright, Bearing and Hub Assembly
4.
Install the upright assembly on the vehicle.
See Steering Upright Installation on page 7-16.
REAR HUBS
REAR HUB REMOVAL
1.
Disconnect battery and spark plug wire(s)
(gasoline vehicles only)
.
See Disconnecting the Battery –
Gasoline/Diesel Vehicles on page 1-3.
2.
Loosen the lug nuts.
3.
Remove the rubber dust cap.
4.
Remove and discard the cotter pin (1)
.
5.
Remove nut locking cap (2) and loosen the axle nut (3) on the axle shaft.
6.
Lift and support the rear of vehicle and remove the wheel(s).
See Lifting The Vehicle on page 3-8.
7.
Remove the lug nuts and wheel.
8.
Remove the rear caliper from the axle tube. Secure the rear caliper to the suspension or chassis with wire ties to
prevent strain on the fittings and brake line.
See following WARNING.
WARNING
• Strain on the brake hose or the brake hose fittings can result in damage to the line or fittings and
cause a leak in the hydraulic system, diminished brake performance, or brake failure.
WARNING CONTINUED ON NEXT PAGE
Page 8-6
2013 Carryall 295/XRT 1550 Maintenance and Service Manual
Содержание Carryall XRT 1550
Страница 2: ......
Страница 28: ......
Страница 40: ......
Страница 62: ......
Страница 106: ......
Страница 120: ......
Страница 180: ......
Страница 224: ......
Страница 272: ......
Страница 310: ......
Страница 344: ......
Страница 362: ......
Страница 370: ......
Страница 418: ...NOTES...
Страница 428: ...NOTES...
Страница 430: ...NOTES...
Страница 431: ......
Страница 432: ......


