1-4 Cisco 7010 Hardware Installation and Maintenance
Physical Description
The three interface processor slots support any combination of network interface types: Ethernet,
Token Ring, FDDI, serial, multichannel channel attachment, and HSSI. The RP, SP (or SSP), and
interface processors are keyed with guides on the backplane to prevent them from being fully
inserted in the wrong slot.
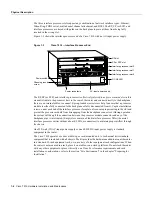
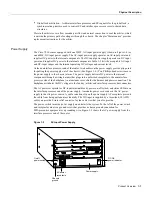
Figure 1-3 shows the interface processor end of a Cisco 7010 with an AC-input power supply.
Figure 1-3
Cisco 7010 —Interface Processor End
The RP, SP (or SSP), and interface processors (collectively referred to as processor modules in this
manual) slide into the processor slots in the rear of the router and connect directly to the backplane;
there are no internal cables to connect. Spring-loaded ejector levers help to ensure that a processor
module is either fully connected to the backplane or fully disconnected from it. Captive installation
screws, one at each end of the interface processor faceplate, also ensure proper seating in the slot and
prevent the processor module from disengaging from the backplane connectors. (During operation,
the system will hang if the connection between the processor module connector and any of the
backplane pins is interrupted.) Empty slots contain a blank interface processor filler (the metal
interface processor carrier without a board, LEDs, or connectors) to maintain proper airflow through
the chassis.
One 550-watt (W) AC-input power supply or one 600W DC-input power supply is standard
equipment in the router.
The Cisco 7010 operates as either a tabletop or rack-mounted unit. A rack-mount kit is standard
equipment that is included with all chassis. The kit provides the hardware needed to mount the router
in a standard 19-inch equipment rack, or in a variety of other equipment rack configurations. When
the router is not mounted in a rack, place it on a table or on a sturdy platform. Do not stack the router
with any other equipment or place it directly on a floor. For clearance requirements and rack
installation considerations, refer to the section “Site Environment” in the chapter “Preparing for
Installation.”
H2359
RP slot
SP or SSP slot
Interface processor slot 1
DC OK LED
Power switch
Chassis ground
screw
Power receptacle
Interface processor slot 2
Interface processor slot 0
AC-input power supply
Содержание TelePresence Server 7010
Страница 10: ...x Cisco 7010 Hardware Installation and Maintenence ...
Страница 14: ...iv Cisco 7010 Hardware Installation and Maintenance Document Conventions ...
Страница 112: ...2 52 Cisco 7010 Hardware Installation and Maintenance Initial Configuration Information Page ________ ...
Страница 148: ...3 36 Cisco 7010 Hardware Installation and Maintenance Using the Flash Memory Card ...
Страница 158: ...4 10 Cisco 7010 Hardware Installation and Maintenance Troubleshooting the Processor Subsystem ...
Страница 242: ...5 84 Cisco 7010 Hardware Installation and Maintenance Replacing Internal Components ...
Страница 258: ...A 16 Cisco 7010 Hardware Installation and Maintenance MIP Interface Cable Pinouts ...
Страница 270: ...B 12 Cisco 7010 Hardware Installation and Maintenance Interface Processor LEDs ...
Страница 274: ...C 4 Cisco 7000 Hardware Installation and Maintenance ...
Страница 287: ...Index 13 ...

