background image

2-28

CP2000-SB User Manual

020-100162-06 Rev. 1 (03-2014)

Section 1: Introduction

2.8.5 Add Auxiliary Lens

If present, swing the auxiliary lens in position in front of the primary lens. It should magnify in the horizontal 
direction only, stretching the image straight across the screen—this requires that its aperture (visible within the 
lens) be 

vertically

 aligned with the screen. If the image appears skewed, loosen the locking ring on the 

auxiliary lens and rotate the lens as necessary until the wide image is horizontal. Refer to the Motorized 

Auxiliary Lens Mount Instruction Sheet (020-100036-04) for details on mounting the anamorphic and wide 

converter lenses.

Anamorphic (1.25x)

1.

FOCUS PRIMARY LENS:


With the auxiliary lens in place, re-focus the primary lens using focus knob. 

The goal is good focus at center and on all sides.

2.

FOCUS ANAMORPHIC LENS:

 If horizontal focus in the image needs improvement, focus the auxiliary 

lens too—rotate its barrel as needed.

3.

RECORD SERIAL NUMBER: 

Enter the serial number of your anamorphic lens in 

Advanced: Lens


menu. Refer to 

Figure 3-20 Advanced: Lens Menu Options, on page 3-31

.

Wide Converter Lens (1.26x)

NOTE: 

Use a gauge block (or measuring device) to establish basic alignment of the wide converter lens to the 

primary lens.

 Use the Wide Converter lens with the following High Brightness or High Con-

trast Zoom lenses only: 1.45-1.8:1, 1.8-2.4:1, 2.2-3.0:1 or 3.0-4.3:1.

1.

FOCUS PRIMARY LENS:


With the auxiliary lens in place, re-focus the primary lens using focus knob. 

The goal is good focus at center and on all sides.

2.

LENS CLEARANCE: 

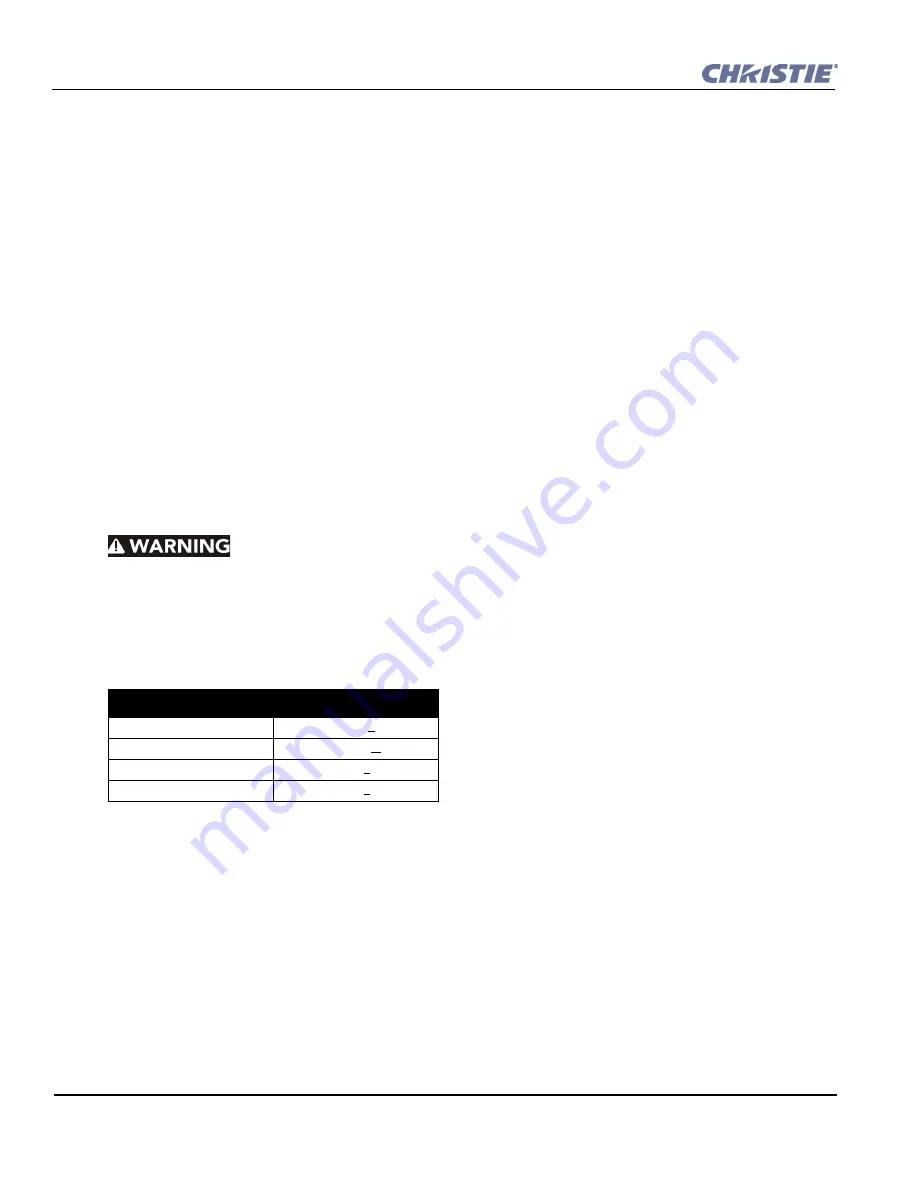
Adjust clearance between the primary and wide converter lens to match the values 

in the following table. 

NOTE

Measure from front of prime lens to back of wide converter lens barrel.

3.

VERTICAL LENS POSITION:

 Adjust the converter lens vertically so that it is exactly on the center line 

with the pre-adjusted prime lens.

4.

HORIZONTAL LENS POSITION:

 Adjust the converter lens horizontally so that it is exactly on the 

center line with the pre-adjusted prime lens.

5.

PITCH ADJUSTMENT:

 Adjust the top and bottom clearance between the wide converter and prime 

lenses until they are equal, using a wedge gauge or small calipers.

6.

YAW ADJUSTMENT:

 Adjust the two side clearances between the wide converter and prime lenses until 

they are equal, using a wedge gauge or small calipers.

7.

RECORD SERIAL NUMBER: 

Enter the serial number of your converter lens in 

Advanced: Lens

 menu. 

Refer to 

Figure 3-20 Advanced: Lens Menu Options, on page 3-31

.

Zoom Lens

Clearance

1.45 - 1.8:1

8.6 mm + 2

1.8 - 2.4:1

13.6 mm + 2

2.2 - 3.0:1

6 mm + 2

3.0 - 4.3:1

6 mm + 2

Содержание CP2000-SB

Страница 1: ...CP2000 SB U S E R M A N U A L 020 100162 06 ...

Страница 2: ...Optional 2 12 2 1 5 Install First Lamp 2 12 2 1 6 Connecting to Power 2 13 2 2 Installing and Connecting Sources 2 16 2 2 1 Support for Internal Servers Source 2 18 2 2 2 Security for Internal Servers Source 2 18 2 3 Connecting for Communications 2 18 TPC 2 19 PC Laptop Server or Network 2 19 2 4 Adjusting Tilt and Leveling 2 19 2 5 Initial Power Up 2 21 2 6 Maximizing Light Output 2 22 2 6 1 Cali...

Страница 3: ...d 3 5 Security Locks 3 5 Security Plates 3 5 Source Control Cabling 3 6 Touch Panel Controller TPC 3 6 3 2 Power up Procedure 3 6 3 3 Power down Procedure 3 7 3 4 Introduction to the Touch Panel Controller 3 8 3 4 1 User Access and Rights 3 8 3 4 2 TPC Power up Defaults 3 9 3 4 3 Failed TPC Connection 3 9 3 5 Using the Touch Panel Controller TPC 3 10 3 5 1 TPC Main Menu 3 11 3 5 2 TPC Status Menu ...

Страница 4: ...ler 3 52 3 6 1 Understanding ASCII Message Formats 3 52 3 6 2 Message Components and Structure 3 52 3 6 3 Sample Messages and Their Meaning 3 53 3 6 4 What is Actually Sent in a Message 3 54 3 6 5 Available ASCII Codes 3 54 3 6 6 Setup and Shutdown 3 54 3 7 Upgrading SSM Firmware 3 55 3 7 1 Requirements 3 55 3 7 2 Update Procedure 3 55 3 7 3 Troubleshooting 3 56 3 8 Working with the Lamp 3 57 3 8 ...

Страница 5: ... Diagnostics 3 71 3 11 1 TPC Status Server Menu 3 71 3 11 2 TPC Status Diag Menu 3 72 3 11 3 TPC Status Interrogator Menu 3 72 4 Cinema Operation 4 1 Compatible Cinema Sources 4 2 4 2 Image Formats 4 4 4 2 1 Projector Variables Electronic and Auxiliary Resizing 4 4 4 2 2 Theatre Variables Masking 4 5 4 3 Selecting the Cinema Source 4 7 4 3 1 Touch Panel Controller Method 4 7 4 3 2 Other Methods 4 ...

Страница 6: ...es Off 7 2 7 2 3 No Lamp Current Reading 7 2 7 2 4 Flicker Shadows or Dimness 7 3 7 2 5 LampLOC Does Not Seem to Work 7 3 7 2 6 LiteLOC Does Not Seem to Work 7 3 7 3 TPC 7 3 7 4 Ethernet 7 4 7 5 Cinema Displays 7 4 7 5 1 Blank Screen No Display of Cinema Image 7 4 7 5 2 Severe Motion Artifacts 7 4 7 5 3 Image Appears Squeezed or Vertically Stretched into Center of Screen 7 4 7 5 4 No Image Just Pi...

Страница 7: ...ng Environment 8 7 8 8 2 Non Operating Environment 8 7 8 9 Weight Size 8 7 8 10 Standard Components 8 9 A Appendix A Glossary B Appendix B ASCII Messages B 1 Function Codes B 2 B 2 Messages with Multiple Parameters B 15 B 2 1 Error Messages ERR B 15 Additional Parameters for 001 System Errors and 002 System Warnings B 15 Examples of Critical System Error 001 Messages B 17 Examples of System Warnin...

Страница 8: ...Table of Contents CP2000 SB User Manual vii 020 100162 06 Rev 1 03 2014 D 1 1 Example GPIO and 3D Device D 2 E Appendix E Repacking the Projector ...

Страница 9: ......

Страница 10: ...Manual 1 1 020 100162 06 Rev 1 03 2014 1 Introduction This section includes information on the following 1 1 The Projector 1 2 List of Components 1 3 Purchase Record and Service Contacts 1 4 Who Should Use This Manual ...

Страница 11: ... Cinema 3 chip electronics with 2048 x 1080 native resolution Versatile electronic and optical scaling to fill wide screens CineBlack and CinePalette for deep film like blacks and superior colorimetry CineCanvas for flexible telecine grade resizing subtitling and other text and graphic overlays Two SMPTE 292M cinema inputs used individually or simultaneously for high speed dual link process ing an...

Страница 12: ...sharp full color images 1 2 List of Components Ensure that you have received the following components Pedestal on casters with 4 retractable feet installed Projector Head with lens mount installed and auxiliary lens mount optional Touch Panel Controller with mounting hardware Lamp Lens plus anamorphic or wide converter lens optional Standard security keys high security keys and assembly hardware C...

Страница 13: ...r dealer or one of the Christie service depots listed on the back cover of this manual In most cases servicing is performed on site If you have purchased the projector fill out the following information and keep it with your records Table 1 1 Purchase Record NOTE Both serial numbers are located at the rear of the projector Table 1 2 Ethernet Settings for This Projector The following Ethernet setti...

Страница 14: ...ng notations are used throughout this manual Keypad commands and PC keystrokes appear in bold small caps such as POWER INPUT ENTER etc References to specific areas of the document appear italicized and underlined When viewed online the text appears in blue indicating a direct link to that section For example Section 8 Specifications References to other documents appear italicized and bold such as ...

Страница 15: ...1 6 CP2000 SB User Manual 020 100162 06 Rev 1 03 2014 Section 1 Introduction ...

Страница 16: ...e the understanding of the written material They are graphical representations only and may not represent your exact projector model 2 1 Assembly and Connection of Components 2 2 Installing and Connecting Sources 2 3 Connecting for Communications 2 4 Adjusting Tilt and Leveling 2 5 Initial Power Up 2 6 Maximizing Light Output 2 7 Basic Image Alignment 2 8 Offset and Boresight Alignment 2 9 Fold Mi...

Страница 17: ...destal certified elec trician required Heat extractor such as inline centrifugal blower Elicent model AXC 315B or roof extractor providing at least 450 CFM 2 or 3 kW lamps or 600 CFM 4 5 or 6 kW lamps at 8 exhaust duct opening 600 watts or lower NOTE Mount at an external location Lamp and protective clothing safety gear Laptop computer with DCP Librarian setup software with Ethernet or standard RS...

Страница 18: ... stop will then elevate the rear of the projection head until fingers are safely out of the way See Figure 2 1 Step 1 c Lift the projection head onto the pedestal aligning the four threaded rods with the four holes in the pedestal frame Warning Requires at least two people For cable connections maintain cable ties that have been trimmed and those that are not The front of the head will sit on the ...

Страница 19: ...s the projector should be firmly on the floor rather than on its casters Extend rotate the foot located behind each caster until the lens opening is fairly well centered with the port window Figure 2 3 Lock top nut in place Remove caster if desired NOTE There is no need to adjust leveling and or tilt at this point wait until all other components are mounted installed and refer to Section 2 4 Adjus...

Страница 20: ...ting the ballast to AC set the ballast s AC input switch to match the AC available at the site Toggle left for nominal 200 VAC supplies and toggle right for 400 VAC supplies The factory default is 200 VAC d BALLAST RS 232 CABLE Connect the ballast s RS 232 cable 34 002075 to Panel B 9 pin routing through the small rectangular access hole in the front underside of the projection head Figure 2 6 e B...

Страница 21: ...ponents in the lamp compartment will require 200 230 VAC NOTE If you prefer to use an uninterruptible power supply UPS for supplying power to the projection head route the UPS power cables through the pedestal toe and connect to the IEC receptacles on Panel B 100 230 VAC In this case only one power cable provided in the pedestal is used g CHECK ETHERNET AND TPC POWER Within the pedestal confirm th...

Страница 22: ...rd the back and remains at least from the high voltage terminal with braid connection 2 Route all igniter wires AWAY from 9 pin and 15 pin con nectors 3 Twist both ballast cables twice per foot 3 Connect the POSITIVE WHITE lamp lead to the POSITIVE igniter terminal 3 4 wrench This terminal also has a small PCB attached stack this on top of the lamp lead 4 Close and lock the igniter door IN THE LAM...

Страница 23: ... length See right NOTE The universal nut shown accommodates all models Do not install a shorter nut Important Ball joint must move freely If necessary hand tighten with 9 64 Allen key 8 With 3 16 Allen key secure the NEGATIVE BLACK lamp lead and the two igniter harnesses to the side of the connector nut Important Secure lamp lead FIRST on connector then remaining two igniter wires on TOP At this p...

Страница 24: ...g liquid stored in the pedestal to critical electronics components located in the front compartment of the projection head Looking into the pedestal the liquid will circulate counterclockwise NOTE The TOP graphic in Figure 2 14 is for pedestals manu factured before Fall 2006 The BOTTOM graphic in Figure 2 14 is for pedestals manufactured for Fall 2006 and after Figure 2 14 The Liquid Cooling Loop ...

Страница 25: ...the projector from AC power before filling the reser voir After connecting the hoses completely fill the cooler reservoir with Chris tie approved coolant Jeffcool E105 provided in the liquid coolant fill ser vice kit P N 003 001837 02 Danger HAZARDOUS SUBSTANCE The coolant used in this product contains ethylene glycol Use caution when handling Do not ingest For this first filling fill the reservoi...

Страница 26: ... sec at the rigid end of the duct that will connect to the projector measure right at the end Then multiply the reading by the cross sectional area of the 8 duct to calculate the cubic feet min airflow The formula is Measured linear ft min x 0 34 CFM Depending on the lamp calculations should show 450 or 600 CFM airflow see Table 2 1 in the 8 exhaust duct Add extractors boosters as needed for your ...

Страница 27: ... leveling and boresight adjustments Install only for those installations requiring full size 2 39 1 scope images mostly side masking screens 1 INSTALL THE AUXILIARY LENS MOUNT ON THE PROJECTOR At the front of the projector install the motorized auxiliary lens mount hardware as described in the instructions provided with the auxiliary lens mount kit 2 INSTALL THE AUXILIARY LENS Clamp the anamorphic...

Страница 28: ...nel This will ensure adequate environmental sealing and prevent cables from wear and being accidentally torn out Warning Use of the conduit panel is mandatory to prevent electric shock 2 Connect the incoming AC ground lead directly to the frame ground stud on the floor of the pedestal Figure 2 20 Secure with both washers and nut provided and ensure there are no other wires present at this stud War...

Страница 29: ...rame ground stud on the pedestal floor Attach no other wires here Connect 1 2 and 3 180 235 VAC 3 phase No L or N available so the internal outlet will not be functional 342 456 VAC Europe etc If 3 phase and single phase feeds 6 wire Make sure ground wire is connected directly to the frame ground stud on the pedestal floor Attach no other wires here Connect L and N 200 230 VAC single phase Connect...

Страница 30: ...s for most countries If you find your incoming AC is below 207 VAC connect terminal 2 jumper to T1 instead If AC between terminals 2 and 3 is 207 265 connect terminal 2 to T2 factory default If AC between terminals 2 and 3 is 180 207 connect terminal 2 to T1 See Figure 2 21 BALLAST 115 VAC TAPS Ensure your nominal line between the terminals labeled 115V and COMMON or 0V is within 10 of 115 VAC See...

Страница 31: ...ermanent Changing or adding a source connection requires access via the locked CP pedestal NOTE To maintain radiated emissions compliance do not connect I 0 cables to the projector without connecting the source or receiver at the other end IF EXTERNAL Source server cabling routes through the pedestal toe and up to the underside of the projection head Limit cable length to 300 feet or less Connect ...

Страница 32: ...l 4 Re install the pair of rack protector posts Keep extra covers Do not modify any CP wiring or lead dress during installation and ensure the added device does not interfere with normal CP operation Power normally is hard wired to the TB2 terminal block NOTE Internal power connection is not possible if incoming AC feed is 4 wire 3 phase only as the TB2 terminal has no power in this case NOTE The ...

Страница 33: ...ed from the projector in the future Do not operate the CP with open slots at the rear 2 3 Connecting for Communications Many communications with the projector are initiated on the Touch Panel Controller TPC mounted at the rear of the projector Depending on the installation you may also need certain other serial and or Ethernet links to the CP2000 SB such as from a server or PC functioning as a con...

Страница 34: ...nly Warning The RS 232 B port is compatible with Christie accessories only 2 4 Adjusting Tilt and Leveling NOTE Disconnect from AC for these initial alignments Images are not yet needed In an ideal installation the CP2000 SB lens surface is centered with and parallel to the screen This orientation helps to ensure optimized lens performance with minimal offset Figure 2 28 If this position is not po...

Страница 35: ...bs from the CP pedestal Figure 2 30 4 Use a low profile scissor jack to elevate the rear of the projector 5 On each side of the rear opening in the pedestal loosen the 2 bolts securing the rear extender legs to the projector Figure 2 31 6 Slide the legs out to the desired position and secure with two bolts 7 Remove the jack 8 If necessary re adjust all leveling feet for side to side leveling Figur...

Страница 36: ...N 003 001837 02 re fill the reservoir until the level is close to but not above the top mark on the gauge located on the outside of the pedestal door Figure 2 32 If you over fill remove the reservoir from the pedestal and pour out excess STEP 3 Power Down and Up Again Turn all projector breakers OFF then ON again to clear air from lines STEP 4 Check for Airlock in Cooling System After topping up t...

Страница 37: ... menu Watch the gauge on this menu After 2 3 minutes the best lamp position will be established using an internal light sensor and the Do Auto button will no longer be disabled At this point light output is optimized NOTE Lamp must be on and douser shutter open during LampLOC adjustment However the projector does not need to be displaying an image 2 6 1 Calibrating Screen Brightness fL In order fo...

Страница 38: ... be lost once the channel changes Ensure the CP2000 SB is properly positioned relative to the screen before you begin Refer to Figure 2 2 and Figure 2 28 2 7 1 Basic Optical Alignment Procedure 1 Display a good test pattern appropriate for analyzing image focus and geometry such as a single crosshair centered across the image 2 COARSE FOCUS Do a quick preliminary focus and if available zoom adjust...

Страница 39: ...ore boresight Important Ensure the correct lens is selected in the Advanced Lens menu before calibration to ensure you will remain within the applicable boundary of the installed lens NOTE When adjusting the Focus Offset and Zoom you may experience a slight delay in the response rate of the lens upon selecting the buttons 1 Ensure Auto ILS is selected from the Main Lens menu NOTE Enabling Auto ILS...

Страница 40: ...are aligned properly at the factory but due to mechanical tolerances in the alignment between the projector and the screen the left and right sides of the image come into focus at different times By focusing on the left side of the screen we need to determine if the right side of the image focuses in front or behind the screen relative to the left side NOTE Use a test pattern with a single pixel v...

Страница 41: ...een See Figure 2 41 To correct this problem adjust the Horizontal Bore sight bolt to direct or aim the lens mount towards the LEFT to balance out the left right edges See Figure 2 39 b If the right side of the image fails to come into focus then the image focuses behind the screen To cor rect this problem direct the lens mount towards the RIGHT by adjusting the Horizontal Boresight accordingly 5 W...

Страница 42: ...een To correct this problem direct the lens mount DOWN by adjust ing the Vertical Boresight accordingly 5 When both sides appear equally blurry adjust the Offset by clicking the up down left right buttons on the Main Lens menu to re center the image on the screen 6 Repeat Steps 2 5 until the top and bottom of the screen are both well focused 7 Refocus Although all sides of the image should now be ...

Страница 43: ...lish basic alignment of the wide converter lens to the primary lens Use the Wide Converter lens with the following High Brightness or High Con trast Zoom lenses only 1 45 1 8 1 1 8 2 4 1 2 2 3 0 1 or 3 0 4 3 1 1 FOCUS PRIMARY LENS With the auxiliary lens in place re focus the primary lens using focus knob The goal is good focus at center and on all sides 2 LENS CLEARANCE Adjust clearance between t...

Страница 44: ...the underside of the projection head this plate is located just below the lens Two access holes will be revealed through which you can adjust two fold mirror screws To raise or lower the image adjust the screw closest to the operator s side To move the image left or right adjust the screw furthest from the operator s side DMD Convergence A convergence problem is evident when one or more projected ...

Страница 45: ...and downloaded to projector memory to be used as a basis for all future displays If there are changes to the environment in the future for example a new screen is installed the CP2000 should be re calibrated Also note that correction for proper color balance sometimes reduces overall light output NOTE Most gamut functions are also now available in the TPC Gamut menu password required Multiple MCGD...

Страница 46: ...ded are to enhance the understanding of the written material and may not represent your exact projector model 3 1 Projector Basics 3 2 Power up Procedure 3 3 Power down Procedure 3 4 Introduction to the Touch Panel Controller 3 5 Using the Touch Panel Controller TPC 3 6 Remote Control of the Touch Panel Controller 3 7 Upgrading SSM Firmware 3 8 Working with the Lamp 3 9 Working with the Lens 3 10 ...

Страница 47: ...Rev 1 03 2014 Section 1 Introduction 3 1 Projector Basics 3 1 1 Components and Features The main CP2000 SB components appear in Figure 3 1 and are briefly described below in alphabetical order Figure 3 1 Basic Projector and Related Components ...

Страница 48: ...s do not ignite the lamp You must use the TPC Lamp Button Casters The 4 large casters are typically used only when the CP is rolled into place for installation or if the projector is moved from one location to another When the projector leveling feet recommended for all installations are extended enough to raise the projector the casters will spin freely and can be removed if desired Communication...

Страница 49: ...lowatt lamp The lamp door must remain closed and locked for all normal operation Trained operators only can access the lamp via security key Complete lamp specifications are provided in Section 8 6 Lamps Lens Mount Auxiliary Lens Mount The standard lens mount secures and seals a primary zoom lens within the projector and provides manual adjustment of focus zoom and offset Adjacent to the primary m...

Страница 50: ...ojection head are protected by an electronically monitored high security lock on the lid This interlock strictly controls access since every opening of the lid is 1 electronically logged and reported and 2 will immediately disable the current CineLink 2 cinema presentation The unlocked state is reported via a TPC alarm window serial communication and SNMP note the latter requires the TPC 60 model ...

Страница 51: ...n system that controls lamp ignition in conjunction with other theatre variables such as house lights audio and the start of the feature from a digital media storage device server Do not attempt opera tion if the AC supply and pedestal are not within the specified voltage range 1 Ensure that the breakers at the main wall panel for the CP are switched ON 2 At the operator s side of the pedestal set...

Страница 52: ...nu to turn the lamp OFF You must hold the button down briefly 2 Wait at least 10 minutes so that fans continue to cool the lamp Warning Be sure to wait for the cooling fans 3 At the operator s side of the pedestal set all breakers to OFF NOTE Manual shut down only Optional automation not yet available from Christie Figure 3 3 Power down Procedure ...

Страница 53: ...c TPC menus and functions depends on how you have logged on to the TPC See Figure 3 4 General Users For the general user having no username or password the Touch Panel Controller TPC offers three menus providing ON OFF toggling of the lamp shutter auxiliary lens position user test patterns and pre configured displays Basic status and or diagnostic information about projector components Versions of...

Страница 54: ...sonnel can access two additional configuration menus General and Lamp as well as three more Status submenus Server Diag and Interrogator The installer can define system operating parameters such as which projector is controlled by the TPC and critical lamp parameters such as installed lamp type fan speed and light level at the screen Installers can also establish temperature scale preference remot...

Страница 55: ...tions in pull down menus touch To select an option in a list touch the option text To begin entering text such as serial numbers touch the entry box To escape without change from a pull down list touch menu background Leaving a menu automatically saves its current settings Touch checkboxes to toggle on or off Touch to jump to the Status menu at any time All TPC menus and functions are illustrated ...

Страница 56: ... or move it aside NOTE For complete operating instructions refer to the information supplied with the Motorized Auxiliary Lens Mount SEE TEST PATTERNS To display a test pattern press the Test Pattern button repeat to cycle through available test patterns To return to a presentation toggle the Test Pattern button again or select one of the 8 display buttons from a Main menu page NOTES 1 Allow 2 3 s...

Страница 57: ...eration These indicators can change to indicate a warning yellow or critical error red status Yellow Warning Indicates an unusual environmental condition For example a temperature may be elevated and nearing its upper limit correct the problem by checking all cooling systems turning OFF the projector and cooling if necessary make sure to follow the standard shut down procedure Service may be requi...

Страница 58: ...on location and channel Signal Hor and Vert Freq of current source Standby ON OFF NOTE lamp remains on regardless OSD ON OFF screen display of Cine IPM menus Green All OK Yellow Environmental Diagnostics WARNING Red Environmental Diagnostics CRITICAL ERROR Figure 3 6 Status System Menu If Yellow Red stop operation and correct the problem If Red Failure Service likely required NOTE Requires service...

Страница 59: ...Failure also triggers an alarm window Tamper projector lid OK Failure Failure triggers an alarm window and stops CineLink 2 encrypted cinema processing Temperatures C or F Critical internal temperatures in C or F Card Cage 55 69 C warning 70 C critical DMD Blue 60 64 C warning 65 C critical DMD Red 60 64 C warning 65 C critical Integrator 95 104 C warning 105 C critical Prism 70 74 C warning 75 C ...

Страница 60: ... Performed ARM FPGA Load FPGA Code Valid FPGA Initialize FPGA No Load Jumper FPGA Done FPGA Register Read Write UART 0 UART 1 I2 C Ethernet Synchronous Serial Port File System GPI Macro A D Macro Formatter Board a k a Formatter Interface Board Processor Board Diagnostics Performed DSP FPGA Load FPGA Code Valid FPGA Initialize FPGA McBSP XRDY FPGA Done FPGA Register Read Write Serial ID Chip CLUT S...

Страница 61: ...n session the alarm window will not reappear for a condition that you have acknowledged shunted but not yet solved However if you cycle the projector OFF and ON again any persisting alarm condition will trigger the alarm window again Although it is highly recommended that the monitored over temperature and fan speed conditions always be set to trigger a flashing alarm window default this trigger c...

Страница 62: ...n Integrator is too hot Power down and cool projector Reduce lamp power Ambient temperature may be too high Check air filter and sensor Check liquid cooler fan Red DMD is too hot Power down and cool projector Reduce lamp power Ambient temperature may be too high Check fluid flow and level Check air filter Check liquid cooler fan Blue DMD is too hot Power down and cool projector Reduce lamp power A...

Страница 63: ...ned in the PCF Source Target Color Color Space Gamma and LUT CLUT disappear from the Custom menus and are protected from further modification The channel defined in such a case will thus be based on 1 the display settings in the supplied PCF and 2 the remaining Custom parameters that are not contained in a PCF the physical location of the input connection such as a cinema port or DVI port the scre...

Страница 64: ...ing Use for all cinema sources plus DVI sources with vertical freq 60Hz or lower Refresh Update Refresh all selection lists available in Custom Menu 3D is in use 3D Control Menu Clear 1 or more channels restore factory defaults Native color reference Choices defined by installer Default OnSite PCF list replaces Color Space Gamma LUT CLUT Target Color and Source options List is configured by instal...

Страница 65: ...urrent source Click to assign a different icon Cinema Keep checked for most sources default ensuring that incoming data is processed using the com plete cinema path and scaled to fill the screen where possible Currently cinema sources A B pro jector inputs should always utilize the cinema path and scaling Uncheck only for incoming DVI having a frame rate 60 Hz if SXGA or 48 Hz if 2048 x 1080 as th...

Страница 66: ...d with this channel Pull Down Re Sync This command is used to enable or disable the re synchronization function associated with the Pull Down Sequence It is sometimes useful to disable the re synchronization function when the time code is not running at the proper rate such as when a jog control is being used with a tape machine Screen Identifies sets display area masking cropping and expected len...

Страница 67: ...put true or reversed inverted See L R Output Polarity Notes below Frame Rate Ratio of total frames displayed to frames forming complete data Increase to reduce flicker in displays 96 Hz Max recommended setting for 2048 x 1080 displays 5 2 Can be higher in smaller displays or decreased if incoming signal is already high enough to prevent flicker See Frame Rate Notes below Input GPI Select None when...

Страница 68: ...RENCE NOTES Select the option matching your L R Input Reference above If your 3D source provides separate left and right data via 2 cables at the A and B SMPTE ports simply select the desired frame order either L R or R L If your single 3D source provides a separate sync connected at the GPIO or if the single 3D source includes an embedded 3D sync signal code the Input Frame Dominance choice shoul...

Страница 69: ...lete its switch Ideally when this interval is properly set and exactly suits the speed of your device neither eye sees image data intended for the other eye This helps to prevent color artifacts and ghosting while ensuring that each eye sees all intended data NOTE Because the Dark Time interval essentially increases frame rate increasing this setting beyond its range for the current frame rate fac...

Страница 70: ... Power directly Lamp Power Indicates what percentage of power appropriate for the installed lamp to supply to the lamp auto matically overriding any LiteLOC setting that may be in effect This causes the bar graph to rise or fall but the LiteLOC line and set value will not change unless Set is pressed defining a new LiteLOC setting See Table 8 1 Minimum and Maximum Lamp Power by Lamp Type on page 8...

Страница 71: ...re performing any lens calibrate or reset functions on the Motorized Primary Lens Mount to prevent collision between the projection lens and the MALM 2 Hazardous moving parts Keep fingers and other body parts away To adjust ILS settings for a particular channel 1 Select a channel from the drop down list 2 Use the designated buttons to adjust Focus Horizontal X and Vertical Y Offset and Zoom Copy I...

Страница 72: ...enu is not selected the Custom Lens menu will not display 3 5 5 TPC Advanced Menu All password protected requires Installer Admin or Advanced User rights except for the New Lamp button accessible by Operator login The TPC Advanced menu consists of six different submenus Preference Lamp Lamp History Lens Test Patterns and User that enable installers administrators and advanced users to define numer...

Страница 73: ...he alarm appears to be mal functioning without real errors Lamp Limit Enter the hours 0 5000 that are expected for this lamp typically no more than the number covered under warranty Expiry Message Select to display the Lamp Expiry Message on the TPC when the lamp reaches its defined lamp limit Language Choose English or Chinese TPC menu text for next re boot System Calendar Clock Reset the system ...

Страница 74: ...propriate for the installed lamp to supply to the lamp automat ically overriding any LiteLOC setting that may be in effect This causes the bar graph to rise or fall The LiteLOC line and Set values will not change unless Set is clicked defining a new LiteLOC setting Refer to Table 8 1 Minimum and Maximum Lamp Power by Lamp Type on page 8 6 for lamp power ranges LampLOC LampLOC buttons activate moto...

Страница 75: ...list Serial Touch to activate keyboard for editing Change Reason Select description that best explains why lamp was changed Save Touch to record the new serial number and date and automatically reset the lamp timer to the same value entered in Hours text box Hours Enter the number of hours logged on the newly installed lamp If the lamp has never been used the value should be 0 Figure 3 18 New Lamp...

Страница 76: ...n order to use ILS functionality Lens Reset On Startup Select this checkbox for the ILS to locate the sensor flags and the backlash of each motor at the same time Keep checked if you need to reset the lens often Calibrate Click Calibrate to calculate the amount of backlash for each motor and make the necessary adjustments to ensure proper motor range Calibration should only be used when changing l...

Страница 77: ...both windows form the master pull down list of test patterns available in the Advanced Preferences menu TO TOGGLE A PATTERN INTO ANOTHER WINDOW Select a test pattern checkbox to instantly move the pattern to the other window TO RE ORDER SELECTED TEST PATTERNS To change the order in which a test pattern will be projected when cycled with the Test Pattern button highlight the name not its checkbox i...

Страница 78: ... are available The User Level tracks with different user names in the box above When adding a user User Levels can be chosen from in a pull down list note that only those levels with rights that are equal to or lesser than those of the current login will appear Password Enter a new 1 8 character password for the current login or when adding a new user Non editable at other times Confirm PW Re ente...

Страница 79: ...ist cannot be current login 2 Press Delete User 3 Press Save TO CHANGE A USER S RIGHTS USER LEVEL 1 Select the User Name you wish to modify cannot be current login 2 Press Change Level button 3 Select the new User Level desired for this user 4 Press Save TO CHANGE YOUR PASSWORD 1 Select Change PW button 2 Enter the desired password 3 Re enter the new password in the Confirm PW box 4 Press Save WHO...

Страница 80: ...for the projector Incoming resolution pixels across pixels top to bottom Offset desired i e amount of data to discard Rare Desired aspect ratio i e the original display format to be recovered Although in rare cases the content distributor may include this source information as part of a pre defined PCF applied by using the PCF in the projector alternatively these variables can be defined either in...

Страница 81: ...es to accurately zoom in on a precise area and you must also define offset see below if you want to zoom in on an area other than the center ADMIN SOURCE MENU OPTIONS Resolution Activate then record the x y resolution of your incoming signal such as 2048 x and 1080 y or 1920 x and 1080 y Note that resolution must match the incoming signal format assuming you want to display all of it and may diffe...

Страница 82: ... sixteen most common source setups which are selectable from the Main menu pages In the event your source material is pre scaled or compressed enter the desired aspect ratio Adding the 1 25x anamorphic or 1 26x wide converter lens will widen a squeezed image back to its original scope aspect ratio For sources that are not pre squeezed aspect ratio can be left at 0 Table 3 15 Pre configured Source ...

Страница 83: ...g hides unwanted data useful if the image appears keystoned etc See Cropping Notes below Letter Box Letter Boxing ensures that all image data is displayed and its aspect ratio is maintained See Letter Box Notes below Lens Factor Define the auxiliary lens needed 1 25 for the CP2000 series to stretch an image horizontally Leave at 1 default if no auxiliary lens is needed Slidebars Adjust coordinates...

Страница 84: ...l adjustment or electronic keystone with sloped sides is not possible CROPPING NOTES Cropping is the digital equivalent of filing aperture plates in a film projector to perfect the image squareness For example if the bottom of the image appears slightly wider than the top activate the bottom left or right cropping point in the Screen menu and change the coordinates to crop or bring in the corner s...

Страница 85: ...iles for new color gamut performance and set how closely you want to match the target white Recording the projector s uncorrected color performance is typically completed as a final step like a calibration after installation For this one time procedure the installer measures initial native i e uncorrected colors at the screen enters the data as Measured Color Gamut Data on the left side of the Gam...

Страница 86: ...on but unsaved MCGD settings See Restore Notes below Test Apply current settings to the image without saving Create MCGD Save current MCGD settings as a new OnSite or other file name NOTE OnSite is a permanent over write of any previous OnSite file and cannot be cancelled in the future except by another over write If desired create other MCGD files to reference under specific conditions and for sp...

Страница 87: ...red MCGD file as the basis for the color corrections needed for a target color MCGD files are chosen in the Custom menu NOTE Once created user created MCGD files can be deleted only by using Christie s licensed DCP Librarian software Important Create MCGD is a permanent over write of any previous MCGD OnSite file and will define new default color processing in the projector TARGET TCGD and CREATE ...

Страница 88: ...mended that you enable the tolerance box for all applications requiring maximum brightness such as in theatres Do not enable the tolerance box if exact color performance is more crucial than overall image brightness such as in telecine applications RESTORE NOTES This button enables you to return to the Gamut menu settings that were present when you opened the menu however the precise behavior depe...

Страница 89: ... DLP or TCP from Admin IP Config Menu Projector name Not applicable for TPC Auto assign NOTE Requires a DHCP server Enter valid and unique address for this device and site Defaults shown NOTE Gateway is cur rently non functional Choose which address to see or change Enables disables text entry below Implement current settings Figure 3 33 Choosing SNMP from Admin IP Config Menu Enables disables SNM...

Страница 90: ...twork changes ADMIN IP CONFIG MENU OPTIONS DLP vs TPC vs SNMP Select which device address you wish to see or set DLP projector TPC Touch Panel Controller SNMP The Internet standard protocol developed to manage nodes servers workstations routers switches and hubs etc on an IP network SNMP enables network administrators to manage net work performance find and solve network problems and plan for netw...

Страница 91: ...must match otherwise the devices are on different networks and cannot communicate Do not re boot until this match is confirmed You do not have to change the TPC Ethernet configuration if you have changed only the last octet of the projector s IP Address In this case rare both devices still belong to same network and will be able to communicate with each other 6 Change the TPC Ethernet network conf...

Страница 92: ...r and so on NOTE This menu does NOT define the projec tor s address Image Orientation Define the orientation of the screen relative to the projector Celsius Display Choose Celsius or Fahrenheit temperature display for Status menu Remote Access Define whether all users can access TPC functions remotely or not at all or whether a login is required Data Logging Define the extent of activity to record...

Страница 93: ...ly drive the lamp at its minimum or maximum power record light measured at the screen for both extremes in power defining a range of footlamberts possible Light readings fL appearing elsewhere in TPC will then be interpolations based on this range Click SAVE to implement new values NOTE Re calibration must be done with new lamp change Figure 3 36 Admin Lamp Menu Options Select to implement new val...

Страница 94: ... service technician TOUCH PANEL Determines the software functionality of the Touch Panel Controller TPC its menu language and its operating system SSM Indicates which System Supervisor Module is installed H W and what SSM software is present Main and Boot portions ENGINE Indicates the main processing software of the projector This is a summary of the Interface Processor and Formatter Interface ent...

Страница 95: ...on and or text What Happens When a Button is Selected For any display button on the two page Main menu the projector interprets incoming signal data according to one of sixteen user selectable display setups defined at the time of CP2000 SB installation and or with each subsequent release of a new digital cinema feature and stored in projector memory Each display setup consists of Projector Config...

Страница 96: ...lay setup may first have to be re configured with new settings Contact the trained operator responsible for updating display setups 3 5 10 Errors and Alarms Encountering the following conditions will always trigger a flashing red alarm window at the TPC ACTIVATED SAFETY INTERLOCK caused by an open lamp door a failed extractor or lamp fan or an open fire alarm switch For any safety interlock breach...

Страница 97: ...ormation such as what channel is currently in use the projector then returns the data in a reply message Regardless of message type or origin all messages use the same basic format and code as shown in Figure 3 40 Where applicable a message can expand to include additional parameters of related data 3 6 2 Message Components and Structure START AND END OF MESSAGE Every message begins with the chara...

Страница 98: ...ed in double quotes following the data as in Name TEXT PARAMETERS Most data is simply a numerical value however some messages also require text For example a channel naming message typically includes a text based name after the channel number enclose this text in double quotation marks as in Tilt the Wagon Use all characters as desired except for the following special characters these require a 2 ...

Страница 99: ...dmin General menu define which users all none or some have remote access rights 2 Open an Ethernet socket to the TPC address socket 5000 By default the TPC address is 192 168 206 110 If you have additional TPCs the installer should have defined their addresses as 192 168 206 111 192 168 206 112 and so on or used other addresses that are valid for your site 3 Communication protocol should now be es...

Страница 100: ...ation such as FFFTP or WS_FTP or as provided in Windows XP or Internet Explorer 3 7 2 Update Procedure NOTE Screen shots throughout this section are for representation purposes only and may differ slightly from those on your screen FFFTP is a freeware FTP client application recommended for communicating with the TPC via file transfer protocol NOTE FFFTP is the only supported FTP software When inst...

Страница 101: ...later 4 Keep other settings as default Click OK to go back to the Host List window 5 Under the Advanced tab ensure the selection to Use PASV mode is unchecked Figure 3 44 6 In the Host List window click your desired site and then click Connect to connect to the TPC FTP server Both devices should now appear in the FTP windows 7 Transfer the file from the PC left side of screen to the TPC ISPM folde...

Страница 102: ...N ignite the lamp by pressing the lamp button on the Main menu of the TPC make sure to press and hold for approximately second OFF To turn the lamp OFF press the lamp button on the Main menu of the TPC make sure to press and hold for approximately second Then WAIT for fans to run for 10 minutes to cool the lamp and other compo nents then turn off all breakers 3 8 2 If the Lamp Won t Turn ON If the...

Страница 103: ...ecord the current brightness reading in memory NOTE Arbitrary units of measure are shown above the light output bar 3 Enable LiteLOC As the lamp ages and loses efficiency the projector will gradually and automatically supply more current to the lamp as necessary to maintain your chosen level of light output for as long as possible the light level is read from an internal light sensor 4 To change y...

Страница 104: ...lace the lamp Using Lamp Power To change to a different power level simply enter a new Lamp Power percentage at any time This will override and temporarily disable any LiteLOC setting that may be in effect 1 Set Lamp Power to apply a specific percentage of power appropriate for the installed lamp LiteLOC will automatically be disabled 2 Brightness will change accordingly new values will appear for...

Страница 105: ...over driving a lamp for extended periods When using LiteLOC which automatically increases lamp power over time check the Status menu lamp power readings periodically as the lamp ages to prevent prolonged over driving Table 3 23 Lamp Current Ranges CXL 20 requires adaptor kit P N 003 001728 XX NOTE A Lamp Power setting of 110 will exceed the maximum values shown here by approx 10 CXL CDXL Lamps kW ...

Страница 106: ...e lens and screen or simply watch the light output gauge in the Advanced Lamp menu Note that with these buttons you may attain a slightly higher peak than with the Do Auto button but the peak may not be centered on the lamp curve and lamp performance may not be optimized whereas the Do Auto button also utilizes filtering to eliminate the effects of any lamp flicker In general use the individual bu...

Страница 107: ...ng 3 8 6 How Old is My Lamp When a new lamp is installed and its serial number recorded Advanced Lamp menu the lamp timer resets to 0 and begins logging time for the new lamp This total appears in both the Advanced Lamp menu and the Status menu See right The Status menu also shows Total Lamp Hours which is the accumulated time logged for all lamps installed thus far Each past lamp log also appears...

Страница 108: ...er exceed the lamp lifetime by the hours shown in Table 3 24 as an old lamp becomes increasingly fragile and more prone to sudden failure or even explosion which can be damaging and dangerous Table 3 24 When to Replace Your Lamp NOTE Hours shown here are greater than or equal to the pro rated credit warrantied lifetimes refer to Section 8 Specifications Do not exceed Refer to Section 6 4 Replacing...

Страница 109: ...king but a very short throw ratio throw ratio throw distance screen width To move the auxiliary lens select the Anamorphic Lens button on the Main menu of the TPC Refer to Section 2 8 Offset and Boresight Alignment for all lens installation and boresight instructions Refer to Section Custom Lens Menu on page 3 26 for ILS and channel setup 3 9 1 Lens Mount Functions 1 If the Motorized Auxiliary Len...

Страница 110: ...tch test pattern or similar and focus on the center of the image If the focus quality differs from edge to edge whether top bottom left or right the boresight of the lens mount likely needs correction Refer to Section 2 8 Offset and Boresight Alignment 3 9 2 Auxiliary Lens NOTES 1 The auxiliary lens and its motorized mounting mechanism are optional 2 To install replace or use the auxiliary lens re...

Страница 111: ...ltiplication is set to 6 2 meaning the input frame rate is multiplied by 3 Triple for a total frame rate of 144 frames per second Hz or FPS 3 10 2 What Do I Need for 3D The CP2000 SB requires a 3D capable SMPTE source and a few special hardware software setups described here Essentially you will connect two signals one left eye one right eye to the projector then use the TPC s Custom 3D Control me...

Страница 112: ...rdware Setup Figure 3 56 shows the general hardware configuration currently supported Use either an IR emitter to control gating in active glasses or a polarizing cell and Z screen with passive glasses NOTES 1 All configurations require a custom 3D Sync Cable such as supplied by RealD for the GPIO port 2 A pull up power supply not shown is also required for the IR emitter or polarizing cell 3 See ...

Страница 113: ...14 Section 1 Introduction 3 10 4 Other Hardware Setups Other expected hardware configurations with a single 3D source input are shown in Figure 3 57 NOTE For future reference Single 3D input is not currently supported Figure 3 57 Single Input 3D Systems ...

Страница 114: ...played per number of frames for complete data For example a setting of 6 2 creates 6 frames from 2 inputs 144 Hz The resulting frame rate cannot exceed the maximum frame rate possible in the projector with 24 Hz full screen incoming signals use a maximum factor of 5 2 NOTE Frame rate multiplication less than 6 2 may flicker at slow incoming frame rates 3 DEFINE 3D SYNC INPUT LOCATION For dual inpu...

Страница 115: ...tern to confirm 3D mode L R orientation and your Sync Output GPO setting only This pattern automatically activates 3D mode and increases frame rate by a factor of 6 2 NOTE The test pattern will flicker significantly due to its low frame rate and is not recommended for synchronizing projector processing with your 3D device Image Breakup Increasing the Dark Time beyond its maximum may cause image br...

Страница 116: ... of performance parameters such as synchronization with content language font type font color position etc in the current presentation Define the desired URI Uniform Resource Identifier i e cinema server or distributor providing the subtitling xml file you wish to examine then select Enable to begin the test Any errors encountered in file content or transmission from the server for example a lost ...

Страница 117: ...successfully retrieve these diagnostic files the projector must remain in its failed state with incorrectly displayed image on screen NOTES 1 Always run Interrogator first before power cycling the projector otherwise important diagnostic files will be unusable 2 Never run Interrogator during a show as this could cause image disruption 3 Interrogator is also accessible through a separate login and ...

Страница 118: ...displaying cinema for the first time A good understanding of all cinema functions and how to access them will help you to run an event smoothly and easily NOTE Before attempting cinema use the projector must be properly installed aligned and configured by a qualified service technician as described in Section 2 Installation Setup Read also Section 3 Operation 4 1 Compatible Cinema Sources 4 2 Imag...

Страница 119: ... total klines per frame SMPTE 274 1920 x 1080 60 Hz Interlaced 1920 x 1080 24 Hz 1920 x 1080 59 94 Hz Interlaced 1920 x 1080 23 98 Hz 1920 x 1080 50 Hz Interlaced 1920 x 1080 25 Hz 1920 x 1080 30 Hz Progressive 1920 x 1080 30 Hz 1920 x 1080 29 97 Hz Progressive 1920 x 1080 29 97 Hz 1920 x 1080 25 Hz Progressive 1920 x 1080 25 Hz 1920 x 1080 24 Hz Progressive 1920 x 1080 24 Hz 1920 x 1080 23 98 Hz ...

Страница 120: ... M 1920 x 1080 50 Hz Interlaced 1920 x 1080 25 Hz SMPTE 296M 2001 SMPTE 296M 1280 x 720 60 Hz Progressive 1673 x 941 60 Hz Progressive 1280 x 720 59 94 Hz Progressive 1673 x 941 59 94 Hz Progressive 1280 x 720 50 Hz Progressive 1920 x 1080 50 Hz 1280 x 720 30 Hz Progressive 1920 x 1080 30 Hz 1280 x 720 29 97 Hz Progressive 1920 x 1080 29 97 Hz 1280 x 720 25 Hz Progressive 1920 x 1080 25 Hz 1280 x ...

Страница 121: ...is typically squeezed electronically that is it is distorted into a narrow image characterized by unusually thin people and then its pixels are stretched horizontally through the auxiliary lens so that the full 2 39 image width appears on screen The image becomes wider but not taller See Figure 4 5 If the incoming material has not been pre squeezed by the distributor you can squeeze it by using a ...

Страница 122: ... but not its width The screen shown in Figure 4 4 also has a bottom mask Add masks for scope Open masks for flat Alternatively masks may be installed at each side of the screen in order to change the width of the screen but not its height Figure 4 5 Add masks for flat Open masks for scope In some cases a theatre has both side and top bottom masking installed This arrangement is the most flexible o...

Страница 123: ...4 6 CP2000 SB User Manual 020 100162 06 Rev 1 03 2014 Section 1 Introduction Table 4 2 Basic Ways to Achieve Flat Scope Displays ...

Страница 124: ...lar which are displayed according to strict parameters pre defined by the producers of the feature and implemented in the projector by a CP2000 SB installer administrator or trained operator this simplicity ensures that the intended display can be selected quickly and easily by any user To change to a new feature do the following Ensure the CP2000 SB and TPC are both powered up and operating norma...

Страница 125: ...s not appear as expected on screen part of the display setup is probably not configured correctly for the incoming source Try a different button on the Main menu If the image is still incorrect this source may have to be re configured 4 4 Adjusting the Cinema Display For general users only the selection of a digital cinema feature is accessible The precise processing which affects details of image...

Страница 126: ...ve content originating from a standard definition or high definition non cinema source such as a PC or other graphics devices Such a source routes to a DVI Digital Visual Interface port in the CP2000 SB projection head and can bypass cinema processing when necessary 5 1 Compatible Non Cinema Sources 5 2 Selecting the Source ...

Страница 127: ...uires additional hardware and is not currently supported see Figure 5 2 Table 5 1 Compatible Non Cinema DVI Sources All Digital RGB 8 bit Incoming Format Vert Freq Processing Path Required Display Format 640 x 480 60 Hz Non cinema 640 x 480 640 x 480 72 Hz Non cinema 640 x 480 800 x 600 60 Hz Non cinema 800 x 600 800 x 600 72 Hz Non cinema 800 x 600 1024 x 768 60 85 Hz Non cinema 1024 x 768 1280 x...

Страница 128: ... Although dual link and twin link input options appear in the TPC Custom menu using the pair of DVI ports for a dual link signal that is two data streams and one clock via one dual link cable requires an adapter that accepts the dual link DVI connector Using the ports for a twin link signal two data streams with their own clocks each on their own single link cable requires a source that can provid...

Страница 129: ...n selectable over several pages of the TPC Main menu Depending on your installation you may have 0 32 different non cinema sources defined for use TO SELECT A NON CINEMA SOURCE With a non cinema source connected to the CP2000 SB use the main menu on the Touch Panel Controller to select the display button representing the desired non cinema source Once selected the button will darken and the projec...

Страница 130: ...00 SB projector NOTE The illustrations provided are to enhance the understanding of the written material They are graphical representations only and may not represent your exact projector model 6 1 Warnings and Guidelines 6 2 Maintaining Proper Cooling 6 3 Maintenance and Cleaning 6 4 Replacing the Lamp Filter 6 5 Replacing a Lens ...

Страница 131: ...P2000 SB installations 1 Never look directly into the projector lens or at the lamp The extremely high brightness can cause permanent eye damage 2 For protection from ultraviolet radiation keep all projector housings intact during operation Protective clothing and safety goggles are recommended NOTES 1 The American Conference of Governmental Industrial Hygienists ACGIH recommends occupational UV e...

Страница 132: ...otective Clothing Safety Kit P N 598900 095 Recommended protective clothing includes but may not be limited to protective gloves latex lab gloves double layer 0 040 acetate face shield and a quilted ballistic nylon jacket or a welder s jacket Warning 1 EXPLOSION HAZARD Wear authorized protective clothing whenever the lamp door is open 2 Never attempt to remove the lamp directly after use The lamp ...

Страница 133: ...the laminar airflow device LAD just beyond the filter opening The LAD should be nearly white or light gray in color 6 2 3 Liquid Cooler The liquid cooler system circulates liquid to and from the DMDs in the CP2000 SB projection head reducing their operating temperature to an acceptable level Periodically check the coolant level visible through the gauge window on the non operator s side of the ped...

Страница 134: ...6 3 1 Electrical Do the following every 60 days or 500 hours always disconnecting from AC first Check the contact surfaces of positive anode and cathode negative connections for cleanliness Clean electrical contact surfaces as necessary to prevent contact resistance from scorching connectors Verify that all electrical and lamp connections are tight 6 3 2 Optical Unnecessary cleaning of optics can ...

Страница 135: ...nsion in the folded cloth itself to collect the dust 3 If significant dust is still bound to the surface dampen a clean microfibre cloth with lens cleaning solution damp not dripping Wipe gently until clean IF FINGERPRINTS SMUDGES OIL 1 Brush most of the dust off with a camel hair brush and or blow dust away with compressed air 2 Roll a lens tissue around a swab and soak in lens cleaning solution ...

Страница 136: ... all air intake areas of the CP2000 SB are unobstructed and 3 exhaust airflow is within the range shown in Table 2 1 on page 11 Ensure lamp wiring does not interfere with vane switch Refer to Section 6 2 Maintaining Proper Cooling Laminar Airflow Device LAD Whenever checking replacing the air filter on the side of the projector also visually check the small square laminar airflow device LAD just b...

Страница 137: ...t breakers located on the breaker panel of the projector STEP 3 Disconnect Projector from AC Supply SHOCK HAZARD Disconnect from all AC at ALL wall breakers STEP 4 Open the Lamp Door With protective clothing and shield on unlock the lamp door and open it Refer to Figure 2 5 Open Pro jector for Access on page 2 5 If desired release the latch mechanism to remove the door entirely STEP 5 Open Cooling...

Страница 138: ...negative lamp connector nut located in the rear of the lamp compartment and screw in fully Figure 6 1 left Hand tighten only Caution Handle by the cathode anode end shafts only never the glass Do not over tighten Do not stress the glass b Rest the anode end of the lamp on the lamp cradle Figure 6 1 and slip the positive lamp connec tor over the bulb end c Hand tighten set screws in both negative a...

Страница 139: ... the installed lamp ensuring that the new lamp is neither under powered nor over driven Warning Do not attempt to ignite the lamp until its type is correctly selected in the Advanced Lamp menu a In the Advanced Lamp menu select New Lamp b In the Lamp History submenu select the correct lamp type from the Lamp Type drop down menu c Enter the serial number and the number of hours logged on the newly ...

Страница 140: ...ry and or property damage Allow to cool completely STEP 2 Turn Off Remaining Circuit Breakers After allowing the fans to run for at least 10 minutes turn off the remaining INTERNAL and PROJEC TOR circuit breakers located on the breaker panel of the projector STEP 3 Disconnect Projector From AC Supply SHOCK HAZARD Disconnect from all AC at ALL wall breakers STEP 4 Open Remove Filter Door Open filte...

Страница 141: ...ific types of installations see Section 8 Specifications To replace or change a lens 1 Release the lens locking lever UP position 2 Pull out lens and replace with a different primary lens as described in Section 2 1 4 Lens es 3 Secure with lens locking lever down position 4 Calibrate the lens See Section 2 7 Basic Image Alignment for details Figure 6 3 Replacing the Air Filter ...

Страница 142: ...te the symptoms present and use the following guide to assist you If you cannot resolve the problems yourself contact your dealer for assistance NOTE A qualified service technician is required when opening an enclosure to diagnose any probable cause 7 1 Power 7 2 Lamp 7 3 TPC 7 4 Ethernet 7 5 Cinema Displays 7 6 Non Cinema Displays ...

Страница 143: ... 3 If a DMD temperature is too high DMD over critical temp limit the lamp will not ignite Cool the projector and try again 4 If the Status menu indicates a ballast communication problem re boot and try again 5 If the lamp does not ignite after a second try replace the lamp 6 If there is no buzzing indicating that the igniter is attempting ignition there may be a problem with the igniter Christie s...

Страница 144: ...g LiteLOC is automatically terminated If the values shown in the Advanced Lamp menu indicate that the lamp power has reached this over drive state either reduce your LiteLOC setting or install a new lamp 7 3 TPC 1 If the TPC fails to initialize re boot the projector and try again 2 A failed TPC usually indicates a system failure requiring service 3 A TPC communication failure crash while displayin...

Страница 145: ...lected Check the Touch Panel Controller 6 Is the correct cinema port connected for this display file Check connections 7 5 2 Severe Motion Artifacts Most likely there is a synchronization problem with reversed 3 2 pull down in 60Hz to 24Hz film to digital conversion in your source The display file needs correction 7 5 3 Image Appears Squeezed or Vertically Stretched into Center of Screen Source da...

Страница 146: ... With a poor quality or improperly connected source the projector will repeatedly attempt to display an image however briefly 2 The horizontal or vertical scan frequency of the input signal may be out of range for the projector Refer to Section 8 Specifications for scan frequency ranges 3 The sync signal may be inadequate Correct the source problem 7 6 3 The Display is Faint 1 Brightness and or co...

Страница 147: ...jector Make sure that the lens surface and screen are parallel to one another 2 Is the vertical offset correct Adjust as necessary using the vertical offset knob 3 Is the anamorphic lens straight Rotate to orient aperture correctly 7 6 12 The Display is Noisy 1 Display adjustment at your input source may be required Adjust pixel tracking phase and filter Noise is particularly common on YPbPr signa...

Страница 148: ...ce NOTE The illustrations provided are to enhance the understanding of the written material They are graphical representations only and may not represent your exact projector model 8 1 Display 8 2 Lenses 8 3 Inputs 8 4 Touch Panel Controller 8 5 Power Specifications 8 6 Lamps 8 7 Regulatory 8 8 Environment 8 9 Weight Size 8 10 Standard Components ...

Страница 149: ... Center 1 25 1 45 1 38 809079 51 100 vertical 70 horizontal 1 45 1 8 1 38 809061 51 100 vertical 70 horizontal 1 8 2 4 1 38 809052 51 100 vertical 70 horizontal 2 2 3 0 1 38 809053 51 100 vertical 70 horizontal 3 0 4 3 1 38 809069 51 100 vertical 70 horizontal 4 3 6 0 1 38 809081 51 100 vertical 70 horizontal 5 5 8 5 1 38 809080 51 100 vertical 70 horizontal Primary Zoom Lenses High Brightness Par...

Страница 150: ...morphic for 2 39 1 scope screen 38 809054 51 n a determined by primary lens 1 26x Wide Converter for 2 39 1 scope screen 108 281101 01 n a determined by primary lens Motorized Auxiliary Lens Mount 108 111102 xx n a determined by primary lens Number of inputs 2 Standard supported SMPTE 292M bit serial Connector Type BNC Number of inputs 2 Standard supported VESA Digital Visual Interface DVI D Conne...

Страница 151: ...anel B at front Connector type rating 1 IEC 320 compatible 15 A rating Voltage range 100 230 VAC 10 Line frequency 50 60 Hz nominal Max inrush current 38 A Max current consumption 2 4 A 100V Max power consumption 240 W Max current at this AC input 5 A Lamp Compartment AC near Panel C at front Connector type rating 1 IEC 320 compatible 15 A rating Voltage range 200 to 230 VAC 10 Line frequency 50 6...

Страница 152: ...W all regions Current rating continuous of 3 phase AC input at breaker 40 A N America Japan 40 A Europe Asia Ballast Start up voltage 135 175 VDC Operating voltage range 18 46 VDC Operating current range 50 180 A Max ripple 1 max 25 C Internal Convenience AC Qty type of AC connector receptacle 1 terminal block N America Japan 1 terminal block Europe Asia Maximum wire gauge for terminal blk 8 AWG N...

Страница 153: ... 6600W 110 Type Xenolite Stand by lamp power level for 4 6 kW 50 of lamp s maximum current rating Stand by lamp power level for 2 3 kW 75 of lamp s maximum current rating Motorized adjustment of position 3 axis 0 25 range for each Recommended screen widths 2 0 kW 45 ft nominal 3 0 kW 55 ft nominal 4 5 kW 65 ft nominal 6 0 kW 75 ft nominal Audible Noise 70 dBA maximum NOTE Does not include customer...

Страница 154: ...ty non condensing 0 to 95 8 9 Weight Size NOTE All weights subject to change See page 8 8 Standard Dimensions W x L x H 25 63 5 cm x 55 5 141 cm x 54 137 2 cm with longest primary lens no anamorph Size with Anamorph W x L x H 25 63 5 cm x 62 157 5 cm x 54 137 2 cm with auxiliary lens mount lens Shipping Weight Projection Head Pedestal Total 355 lb 161 4 kg 450 lb 204 5 kg 805 lb 365 9 kg Installed...

Страница 155: ...8 8 CP2000 SB User Manual 020 100162 06 Rev 1 03 2014 Section 1 Introduction ...

Страница 156: ...destal types Projection head with lens mount and TPC Lamp choices shown on Section 8 6 Lamps 1 primary zoom lens high contrast choices listed below Assorted cabling most pre connected and misc assembly hardware CP2000 SB User Manual Other P N Protective Clothing Kit for opening of lamp door 598900 095 DCP Librarian Setup Software for calibration setup by Christie installer ...

Страница 157: ...8 10 CP2000 SB User Manual 020 100162 06 Rev 1 03 2014 Section 1 Introduction ...

Страница 158: ... A 1 020 100162 06 Rev 1 03 2014 Appendix A Glossary The glossary defines the specific terms used in this manual as they apply to this projector Also included are other general terms commonly used in the projection industry ...

Страница 159: ...o reflect ambient light i e light within a room from a source other than the projector in a direction away from the line of best viewing Curved screens usually have better ambient light reflection than do flat screens ANAMORPHIC Having or requiring a linear distortion generally in the horizontal direction Anamorphic lenses restore a scope CinemaScope or flat format film frame to the correct appear...

Страница 160: ...settings curtain movement and position lighting level in the auditorium non sync play and fade in out digital cinema projector NOTE Christie s optional automation system is not yet available AUTO SOURCE The ability of the projector to automatically recognize and synchronize to the horizontal and vertical scan frequencies of an input signal for proper display BANDWIDTH The frequency range of the pr...

Страница 161: ... is currently in effect checked or not unchecked CHROMINANCE The signal representing the color information hue and saturation when the image is represented as separate chrominance and luminance Same as chroma CLEAN APERTURE The fraction of a motion picture frame image that is intended to be viewed by the audience The clean aperture is subjectively free of edge artifacts and lies within the screen ...

Страница 162: ...Digital Cinema Distribution Master A file or collection of files formatted for exhibition and comprised of all the components of the title A reference size of about 200 GB per title is likely DDC The Display Data Channel VESA standard enables communication between PCs and monitors and is based on E EDID protocol DMD Digital Micromirror Devices used in this projector for processing red green and bl...

Страница 163: ...ety system that could require stopping the show raising the house lights and enabling a PA announcement FOOT CANDLE The intensity of visible light per square foot FOOT LAMBERT The luminance brightness which results from one foot candle of illumination falling on a perfectly diffuse surface 1 fL 3 423 candela per square meter cd m2 For example the SMPTE RP 98 calls for theatre screen luminance of 1...

Страница 164: ... are generated which varies amongst sources Also called horizontal scan rate or line rate HORIZONTAL OFFSET The difference between the center of the projected image and the center of the projector lens For this projector this value is expressed as the maximum percentage of the image that can be projected to one side of the lens center without degrading the image quality HOT SPOT A circular area of...

Страница 165: ...esentation system Comment In the event of a fire for example the life safety system may turn on the auditorium lighting to full intensity cancel the presentation audio and replace it with a PA microphone or pre recorded announcement turn the lamp off flash warning lights and so forth Every jurisdiction may have different statutory requirements for life safety systems LINEARITY The reproduction of ...

Страница 166: ...server etc that can be monitored by a network management system such as SNMP NTSC VIDEO A video output format of some video tape and disk players There are two types of NTSC National Television Standards Committee video NTSC 3 58 and NTSC 4 43 NTSC 3 58 is used primarily in North America and Japan NTSC 4 43 is less commonly used NON CINEMA Alternative program material such as concerts plays sporti...

Страница 167: ...or 2048 x 1080 x 24Hz of the incoming source The two processing paths available in the projector cinema vs non cinema offer different maximum pixel clock rates 110 MHz if cinema path and 165 MHz if non cinema path thus their use with DVI sources depends on the incoming resolution and vertical frequency PIXEL PHASE The phase of the pixel sampling clock relative to incoming data PIXEL TRACKING The f...

Страница 168: ...ital video recorder player server QuBit frequently used for providing digital cinema data QuVis image compression uses a proprietary technology called Quality Priority Encoding based on wavelets in which the user selects a quality level based on signal to noise ratio The data rate varies to efficiently maintain that quality level Frames are coded individually REAR SCREEN A translucent panel for sc...

Страница 169: ...images are generated Also known as scan rate or refresh rate SCAN LINE One horizontal line on the display SECAM A video output format of some video tape and disk players used primarily in France SECAM Sequential Couleur á Mémoire signals are similar in resolution and frequency to PAL signals The primary difference between the two standards is in the way color information is encoded SHOW SCRIPT A s...

Страница 170: ...ypted playback such as cinema presentations for example will be interrupted TERMINATED A wire connecting a single video source to a display device such as a projector must be terminated by a resistance usually 75 for video THROW DISTANCE The distance between the front feet of the projector and the screen Also called Projector to Screen Distance Always use the correct Christie throw distance formul...

Страница 171: ...e quality All CP2000 lenses have the same vertical offset range VESA The Video Electronic Standards Association establishes standards of communication between electronic components to help ensure universal compatibility VIDEO The signal that is used by display devices such as projectors to generate an image This term also refers to the output of video tape disk players and computers VIDEO DECODER ...

Страница 172: ...erywhere A 10 white field is a white area usually rectangular that occupies 10 of the image the remaining 90 is black YCBCR A high end digital component video signal YPBPR A high end analog component video signal Sometimes called YUV Component or Y R Y B Y the YPbPr signal by passes the video decoder in this projector YUV See YPbPr ZOOM The adjustment of image size by means of a zoom lens ...

Страница 173: ...A 16 CP2000 SB User Manual 020 100162 06 Rev 1 03 2014 Section 1 Introduction ...

Страница 174: ...for remote communications with the TPC and its corresponding projector All messages must be sent via Ethernet NOTE Please refer to Section 3 6 Remote Control of the Touch Panel Controller for a complete explanation of remote communications setup message protocol and format B 1 Function Codes B 2 Messages with Multiple Parameters ...

Страница 175: ... is the current icon CHI 004 The 5th icon represents the current channel Channel Name NAM NAM S108 Chicken Little or NAMS108 Chicken Little Changes or assigns a name to a particular channel Always pre ceded with S so that the name is assigned for this source only NAM text Assign name to the current channel 256 characters max NAM s1 text Assigns a name to channel 1 NAM s0 text Assigns the same name...

Страница 176: ... 2 2 packed 12 bits color with O E lines 0x03 4 2 2 packed 12 bits color with O E pixels 0x04 4 4 4 unpacked 10 bits 0x05 4 4 4 packed 10 bits color mixed 0x06 4 4 4 packed 10 bits color O E pixels 0x07 4 4 4 packed 12 bits DVI port 0x00 Unpacked 8 bits color default 0x01 Packed 10 bits color 0x02 Packed 12 bits color Data Logging DLG DLG 1 DLG DLG 002 0 Minimum logging of activities i e for error...

Страница 177: ...Fan Card Cage 11 Fan LAD 12 Fan Ballast 16 Temperature Prism 17 Temperature Red DMD 18 Temperature Blue DMD 19 Temperature Integrator 20 Temperature SSM 21 Temperature Card Cage 22 Temperature Ballast 23 ILS over temperature 32 Lamp Life Expired 33 Lamp Failed to Strike 35 Lamp Unexpected Lamp OFF 36 Lamp Reading Lamp Intensity Failed 48 SSM Communication Error 48 SSM Upgrade Failed 68 I2C Communi...

Страница 178: ... Moving Status 0 not moving 1 moving Related commands are Intelligent Lens System ILS Lens Horizontal Offset LHO Lens Vertical Offset LVO and Zoom ZOM For Your Information FYI FYI A change in projector status generally broadcast from TPC proj to all clients See Messages With Multiple Parameters in this Appendix Gamma GAM GAM gamma2 6 The filename representing the current gamma For example gamma2 6...

Страница 179: ... be used for macros P1 input 1 5 or output 1 5 P2 Macro Name Predefined GPI macros LampOn LampOff DouserOpen DouserClosed AuxLensIn AuxLensOut Channel 101 through Channel 116 Predefined GPO macros System Health Lamp State Douser State Auxiliary Lens State Image Scaling Enable Disable IMS IMS 0 Enables or disable image scaling 0 disable 1 enable Intelligent Lens System ILS requires v2 9 or higher M...

Страница 180: ...er 20 00000 00000 00000 000 Usage Hours Exceeded Lamp history describes lamps used in the projector See Messages With Multiple Parameters in this Appendix Lamp Hours of Use LPH LPH 0528 The hours logged on the current lamp 0 9999 Lamp Hours Limit LPL LPL 750 The hours that a lamp can be used before a warning message appears Range 0 20000 hours Lamp Intensity LPI LPI 12345 The light output level ch...

Страница 181: ...with S If no S parameter is included the LPM setting will apply to the current channel when the Lamp Per Channel checkbox is enabled and to all channels when the checkbox is cleared 2 Specify global parameter with G LPM S101 2 Changes mode for channel 101 to constant power LPM G Requests global power mode LPM G 002 Reply to global power mode request LPM S101 Request for Chan 101 power mode LPM S10...

Страница 182: ...lue LPP S101 2000 Reply to Chan 101 power request LPP LPP 2000 If Lamp per channel reply is channel power otherwise returns global intensity Lens Auxiliary LNA requires v2 7 or high LNA 1 25AN 1234567 P1 Lens type Valid lens 1 25 AN or 1 25WC P2 Lens serial number Lens Horizontal Offset LHO requires v2 9 or higher LHO 1023 LHO 1023 1 LHO 1023 1 0 Adjusts the horizontal offset of the output lens un...

Страница 183: ...tive Approach 1 Negative to Position Approach Read P1 Real time position P2 Current direction P3 Moving Status 0 not moving 1 moving Related commands are Intelligent Lens System ILS Lens Horizontal Offset LHO Focus FCS and Zoom ZOM Measured Color Gamut MCG MCG OnSite Use OnSite MCGD as the reference point for color proc MCG What MCGD is currently in use MCG OnSite Reply indicating the OnSite MCGD ...

Страница 184: ...92 168 206 10 Projector 192 168 206 10 is controlled by the TPC Projector Configuration File PCF PCF TPC1 Use this pre defined projector configuration file PCF filename for processing This file contains TCGD CSC LUT AL LUT DG LUT CLUT and SOURCE information PCF What pre defined processing file is currently in effect PCF TPC1 The TPC1 pre defined proj configuration file is in use Projector Hours of...

Страница 185: ...ear 2 Inverted Front 3 Inverted Rear SOR What is the current screen orientation setting SOR 0 Current screen orientation is normal front position Select Input SIN SIN 0 Select which projector P1 and input P2 to use P1 Input 0 Input A SMPTE cinema 1 Input B SMPTE cinema 2 Dual SMPTE cinema 3 DVI A non cinema 4 DVI B non cinema 5 DVI Twin 6 CineIPM input on DVI A 7 CineIPM input on DVI B 8 CineIPM i...

Страница 186: ...erminate TPC Application STP 0 Start TI communication 1 Stop TI communication 2 Terminate TPC application 3 Reboot TPC System Status SST Method of reading projector information See Messages With Multiple Parameters later in this Appendix Target Color Gamut TCG TCG filename Select the stored target color gamut file to apply to the current display TCG What TCGD is currently in use TCG P7V2 The P7V2 ...

Страница 187: ...cessary when the remote access setting in the projector is set to login required P1 User Name e g JSMITH case insensitive P2 Password e g PassWord case insensitive Virtual Network VNC requires v2 7 or higher and TPC 60 66 VNC 1 Start VNC server NOTE Should only be used for training VNC 0 Reboots TPC Zoom ZOM requires v2 9 or higher ZOM 1264 ZOM 1264 1 ZOM 1264 1 1 Changes the zoom setting of the l...

Страница 188: ...4 which further describe the error P3 indicates what component or system is involved such as interlocks fans temperature SSM communication or a lamp failure and P4 relays the specific condition detected at the suspect component such an over temperature reading or a slow fan speed reading note these values indicate temperature or fan speed only See Table B 3 Table B 4 and Table B 5 When a system er...

Страница 189: ...an Intake 2 non operator s side of projection head 10 Fan Card Cage 11 Fan LAD laminar airflow device near light engine 12 Fan Ballast 16 Prism Over temperature 17 DMD Red Over temperature 18 DMD Blue Over temperature 19 Integrator Over temperature 20 SSM System Supervisor Module Over temperature 21 Card Cage Over temperature 22 Ballast Over temperature 32 Lamp Life Expired 33 Lamp Failed to Strik...

Страница 190: ...SAGES ONLY Examples of System Warning 002 Error Messages 65535 01002 ERR 002 System Warning 8010 00051 Prism Temperature Warning 65535 01002 ERR 002 System Warning 8020 00001 Lamp Life Expired 65535 01002 ERR 002 System Warning 8032 00001 SSM Read Failed Component Code P3 Component 8010 Prism Temperature Warning 8011 Temperature DMD Red 8012 Temperature DMD Blue 8013 Temperature Integrator 8014 Te...

Страница 191: ...1 Lamp order oldest lamp installed 001 next oldest 002 etc P2 of hours logged P3 Lamp serial P4 strikes P5 Installation date time P6 Lamp type P7 Status Failed to Strike P8 Status Failed Restrike P9 Status Unexpected Offs P10 Life State P11 Change Reason B 2 4 Intelligent Lens System ILS P1 P2 Return Value 0 Installed 1 Lens Reset on Startup 2 Auto ILS 3 Lens Calibrate 4 Lens Reset 0 No 1 Yes 0 No...

Страница 192: ... example SST 4 3 asks what version of SSM main software is installed Table B 6 System Status Messages ILS Command Result ILS 0 1 Sets ILS installed to Yes ILS 1 1 Sets Lens Reset on Startup to Yes ILS 2 1 Sets AutoILS to Yes ILS 3 Invokes Lens Calibration ILS 4 Invokes Lens Reset ILS 10 1023 264 800 1248 Moves all four motors to the specified offset focus and zoom locations Approach goes from nega...

Страница 193: ...emperature 15 SSM temperature 16 ILS temperature 20 Lamp vane switch interlock 21 Extractor vane switch interlock 22 Lamp door interlock 23 Auxiliary interlock High current 24 Tamper switch 30 Intake fan 1 rear speed 31 Intake fan 2 front speed 32 Card cage fan speed 33 LAD fan speed 40 SmpteATotalErr 41 SmpteARecentErr 42 SmpteBTotalErr 43 SmpteBRecentErr 50 SecurityInstalled 51 SecurityArmed 52 ...

Страница 194: ...sor DSP Boot 26 Processor DSP Main 27 Processor DSP Diag 28 Processor DSP FPGA 29 Formatter Interface Hitachi 30 Formatter Interface FPGA 31 Formatter Interface PROM 34 EFIB Main 35 EFIB FPGA 36 EFIB Boot 37 EFIB Sequence 40 Formatter Red Boot 41 Formatter Red Main 42 Formatter Red Config 43 Formatter Red Gamma 44 Formatter Red Sequence 50 Formatter Green Boot 51 Formatter Green Main 52 Formatter ...

Страница 195: ...ntrol 10 Space remaining on TPC IPSM 11 Space remaining on TPC Storage Card 12 Space remaining in TPC memory For any test 0 OK 1 failed 0 Ok Non zero failed KB KB KB P1 P2 0 Disable 3D n a 1 Enable 3D n a 2 Frame Rate Multiplication If L R input reference is 0 1 4 5 6 or 7 rare 0 4 1 1 5 1 2 6 1 If L R input reference is 2 or 3 typical 0 4 2 1 5 2 2 6 2 Use number directly 11 1 1 21 2 1 61 6 1 22 ...

Страница 196: ...rame Reference GPI 0 None 1 7 GPI1 GPI7 6 L R Display Reference 0 None not used 1 Use assigned GPI true polarity 2 Use assigned GPI inverted polarity 7 L R Display Reference GPI 0 None 1 7 GPI1 GPI7 8 L R Output Reference Polarity 0 True 1 Inverted 9 L R Output Reference GPO 0 None 1 7 GPO1 GPO7 10 Dark Time 0 4500 μs 11 Output Sync Delay 0 200 μs P1 P2 ...

Страница 197: ...B 24 CP2000 SB User Manual 020 100162 06 Rev 1 03 2014 Section 1 Introduction ...

Страница 198: ...CP2000 SB User Manual C 1 020 100162 06 Rev 1 03 2014 Appendix C Serial Communication This section explains how to link the projector to serial communication devices C 1 Serial Links to Projector ...

Страница 199: ...be used for ASCII messaging since the TPC recognizes Ethernet only and is too slow for servers C 1 2 Cine IPM 2K Connect the Cine IPM 2K s custom RS 232 cable from the rear of the Cine IPM 2K to the serial communica tion panel port labeled RS 232B on the Source and Communication Connection Panel located on the underside of the projection head near the front The RS 232B port uses Christie proprieta...

Страница 200: ...0 SB User Manual D 1 020 100162 06 Rev 1 03 2014 Appendix D GPIO System Integration This section explains how to use a GPIO link from the projector to external equipment such as devices for 3D synchronizing ...

Страница 201: ... other uses and cannot be specified at the TPC 2 Cable access is through the pedestal toe at front As shown above each available pairing of pins is defined as either an input or output If you are wiring your own GPIO cable for use with a server or 3D device such as an IR emitter or a polarizer follow the circuit diagram in Figure D 2 D 1 1 Example GPIO and 3D Device 1 Assemble a cable according to...

Страница 202: ...Manual E 1 020 100162 06 Rev 1 03 2014 Appendix E Repacking the Projector If you need to relocate or ship the projector repack the pedestal and the projection head with the original packing materials used for shipping ...

Страница 203: ...E 2 CP2000 SB User Manual 020 100162 06 Rev 1 03 2014 Section 1 Introduction Figure E 1 Packing the Pedestal and Projection Head ...

Отзывы: