Section 1: Introduction
CP2000-SB User Manual
2-19
020-100162-06 Rev. 1 (03-2014)
TPC
Connect the TPC cable to the Ethernet hub within the pedestal (this is usually pre-connected from factory).
PC/Laptop, Server or Network
To communicate with the
CP2000-SB
from a computer, server or an existing network, connect the equipment
to the Ethernet hub within the pedestal. If Ethernet is not available at your site, connect a standard serial cable
to the RS-232 A port instead. This communication link is acceptable for using a PC/laptop to run Christie’s
DCP Librarian
or to download new software, but is too slow for server communications and does not support
ASCII messaging to the TPC (which requires Ethernet). Connect RS-232 as shown in
Figure 2-27
, and route
as shown in
Figure 2-23
,
Figure 2-24
,
Figure 2-25
, and
Figure 2-26
.
NOTE:
For serial communication using
a PC, laptop or server, use only the RS-232
A
port. The RS-232
B
port utilizes Christie-proprietary protocol
intended for Christie accessories only.
Warning!
The RS-232 B port is compatible with Christie accessories
only.
2.4
Adjusting Tilt and Leveling
NOTE:
Disconnect from AC for these initial alignments. Images are not yet needed.
In an ideal installation, the
CP2000-SB
lens surface is
centered with
and
parallel to
the screen. This
orientation helps to ensure optimized lens
performance with minimal offset (
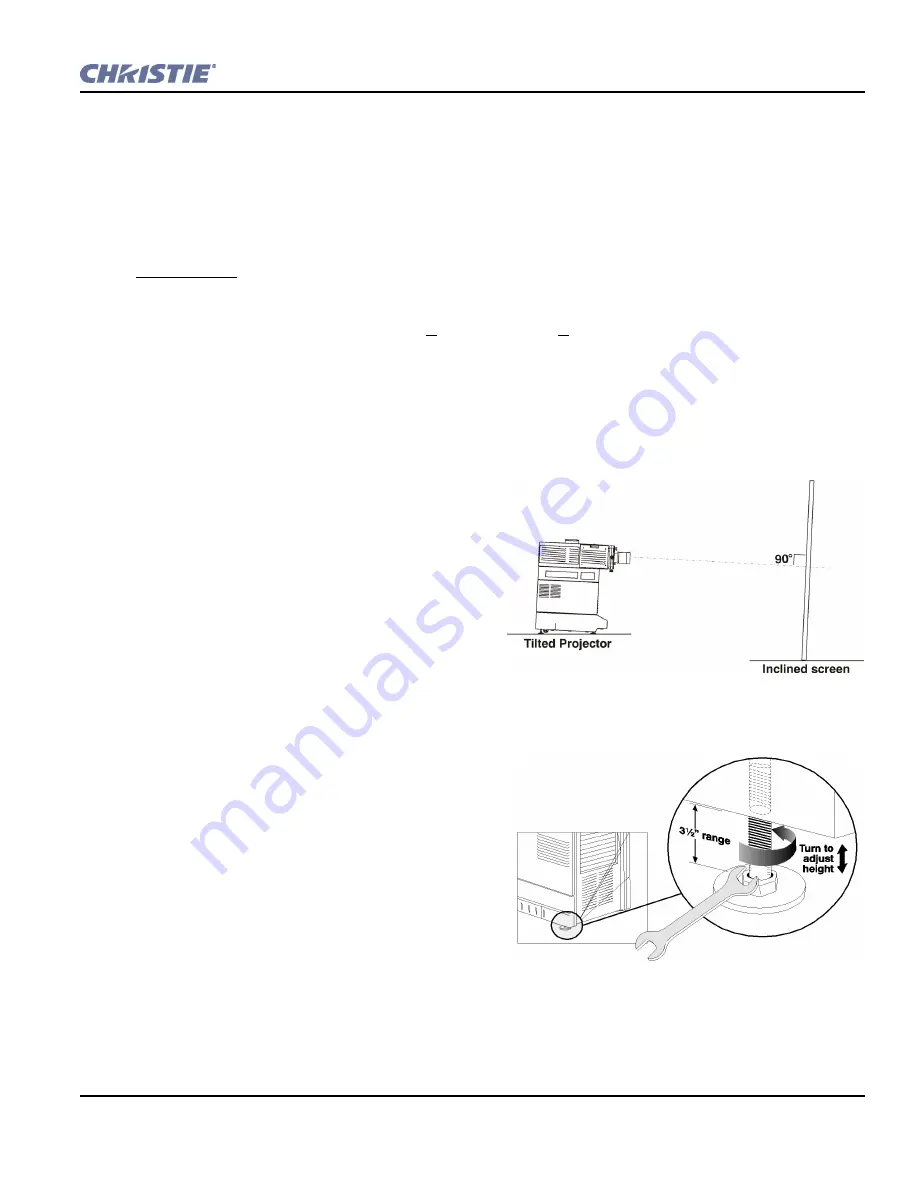
Figure 2-28
). If
this position is not possible (such as when the
projector is significantly higher than the center of the
screen), it is better to rely on
offset
rather than extra
tilt
.
Before adjusting tilt, ensure the projector is as
WELL-CENTERED
(
) with the theatre screen as
possible for your installation area (refer back to
Figure 2-2
).
Check with theatre personnel for the degree of screen
tilt or measure this incline with a protractor at the
screen. Then
TILT
the projector to closely match this
screen tilt angle (
Figure 2-29
), following the
instructions below:
1. Disconnect the projector from AC power.
2. Use a wrench to rotate front and rear feet until
projector tilt matches screen tilt. You can achieve
up to 12° tilt by adjusting the feet.
Figure 2-28 Tilt Projector to Match Screen
Figure 2-29 Adjust 4 Feet for Tilt and Leveling
Содержание CP2000-SB
Страница 1: ...CP2000 SB U S E R M A N U A L 020 100162 06 ...
Страница 9: ......
Страница 15: ...1 6 CP2000 SB User Manual 020 100162 06 Rev 1 03 2014 Section 1 Introduction ...
Страница 155: ...8 8 CP2000 SB User Manual 020 100162 06 Rev 1 03 2014 Section 1 Introduction ...
Страница 157: ...8 10 CP2000 SB User Manual 020 100162 06 Rev 1 03 2014 Section 1 Introduction ...
Страница 173: ...A 16 CP2000 SB User Manual 020 100162 06 Rev 1 03 2014 Section 1 Introduction ...
Страница 197: ...B 24 CP2000 SB User Manual 020 100162 06 Rev 1 03 2014 Section 1 Introduction ...


