1A-28 HEATER A N D AIR C O N D I T IO N I N G
though they do contain quantities of heat. Consequently,
we can’t expect to remove heat from sub-freezing vapors
by "cooling" them in air temperatures that usually range
between 60° and 100°...heat refuses to flow from a cold
object toward a warmer object.
But with a pump, we can squeeze the heat-laden vapor
into a smaller space. And, when we compress the vapor,
we also concentrate the heat it contains. In this way, we
can make the vapor hotter without adding any heat.
Then we can cool it in comparatively warm air.
That is the only responsibility of a compressor in an air
conditioning system. It is not intended to be a pump just
for circulating the refrigerant. Rather, its job is to exert
pressure for two reasons. Pressure makes the vapor hot
enough to cool off in warm air. At the same time, the
compressor raises the refrigerant’s pressure above the
condensing point at the temperature of the surrounding
air so it will condense.
As the refrigerant leaves the compressor, it is still a
vapor although it is now quite hot and ready to give up
the heat that it absorbed in the evaporator. One of the
easiest ways to help refrigerant vapor discharge its heat
is to send it through a radiator-like component known as
a condenser.
The condenser really is a very simple device having no
moving parts. It does exactly the same job as the familiar
radiator in a typical home steam-heating system. There,
the steam is nothing more than water vapor. In passing
through the radiator, the steam gives up its heat and
condenses back into water.
The purpose of the condenser, as the name implies, is to
condense the high pressure, high temperature refrigerant
vapor discharged by the compressor into a high pressure
liquid refrigerant. This occurs when the high pressure,
high temperature refrigerant is subjected to the
considerably cooler metal surfaces of the condenser. This
is due to the fundamental laws, covered earlier, which
state that "heat travels from the warmer to the cooler
surface," and that "when heat is removed from vapor,
liquid is produced."
When the refrigerant condenses into a liquid, it again is
ready for boiling in the evaporator. So, we run a pipe
from the condenser back to the evaporator.
MAIN UNITS OF THE SYSTEM
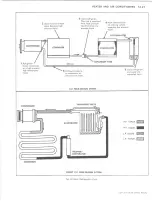
These three units then; the evaporator, the compressor,
and the condenser...are the main working parts in any
typical air conditioning system. We have the evaporator
where the refrigerant boils and changes into a vapor,
absorbing heat as it does so. We have the pump or
compressor to put pressure on the refrigerant so it can
get rid of its heat. And we have a condenser outside the
car body to help discharge the heat into the surrounding
air.
Now let’s look at the compressor in detail, and some of
the components that work with these main units to
complete the air conditioning system.
Compressor
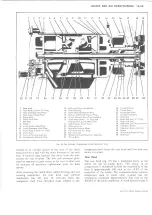
The prime purpose of the compressor (fig. 34) is to take
the low pressure refrigerant vapor produced by the
evaporator and compress it into a high pressure, high
temperature vapor which will be sent on to the
condenser.
It utilizes the principle that "when a vapor is
compressed, both its pressure and temperature are
raised" which we have already discussed. The compres
sor is mounted above the engine in a special rubber
mounted bracket and is belt driven from the engine
through an electromagnetic clutch pulley on the
compressor.
The compressor has three double-acting pistons, making
it a six cylinder compressor. The compressor has a 1.5
inch bore and 1.1875 inch stroke, giving it a total
displacement of 12.6 cu. in. Identification of the
compressor is by model and serial number stamped on a
plate on top of the compressor.
Clutch-Pulley
The movable part of the clutch drive plate is in front of
the pulley and bearing assembly. The armature plate, the
movable member, is attached to the drive hub through
driver springs and is riveted to both members. The hub
of the drive plate is pressed over a square drive key
located in the compressor shaft. A spacer and retainer
ring are assembled to the shaft and the assembly is held
in place with a self-locking nut. The pulley rim, power
element ring and pulley hub are formed into a final
assembly by molding a frictional material between the
rim and the hub with the power element ring imbedded
in the forward face of the assembly.
A two-row ball bearing is pressed into the pulley hub
and held in place by a retainer ring. The entire pulley
and bearing assembly is then pressed over the front head
of the compressor and secured by a retainer ring.
Clutch Coil
The coil is molded into the coil housing with a filled
epoxy resin and must be replaced as a complete
assembly. Three protrusions on the rear of the housing
fit into alignment holes in the compressor front head. A
retainer ring secures the coil and housing in place. The
coil has 3.85 ohms resistance at 80°F. ambient
temperature and will require no more than 3.2 amperes
at 12 volts D.C. Since the clutch coil is not grounded
internally, a ground lead is required as well as a "hot"
lead.
Shaft Seal
The main shaft seal, located in the neck of the
compressor front head, consists of the seal assembly with
its ceramic seal face in a spring loaded cage. An "O"
ring seal, located within the ceramic seal, provides a seal
to the shaft surface. The contact surface of the shaft seal
seat is finished to a high polish and must be protected
against nicks, scratches and even fingerprints. Any
surface damage will cause a poor seal. An "O" ring,
LIGHT DUTY TRUCK SERVICE MANUAL
Содержание Light Duty Truck 1973
Страница 1: ......
Страница 4: ......
Страница 6: ......
Страница 39: ...HEATER AND AIR CONDITIONING 1A 13 Fig 14 Heater Wiring Diagrams LIGHT DUTY TRUCK SERVICE MANUAL...
Страница 53: ...HEATER AND AIR CONDITIONING 1A 27 LIGHT DUTY TRUCK SERVICE MANUAL...
Страница 115: ...LIGHT DUTY TRUCK SERVICE M A N U A L HEATER AND AIR CONDITIONING 1A 89...
Страница 123: ...BODY 1B 3 Fig 6 Typical 06 Van LIGHT DUTY TRUCK SERVICE MANUAL...
Страница 149: ...BODY 1B 29 Fig 84 Body Mounting 06 Fig 85 Body Mounting 14 LIGHT DUTY TRUCK SERVICE MANUAL...
Страница 171: ...LIGHT DUTY TRUCK SERVICE M A N U A L Fig 2 Frame Horizontal Checking Typical FRAME 2 3...
Страница 173: ...LIGHT DUTY TRUCK SERVICE M A N U A L Fig 4 10 30 Series Truck Frame FRAME 2 5...
Страница 174: ...2 6 FRAME LIGHT DUTY TRUCK SERVICE MANUAL Fig 5 Underbody Reference Points G Van...
Страница 177: ...LIGHT DUTY TRUCK SERVICE MANUAL G 10 20 C 10 P 10 30 Fig 2 Front Suspension C P K Typical FRONT SUSPENSION 3 3...
Страница 185: ...FRONT SUSPENSION 3 11 Fig 16 Toe out on Turns LIGHT DUTY TRUCK SERVICE MANUAL...
Страница 224: ......
Страница 229: ...REAR SUSPENSION AND DRIVELINE 4 5 Fig 13 Rear Spring Installation C K Models LIGHT DUTY TRUCK SERVICE MANUAL...
Страница 266: ......
Страница 310: ...5 44 BRAKES C MODELS G MODELS P MODELS Fig 77 Parking Brake System LIGHT DUTY TRUCK SERVICE MANUAL...
Страница 351: ...ENGINE 6 15 Fig ID Sectional View of Eight Cylinder Engine LIGHT DUTY TRUCK SERVICE MANUAL...
Страница 375: ...EN G IN E 6 39 LIGHT DUTY TRUCK SERVICE MANUAL...
Страница 376: ...6 4 0 ENGINE LIGHT DUTY TRUCK SERVICE MANUAL...
Страница 377: ...ENG IN E 6 41 LIGHT DUTY TRUCK SERVICE MANUAL...
Страница 378: ...LIGHT DUTY TRUCK SERVICE MANUAL Fig 37L K Series Engine Front Mount 6 42 ENG INE...
Страница 379: ...E N G IN E 6 43 FRONT MOUNT REAR MOUNT Fig 38L G Series Engine Mounts LIGHT DUTY TRUCK SERVICE MANUAL...
Страница 400: ...6 6 4 ENG INE LIGHT DUTY TRUCK SERVICE MANUAL...
Страница 401: ...ENG IN E 6 65 LIGHT DUTY TRUCK SERVICE MANUAL...
Страница 402: ...6 6 6 ENGINE LIGHT DUTY TRUCK SERVICE MANUAL...
Страница 403: ...E NG IN E 6 67 Fig 36V C Series Engine Mounts LIGHT DUTY TRUCK SERVICE MANUAL...
Страница 410: ......
Страница 423: ...EN G IN E C OOLING 6K 13 Fig 16 Overheating Chart LIGHT DUTY TRUCK SERVICE MANUAL...
Страница 424: ...6 K 1 4 ENG INE COOLING Fig 17 Coolant Loss Chart LIGHT DUTY TRUCK SERVICE MANUAL...
Страница 455: ...ENGINE FUEL 6M 31 Fig K13 Accelerator Controls P30 42 454 Engine LIGHT DUTY TRUCK SERVICE MANUAL...
Страница 456: ...6M 32 ENGINE FUEL Fig K15 Accelerator Controls G Van L 6 LIGHT DUTY TRUCK SERVICE MANUAL...
Страница 492: ......
Страница 506: ...CEC PLUNGER IS EXTENDED Fig lid Vacuum Advance Diagram Six Cylinder Engine 6T 14 EMISSION CONTROL SYSTEMS...
Страница 512: ...Fig 18e Vacuum Advance Diagram V8 Engine...
Страница 515: ...EMISSION CONTROL SYSTEMS 6T 23 Fig If Six Cylinder A I R System LIGHT DUTY TRUCK SERVICE MANUAL...
Страница 516: ...6 T 2 4 E M IS S IO N CONTROL SYSTEMS LIGHT DUTY TRUCK SERVICE MANUAL...
Страница 517: ...E M IS S IO N C O N TR O L SYSTEM S 6T 25 Fig 4f Diverter Valve Vent Valve LIGHT DUTY TRUCK SERVICE MANUAL...
Страница 528: ......
Страница 540: ...6 Y 1 2 ENGINE ELECTRICAL Fig 16b Battery Installation C K Series LIGHT DUTY TRUCK SERVICE MANUAL...
Страница 572: ...6Y 44 ENGINE ELECTRICAL Fig 25i V 8 Spark Plug Wire Installation LIGHT DUTY TRUCK SERVICE MANUAL...
Страница 590: ......
Страница 592: ...7M 2 CLUTCHES MANUAL TRANSMISSIONS VIEW B Fig la Clutch Linkage Assy C K Models LIGHT DUTY TRUCK SERVICE MANUAL...
Страница 593: ...CLUTCHES MANUAL TRANSMISSIONS 7M 3 LIGHT DUTY TRUCK SERVICE MANUAL...
Страница 594: ...7M 4 CLUTCHES MANUAL TRANSMISSIONS Fig lc Clutch Linkage Assy P Models LIGHT DUTY TRUCK SERVICE MANUAL...
Страница 598: ...7M 8 CLUTCHES MANUAL TRANSMISSIONS LIGHT DUTY TRUCK SERVICE MANUAL...
Страница 642: ......
Страница 654: ......
Страница 656: ...LIGHT DUTY TRUCK SERVICE MANUAL Fig 19M Drive Range Low First Gear Typical 7A 14 AUTOMATIC T R A N S M IS S IO N...
Страница 662: ...LIGHT DUTY TRUCK SERVICE M A N U A L Fig 22M LI Range Manual First Gear Typical 7A 20 AUTOMATIC TRANSMISSION...
Страница 668: ...LIGHT DUTY TRUCK SERVICE M A N U A L Fig 25M Reverse Range Typical 7A 26 AUTOMATIC T R A N S M IS S IO N...
Страница 739: ...FUEL TANKS AND EXHAUST 8 9 Fig 15 Filler Neck and Vent Hose Van LIGHT DUTY TRUCK SERVICE MANUAL...
Страница 740: ...8 10 FUEL TANKS AND EXHAUST Fig 16 Fuel Feed and Return Pipes Front C K LIGHT DUTY TRUCK SERVICE MANUAL...
Страница 743: ...FUEL TANKS AND EXHAUST 8 13 LIGHT DUTY TRUCK SERVICE MANUAL...
Страница 744: ...8 14 FUEL TANKS AND EXHAUST LIGHT DUTY TRUCK SERVICE MANUAL...
Страница 746: ...8 16 FUEL TANKS AND EXHAUST Fig 2 5 Fuel Feed Pipe Front P 105 4 2 LIGHT DUTY TRUCK SERVICE MANUAL...
Страница 760: ...8 30 FUEL TANKS AND EXHAUST Fig 40 Exhaust Pipe P Models LIGHT DUTY TRUCK SERVICE MANUAL...
Страница 761: ...FUEL TANKS AND EXHAUST 8 31 LIGHT DUTY TRUCK SERVICE MANUAL...
Страница 763: ...FUEL TANKS AND EXHAUST 8 33 LIGHT DUTY TRUCK SERVICE MANUAL...
Страница 766: ......
Страница 781: ...STEERING 9 15 OIL PRESSURE OIL RETURN PORT VALVE BODY Fig 21 Left Turn Position LIGHT DUTY TRUCK SERVICE MANUAL...
Страница 832: ...LIGHT DUTY TRUCK SERVICE MANUAL Fig 106 Power Steering Pump Mounting Typical 9 66 STEERING...
Страница 833: ...PUMP ASSEMBLY STEERING GEAR TYPICAL SMALL V8 TYPICAL LARGE V8 STEERING 9 67...
Страница 860: ...9 94 STEERING LEAKAGE AREAS Fig 133 Power Steering Gear Leakage LIGHT DUTY TRUCK SERVICE MANUAL...
Страница 861: ...STEERING 9 95 Fig 134 Power Steering Pump Leakage LIGHT DUTY TRUCK SERVICE MANUAL...
Страница 864: ......
Страница 876: ......
Страница 886: ...11 10 CHASSIS SHEET METAL LIGHT DUTY TRUCK SERVICE MANUAL...
Страница 891: ...ELECTRICAL BODY AND CHASSIS 12 5 LIGHT DUTY TRUCK SERVICE MANUAL...
Страница 897: ...ELECTRICAL BODY AND CHASSIS 12 11 Fig 14 Instrum ent Cluster Assembly C K Models LIGHT DUTY TRUCK SERVICE MANUAL...
Страница 934: ......
Страница 942: ......
Страница 970: ......
Страница 972: ......
Страница 974: ......
Страница 976: ...V...
Страница 978: ......
Страница 979: ......


