7. Playback
35
Chauvet® ShowXpress™ V6.22
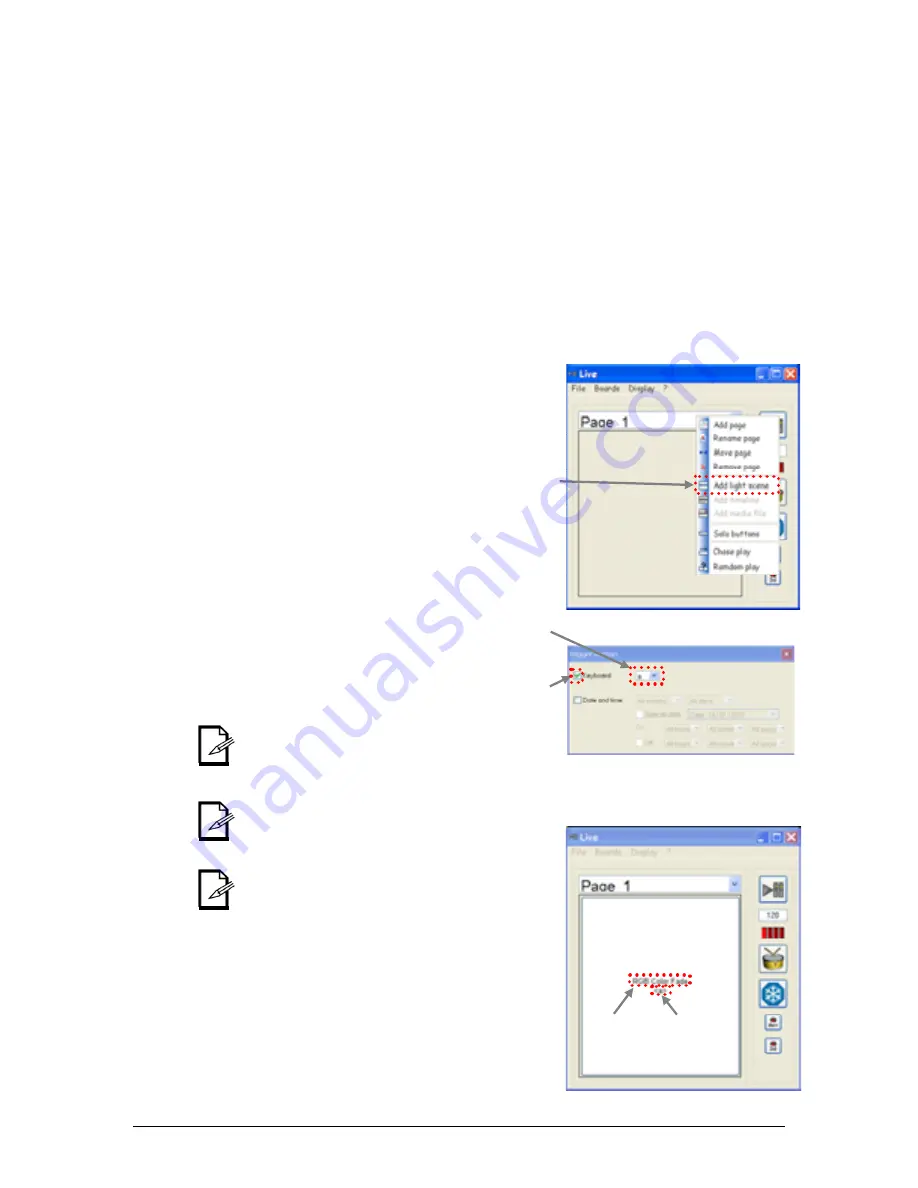
Live screen
Add Light
Scene button
fig. L.a
fig. L.b
Scene
Name
Keyboard
Trigger
(Scene added and trigger set to <a>)
fig. L.c
Drop-down
menu
Keyboard
checkbox
7.
P
LAYBACK
Importing Scenes into the Live-Buttons Screen
In ShowXpress™, playback is intended to occur in the Live screen. Initially, the Live screen does not
include any scenes. It is a clear palette, which allows the user to arrange the screen according to the
needs of their show.
Several parameters may be customized in the Live-Buttons screen, including, but not limited, to the
following: page-name, order, quantity, chase-play, random-play, solo-play, and scene order, quantity,
color, type, trigger method, speed-override.
In order to import scenes into the Live-Buttons screen, please follow the steps below. We will be
importing the 3-step color fading that we created in the Editor section on “Creating a Scene”.
1. Open the Live screen from the
Control Board.
2. Right-click
the
Board Selection
Bar
and select Add Light Scene.
See fig. L.a.
3. Select “RGB Color Fade” from
the file explorer window that
appears and press
<Open>
.
4. The Scene will now appear in
the Live screen as a single
button, completely filling up the
empty space.
See fig. L.c.
5.
Right-click on the Scene button
and select “Trigger button”. The
Trigger button sub-menu will
open.
See fig. L.b.
6.
Check the box next to Keyboard
Trigger.
7. Using the drop-down menu,
select <a> as the keyboard
trigger.
8.
Close the window to save.
If you do not see the keyboard trigger
on the Scene button in the Live screen,
then you need to enable this from the
“Display” option located directly
underneath the window title bar.
If you need to trigger this scene using
the computer’s calendar, then you may
select the apprpriate settings in the
Trigger button sub-menu.
Multiple scene may be selected and
imported simultaneously, provided
that they atre located in the same
folder.


