62-11640
8–24
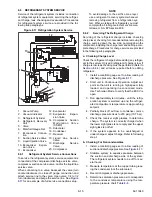
Due to the “washing” action of normal defrost the fiber
dust and particles may not be visible on the face of the
coil but may accumulate deep within.
Clean the evaporator coil on a regular basis, not only to
remove cardboard dust, but to remove any grease or
oil film which sometimes coats the fins and prevents
water from draining into the drain pan.
Cardboard fiber particles after being wetted and dried
several times can be very hard to remove. Therefore,
several washings may be necessary.
1. Ensure the unit will not start automatically by
disabling any two way communication and plac-
ing the STOP/RUN-OFF switch in the OFF posi-
tion. Disconnect the high voltage source and
lockout/tagout the receptacle.
2. Remove rubber check valves (Kazoo) from drain
lines of the evaporator to be cleaned.
3. Spray coil with a mild detergent solution such as
Oakite 164 or 202) or any good commercial
grade automatic dish washer detergent such as
Electrosol or Cascade and let the solution stand
for a few minutes and reverse flush (opposite
normal air flow) with clean water at mild pres-
sure. A garden hose with spray nozzle is usually
sufficient. Make sure drain lines are clean.
4. Re-install check valves and run unit until Defrost
Mode can be initiated to check for proper drain-
ing from drain pan.
8.8.2
Condenser Coil
a. Cleaning
NOTE
Only clean water should be used to wash the
condenser coil. Do not use any detergents to
clean the condenser.
Remove all foreign material from the condenser coil by
reversing the normal air flow. (Air is pulled in through
the front and discharges over the engine.) Compressed
air or water may be used as a cleaning agent. Take
care so that the fins aren’t bent during this procedure.
b. Condenser Coil Replacement
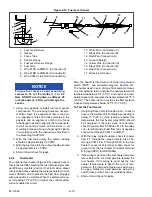
1. Remove the refrigerant charge. Refer to
NOTE
If the condenser coil (
) requires
replacement, the entire condenser/radiator
assembly must be removed from the unit
and disassembled/reassembled on the
bench.
2. Drain coolant into a suitable container by remov-
ing coolant bottle cap and then the engine drain
plug.
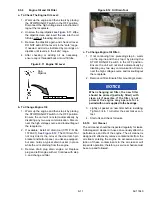
3. Remove the surround with the grille attached.
Refer to
4. Remove hoses from radiator.
NOTICE
Unit uses R404A and POE oil. The use of
inert gas brazing procedures is manda-
tory for all Carrier Transicold refrigera-
tion units; otherwise compressor failure
will occur. For more information Refer to
Technical Procedure 98-50553-00 Inert
Gas Brazing.
5. Unbraze refrigerant lines from condenser coil.
6. Disconnect the hail and bug screen sufficient to
reach the ambient sensor and wiring. Remove
sensor and wiring from radiator frame.
7. Remove the eight bolts securing the condenser/
radiator assembly to the unit.
8. Remove the condenser/radiator assembly from
the unit.
9. Remove the eight bolts securing the radiator
frame to the condenser frame and set radiator
frame aside.
10. Separate the radiator from the condenser/radia-
tor assembly by removing the top and bottom
radiator mounting brackets. Set radiator aside.
11. Remove condenser coil by removing the con-
denser coil mounting brackets.
12. Reassemble condenser/radiator assembly in
reverse order using new coil.
NOTICE
Do not bend the copper tubing on the
condenser coil when installing the new
condenser. Bend the unit tubing if tubes
do not align correctly.
NOTE
Before applying heat to the new condenser
apply a wet rag to the entire copper to alumi-
num transition area to avoid melting the pro-
tective heat shrink or damaging the joint.
13. Reassemble condenser/radiator assembly into
unit.
14. Leak check, evacuate and charge the system.
Refer to
&
.
15. Refill engine coolant. Refer to
Содержание Vector 8500
Страница 23: ...62 11640 1 6 1 3 SAFETY DECALS ...
Страница 24: ...1 7 62 11640 62 03958 ...
Страница 25: ...62 11640 1 8 ...
Страница 26: ...1 9 62 11640 ...
Страница 27: ...62 11640 1 10 ...
Страница 125: ...62 11640 SECTION 6 MESSAGECENTER PARAGRAPH NUMBER Page 6 1 MESSAGECENTER MESSAGES 6 1 ...
Страница 321: ......
Страница 322: ......

