For your first landings, don't be concerned about the model
landing on the runway. All you want is that the model land safely. With
practice, you'll be able to land where you want. If you can confident-
ly fly the model in wide circles as shown in the illustrations and then
simply reduce throttle and glide straight into the wind for your first
landings, well that's fine.
LANDING APPROACH
At most flying fields you will see models flying a rectangular path
around the runway-this is called the "pattern," The most important
reason for flying the pattern is that as the model flies at different
directions in the wind, you will be better prepared for the conditions
as you land. Full-size aircraft fly a landing pattern for this same rea-
son. Another important reason for flying the pattern is to organize the
take-off and landing traffic, reducing confusion.
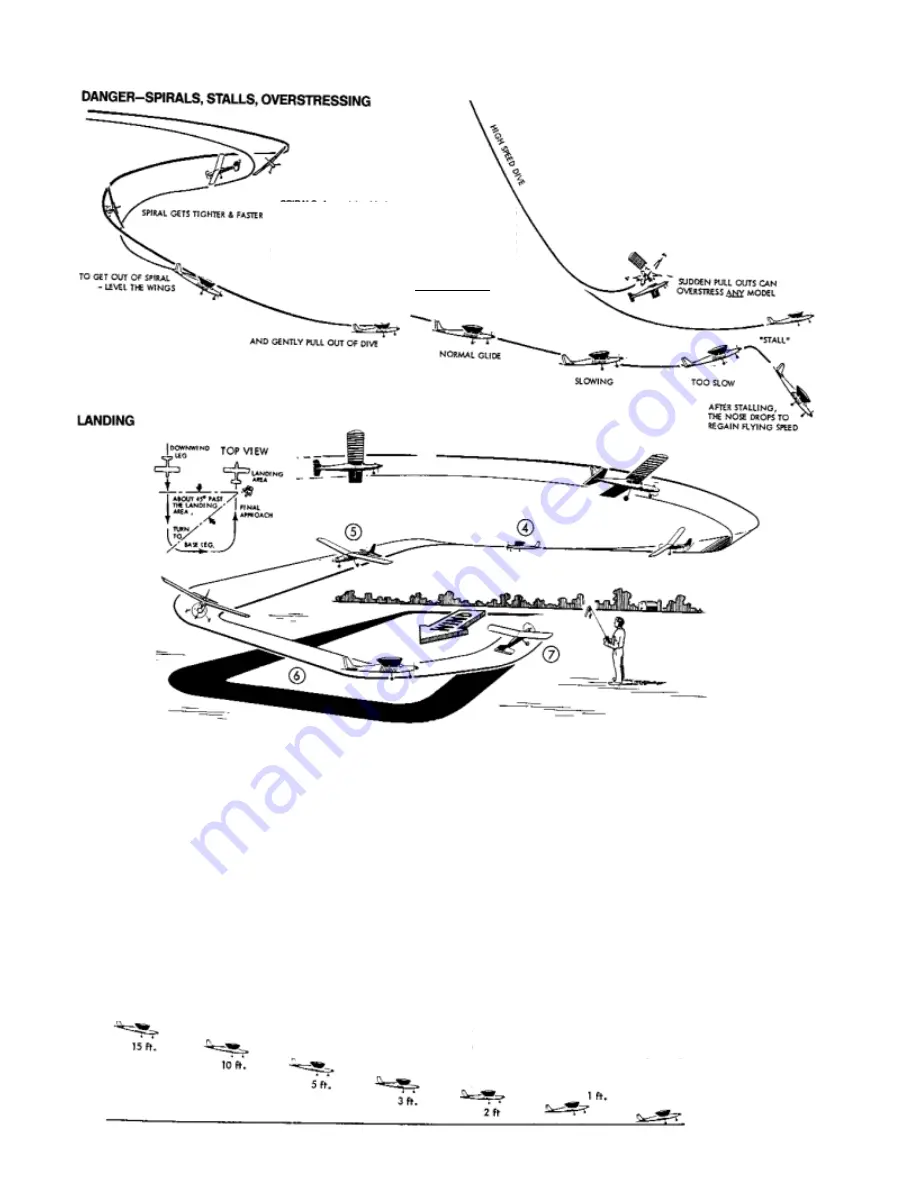
The "traffic" pattern consists of: PATTERN ENTRY, DOWNWIND
LEG, BASE LEG, then FINAL APPROACH & LANDING. And remem-
ber, "a good approach is a good landing."
4. PATTERN ENTRY. Plan to enter the pattern upwind at about 150
feet of altitude.
5. DOWNWIND LEG. Make the downwind leg far enough away to
allow for gentle turns to Base Leg and Final Approach You do not
want to make tight "panic" turns when landing. Reduce throttle 1/3rd
to begin a slow descent When the model is about 45° downwind of
the landing area turn to Base Leg.
6. BASE LEG. Continue your descent, letting the model slowly lose
more altitude by reducing throttle to high idle.
7. FINAL APPROACH & LANDING. Make a gentle turn to point the
model in the direction of the landing area. Reduce throttle to idle.
Keep nose of plane slightly down so you don't stall. Steer the plane
into the wind as it glides keeping the wings level. Let it settle in
towards the ground and land. Just before the model lands you can
add a touch of back-stick (up elevator) to "flare" and soften the land-
ing.
Walk over to your plane, stop the engine. Turn off the receiver first,
then the transmitter. Stop shaking, congratulations!
OVERSTRESSING THE AIRFRAME, Even world class aero-
batic competition planes tan be overstressed. The Mirage is very
strong but can be broken in flight by over-speeding and then jerk-
ing the controls. If you find yourself In a steep high-speed dive,
immediately switch motor off, level the wings and gently pull the
stick back (add up elevator) to recover.
SPIRALS. As explained before, as you increase bank angle, you
have to add back-stick (or "up") to keep flying level. And if you
make the bank too steep, you will have to add more back-stick to
hold the plane level. But it won't keep up. it will start to spiral down-
ward—increasing its speed. Trying to "pull" the model out of the
spiral by pulling back on the elevator only makes things worse!
This sequence of events happens fast and can panic new flyers to
the point that they fly the model right into the ground!
TO GET OUT OF THE SPIRAL-1st LEVEL THE WINGS! Then
2nd, pull it smoothly out of the dive.
STALLS. Your model's movement through the air keeps it
flying. If you fly too slow,there is a point where it will stop
flying and fall out of the sky. This is called a stall. The
Mirage has very gentle stall characteristics. However, when
landing, be careful not to slow down too much.
Содержание Eagle 2
Страница 28: ...27 ...


