background image

1

ATTENTION!

 Before installing this device read the following 

instructions carefully!

Installation example 

Pag. 

2

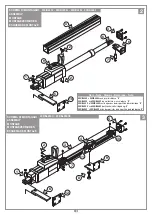
Assembly 

Pag. 3-6

Manual release drawings 

Pag. 

6

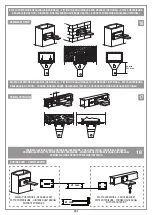
Fitting the holding brackets/electric lock 

Pag. 

7-8

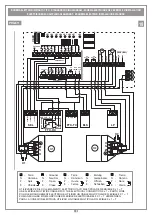
Wiring diagrams (installation examples) 

Pag. 

9-11

Important remarks 

Pag. 

15 

User instructions  

Pag. 

15

Installation instructions 

Pag. 

16

Electrical connection 

Pag. 

17

Manual release mechanism 

Pag. 

17

Technical specifications 

Pag. 

28

ATTENTION!

 Avant de commencer la pose, lire 

attentivement les instructions!

Exemple d’installation 

Pag. 

2

Montage 

Pag. 3-6

Dessins du déverrouillage 

Pag. 

6

Fixation de la patte/serrure électrique 

Pag. 

7-8

Schéma électrique (exemple d’installation) 

Pag. 

9-11

Conseils importants 

Pag. 

18

Domaine d'application 

Pag. 

18

Instructions pour l’installation 

Pag. 

19

Branchement électrique 

Pag. 

20

Déverrouillage manuel 

Pag. 

20

Caractéristiques techniques 

Pag. 

28

ACHTUNG!

 Bevor mit der Installation begonnen wird, sollte 

die Anleitung aufmerksam gelesen werden!

Anlagenart 

Seite 2

Montagegearbeiten 

Seite 3-6

Manuelle Entriegelungs Zeichenen 

Seite 

6

Anbringung Halterbügel/Elektroverriegelung 

Seite 

7-8

Elektrischer Schaltplan (Anlagenart) 

Seite 

9-11

Wichtige Hinweise 

Seite 

21 

Betriebsanleitung 

Seite 21

Anleitungen zur Installation 

Seite 

22 

Elektrischer anschluss 

Seite 

23

Manuelle Entriegelung 

Seite 

23

Technische Daten 

Seite 

28

AUTOMAZIONE PER CANCELLI A BATTENTE

AUTOMATION FOR HINGED GATES

AUTOMATISME POUR PORTAILS BATTANTS

DREHTORANTRIEBE

AUTOMATIZACION PARA CANCILLAS BATIENTES

ATTENZIONE!

 Prima di iniziare l'installazione leggere le 

istruzioni attentamente!

Esempio d'installazione 

Pag. 

2

Schema di montaggio 

Pag. 

3-6

Disegni di sblocco 

Pag. 

6

Fissaggio staffa/elettroserratura   

Pag. 

7-8

Schema elettrico (impianto tipo) 

Pag. 

 9-11

Avvertenze importanti 

Pag. 

 12

Istruzioni per l’uso  

Pag. 

12

Istruzione per l’installazione 

Pag. 

13

Collegamento elettrico 

Pag. 

 14

Sblocco manuale 

Pag. 

 14

Caratteristiche tecniche  

Pag. 

28

¡ATENCIÓN!

 Antes de iniciar la instalación del sistema, leer 

atentamente las instrucciones.

Instalación estándar 

Pág. 

2

Esquema de montaje 

Pág. 

3-6

Dibujos del dispositivo de desbloqueo 

Pág. 

6

Fijación del soporte/electrocerradura   

Pág. 

7-8

Esquema eléctrico (instalación estándar) 

Pág. 

 9-11

Advertencias importantes 

Pág. 

 24

Instrucciones para el uso 

Pág. 

24

Instrucciones para la instalación 

Pág. 

25

Conexión eléctrica 

Pág. 

 26

Desbloqueo manual 

Pág. 

 26

Características técnicas  

Pág. 

28

ZVL240.08-Mod: 10.06.2013

ITALIANO

ENGLISH

ESPAÑOL

DEUTSCH

FRANÇAIS

230Vac


Motors 

200/BL203

200/BL203L

200/BL203C

200/BL203CE

200/BL352

200/BL452

Questo prodotto

 è stato testato e collaudato nei laboratori della casa costruttrice, la quale ne ha verificato la 

perfetta corrispondenza delle caratteristiche con quelle richieste dalla normativa vigente. 

This product

 has been 

tried and tested in the manufacturer's laboratory who have verified that the product conforms in every aspect to 

the safety standards in force. 

Ce produit

 a été testé et essayé dans les laboratoires du fabriquant. Pour l'installer 

suivre attentivement les instructions fournies. 

Dieses Produkt

 wurde in den Werkstätten der Herstellerfirma 

auf die perfekte Übereinstimmung ihrer Eigenschaften mit den von den geltenden Normen vorgeschriebenen 

getestet und geprüft. 

Este producto

 ha sido probado y ensayado en los laboratorios del fabricante, que ha 

comprobado la perfecta correspondencia de sus características con las contempladas por la normativa vigente.

BL

230Vac

Motors

Model

Date

Instruction manual

Series

BL

Automation 20-07-2005

ZVL240.08

CARDIN ELETTRONICA spa 

Via del lavoro, 73 – Z.I. Cimavilla 

3 1 0 1 3   C o d o g n è   ( T V )   I t a l y

Tel:  

+39/0438.404011

Fax:  

+39/0438.401831

email (Italian): 

[email protected]

email (Europe): 

[email protected]

Http: www.cardin.it

Содержание 200/BL203

Страница 1: ...rtanti Pag 12 Istruzioni per l uso Pag 12 Istruzione per l installazione Pag 13 Collegamento elettrico Pag 14 Sblocco manuale Pag 14 Caratteristiche tecniche Pag 28 ATENCI N Antes de iniciar la instal...

Страница 2: ...e photo lectrique ext rieure 5 Clignoteur 6 S lecteur cl 7 Serrure lectrique 8 Antenne C ble coaxial RG58 Imp dance 50 9 Interrupteur omnipolaire avec ouverture des contacts d au moins 3 mm 10 C ble d...

Страница 3: ...ontained in this document is punishable by law 1 2 5 6 9 3 7 10 8 12 4 11 SCHEMA DI MONTAGGIO ASSEMBLY MONTAGE MONTAGEVERFAHREN ESQUEMA DE MONTAJE 200 BL203 200 BL203L 200 BL352 200 BL452 200 BL352 e...

Страница 4: ...MENSIONI D INGOMBRO EXTERNAL DIMENSIONS DIMENSIONS D ENCOMBREMENT AUSSENABMESSUNGEN DIMENSIONES M XIMAS Prodotti Technocity DI0101 Description ber Vista pistone 352 1096 80 745 1025 80 12 59 90 A CORS...

Страница 5: ...2 7 38 5 17 7 20 8 110 180 210 0 80 90 20 30 6 35 39 9 45 7 24 4 28 110 200 180 0 80 90 20 33 38 8 33 38 8 16 19 110 X Spessore da aggiungere a cura dell installatore X Spacer to be added by the insta...

Страница 6: ...h CARDIN ELETTRONICA S p A 31020 San Vendemiano TV Italy via Raffaello 36 Tel 0438 401818 Fax 0438 401831 Draft All rights reserved Unauthorised copying or use of the information contained in this doc...

Страница 7: ...ights reserved Unauthorised copying or use of the information contained in this document is punishable by law FISSAGGIO STAFFA POSTERIORE A PILASTRO FITTING THE REAR BRACKET TO A COLUMN FIXATION DE LA...

Страница 8: ...max SCALA 1 2 Prodotti Technocity BL202 SERIE 12 10 98 DI0096 Description Product Code Date Drawing number P J Heath CARDIN ELETTRONICA S p A 31020 San Vendemiano TV Italy via Raffaello 36 Tel 0438 4...

Страница 9: ...8 TAL CSER 26 25 24 23 22 21 20 19 18 17 16 15 38 37 36 35 34 33 32 31 30 29 28 27 TA ANTENNA TC TD FTC_S FTC_I NC NC NC TB COMUNE COMUNE COMUNE COMUNE COMUNE 1 14 13 12 11 10 9 8 7 6 5 4 3 2 FCC_1 FC...

Страница 10: ...bridge if unused FCA OPENING TRAVEL LIMIT bridge if unused FTC_S STOP PHOTOCELL bridge if unused FTC_I INVERTING PHOTOCELL bridge if unused BSP PASSIVE SAFETY INPUT bridge if unused LP FLASHING WARNI...

Страница 11: ...ING FCC CLOSING TRAVEL LIMIT bridge if unused FCA OPENING TRAVEL LIMIT bridge if unused FTC_S STOP PHOTOCELL bridge if unused FTC_I INVERTING PHOTOCELL bridge if unused LP FLASHING WARNING LIGHTS 24Va...

Страница 12: ...truso Particolari sblocco in plastica antiurto Riduttore con ingranaggi in acciaio racchiusi in semigusci di alluminio pressofuso BL203 202L 202C Riduttore epicicloidale ad alta silenziosit e vite sen...

Страница 13: ...ATTENZIONE Il motore deve essere montato sul cancello con i fori scarico condensa A rivolti verso il basso vedi figura Fissare con l apposito perno 1 l attuatore alla staffa di coda 5 figura 2 a pagi...

Страница 14: ...o 3 mm Collegare tra le fasi 2 e 3 del motoriduttore fig 19 21 pag 9 11 il condensatore fornito di serie Gommino protezione ingresso cavo di alimentazione 1 Inserire il gommino nel cavo di ali mentazi...

Страница 15: ...pliancemustbeusedexclusivelyforthepurposeforwhichithasbeen made i e fortheautomationofhingedgates withoneortwogateleaves The unit may be fitted both to the right and to the left of the passageway This...

Страница 16: ...otor must be installed on the gate with the humidity drain holes A facing downwards see drawing Fix the arm to the rear mooring bracket 5 using the retaining pin 1 fig 2 pag 3 and the front bracket 6...

Страница 17: ...ive torque fed to the system will be that selected by the operator in the electronic programmer The choice of settings depends on the weight and size of the gate leaf door and the different environmen...

Страница 18: ...t tre certifi s et tre adapt s aux conditions atmosph riques du lieu d implantation Les travaux de maintenance ne doivent tre effectu s que par un personnel qualifi Avant une quelconque op ration de n...

Страница 19: ...pilier fig 13 page 7 en respectant les cotes A et B apr s avoir contr l la position du gond par rapport au pilier cote C fig 8 page 5 et en fonction du type d ouverture r aliser ATTENTION Le moteur d...

Страница 20: ...COUPLE MOTEUR voir programmateur Pour r aliser l installation il est conseill d utiliser un des programma teurs Cardin dot s de r glage du couple Les programmateurs Cardin optimisent le fonctionnemen...

Страница 21: ...Ger te d rfen nur f r die Verwendung eingesetzt werden f rdiesieausdr cklichkonzipiertwurden d h DenAntriebvon Drehtoren mit einem oder zwei Torfl geln Die Vorrichtung kann sowohl auf der linken als a...

Страница 22: ...g des Torfl gels im geschlossenen Zustand notwendig Die Sicherheitsfreir ume zwischen den festen und beweglichen Teilen kontrollieren auf der gesamten H he und ffnungsweite der Tores einen Frei raum v...

Страница 23: ...g zu verwenden DieCardin SteuerungenoptimierendenBetriebder Maschine motorisierte Tore indem sie f r den Anlauf bei Beginn des ffnens und Schlie ens immer das h chste lieferbare Drehmoment gew hrleist...

Страница 24: ...as de hasta 3 5 m y de 300 kg de peso cada una 200 BL452 Actuador electromec nico reversible para hojas de hasta 4 5 m y de 300 kg de peso cada una Motor monof sico en casquetes de aluminio fundido a...

Страница 25: ...ber comprobado la posici n del gozne de la cancilla con respecto al pilar medida C fig 8 p g 5 y en funci n de la clase de apertura de la hoja que se quiere conseguir CUIDADO El motor se tiene que mon...

Страница 26: ...R v ase programador Para la realizaci n del sistema se aconseja utilizar programadores Cardin provistos de ajuste del par del motor Los programadores Cardin optimizan el buen funcionamiento de la m qu...

Страница 27: ...x x x x x x x x x x x x x x x x x x x x x x x x x x x x x x x x x x x x x x x x x x x x x x x x x x x x x x x x x x x x x x x x x x x x x x x x x x x x x x x x x x x x x x x x x x x x x x x x x x x x...

Страница 28: ...230 230 230 Frequency Hz 50 50 50 50 50 50 Electrical input A 0 9 0 9 0 9 0 9 1 3 1 4 Power input W 220 220 220 220 270 310 Duty cycle 25 25 25 25 50 50 Travel mm 280 445 330 390 280 280 Force N 2000...

Отзывы: