


Chapter 14
14-1
14.1 Initial Checkup
14.1.1 Site Environment
0016-7930
a. There must be a source of power whose voltage is as specified (+/-10%). The power plug must never be disconnected day and night.
b. The machine must not be in an area subject to high humidity (near a water faucet, water boiler, humidifier). The site must not be too cold or subject to dust. The
machine must not be near a source of fire.
c. The site must not be subject to ammonium gas.
d. The machine must not be exposed to the rays of the sun. As necessary, curtains must be provided.
e. The area must be well ventilated. The machine must be on a level floor.
f. Be sure that there is a source of power that can be used by the machine.
14.1.2 Checking the Paper
0016-7931
a. Be sure the paper being used is of a type recommended by Canon.
b. Be sure that the paper is not moist. Try using paper fresh out of package.
14.1.3 Checking the Placement of Paper
0016-7932
a. There must be paper in the cassette or the tray deposited within a specific limit.
b. If transparencies are used, be sure that they are placed in the manual feed tray in the correct orientation.
14.1.4 Checking the Durables
0016-7933
Refer to the table of durables, and replace those that have reached the end of their lives.
14.1.5 Checking the Units and Functional Systems
0016-7935
<Reader>
- Check whether the optical system (contact image sensor/platen guide (white plate) /stream reading glass) is free from scratches, stain, foreign objects.
- Check whether the contact image sensor unit moves smoothly. Check whether the rails are free from dirt.
- Check whether the contact image sensor is not flickering.
- Check whether the optical system is free from dew condensation.
<Process>
- Check whether the toner cartridge is installed securely.
- Check whether the photoconductor drum is free from scratches and stain.
<Transfer>
- Check whether the transfer roller is free from scratches, stain, and deformation.
<Fixing>
- Check whether the fixing film and pressure roller are free from wear, scratches, dirt, and deformation.
- Check whether the fixing thermistor is broken.
- Check whether the temperature huse is conductive.
<Paper transport >
- Check whether the paper transport path is free from foreign objects such as paper chips.
- Check whether the paper pickup, feed, and separation rollers are free from paper dust. Also check whether these rollers are free from wear, scratches, dirt, and
deformation.
- Check whether the registration roller and paper path are free from wear, scratches, dirt, and deformation.
- Check whether the transport guide is free from wear, scratches, dirt, and deformation.
- Check whether the leading edge of paper is not folded, curled, wavy, or damp.
- Check whether use of the Canon-recommended paper/transparency solves the problem.
<Machine>
- Check whether the drive system load is heavy.
- Check whether gears are worn or cracked?
<Cassette>
- Check whether the cassette is installed properly. Check whether the paper size is set properly. Check whether the same symptom occurs when the cassette is re-
placed with the cassette verified to be normal.
- Check whether the middle plate of the cassette moves smoothly. Check whether it is deformed.
- Check whether the side and rear alignment plates are adjusted properly.
- Check whether the cassette heater switch is turned on (when a cassette heater is installed).
<Service Mode>
- Check whether various adjustment values are the same as those printed on the service label.
- Check whether the output between CIS channels has been corrected.
(Service mode>TEST MODE>"2"(SCANTEST)>"1")
<General>
- Check whether the power cord is plugged in the outlet securely.
- Check whether the specified AC voltage is applied to the outlet.
- Check whether sensors, clutches, motors, and solenoids are operating normally. Check whether connectors are connected properly.
(Check the power supply and signal routes with reference to the general circuit diagram.)
- Check whether all cables are routed properly and all screws are not loose.
- Check whether all outer covers are attached.
- Check whether the main power switch is turned on.
- Check the power cables and signal cables of options are connected properly.
- Check whether no fuse on PCBs is blown.
- Check whether the user uses the machine properly.
Содержание Laser Class 810
Страница 2: ......
Страница 6: ......
Страница 18: ...Contents...
Страница 19: ...Chapter 1 Introduction...
Страница 20: ......
Страница 22: ......
Страница 55: ...Chapter 1 1 33...
Страница 56: ......
Страница 57: ...Chapter 2 Installation...
Страница 58: ......
Страница 60: ......
Страница 76: ......
Страница 77: ...Chapter 3 Basic Operation...
Страница 78: ......
Страница 80: ......
Страница 87: ...Chapter 3 3 7...
Страница 88: ......
Страница 89: ...Chapter 4 Original Exposure System...
Страница 90: ......
Страница 92: ......
Страница 104: ......
Страница 105: ...Chapter 5 Original Feeding System...
Страница 106: ......
Страница 108: ......
Страница 126: ...Chapter 5 5 18...
Страница 127: ...Chapter 6 Laser Exposure...
Страница 128: ......
Страница 130: ......
Страница 134: ......
Страница 135: ...Chapter 7 Image Formation...
Страница 136: ......
Страница 138: ......
Страница 144: ......
Страница 145: ...Chapter 8 Pickup and Feed System...
Страница 146: ......
Страница 148: ......
Страница 161: ...Chapter 9 Fixing System...
Страница 162: ......
Страница 164: ......
Страница 175: ...Chapter 10 External and Controls...
Страница 176: ......
Страница 180: ...Chapter 10 10 2 F 10 2 FM2000 FM1...
Страница 197: ...Chapter 11 e Maintenance imageWARE Remote...
Страница 198: ......
Страница 200: ......
Страница 210: ......
Страница 211: ...Chapter 12 Maintenance and Inspection...
Страница 212: ......
Страница 214: ......
Страница 216: ......
Страница 217: ...Chapter 13 Measurement and Adjustments...
Страница 218: ......
Страница 220: ......
Страница 226: ......
Страница 227: ...Chapter 14 Correcting Faulty Images...
Страница 228: ......
Страница 230: ......
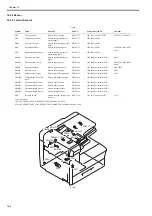
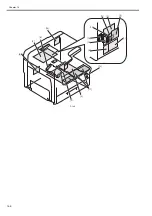
Страница 236: ...Chapter 14 14 6 F 14 3 12 6 5 11 3 14 1 10 9 8 7 16 13 15 4 2...
Страница 238: ...Chapter 14 14 8...
Страница 239: ...Chapter 15 Error Code...
Страница 240: ......
Страница 242: ......
Страница 249: ...Chapter 16 Service Mode...
Страница 250: ......
Страница 256: ...Chapter 16 16 2...
Страница 304: ......
Страница 305: ...Chapter 17 Upgrading...
Страница 306: ......
Страница 308: ......
Страница 314: ......
Страница 315: ...Chapter 18 Service Tools...
Страница 316: ......
Страница 317: ...Contents Contents 18 1 Service Tools 18 1 18 1 1 Special Tools 18 1...
Страница 318: ......
Страница 320: ......
Страница 321: ...Mar 26 2010...
Страница 322: ......


