Chapter 13
13-5
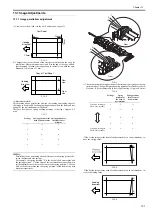
required, make an adjustment.
The specified horizontal registration is 10mm +/-2mm.
F-13-10
1) Load the test chart in the ADF and make a copy of it.
2) Compare the horizontal registration of the chart with that of the copy. If
required, make an adjustment.
The specified horizontal registration is 10mm +/-2mm.
3) Enter the service mode.
Sequentially press the Additional functions key, 2 key, 8 key, and Additional
functions key on the operation panel of the host machine.
4) Using the arrow keys on the operation panel, display "#SCAN".
5) Press the OK key.
6) Using the arrow keys on the operation panel, display "#SCAN NUMER-
IC".
7) Press the OK key.
8) Using the arrow keys, select "41".
9) Using the numeric keys, change the value to determine the optimum value.
Next, press the OK key. (Default: 35)
If the registration cannot be set to the specified value using software, use
the following procedure:
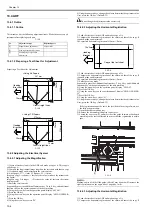
1) Open the document pickup tray.
2) Remove the document pickup tray lower cover.
3) Loosen the one screw [1].
4) Remove the screw [2] and fasten on location [3]. Do not faten too tight.
5) Move the slide guide forward or backward according to the scale calibrat-
ed in mm so that the registration is within spec.
F-13-11
MEMO:
Making copies with the slide guide shifted 1 mm upward will increase the
right registration (on the upper side of paper) by 1 mm.
13.4.2.4 Leading edge registration adjustment
0017-5954
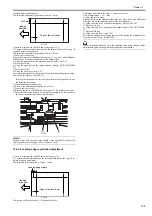
1) Load the test chart in the ADF and make a copy of it.
2) Compare the end registration of the test chart with that on the copy. If re-
quired, make an adjustment.
The specified end registration is 10mm +/-2mm.
F-13-12
The image is shifted to the left. -> Decrease the value.
The image is shifted to the right. -> Increase the value.
Unit of adjustment 1 = 0.1 mm
3) Enter the service mode.
Sequentially press the Additional functions key, 2 key, 8 key, and Additional
functions key on the operation panel of the host machine.
4) Using the arrow keys on the operation panel, display "#SCAN".
5) Press the OK key.
6) Using the arrow keys on the operation panel, display "#SCAN NUMER-
IC".
7) Press the OK key.
8) Using the arrow keys, select "42".
9) Using the numeric keys, change the value to determine the optimum value.
Next, press the OK key. (Default: 241)
If the registration cannot be set to the specified value using software, make
adjustments again starting with the perpendicular adjustment.
Copy of the test sheet
(feeding
direction)
10±2mm
[2]
[1]
[3]
Copy of the test sheet
(feeding
direction)
Leading edge margin
L
Содержание Laser Class 810
Страница 2: ......
Страница 6: ......
Страница 18: ...Contents...
Страница 19: ...Chapter 1 Introduction...
Страница 20: ......
Страница 22: ......
Страница 55: ...Chapter 1 1 33...
Страница 56: ......
Страница 57: ...Chapter 2 Installation...
Страница 58: ......
Страница 60: ......
Страница 76: ......
Страница 77: ...Chapter 3 Basic Operation...
Страница 78: ......
Страница 80: ......
Страница 87: ...Chapter 3 3 7...
Страница 88: ......
Страница 89: ...Chapter 4 Original Exposure System...
Страница 90: ......
Страница 92: ......
Страница 104: ......
Страница 105: ...Chapter 5 Original Feeding System...
Страница 106: ......
Страница 108: ......
Страница 126: ...Chapter 5 5 18...
Страница 127: ...Chapter 6 Laser Exposure...
Страница 128: ......
Страница 130: ......
Страница 134: ......
Страница 135: ...Chapter 7 Image Formation...
Страница 136: ......
Страница 138: ......
Страница 144: ......
Страница 145: ...Chapter 8 Pickup and Feed System...
Страница 146: ......
Страница 148: ......
Страница 161: ...Chapter 9 Fixing System...
Страница 162: ......
Страница 164: ......
Страница 175: ...Chapter 10 External and Controls...
Страница 176: ......
Страница 180: ...Chapter 10 10 2 F 10 2 FM2000 FM1...
Страница 197: ...Chapter 11 e Maintenance imageWARE Remote...
Страница 198: ......
Страница 200: ......
Страница 210: ......
Страница 211: ...Chapter 12 Maintenance and Inspection...
Страница 212: ......
Страница 214: ......
Страница 216: ......
Страница 217: ...Chapter 13 Measurement and Adjustments...
Страница 218: ......
Страница 220: ......
Страница 226: ......
Страница 227: ...Chapter 14 Correcting Faulty Images...
Страница 228: ......
Страница 230: ......
Страница 236: ...Chapter 14 14 6 F 14 3 12 6 5 11 3 14 1 10 9 8 7 16 13 15 4 2...
Страница 238: ...Chapter 14 14 8...
Страница 239: ...Chapter 15 Error Code...
Страница 240: ......
Страница 242: ......
Страница 249: ...Chapter 16 Service Mode...
Страница 250: ......
Страница 256: ...Chapter 16 16 2...
Страница 304: ......
Страница 305: ...Chapter 17 Upgrading...
Страница 306: ......
Страница 308: ......
Страница 314: ......
Страница 315: ...Chapter 18 Service Tools...
Страница 316: ......
Страница 317: ...Contents Contents 18 1 Service Tools 18 1 18 1 1 Special Tools 18 1...
Страница 318: ......
Страница 320: ......
Страница 321: ...Mar 26 2010...
Страница 322: ......


