Chapter 2
2-9
F-2-23
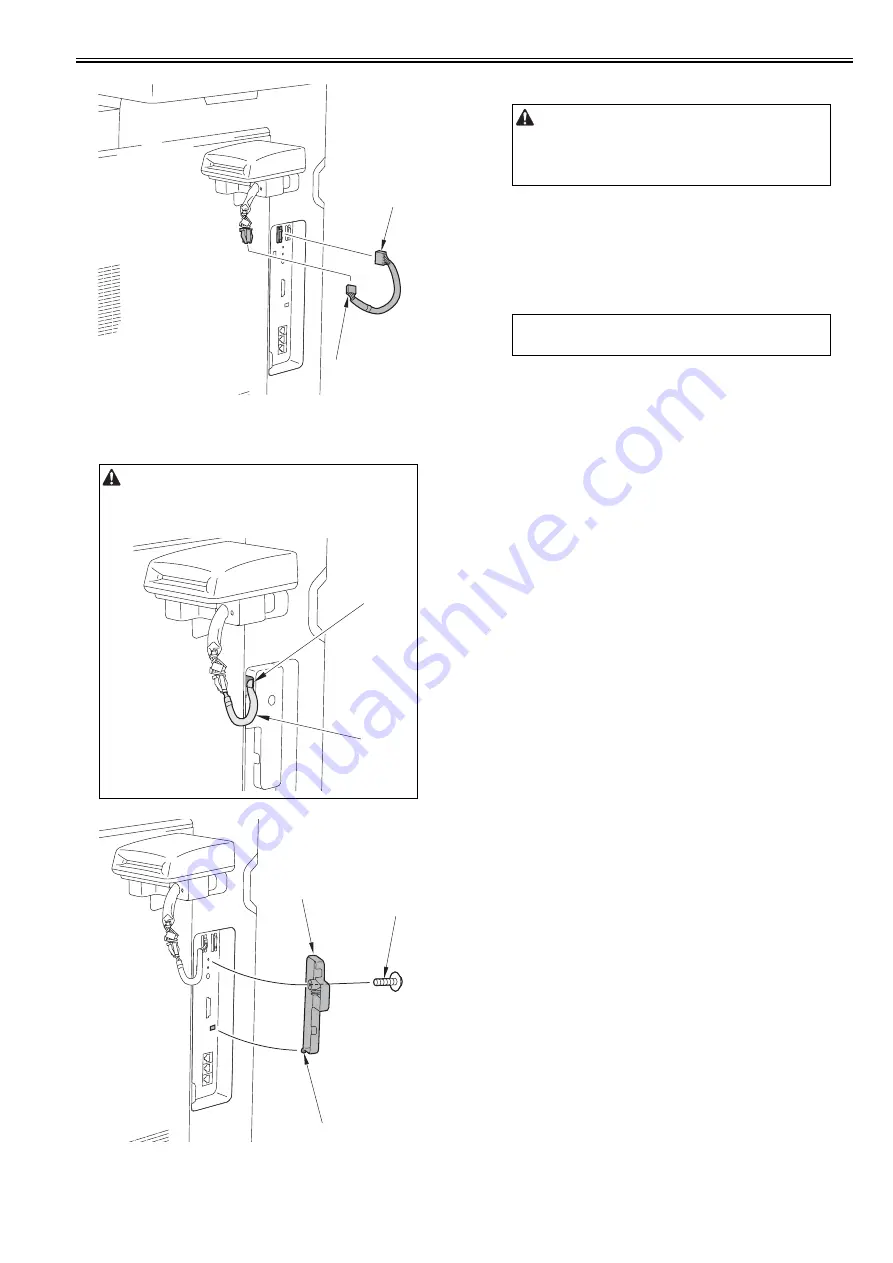
5) Install the panel mount cover [1] removed in step 3.
- 1 claw [2]
- 1 screw [3] (The screw removed in step 3 is used.)
F-2-24
2.5.5 Card ID Registration
0019-8712
1) Connect the power plug to the power outlet and turn on the main power
switch.
2) Specify the first number of the card ID to register.
- COPIER > OPTION > ACC > CARD
- The serial numbers beginning the specified one are automatically
registered in Dept. ID for 1000 cards.
- Exit service mode after registration.
3) Select the following; [Additional Func.] > [System Management Set.] >
[Dept. ID Management] > ON, and press the OK key.
4) Press 'Back' key or 'Done' key to display the [Dept. ID and Password]
screen.
5) Select [Dept. ID:], press the OK key, enter the numeric characters regis-
tered in step 2, and then press the OK key.
6) Press [ID] key when [Dept.IDxxxx] is displayed.
- When the registration is complete, the display automatically returns to
the main screen.
7) Turn off and then on the main power switch.
8) Check to see that 'Set the control card' is displayed.
Be sure to route the card reader cable [1] through the cut-off [2] of the panel
mount cover to prevent the cable from being caught.
[1]
[1]
[1]
[2]
[1]
[2]
[3]
Be sure to enter the card number to use in service mode of the host machine
after installing the Card Reader. If the number is not entered, the card is not
recognized when being inserted.
MEMO:
Implement the procedure below to check the registration although card ID
registration is complete by performing step 1 to 3.
Содержание iR C1020 Series
Страница 1: ...Sep 8 2008 Service Manual iR C1020 Series iR C1021i ...
Страница 2: ......
Страница 6: ......
Страница 18: ...Contents ...
Страница 19: ...Chapter 1 Introduction ...
Страница 20: ......
Страница 22: ......
Страница 57: ...Chapter 2 Installation ...
Страница 58: ......
Страница 60: ......
Страница 73: ...Chapter 3 Basic Operation ...
Страница 74: ......
Страница 76: ......
Страница 81: ...Chapter 4 Main Controller ...
Страница 82: ......
Страница 84: ......
Страница 97: ...Chapter 5 Original Exposure System ...
Страница 98: ......
Страница 100: ......
Страница 112: ......
Страница 113: ...Chapter 6 Original Feeding System ...
Страница 114: ......
Страница 116: ......
Страница 132: ......
Страница 133: ...Chapter 7 Laser Exposure ...
Страница 134: ......
Страница 136: ......
Страница 143: ...Chapter 8 Image Formation ...
Страница 144: ......
Страница 146: ......
Страница 180: ......
Страница 181: ...Chapter 9 Pickup and Feed System ...
Страница 182: ......
Страница 213: ...Chapter 9 9 29 F 9 79 1 2 3 ...
Страница 214: ......
Страница 215: ...Chapter 10 Fixing System ...
Страница 216: ......
Страница 218: ......
Страница 233: ...Chapter 11 External and Controls ...
Страница 234: ......
Страница 263: ...Chapter 12 e maintenance imageWARE Remote ...
Страница 264: ......
Страница 266: ......
Страница 275: ...Chapter 12 12 9 F 12 27 ...
Страница 280: ......
Страница 281: ...Chapter 13 Maintenance and Inspection ...
Страница 282: ......
Страница 284: ......
Страница 286: ......
Страница 287: ...Chapter 14 Measurement and Adjustments ...
Страница 288: ......
Страница 290: ......
Страница 293: ...Chapter 15 Correcting Faulty Images ...
Страница 294: ......
Страница 296: ......
Страница 304: ...Chapter 15 15 8 15 3 2 2 Fans 0019 5064 F 15 11 T 15 3 Notation Name FM1 main unit fan FM2 duplex fan FM2 FM1 ...
Страница 313: ...Chapter 15 15 17 F 15 19 21 22 28 29 30 31 24 14 15 16 23 26 25 32 27 20 19 18 17 2 13 6 10 33 1 8 4 3 12 11 5 7 9 ...
Страница 317: ...Chapter 16 Error Code ...
Страница 318: ......
Страница 320: ......
Страница 331: ...Chapter 16 16 11 ...
Страница 332: ......
Страница 333: ...Chapter 17 Special Management Mode ...
Страница 334: ......
Страница 336: ......
Страница 343: ...Chapter 17 17 7 ...
Страница 344: ......
Страница 345: ...Chapter 18 Service Mode ...
Страница 346: ......
Страница 348: ......
Страница 388: ......
Страница 389: ...Chapter 19 Upgrading ...
Страница 390: ......
Страница 392: ......
Страница 396: ...Chapter 19 19 4 3 Click Next F 19 4 4 Select a USB connected device and click Next F 19 5 ...
Страница 397: ...Chapter 19 19 5 5 Click Start F 19 6 6 Click Yes F 19 7 Download will be started F 19 8 ...
Страница 399: ...Chapter 19 19 7 ...
Страница 400: ......
Страница 401: ...Chapter 20 Service Tools ...
Страница 402: ......
Страница 404: ......
Страница 407: ...Sep 8 2008 ...
Страница 408: ......


