background image

You can specify the type of paper, color processing, print quality, print preview, and other settings. Choose

Easy Settings

 to specify basic print settings based on the printing application or 

Advanced Settings

 to com-

plete more detailed settings as desired.

Paper Detailed Settings Dialog Box 

P.170

View Settings Dialog Box for the Printing Application 

P.172

Color Adjustment Sheet: Color 

P.172

Object Adjustment Dialog box: Color

P.173

Matching Sheet 

P.174

Color Adjustment Sheet: Monochrome 

P.176

Object Adjustment Dialog box: Monochrome

P.177

Page Setup Sheet 

P.177

You can specify the page size of the original, borderless printing, enlargement or reduction, the orientation, the
paper size and feed source, and automatic cutting.

Output Method Dialog box

P.180

Paper Size Options Dialog Box 

P.181

Layout Sheet 

P.182

You can specify the page layout, watermarks, the orientation, the number of copies, and print processing op-
tions.

Page Options Dialog Box 

P.183

Special Settings Dialog Box 

P.184

Favorites Sheet 

P.185

Groups of print settings you select on each sheet can be saved as a favorite. Favorites you have added can
be edited or used at the time of printing as desired.

Utility Sheet 

P.186

You can specify settings related to maintenance for the Printhead and feed amount, as well as settings for

Color imageRUNNER Enlargement Copy

.

Support Sheet 

P.187

You can view support information and the user manual.

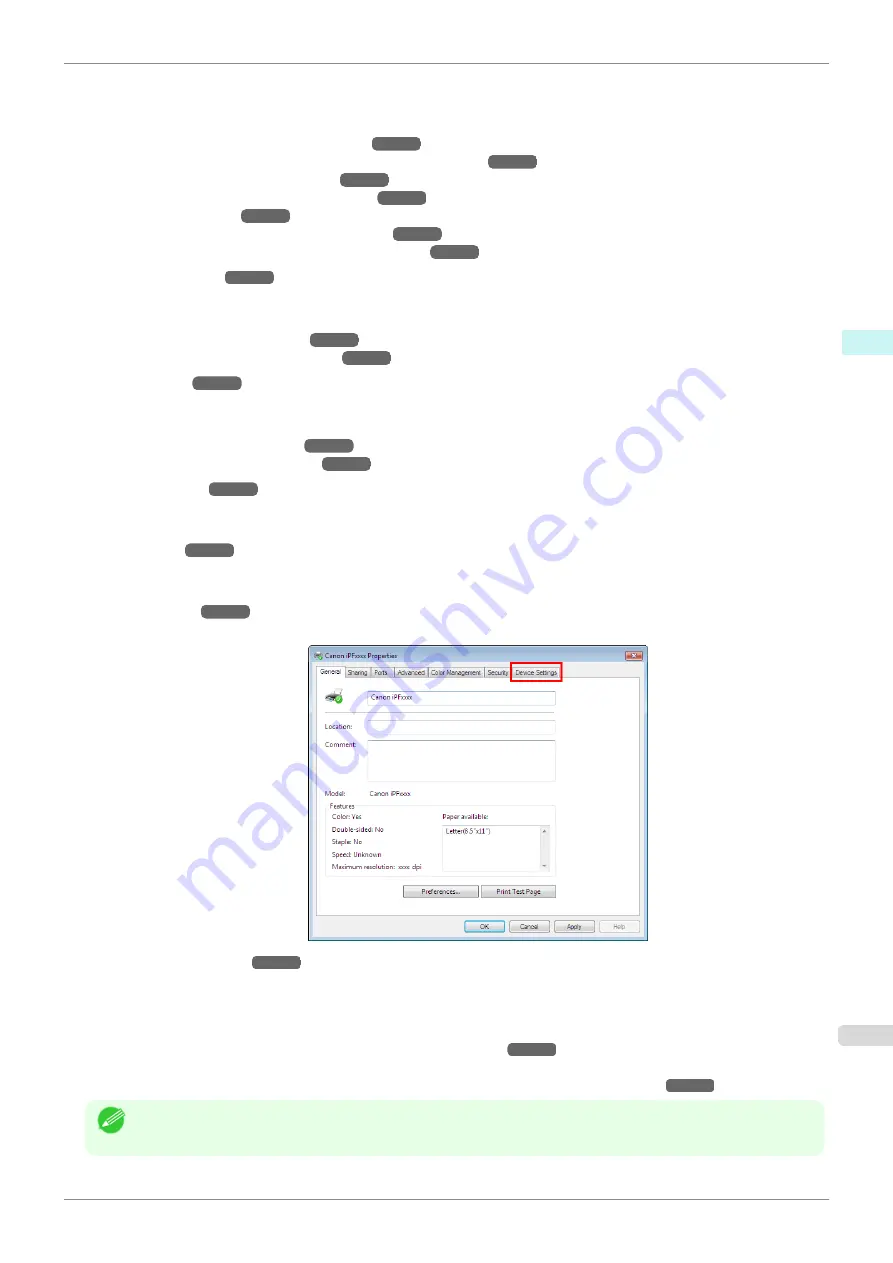
Device Settings Sheet 

P.188

You can display settings for optional equipment installed on the printer and see the version information for the
printer driver.

imagePROGRAF Free Layout

 is a feature for freely arranging originals from various source applications on a sin-

gle page as desired before printing. For details, 

see "

Free Layout

."

P.199

Color imageRUNNER Enlargement Copy

 is a feature for automatic enlargement and printing of scanned originals

from a 

Color imageRUNNER

. For details, 

see "

Color imageRUNNER Enlargement Copy

."

P.221

Note

Color imageRUNNER Enlargement Copy

 is not displayed in 64-bit editions of Windows.

iPF850


Printer Driver Settings

User's Guide


Windows Software

Printer Driver

159


Содержание IPF850

Страница 1: ...out 199 Color imageRUNNER Enlargement Copy 221 Print Plug In for Office 230 and so on Mac OS Software 267 Printer Driver 268 Preview 286 Free Layout 307 and so on Handling and Use of Paper 331 Control Panel 429 Printer Parts 467 Network Setting 481 Print Job Management 501 Adjustments for Better Print Quality 555 Maintenance and Consumables 573 Troubleshooting 617 Error Message 651 Specifications ...

Страница 2: ...dows 32 Printing by Automatically Switching Between Upper and Lower Roll Paper Mac OS 37 Roll Paper Switching Method 39 Printing Photos and Office Documents 43 Printing Photos and Images 43 Printing Photos and Images Windows 43 Printing Photos and Images Mac OS 45 Printing Office Documents 47 Printing Office Documents Windows 47 Printing Office Documents Mac OS 48 Using PosterArtist to Compose Ori...

Страница 3: ...Horizontal Banners Large Format Printing Mac OS 105 Printing on Non Standard Paper Sizes 108 Printing on Non Standard Paper Sizes Windows 108 Printing on Non Standard Paper Sizes Mac OS 111 Tiling and multiple pages per sheet 114 Printing Multiple Originals Next to Each Other 114 Printing Multiple Originals Next to Each Other Windows 115 Printing Multiple Originals Next to Each Other Mac OS 117 Pr...

Страница 4: ...e Printer Driver Dialog Box from the Operating System Menu 165 Main Sheet 166 Paper Information on Printer Dialog Box 170 Paper Detailed Settings Dialog Box 170 View Settings Dialog Box for the Printing Application 172 Color Adjustment Sheet Color 172 Object Adjustment Dialog box Color 173 Matching Sheet 174 Color Adjustment Sheet Monochrome 176 Object Adjustment Dialog box Monochrome 177 Page Set...

Страница 5: ...rs 228 Printing Enlargements of Scanned Originals from a Color imageRUNNER 229 Print Plug In for Office 230 Print Plug In for Officefeatures 230 Steps to install 230 Steps to uninstall 233 When Print Plug In for Office is not displayed 233 To start from Microsoft Word 236 Print Matching Roll Width Word 238 Borderless Printing Word 240 Multi Page Printing Word 242 Register the settings Word 243 Pri...

Страница 6: ...01 Zoom Dialog Box 301 Go to Page Dialog Box 302 Print with No Borders 302 Print on the Center 303 Not Print Spaces at the Top Bottom 303 Print Page Rotated 90 Degrees 304 Display with Fitting to the Width of the Paper 304 Display with All 304 Display with Actual Size 305 Moving a Page 305 Free Layout 307 The Features of Free Layout 307 Starting Free Layout 307 Free Layout Main Window 308 Paper Se...

Страница 7: ... Roll Paper Automatically 366 Reducing Dust from Cutting Rolls 367 Roll Holder Set 368 Automatic Roll Switching 368 Handling sheets 369 Loading Sheets in the Printer 369 Printing From a Desired Starting Point 371 Removing Sheets 373 Stacker 375 Stacker 375 Installing and Removing the Stacker On the Printer 376 Ejecting to the Stacker 380 Ejecting to the Output Stacker 381 Media Configuration Tool ...

Страница 8: ...int 460 Printing Interface Setting Reports 463 Setting Control panel access lock 465 Printer Parts Printer Parts 467 Printer parts 468 Front 468 Printer Front 469 Stacker 470 Back 471 Top Cover Inside 472 Carriage 473 Ink Tank Cover Inside 474 Hard Disk 475 Printer Hard Disk Operations 475 Checking the Free Hard Disk Space 476 Erasing Data on the Printer s Hard Disk 477 Optional accessories 479 Ne...

Страница 9: ...nager 511 Setting the Unit Cost for Ink 512 Setting the Unit Cost for Paper 513 Setting the Unit Cost for Items Other Than Ink and Paper 514 Configuring Units and Display Settings in Accounting Manager 515 Automatically Acquiring Print Job Logs at Regular Intervals 515 Canceling Regular Print Job Log Acquisition 516 Switching Between Displaying Jobs on Printer and Regularly Acquired Jobs 516 Expor...

Страница 10: ... Tank Levels 583 When to Replace Ink Tanks 583 Printheads 585 Printhead 585 Checking for Nozzle Clogging 585 Cleaning the Printhead 586 Replacing the Printhead 587 Maintenance Cartridge 593 Maintenance Cartridge 593 Replacing the Maintenance Cartridge 593 Checking the Remaining Maintenance Cartridge Capacity 597 When to Replace the Maintenance Cartridge 598 Cleaning the Printer 599 Cleaning the Pr...

Страница 11: ...g direction 640 Images are printed crooked 641 Documents are printed in monochrome 641 Line thickness is not uniform 641 Lines are misaligned 641 Cannot print over a network 642 Cannot connect the printer to the network 642 Cannot print over a TCP IP network 642 Cannot print over a Bonjour network 642 Installation problems 643 Removing Installed Printer Drivers 643 HP GL 2 problems 644 With HP GL ...

Страница 12: ...1 Paper position not suitable for borderless printing 662 Roll feed unit error 662 The roll feed unit is loose 662 Stacker not ready 662 Cutting Mode not Automatic 662 Messages regarding ink 663 Ink insufficient 663 No ink left 663 Remaining level of the ink cannot be correctly detected Check ink tank 663 Close Ink Tank Cover 663 Ink tank is empty 663 Not much ink is left 664 No ink tank loaded 66...

Страница 13: ...xxx is 0501 0903 or 0904 670 GL2 W0502 The parameter is out of range 670 GL2 W0504 This command is not supported 670 Other Messages 671 GARO Wxxxx x represents a number 671 ERROR Exxx xxxx x represents a letter or number 671 Hardware error xxxxxxxx xxxx x represents a letter or number 671 Top cover is open 671 Prepare for parts replacement 672 Parts replacement time has passed 672 Unknown file 672...

Страница 14: ...14 ...

Страница 15: ...29 Windows Software 157 Mac OS Software 267 Handling and Use of Paper 331 Control Panel 429 Printer Parts 467 Network Setting 481 Print Job Management 501 Adjustments for Better Print Quality 555 Maintenance and Consumables 573 Troubleshooting 617 Error Message 651 Specifications 673 Appendix 677 imagePROGRAF Basic Printing Workflow 15 ...

Страница 16: ...liar applications such as Microsoft Office applications See Printing Vertical or Horizontal Banners Large Format Printing P 101 Borderless printing Print without a margin border around posters or photos See Borderless Printing on Paper of Equivalent Size P 92 See Borderless Printing by Resizing Originals to Fit the Roll Width P 95 See Borderless Printing at Actual Size P 87 Banner printing You can...

Страница 17: ...he sheet between the Platen and the Paper Retainer Enlarged reduced printing You can freely adjust the size of originals by enlarging or reducing originals before printing See Resizing Originals to Match the Paper Size P 72 See Resizing Originals by Entering a Scaling Value P 78 Free Layout Windows and imagePROGRAF Free Layout Mac OS Print multiple documents from multiple applications such as word...

Страница 18: ...r off Important Never disconnect the printer s power supply or unplug it during a print job This may damage the printer 1 Make sure no print jobs are in progress If the Message Lamp is flashing check the message on the Display Screen and take action as necessary See Er ror Messages P 652 If the Data Lamp is flashing the printer is receiving a print job Turn off the printer only after printing is f...

Страница 19: ... P 358 Once you have used all the paper on a roll clean the platen If the Platen inside the Top Cover becomes dirty it may soil the underside of paper See Cleaning Inside the Top Cover P 599 1 Turn the printer on See Turning the Printer On and Off P 17 2 Load the roll on the Roll Holder See Attaching the Roll Holder to Rolls P 342 3 Load the roll in the printer See Loading Rolls in the Printer P 3...

Страница 20: ...code has been printed on the roll and you have set ManageRemainRoll to On specify the roll length after the type of paper See Specifying the Paper Length P 352 5 Complete settings in the printer driver for the type of paper and other details Specifying Paper in the Printer Driver Windows P 160 Specifying Paper in the Printer Driver Mac OS P 269 6 Send the print job Printing in Windows P 22 Loading...

Страница 21: ...332 Borderless printing is not supported on sheets For the features and the main printing methods available for sheet printing see Printing Options Using Rolls and Sheets P 16 1 Turn the printer on See Turning the Printer On and Off P 17 2 Complete settings in the printer driver for the type of paper and other details Specifying Paper in the Printer Driver Windows P 160 Specifying Paper in the Pri...

Страница 22: ...e Print dialog box displayed by the applica tion If another printer is selected select the printer you want to use under Select Printer or in the dialog box displayed after clicking Printer Settings for many printing methods including enlarged or reduced printing borderless printing and so on are dis played in the printer driver dialog box There are two ways to access the printer driver dialog box...

Страница 23: ...software 1 In the application software select Print from the File menu to display the dialog box for printing conditions Note This dialog box includes basic printing options and enables you to choose the printer specify the range of pages number of copies and so on 2 Select the printer in the Printer list 3 Click Print to start printing As shown in the following illustration you can switch to othe...

Страница 24: ...n varies depending on the current status If you press the Stop button before printing starts Pressing the Stop button before printing starts will display a confirmation message To cancel the print job select Yes Rose Wine Rose Wine The Printer does not print If you press the Stop button during printing Pressing the Stop button during printing will display a confirmation message To cancel the print...

Страница 25: ...nitor 4 On the Printer Status sheet click Cancel Job Note The screen may differ slightly depending on the model you are using Canceling Print Jobs from Mac OS Canceling Print Jobs from Mac OS In the printer window you can cancel jobs that are being sent to the printer Otherwise you can cancel jobs from imagePROGRAF Printmonitor if they have been received by the printer or are currently being print...

Страница 26: ...intmonitor 4 Select the print job to cancel and click to delete the print job Note The screen may differ slightly depending on the model you are using The job sent to the printer is canceled 5 Exit imagePROGRAF Printmonitor In the printer window click Resume or Resume Printer Important Always follow these steps if you cancel print jobs from imagePROGRAF Printmonitor If you do not re start job proc...

Страница 27: ...wing cases the status is cleared even if you do not set Pause Print to Off and printing from the job queue resumes When paper is advanced When you execute Chg Paper Type in the Paper Menu 1 During printing on the Tab Selection screen of the Control Panel press or to select the Job tab Note If the Tab Selection screen is not displayed press the Menu button 2 Press the OK button The Job Menu is disp...

Страница 28: ...iPF850 User s Guide 28 ...

Страница 29: ... or at other non standard sizes 101 Tiling and multiple pages per sheet 114 Centering originals 128 Conserving roll paper 137 Checking Images Before Printing 145 Other useful settings 146 Windows Software 157 Mac OS Software 267 Handling and Use of Paper 331 Control Panel 429 Printer Parts 467 Network Setting 481 Print Job Management 501 Adjustments for Better Print Quality 555 Maintenance and Con...

Страница 30: ... Paper Reference Guide An error message is displayed on the printer Control Panel if the media type specified in the printer driver does not match the media type specified in the printer Although you can print under these conditions the printing results may not be suitable Genuine Canon paper or Canon feed confirmed paper For genuine Canon paper or Canon feed confirmed paper select the settings th...

Страница 31: ...e Loading Roll Paper in the Printer Depending on the Purpose When performing double roll switching load the roll paper in the upper and lower printer rolls in one of the following ways depending on the purpose When continuously printing large quantities of the same document etc Load roll paper of the same width and same type in the upper and lower rolls Printing is performed by automatically switc...

Страница 32: ...ia and size specified in the print job For details refer to the following topics depending on the operating system you are using Printing by Automatically Switching Between Upper and Lower Roll Paper Windows P 32 Printing by Automatically Switching Between Upper and Lower Roll Paper Mac OS P 37 Printing by Automatically Switching Between Upper and Lower Roll Paper Windows Printing by Automatically...

Страница 33: ...nter driver dialog box See Accessing the Printer Driver Dialog Box from Applications P 164 4 Make sure the Main sheet is displayed 5 Click the type of media to use for printing from the AMedia Type list Note Always specify the media type of the roll paper that is loaded in the printer 6 Click the Page Setup tab to display the Page Setup sheet 7 In the APage Size list select and click the size of t...

Страница 34: ...ent printing is performed on the roll paper that matches the media type specified in the print job If both the width and media type of the roll paper loaded in the upper and lower rolls are different when using the function for rotating the document by 90 degrees you should correctly set the combination of roll paper width and media type for any one of the rolls loaded in the printer 10 Confirm th...

Страница 35: ...342 2 Click start Devices and Printers 3 Right click the icon of this printer and choose Printer Properties to open the printer properties window 4 Click the Device Settings tab to display the Device Settings sheet 5 Select the AAutomatically switch paper sources paper size priority check box 6 Click CAcquire Status The paper size information is acquired from the printer and the width of the roll ...

Страница 36: ...ed in the printer 12 Click the Page Setup tab to display the Page Setup sheet 13 In the APage Size list select and click the size of the original as specified in the application 14 Click to select Roll Paper Auto from the LPaper Source list 15 Select the KRotate Page 90 degrees Conserve Paper check box as necessary 16 Confirm the print settings and print as desired Note For tips on confirming prin...

Страница 37: ...omatically Switching Between Upper and Lower Roll Paper Mac OS OS This section describes how to print by automatically switching between roll paper 1 and roll paper 2 depending on the print job Important If you set Set Adj Menu System Setup Roll Switching to No RollSwitching in the control panel printing may be performed on the unintended roll paper It is recommended that you set this setting to U...

Страница 38: ...s the Main pane 8 Select the type of media to use for printing from the AMedia Type list Note Always specify the media type of the roll paper that is loaded in the printer 9 Access the Page Setup pane 10 Click to select Roll Paper Auto from the APaper Source list Printing by Automatically Switching Between Upper and Lower Roll Paper Mac OS iPF850 User s Guide Enhanced Printing Options Using double...

Страница 39: ...Switching Method This section describes how the printer switches between roll paper 1 and roll paper 2 depending on the case Refer to this as necessary such as when the printing is not as you expected When Roll Paper Auto is selected from the Paper Source list in the printer driver the more suitable roll paper loaded in the upper or lower roll of the printer is automatically selected depending on ...

Страница 40: ...d for borderless printing Go to Condition 5 Condition 5 Does the roll paper width specified in the print job match the width of roll paper loaded in the printer Only for borderless printing or enlarged reduced printing Only either roll paper 1 or roll paper 2 is roll paper of the width specified in the print job The roll paper with the matched roll paper width is selected Neither roll paper 1 nor ...

Страница 41: ...ollSwitching The roll paper currently fed to the platen is se lected 1 Set to Use Optimal Size Go to Condition 4 Condition 4 Borderless printing is specified in the print job if not specified go to Condition 5 Only either roll paper 1 or roll paper 2 is paper that can be used for bor derless printing The roll paper that can be used for borderless printing is selected Neither roll paper 1 nor roll ...

Страница 42: ... roll paper 2 dif ferent The roll paper widths are different The roll paper with the smaller difference be tween the paper size width and the width specified in the print job is selected The roll paper width is the same The roll paper currently fed to the platen is se lected 1 1 In the following case neither roll paper 1 nor roll paper 2 is fed to the platen In this case roll paper 1 is selected W...

Страница 43: ...nt Target options may not be available Note You can check the settings values for each print target by clicking View Settings You can also fine tune these values as needed Advanced Settings For details on Advanced Settings see Giving Priority to Particular Graphic Elements and Colors for Print ing P 66 For instructions on printing photos and images refer to the following topics as appropriate for ...

Страница 44: ...ation by using the Media Configuration Tool For details see Media Configuration Tool Win dows P 383 5 After confirming that DEasy Settings is selected click Photo Color in the EPrint Target list Note You can check the settings values selected in the EPrint Target list by clicking GView Settings 6 Click the Page Setup tab to display the Page Setup sheet 7 In the APage Size list click the size of th...

Страница 45: ...r 170gsm Roll paper width 10 inches 254 0 mm 1 Choose Page Setup from the application menu to display the Page Attributes dialog box Note Page Setup might not be displayed in the menu de pending on the OS you are using and the applica tion software In this case select Print from the menu in the appli cation software and configure the settings in the up per part of the printer driver screen that is...

Страница 46: ... the Media Configuration Tool For details see Media Configuration Tool Mac OS P 405 8 After confirming that DEasy Settings is selected click Photo Color in the EPrint Target list Note For information on settings optimized for printing photos and images see Printing Photos and Im ages P 43 You can check the settings values selected in the EPrint Target list by clicking GView set 9 Make your selecti...

Страница 47: ... can check the settings values for each print target by clicking View Settings You can also fine tune these values as needed Advanced Settings For details on Advanced Settings see Giving Priority to Particular Graphic Elements and Colors for Print ing P 66 Printing Office Documents Windows Printing Office Documents Windows This topic describes how to print office documents based on the following e...

Страница 48: ...t 9 Specify additional printing conditions For details on available printing conditions see Printer Driver Settings P 158 10 Confirm the print settings and print as desired Note For tips on confirming print settings see Confirming Print Settings P 161 Printing Office Documents Mac OS Printing Office Documents Mac OS This topic describes how to print office documents based on the following example ...

Страница 49: ... list 3 In the CPaper Size list click the size of the original In this case click ISO A4 Cut Sheet 4 Click FOK to close the dialog box 5 Choose Print in the application menu 6 Access the Main pane 7 In the AMedia Type list select the type of paper that is loaded In this case click Plain Paper 8 After confirming that DEasy Settings is selected click Office Document in the EPrint Target list Note Yo...

Страница 50: ...You can print a variety of source documents from word processing or spreadsheet programs or screen shots from web browsers after composing an original with them using PosterArtist This topic describes how to use PosterArtist to compose originals from multiple applications creating a poster lay out for printing 1 Choose Print in the application menu 2 Select the printer in the dialog box and then o...

Страница 51: ...t the document will not be printed yet 8 Choose the page to load in PosterArtist 9 Edit and rearrange the image in the PosterArtist window as desired Without closing the PosterArtist window repeat steps 1 8 to arrange originals from multiple applications on the same page Note For details on how to edit and sort images refer to the PosterArtist Manual 10 Print from the PosterArtist menu iPF850 Usin...

Страница 52: ...is easy when you simply choose the type of original to print Easy Settings Simply choose the printing application in the list for optimal printing results Print Target Choose presets that match the type of document to be printed Print targets for line drawings and text Print Target Description CAD Color Line Drawing Settings optimized to print intricate lines in CAD drawings clear ly CAD Monochrom...

Страница 53: ...r your operat ing system Printing Line Drawings and Text Windows P 53 Printing Line Drawings and Text Mac OS P 54 Printing Line Drawings and Text Windows Printing Line Drawings and Text Windows This topic describes how to print line drawings based on the following example Document CAD drawing Page size A3 297 0 420 0 mm 11 7 16 5 in Paper Roll paper Paper type Plain Paper Roll paper width A2 A3 ro...

Страница 54: ...tings P 158 11 Confirm the print settings and print as desired Note For tips on confirming print settings see Confirming Print Settings P 161 Printing Line Drawings and Text Mac OS Printing Line Drawings and Text Mac OS This topic describes how to print line drawings based on the following example Document CAD drawing Page size A3 297 0 420 0 mm 11 7 16 5 in Paper Roll Paper type Plain Paper Roll ...

Страница 55: ...ick ISO A3 4 Click FOK to close the dialog box 5 Choose Print in the application menu 6 Access the Main pane 7 In the AMedia Type list select the type of paper that is loaded In this case click Plain Paper 8 After confirming that DEasy Settings is selected click CAD Color Line Drawing or CAD Monochrome Line Drawing in the EPrint Target list Note You can check the settings values selected in the EP...

Страница 56: ...r AutoCAD is software for printing optimally from AutoCAD with the printer driver By optimally controlling the processing resolution of raster data and the memory to be used in image processing of AutoCAD printing superior in reliability and productivity is realized If you install Printer Driver Optimization Module for AutoCAD on a computer on which supported AutoCAD is instal led it will be insta...

Страница 57: ...adjusted before printing as follows when Color Compatibility is selected Note Color CAD is displayed when you select Advanced Settings on the Main sheet and set Print Priority to Line Drawing Text Color Compatibility Color Setting Item Color Setting Description Color CAD 1 Print in standard colors Color CAD 2 Print with approximate colors emulating Canon iPF750 iPF755 iPF650 iPF655 iPF760 iPF765 C...

Страница 58: ...omplete color settings when Color CAD is selected in Color Mode Note Color CAD is displayed when you select Advanced Settings on the Main sheet and set Print Priority to Line Drawing Text This section describes the procedure in Windows 7 1 Click start Devices and Printers 2 Right click the icon of this printer and choose Printer Properties to open the printer properties window 3 Click the Device S...

Страница 59: ...s Language with Raster Operations HP GL 2 is an abbreviation of Hewlett Packard Graphics Language 2 and HP RTL is an abbreviation of Hewlett Packard Raster Transfer Language Emulation is good for obtaining results similar to printing on other printers When printing from applications that support HP GL 2 output specify HP GL 2 in the application s plotter output settings HP GL 2 and HP RTL emulatio...

Страница 60: ...onochrome Bitmap Print in a color mode for CAD using Col or Ink with all non white portions printed in black No color adjustment is supported No color correction 1 Prints without performing color matching in the printer driver You can adjust the color balance 1 If No color correction is selected the Matching sheet Matching pane is not displayed Color Adjustment You can adjust colors separately for...

Страница 61: ...r matching optimized for printing typical photos attractively Smooth gra dation is a feature This is also an easy to use mode when performing color ad justment using application software Colorimetric Color matching optimized for printing im age data with accurate colors in input color space This is the easiest to use mode when you want to adjust the color and print However gradation may be lost fo...

Страница 62: ...e the Main sheet is displayed 4 In the AMedia Type list select the type of paper that is loaded 5 Click DAdvanced Settings to switch the print mode 6 Click Color in the GColor Mode list 7 Click HColor Settings to display the Color Settings dia log box Fine Tuning Colors of Photos and Images Windows iPF850 User s Guide Enhanced Printing Options Adjusting Images 62 ...

Страница 63: ...other For soft gradation decrease the contrast For hard gradation increase the contrast JSaturation Adjust the level of color saturation in a range from subdued to vivid Note Click Object Adjustment to open the Object Adjustment dialog box which allows you to select the color adjustment target from Image Graphics and Text 9 Close the Color Settings dialog box 10 Click the Page Setup tab to display...

Страница 64: ... pending on the OS you are using and the applica tion software In this case select Print from the menu in the appli cation software and configure the settings in the up per part of the printer driver screen that is displayed 2 Select the printer in the BFormat for list 3 Choose the original size in the CPaper Size list 4 Click FOK to close the dialog box 5 Choose Print in the application menu 6 Ac...

Страница 65: ...tinged with red and so on HBrightness Adjust the brightness of printed images while keeping the darkest and lightest portions intact IContrast Adjust the contrast of the darkest and lightest portions relative to each other For soft gradation decrease the contrast For hard gradation increase the contrast JSaturation Adjust the level of color saturation in a range from subdued to vivid Note Click Ob...

Страница 66: ...52 Printing Office Documents P 47 Print Priority Choose the graphic elements that you want to emphasize for printing Print Priority 1 Description Image A setting for posters or other documents made up mainly of photos or images or for em phasizing photos or images in printed documents Line Drawing Text Choose this setting for CAD drawings made up mainly of intricate lines or wall newspa pers and o...

Страница 67: ... Cyan Magenta Yellow Gray Tone Brightness Contrast Saturation You can adjust the levels of cyan magenta and yellow as well as the brightness contrast satura tion and gray tones If you choose Monochrome or Monochrome BK ink in Color Mode only Brightness and Con trast can be adjusted Image Graphics and Text are available as Ob ject Adjustment options Color Matching Modes Driver Matching Mode ICC Mat...

Страница 68: ...lor settings before printing refer to the following topics as appropriate for your operating system Choosing the Document Type and Printing Conditions Windows P 68 Choosing the Document Type and Printing Conditions Mac OS P 70 Choosing the Document Type and Printing Conditions Windows Choosing the Document Type and Printing Conditions Windows You can specify your own print settings instead of usin...

Страница 69: ...Settings Note For instructions on adjusting color see Adjusting the Color in the Printer Driver P 60 10 Select the KSharpen Text check box 11 Click the Page Setup tab to display the Page Setup sheet 12 Confirm the settings of APage Size LPaper Source and so on 13 Confirm the print settings and print as desired Note For tips on confirming print settings see Confirming Print Settings P 161 iPF850 Ch...

Страница 70: ...pending on the OS you are using and the applica tion software In this case select Print from the menu in the appli cation software and configure the settings in the up per part of the printer driver screen that is displayed 2 Select the printer in the BFormat for list 3 Choose the original size in the CPaper Size list 4 Click FOK to close the dialog box 5 In the application menu choose Print 6 Acc...

Страница 71: ...st 12 To adjust the brightness and contrast click ISet Note For instructions on adjusting brightness and contrast see Adjusting the Color in the Printer Driv er P 60 13 Access the Page Setup pane 14 Confirm the print settings and then click MPrint to start printing Note For tips on confirming print settings see Confirming Print Settings P 270 iPF850 Choosing the Document Type and Printing Conditio...

Страница 72: ... you are using For instructions on printing with resizing to fit the paper size refer to the following topics Resizing Originals to Match the Paper Size Windows P 72 Note To print with resizing to fit the paper size on Mac OS use Scale to fit paper size in the Paper Handling panel provided by the OS For more information see the Mac OS User Manual For better printing results when enlarging photos f...

Страница 73: ...rint Target list 6 Click the Page Setup tab to display the Page Setup sheet 7 Select and click a roll paper in the LPaper Source list 8 Select the width of the loaded roll in the MRoll Paper Width list in this case ISO A2 A3 Roll 420 0mm 9 In the APage Size list click the size of the original as specified in the application In this case click ISO A4 10 Select the CEnlarged Reduced Printing check b...

Страница 74: ... as desired Resizing Originals to Fit the Roll Width Windows Resizing Originals to Fit the Roll Width Windows This topic describes how to enlarge originals before printing to match the roll width based on the following exam ple Document Any type Page size A4 210 0 297 0 mm Letter 8 3 11 7 in Paper Roll Paper type Plain Paper Roll paper width 16 inches 406 4 mm 1 Choose Print in the application men...

Страница 75: ...et list 6 Click the Page Setup tab to display the Page Setup sheet 7 Select and click a roll paper in the LPaper Source list 8 In the APage Size list click the size of the original as specified in the application In this case click ISO A4 or Letter 8 5 x11 iPF850 Resizing Originals to Fit the Roll Width Windows User s Guide Enhanced Printing Options Printing enlargements or reductions 75 ...

Страница 76: ...ettings and print as desired Note For tips on confirming print settings see Confirming Print Settings P 161 Resizing Originals to Fit the Roll Width Mac OS Resizing Originals to Fit the Roll Width Mac OS This topic describes how to enlarge originals before printing to match the roll width based on the following exam ple Document Any Type Page size A4 210 0 297 0 mm 8 3 11 7 in Paper Roll paper Pap...

Страница 77: ...mat for list 3 In CPaper Size click the size of the original In this case click ISO A4 4 Click FOK to close the dialog box 5 Choose Print in the application menu 6 Access the Main pane 7 In the AMedia Type list select the type of paper that is loaded In this case click Plain Paper 8 Make your selection in the EPrint Target list 9 Make your selection in the FPrint Quality list iPF850 Resizing Origi...

Страница 78: ...ue Resizing Originals by Entering a Scaling Value You can freely adjust the size of originals by enlarging or reducing them as desired Enlarged Reduced Printing Enlarge or reduce the original in the printer driver as desired Scaling Enlarge or reduce originals by a particular amount as desired For instructions on entering a scaling value to resize originals refer to the following topics as appropr...

Страница 79: ...3 11 7 in Paper Roll paper Paper type Plain Paper Roll paper width A2 A3 roll 420 0 mm 16 5 in Important In borderless printing you cannot resize originals by entering a scaling value 1 Choose Print in the application menu 2 Select the printer in the dialog box and then display the printer driver dialog box See Accessing the Printer Driver Dialog Box from Applications P 164 3 Make sure the Main sh...

Страница 80: ...and right edges of the paper will not be printed If the original size after enlargement or reduction is smaller than the paper size the original is printed in the upper left corner In this case you can center originals by selecting EPrint Centered on the Lay out sheet 13 Confirm the print settings and print as desired Note For tips on confirming print settings see Confirming Print Settings P 161 R...

Страница 81: ...he menu in the appli cation software and configure the settings in the up per part of the printer driver screen that is displayed 2 Select the printer in the BFormat for list 3 In CPaper Size click the size of the original In this case click ISO A4 4 Click FOK to close the dialog box 5 Choose Print in the application menu 6 Access the Main pane 7 In the AMedia Type list select the type of paper th...

Страница 82: ...largement that exceeds the paper size but in this case the portion off the edge of the paper will not be printed If the original size after enlargement or reduction is smaller than the paper size the original is printed in the upper left corner In this case you can center originals by selecting the JPrint Centered check box 15 Confirm the print settings and then click MPrint to start printing Note...

Страница 83: ...ons outside of the region of the original to give the result as shown in Figure c The A4 size print as shown in Figure b can then be obtained by trimming the margins from the periphery after printing Important When printing on Oversize paper load paper larger than the page size a size that includes the margin required by the printer Sheets Load paper that is at least 10 mm 0 39 in wider and 28 mm ...

Страница 84: ...d then display the printer driver dialog box See Accessing the Printer Driver Dialog Box from Applications P 164 3 Make sure the Main sheet is displayed 4 In the AMedia Type list select the type of paper that is loaded In this case click Plain Paper 5 Click the Page Setup tab to display the Page Setup sheet 6 Click OSize Options to display the Paper Size Options dialog box 7 In the Paper Size Opti...

Страница 85: ... Paper Roll paper Paper type Plain Paper Roll paper width A2 A3 roll 420 0 mm 16 5 in 1 Choose Page Setup from the application menu to display the Page Attributes dialog box Note Page Setup might not be displayed in the menu de pending on the OS you are using and the applica tion software In this case select Print from the menu in the appli cation software and configure the settings in the up per ...

Страница 86: ...Setup pane 11 Select and click a roll paper in the APaper Source list 12 Select the paper width of the roll loaded in the printer for BRoll Width In this case ISO A2 A3 420 0mm is selected 13 Confirm the print settings and then click MPrint to start printing Note For tips on confirming print settings see Confirming Print Settings P 270 Printing at Full Size Mac OS iPF850 User s Guide Enhanced Prin...

Страница 87: ...he original If the length of the image to print is short then since the roll paper is fed out to a prescribed length before cutting in order to prevent cutting problems and ejection problems the trailing edge of the roll paper might not be printed borderless These features cannot be used in combination with borderless printing special page layouts centering originals and printing cut lines on roll...

Страница 88: ...non Glossy Photo Paper 170gsm Roll paper width 10 inches 254 0 mm 1 Create the original in the source application 3 mm 0 12 in larger on each side than 254 0 304 8 mm 10 12 in that is 260 0 310 8 mm 10 2 12 2 in Note If you can specify the margin as in Microsoft Word set the margin at 0 mm For instructions on specifying the margin refer to the software documentation The extra 3 mm 0 12 in on each ...

Страница 89: ...ges setting of Drying Time 7 Click the Page Setup tab to display the Page Setup sheet 8 In the APage Size list click the size of the original as specified in the source application In this case click 10 x12 9 Select and click a roll paper in the LPaper Source list 10 Select the BBorderless Printing check box to dis play the Information dialog box 11 Select the width of the loaded roll in the Roll ...

Страница 90: ...orderless Paper Roll Paper type Canon Glossy Photo Paper 170gsm Roll paper width 10 inches 254 0 mm 1 Choose Page Setup from the application menu to display the Page Attributes dialog box Note Page Setup might not be displayed in the menu de pending on the OS you are using and the applica tion software In this case select Print from the menu in the appli cation software and configure the settings ...

Страница 91: ... is cut depending on frequency of use In this kind of situation change the ink drying time in Between Pages in the Paper Detailed Settings dialog box 10 Access the Page Setup pane 11 Select and click a roll paper in the APaper Source list Select the paper width of the roll loaded in the printer for BRoll Width In this case 10 in 254 0mm is selected 12 Confirm the print settings and then click MPri...

Страница 92: ... because the top and bottom of the printed image are not automatically cut When paper where the borderless printing is described as two edges only in the Paper Reference Guide paper where printed image areas cannot be cut cleanly is selected When the following settings are made in the printer control panel Cutting Mode is Manual CutDustReduct is On When auto cut is configured as not performed in t...

Страница 93: ... This topic describes how to enlarge originals before borderless printing to match the paper size based on the fol lowing example Important When borderless printing is used the edge of the paper is cut during printing Thus ink density may be uneven at the edges If you require higher image quality select No from the Automatic Cutting list in the Roll Paper Op tions dialog box In this case the paper...

Страница 94: ...rfaces that are not dry yet it may damage the paper or the edge of the document that is cut depending on frequency of use In this kind of situation change the ink drying time using the following procedure Click Advanced Settings in Media Type Select an ink drying time in the list for the Between Pages setting of Drying Time 7 Click the Page Setup tab to display the Page Setup sheet 8 In the APage ...

Страница 95: ...ing you can print documents without the margin so that the printed image covers the entire surface of the paper Borderless printing is only available with rolls Paper you can use for borderless printing is restricted to particular types of paper and rolls of particular widths See Displaying the Paper Reference Guide P 335 Although it normally prints borderless on the top bottom left and right 4 ed...

Страница 96: ... that the original width rela tive to portrait orientation matches the roll paper width in borderless printing For instructions on borderless printing of photos images and other documents to match the roll paper width refer to the following topics as appropriate for your operating system Borderless Printing by Resizing Originals to Fit the Roll Width Windows P 96 Borderless Printing by Resizing Or...

Страница 97: ...case click Canon Glossy Photo Paper 170gsm 6 Select the print target in the EPrint Target list Important When you are using paper that takes longer for ink to adhere for borderless printing and the Cutter Unit touches printing surfaces that are not dry yet it may damage the paper or the edge of the document that is cut depending on frequency of use In this kind of situation change the ink drying t...

Страница 98: ...derless Printing by Resizing Originals to Fit the Roll Width Mac OS This topic describes how to enlarge originals before borderless printing to match the roll width based on the follow ing example Important When borderless printing is used the edge of the paper is cut during printing Thus ink density may be uneven at the edges If you require higher image quality select No from the Automatic Cuttin...

Страница 99: ...s displayed 2 Select the printer in the BFormat for list 3 In CPaper Size click the size of the original In this case click ISO A4 Note All sizes are available in borderless printing if you resize originals to fit the roll width 4 Click FOK to close the dialog box 5 In the application create an original that takes up the entire space of the paper size 6 Choose Print in the application menu 7 Acces...

Страница 100: ...Between Pages in the Paper Detailed Settings dialog box 10 Access the Page Setup pane 11 In the APaper Source list click Roll Paper 1 or Roll Paper 2 12 Select the paper width of the roll loaded in the printer for BRoll Width In this case 10 in 254 0mm is selected 13 Select the DEnlarged Reduced Printing check box 14 Select FFit Roll Paper Width 15 Select the HBorderless Printing check box 16 Conf...

Страница 101: ...Fit Roll Paper Width To match the width of vertical and horizontal banners with the width of rolls use the printer driver function for auto matically enlarging reducing and printing For example if you automatically enlarge a document created with application software such as Microsoft Word you can print the full width of the roll easily For instructions on printing vertical or horizontal banners r...

Страница 102: ...ize you then can select it repeatedly from the paper size list Custom Paper Size can be set up to 18 0 m 2 In the application create an original in the size you registered 3 Print the banner using the settings that correspond to banners Registering a Custom Paper Size This example describes how to register a paper size that is horizontally elongated and suitable for banners in either horizontal or...

Страница 103: ...ed as the printer to use In applications such as Microsoft PowerPoint that do not enable you to choose registered paper sizes use the custom paper size setting in Custom and specify 100 500 mm 3 9 19 7 in 4 Set the printing orientation to horizontal 5 Create the banner Printing the banner Follow these steps to print the banner using the corresponding banner settings 1 Choose Print in the Microsoft...

Страница 104: ...roll paper in the LPaper Source list 10 After you click EFit Roll Paper Width the Information dialog box is displayed 11 Select the width of the loaded roll in the Roll Paper Width list In this case click 16 in Roll 406 4mm and then click OK 12 Confirm the print settings and print as desired Note For tips on confirming print settings see Confirming Print Settings P 161 Printing Vertical or Horizon...

Страница 105: ...riginal designed for a horizontal banner Page Size Non standard 100 500 mm 3 9 19 7 in Paper Roll Paper type Plain Paper Roll paper width 16 inches 406 4 mm The print procedure is as follows 1 In the application create an original in the format of a horizontal or vertical banner 2 In Page Setup register Custom Paper Sizes Once you register Custom Paper Sizes you then can select it repeatedly from ...

Страница 106: ...0 in Width and 500 in Height Here measurements are entered in millimeters 7 Specify the margins by entering 3 in Non Printable Area Here too measurements are entered in millime ters 8 Click OK to close the Custom Paper Sizes dialog box 9 In the FPaper Size list click the size of the original In this case click 100 500 the size you registered 10 In GOrientation click the icon of the document in lan...

Страница 107: ...ge Setup pane 7 Select and click a roll paper in the APaper Source list 8 Select the paper width of the roll loaded in the printer for BRoll Width In this case 16 in 406 4mm is selected 9 Select the DEnlarged Reduced Printing check box 10 Click FFit Roll Paper Width iPF850 Printing Vertical or Horizontal Banners Large Format Printing Mac OS User s Guide Enhanced Printing Options Printing banners o...

Страница 108: ...er first register the paper size in the printer driver Call a non standard paper size registered in the printer driver with Custom Paper Size Once you register Custom Paper Size you then can select it repeatedly from the paper size list Custom Paper Size can be set up to 18 0 m Note Although you also can set Custom Size for the paper size temporarily the maximum settable size is 3 2 m Also the set...

Страница 109: ...0 Select mm in Units 11 Enter 430 16 9 in in both Width and Height Note If you select the Fix the Ratio of the Width to Height check box after you enter a value in either Width or Height the other value will be automatically applied based on the original aspect ratio 12 Click Add to register 430 mm Square 13 Click OK to close the Paper Size Options dialog box 14 Click Cut Sheet in the LPaper Sourc...

Страница 110: ...16 9 16 9 in 1 Load the square paper 430 430 mm 16 9 16 9 in in the printer 2 Choose Print in the application menu 3 Select the printer in the dialog box and then display the printer driver dialog box See Accessing the Printer Driver Dialog Box from Applications P 164 4 Make sure the Main sheet is displayed 5 In the AMedia Type list select the type of paper that is loaded 6 After confirming that D...

Страница 111: ... registered in the printer driver with Custom Paper Sizes Once you register Custom Paper Sizes you then can select it repeatedly from the paper size list Custom Paper Sizes can be set up to 18 0 m This topic describes how to register a non standard paper size by the name of 430 430 and print based on the following example Document Any Type Page Size A square sheet 430 430 mm 16 9 16 9 in Paper She...

Страница 112: ...llimeters 8 Double click Untitled in the list at left in the Custom Paper Sizes dialog box and enter the paper name in this case 430 430 9 Click OK to close the Custom Paper Sizes dialog box 10 In the FPaper Size list click the size of the original In this case click 430 430 the size you registered 11 If you configured the settings using the Page Attributes dialog box click OK to close the dialog ...

Страница 113: ...tion in the FPrint Quality list 16 Access the Page Setup pane 17 Click Cut Sheet in the APaper Source list 18 Confirm the print settings and then click MPrint to start printing Note For tips on confirming print settings see Confirming Print Settings P 270 iPF850 Printing on Non Standard Paper Sizes Mac OS User s Guide Enhanced Printing Options Printing banners or at other non standard sizes 113 ...

Страница 114: ...in Sections 126 Printing Large Posters Windows 126 Printing Multiple Originals Next to Each Other Printing Multiple Originals Next to Each Other By arranging originals from word processing or spreadsheet programs or web browser screen shots next to each other on single sheets you can create highly expressive presentation materials easy to understand meeting mate rials and a variety of other printe...

Страница 115: ...er Mac OS P 117 Printing Multiple Originals Next to Each Other Windows Printing Multiple Originals Next to Each Other Windows This topic describes how to arrange multiple originals using the Free Layout function 1 Choose Print in the application menu 2 Select the printer in the dialog box and then display the printer driver dialog box See Accessing the Printer Driver Dialog Box from Applications P...

Страница 116: ...t window as desired Note Without closing the imagePROGRAF Free Layout window repeat steps 1 7 to arrange originals from multiple applications on the same page For instructions on editing and rearranging images refer to the imagePROGRAF Free Layout help topic 9 Print from the imagePROGRAF Free Layout menu Note For details on imagePROGRAF Free Layout functions see Free Layout P 199 Printing Multiple...

Страница 117: ...t and rearrange the image in the Canon imagePROGRAF Free Layout window as desired Note Without closing the Canon imagePROGRAF Free Layout window repeat steps 1 to 4 to arrange origi nals from multiple applications on the same page For instructions on editing and rearranging images refer to the Canon imagePROGRAF Free Layout help topic 7 Print from the Canon imagePROGRAF Free Layout menu Note For d...

Страница 118: ...inting Multiple Pages Continuously Mac OS P 120 Printing Multiple Pages Continuously Windows Printing Multiple Pages Continuously Windows This topic describes how to print multiple pages as a single continuous image without margins between pages Important This feature is only available with rolls It cannot be used when printing on sheets When using Banner Printing some of the settings are disabled...

Страница 119: ...LPaper Source list 7 Click NRoll Paper Options to display the Roll Paper Op tions dialog box 8 Select the BBanner Printing check box 9 Click OK 10 Confirm the print settings and print as desired Note For tips on confirming print settings see Confirming Print Settings P 161 iPF850 Printing Multiple Pages Continuously Windows User s Guide Enhanced Printing Options Tiling and multiple pages per sheet...

Страница 120: ...tion menu to display the Page Attributes dialog box Note Page Setup might not be displayed in the menu de pending on the OS you are using and the applica tion software In this case select Print from the menu in the appli cation software and configure the settings in the up per part of the printer driver screen that is displayed 2 Select the printer in the BFormat for list 3 Choose the original siz...

Страница 121: ...Note For tips on confirming print settings see Confirming Print Settings P 270 Printing Multiple Pages Per Sheet Printing Multiple Pages Per Sheet To conserve paper you can print several pages of the original on a single sheet by reducing the original and divid ing the sheet into areas for each page Page Layout Specify a number of pages of the original to print on a single sheet in a layout of mul...

Страница 122: ...ultiple Pages Per Sheet Windows This topic describes how to print four pages of originals together on a single sheet based on the following example Document Any Type Page size A3 297 0 420 0 mm 11 7 16 5 in Paper Roll Paper type Plain Paper Roll paper width A2 A3 roll 420 0 mm 16 5 in 1 Choose Print in the application menu 2 Select the printer in the dialog box and then open the printer driver dia...

Страница 123: ...ck 4 Pages Sheet in the APage Layout list Note You can select the layout order for placing four pages on a sheet and a frame border in the Page Layout Printing dialog box by clicking BSet If you select a pattern to print borders the size of the images are reduced about 5 to create space for the printed border If None is selected then the images are not reduced for printing 14 Confirm the print set...

Страница 124: ...ing and the applica tion software In this case select Print from the menu in the appli cation software and configure the settings in the up per part of the printer driver screen that is displayed 2 Select the printer in the BFormat for list 3 In the CPaper Size list click the size of the original In this case click ISO A3 4 Click FOK to close the dialog box 5 Choose Print in the application menu 6...

Страница 125: ...3 Select and click a roll paper in the APaper Source list 14 Select the paper width of the roll loaded in the printer for BRoll Width In this case ISO A2 A3 420 0mm is selected 15 Confirm the print settings and then click MPrint to start printing Note For tips on confirming print settings see Confirming Print Settings P 270 iPF850 Printing Multiple Pages Per Sheet Mac OS User s Guide Enhanced Prin...

Страница 126: ...Windows Printing Large Posters Windows Printing Large Posters Windows You can enlarge an original to print it in sections on several sheets By assembling the printed sheets you can create a poster larger than the maximum supported paper size of the printer This topic describes how to enlarge an A2 original for printing it in sections on four sheets based on the following example Document Poster Pa...

Страница 127: ...box 11 Click Poster 2 x 2 in the APage Layout list Note Follow the steps below to print only a portion of the poster as divided for printing Click BSet under APage Layout to display the Pages to Print dialog box On the Pages to Print dialog box clear the check boxes of the portion you do not want to print Click OK to close the Pages to Print dialog box 12 Confirm the print settings and print as de...

Страница 128: ...tructions on centering originals when printing on roll paper refer to the following topics as appropriate for your operating system Printing Originals Centered on Rolls Windows P 128 Printing Originals Centered on Rolls Mac OS P 130 Printing Originals Centered on Rolls Windows Printing Originals Centered on Rolls Windows This topic describes how to center originals before printing on rolls based o...

Страница 129: ...the Page Setup sheet 7 In the APage Size list click the size of the original as specified in the application In this case click ISO A4 or Letter 8 5 x11 8 Select and click a roll paper in the LPaper Source list 9 Select the width of the loaded roll in the MRoll Paper Width list in this case ISO A3 A4 Roll 297 0mm iPF850 Printing Originals Centered on Rolls Windows User s Guide Enhanced Printing Op...

Страница 130: ... A4 210 0 297 0 mm 8 3 11 7 in Paper Roll paper Paper type Plain Paper Roll paper width A3 A4 roll 297 0 mm 11 7 in 1 Choose Page Setup from the application menu to display the Page Attributes dialog box Note Page Setup might not be displayed in the menu de pending on the OS you are using and the applica tion software In this case select Print from the menu in the appli cation software and configu...

Страница 131: ...Paper 8 Make your selection in the EPrint Target list 9 Make your selection in the FPrint Quality list 10 Access the Page Setup pane 11 Select and click a roll paper in the APaper Source list 12 Select the paper width of the roll loaded in the printer for BRoll Width In this case ISO A3 A4 297 0mm is selected 13 Select the JPrint Centered check box iPF850 Printing Originals Centered on Rolls Mac O...

Страница 132: ...riginals when printing on cut sheets refer to the following topics as appropriate for your operating system Printing Originals Centered on Sheets Windows P 132 Printing Originals Centered on Sheets Mac OS P 134 Printing Originals Centered on Sheets Windows Printing Originals Centered on Sheets Windows This topic describes how to reduce an original 50 for printing centered on a sheet Document Any T...

Страница 133: ...the Page Setup sheet 7 In the APage Size list click the size of the original as specified in the application In this case click ISO A4 8 Select the CEnlarged Reduced Printing check box 9 Click Match Page Size in the GPaper Size list 10 Click FScaling and enter 50 11 Click Cut Sheet in the LPaper Source list iPF850 Printing Originals Centered on Sheets Windows User s Guide Enhanced Printing Options...

Страница 134: ...c describes how to center originals for printing on sheets based on the following example Document Any Type Page size A4 Paper Sheets Paper type Plain Paper Paper size Non standard 1 Choose Page Setup from the application menu to display the Page Attributes dialog box Note Page Setup might not be displayed in the menu de pending on the OS you are using and the applica tion software In this case se...

Страница 135: ...n pane 7 In the AMedia Type list select the type of paper that is loaded In this case click Plain Paper 8 Make your selection in the EPrint Target list 9 Make your selection in the FPrint Quality list 10 Access the Page Setup pane 11 Click Cut Sheet in the APaper Source list 12 Select the JPrint Centered check box iPF850 Printing Originals Centered on Sheets Mac OS User s Guide Enhanced Printing O...

Страница 136: ...int settings see Confirming Print Settings P 270 Important If you have selected Cut Sheet as the paper source follow the instructions on the printer control panel to enter the paper size Printing Originals Centered on Sheets Mac OS iPF850 User s Guide Enhanced Printing Options Centering originals 136 ...

Страница 137: ...l Paper Width to print rotated pages For tips on conserving roll paper refer to the following topics as appropriate for your operating system Conserving Roll Paper by Rotating Originals 90 Degrees Windows P 137 Conserving Roll Paper by Rotating Originals 90 Degrees Mac OS P 138 Conserving Roll Paper by Rotating Originals 90 Degrees Windows Conserving Roll Paper by Rotating Originals 90 Degrees Win...

Страница 138: ...case ISO A3 A4 Roll 297 0mm 9 Select the KRotate Page 90 degrees Conserve Paper check box 10 Confirm the print settings and print as desired Note For tips on confirming print settings see Confirming Print Settings P 161 Conserving Roll Paper by Rotating Originals 90 Degrees Mac OS Conserving Roll Paper by Rotating Originals 90 Degrees Mac OS This topic describes how to conserve roll paper by rotat...

Страница 139: ...ht not be displayed in the menu de pending on the OS you are using and the applica tion software In this case select Print from the menu in the appli cation software and configure the settings in the up per part of the printer driver screen that is displayed 2 Select the printer in the BFormat for list 3 In CPaper Size click the size of the original In this case click ISO A4 4 Click FOK to close t...

Страница 140: ...s as suitable for your original No Spaces at Top or Bottom Conserve Paper You can print without feeding the paper for blank portions of originals if there are top and bottom margins in originals This enables you to conserve as much paper as the size of the margins Important Printing without the top and bottom margins is not supported in the following cases If you have chosen poster as the type of ...

Страница 141: ...er Roll Paper type Plain Paper Roll paper width A3 A4 roll 297 0 mm 11 7 in 1 Choose Print in the application menu 2 Select the printer in the dialog box and then display the printer driver dialog box See Accessing the Printer Driver Dialog Box from Applications P 164 3 Make sure the Main sheet is displayed 4 In the AMedia Type list select the type of paper that is loaded In this case click Plain ...

Страница 142: ...ginals Without Top and Bottom Margins Mac OS Conserving Roll Paper by Printing Originals Without Top and Bottom Margins Mac OS This topic describes how to conserve roll paper when printing originals that have a top and bottom margin based on the following example Document Any Type Page size A4 210 0 297 0 mm 8 3 11 7 in Paper Roll paper Paper type Plain Paper Roll paper width A3 A4 roll 297 0 mm 1...

Страница 143: ... the printer in the BFormat for list 3 In CPaper Size click the size of the original In this case click ISO A4 4 Click FOK to close the dialog box 5 Choose Print in the application menu 6 Access the Main pane 7 In the AMedia Type list select the type of paper that is loaded In this case click Plain Paper 8 Access the Page Setup pane iPF850 Conserving Roll Paper by Printing Originals Without Top an...

Страница 144: ...is selected 11 Select the KNo Spaces at Top or Bottom check box 12 Confirm the print settings and then click MPrint to start printing Note For tips on confirming print settings see Confirming Print Settings P 270 Conserving Roll Paper by Printing Originals Without Top and Bottom Margins Mac OS iPF850 User s Guide Enhanced Printing Options Conserving roll paper 144 ...

Страница 145: ...eview screen Note Under some settings and in some environments PageComposer may be started Preview Mac OS While viewing the preview screen you can also adjust layout or size settings and your changes will be instant ly applied on the preview screen For instructions on how to check the layout before printing refer to the following topics Checking the Layout in a Preview Before Printing Windows P 16...

Страница 146: ... Important Watermarks are not printed if you select poster as the type of page layout The following watermarks are provided CONFIDENTIAL COPY DRAFT FILE COPY FINAL PRELIMINARY PROOF TOP SECRET You can also create your own watermarks Specify the following options to customize your watermark Watermark string Specify the font size color and so on Surround the watermark with a frame if de sired Waterm...

Страница 147: ...rint in the application menu 2 Select the printer in the dialog box and then display the printer driver dialog box See Accessing the Printer Driver Dialog Box from Applications P 164 3 Make sure the Main sheet is displayed 4 In the AMedia Type list select the type of paper that is loaded In this case click Plain Paper 5 Make your selection in the EPrint Target list Note You can check the settings ...

Страница 148: ... settings and print as desired Note For tips on confirming print settings see Confirming Print Settings P 161 Making the Original Orientation Match the Paper Orientation Making the Original Orientation Match the Paper Orientation You can specify the original orientation to match the orientation of the paper for printing Orientation Paper is usually loaded in the printer in portrait orientation Whe...

Страница 149: ...llowing example Document An original in landscape orientation Page size A4 210 0 297 0 mm Letter 8 3 11 7 in Paper Roll Paper type Plain Paper Roll paper width A2 A3 roll 420 0 mm 16 5 in 1 Choose Print in the application menu 2 Select the printer in the dialog box and then open the printer driver dialog box See Accessing the Print er Driver Dialog Box from Applications P 164 3 Make sure the Main ...

Страница 150: ...ming Print Settings P 161 Making the Original Orientation Match the Paper Orientation Mac OS Making the Original Orientation Match the Paper Orientation Mac OS This topic describes how to print an original in landscape orientation after matching the paper orientation based on the following example Document An original in landscape orientation Page size A4 210 0 297 0 mm 8 3 11 7 in Paper Roll pape...

Страница 151: ...size of the original In this case click ISO A4 4 In DOrientation click the icon of the document in landscape orientation 5 Click FOK to close the dialog box 6 Choose Print in the application menu 7 Access the Main pane 8 In the AMedia Type list select the type of paper that is loaded In this case click Plain Paper 9 Make your selection in the EPrint Target list 10 Make your selection in the FPrint...

Страница 152: ...s Using these files is a convenient way to print under the same conditions on another computer In Windows For instructions on using favorites to print refer to the following topics as appropriate for your operating sys tem Using Favorites Windows P 162 Using Favorites Mac OS P 271 Cutting Roll Paper After Printing Cutting Roll Paper After Printing Roll paper can be automatically cut after printing...

Страница 153: ...inter in the dialog box and then display the printer driver dialog box See Accessing the Printer Driver Dialog Box from Applications P 164 3 Click the Page Setup tab to display the Page Setup sheet 4 Select and click a roll paper in the LPaper Source list 5 Click NRoll Paper Options to display the Roll Paper Op tions dialog box 6 To enable automatic cutting click Yes in the AAutomatic Cutting list...

Страница 154: ...ication menu to display the Page Attributes dialog box Note Page Setup might not be displayed in the menu de pending on the OS you are using and the applica tion software In this case select Print from the menu in the appli cation software and configure the settings in the up per part of the printer driver screen that is displayed 2 Select the printer in the BFormat for list 3 Choose the original ...

Страница 155: ...f click Print Cut Guideline Important If the automatic cut function has been deactivated on the printer change the auto cut setting on the printer Control Panel 12 Click OK to close the Paper Detailed Settings dialog box 13 Confirm the print settings and then click MPrint to start printing Note For tips on confirming print settings see Confirming Print Settings P 270 iPF850 Cutting Roll Paper Afte...

Страница 156: ...iPF850 User s Guide 156 ...

Страница 157: ...ce 230 Status Monitor 502 Accounting 507 Device Setup Utility 497 Media Configuration Tool 383 Mac OS Software 267 Handling and Use of Paper 331 Control Panel 429 Printer Parts 467 Network Setting 481 Print Job Management 501 Adjustments for Better Print Quality 555 Maintenance and Consumables 573 Troubleshooting 617 Error Message 651 Specifications 673 Appendix 677 imagePROGRAF Windows Software 1...

Страница 158: ...ent Sheet Monochrome 176 Object Adjustment Dialog box Monochrome 177 Page Setup Sheet 177 Output Method Dialog box 180 Paper Size Options Dialog Box 181 Layout Sheet 182 Page Options Dialog Box 183 Special Settings Dialog Box 184 Favorites Sheet 185 Utility Sheet 186 Support Sheet 187 Settings Summaries Dialog Box 187 Device Settings Sheet 188 Printer Driver Settings Printer Driver Settings For in...

Страница 159: ...83 Special Settings Dialog Box P 184 Favorites Sheet P 185 Groups of print settings you select on each sheet can be saved as a favorite Favorites you have added can be edited or used at the time of printing as desired Utility Sheet P 186 You can specify settings related to maintenance for the Printhead and feed amount as well as settings for Color imageRUNNER Enlargement Copy Support Sheet P 187 Y...

Страница 160: ...d 4 In the AMedia Type list select the type of paper that is loaded Note Click the BGet Information button to display the Paper Information on Printer dialog box On the Pa per Information on Printer dialog box you can obtain information on the paper in the printer and config ure printer driver settings for the feed source and type of paper This function requires that the Status Monitor be installe...

Страница 161: ...ntage of enlargement or reduction are indicated RBottom illustrations Illustrations indicate the feed source orientation borderless printing selection and other settings information Note To confirm the Print Target specified in Easy Settings click GView Settings on the Main sheet to display the View Settings dialog box Checking a print preview You can check an image of the original just as it will...

Страница 162: ...nt in the File menu Note For details on imagePROGRAF Preview functions see Preview P 189 Using Favorites Using Favorites This topic describes how to register favorites and print using favorite settings Registering a favorite This section describes the procedure for registering printing settings that have been changed in the driver as Fa vorites 1 Choose Print in the application menu 2 Select the p...

Страница 163: ...rite to be added as desired 9 Click OK to close the Add dialog box The favorite you have added is now displayed in AFavorites Note To save a favorite as a file click JExport and specify the file to save Printing using the favorite Follow the steps below to print using the favorite you have registered 1 Choose Print in the application menu 2 Select the printer in the dialog box and then display the...

Страница 164: ...m Applications Accessing the Printer Driver Dialog Box from Applications 1 Choose Print from the File menu to display the dialog box for printing conditions 2 Select the printer and then display the printer driver dialog box Note The dialog box for specifying printing conditions varies depending on the source application In some ca ses when you select the printer a sheet for configuring the printe...

Страница 165: ...alog box from the Windows system menu To use the settings continuously in all applications open the printer driver from the system menu to make the settings See Accessing the Printer Driver Dialog Box from the Operating System Menu P 165 Accessing the Printer Driver Dialog Box from the Operating System Menu Accessing the Printer Driver Dialog Box from the Operating System Menu 1 Open the folder of...

Страница 166: ... you make to the settings will apply to all applications you use for printing You can also access the printer driver dialog box from applications See Accessing the Printer Driver Dialog Box from Applications P 164 Main Sheet Main Sheet The following settings are available on the Main sheet For details on settings items refer to the printer driver help file Note On the Main sheet choose Easy Settin...

Страница 167: ...g time Paper Detailed Settings Dialog Box P 170 LOpen Preview When Print Job Starts When the check box is selected imagePROGRAF Preview is launched before printing This allows you to check on screen previews of documents before printing Checking the Layout in a Preview Before Printing P 145 MStatus Monitor Starts imagePROGRAF Status Monitor You can check the printer status job status and other con...

Страница 168: ...nt quality Giving Priority to Particular Graphic Elements and Colors for Printing P 66 GView Settings Displays the EPrint Target setting values You can view and change the order of EPrint Target setting values View Settings Dialog Box for the Printing Application P 172 Configuration using Advanced Settings EPrint Priority Choose the graphic elements that you want to emphasize for printing Giving P...

Страница 169: ...ing on the settings of AMedia Type and FPrint Quality you may not be able to select this option Note If you set FPrint Quality to Fast you can select UEconomy Printing However depending on AMedia Type and EPrint Priority you may not be able to select UEconomy Printing GColor Mode Choose the color mode Giving Priority to Particular Graphic Elements and Colors for Printing P 66 Note Depending on the...

Страница 170: ...inter driver select the desired Paper Source option and click OK Paper Detailed Settings Dialog Box Paper Detailed Settings Dialog Box In the Paper Detailed Settings dialog box you can set Drying Time for the paper selected with Media Type of the Main sheet etc You can display this dialog box by clicking Advanced Settings of Media Type on the Main sheet See Main Sheet P 166 As for the items for wh...

Страница 171: ...You can specify the length of a margin on the leading edge of paper to ensure that paper susceptible to curling is held firmly against the Platen ENear End Margin Specify the length of the Near End Margin the leading edge margin of the roll as needed Setting Item Details Printer Default The setting of the control panel of the printer is applied 3 mm 0 12 in The document is printed in the standard ...

Страница 172: ...and an icon CDetails Here you can confirm detailed settings values for each listed item for the selected Print Target Color Adjustment Sheet Color Color Adjustment Sheet Color If the color tone as printed is not as you expected you can adjust it on the Color Adjustment sheet Note To display the Color Adjustment sheet on the Main sheet click Color Settings by Color Mode in Advanced Settings See Mai...

Страница 173: ...and reducing the Saturation makes colors more subdued KObject Adjustment Select this option to display the Object Adjustment dialog box in which you can specify objects subject to color adjustment Object Adjustment Dialog box Color P 173 SDefaults Click to restore all settings on the sheet to the default values Note For details on settings items see Adjusting the Color in the Printer Driver P 60 O...

Страница 174: ...owing options are available when you select Driver Matching Mode in the AMatching Mode list AMatching Mode Select the color matching mode to use as desired Normally select Driver Matching Mode For color matching based on ICC profiles select ICC Matching Mode or Host ICM Mode depending on your color matching system BMatching Method Select the color matching method that suits the document to be prin...

Страница 175: ...s and Text clear Use the Same Profile for All Objects and specify the individual settings CPrinter Profile Settings Specify the printer profile as desired Normally select Auto Settings We recommend that you select an ICC profile created using commercially available profile creation software in order to perform color management accurately on paper other than genuine Canon paper and feed confirmed p...

Страница 176: ...ed You can adjust the brightness if the printed document is lighter or darker than the original image that is the original photo that was scanned or the original graphic as it ap pears on the computer screen IContrast Adjust the contrast of the darkest and lightest portions relative to each other as desired Increasing the Con trast makes images sharper and reducing the Contrast softens images JSat...

Страница 177: ...t this option to apply color adjustment to image areas such as photos BGraphics Select this option to apply color adjustment to graphics such as lines and circles CText Select this option to apply color adjustment to text Page Setup Sheet Page Setup Sheet The following settings are available on the Page Setup sheet For details on settings items refer to the printer driv er help file APage Size Sel...

Страница 178: ...able when DFit Paper Size is selected Choose the size of the paper you will print on For details on available paper sizes see Paper Sizes P 332 Paper sizes compatible with borderless printing are shown in the list CEnlarged Reduced Printing Choose from the following options when this setting is activated Resizing Originals to Match the Paper Size P 72 Resizing Originals to Fit the Roll Width P 74 ...

Страница 179: ... the Roll Paper Options dialog box Under AAutomatic Cutting you can specify Yes or No and Print Cut Guideline Cutting Roll Paper After Printing P 152 Select BBanner Printing when printing multiple pages continuously Printing Multiple Pages Continuously P 118 POutput Method Click to display the Output Method dialog box which enables you to complete the Output Method and Name of data to be saved set...

Страница 180: ...the destination personal box in the Mail box list If Print after reception is complete is checked you can prevent degradation of print quality that occurs when receiving a print job is interrupted and printing is aborted in the middle These can be selected as Print options BName of data to be saved To use the file name choose Use file name Otherwise choose Enter name and enter a name in Name CMail...

Страница 181: ...eated by users can be deleted from the APaper Size List as needed However they cannot be deleted in the following situations If a standard paper size of the printer driver is selected If an oversized paper size is selected If a paper size marked with a red circle is selected CCustom Paper Size Name You can name Custom Paper Size as desired DUnits Specify the desired unit of measure for the Custom ...

Страница 182: ... makes two settings available Watermarks and DEdit Watermark Printing With Watermarks P 146 Watermarks Lists the provided watermarks Choose the watermark to print DEdit Watermark Click to display the Edit Watermark dialog box for creating your own original watermark EPrint Centered Activate this setting to print document images in the center of the paper Printing Originals Centered on Rolls P 128 ...

Страница 183: ... how printing is processed Special Settings Dialog Box P 184 SDefaults Click to restore all settings on the sheet to the default values Page Options Dialog Box Page Options Dialog Box The Page Options dialog box offers the following settings Note To display the Page Options dialog box on the Layout sheet click Page Options See Layout Sheet P 182 APrint Date Select where the date is printed as desi...

Страница 184: ...setting details under the frame ASpooling at Printer Driver Sets whether or not print jobs are spooled in the printer driver and processed by PageComposer Printing results may be improved in some cases by setting this to No or No EMF Spooling Note When set to No or No EMF Spooling functions such as Page Layout Watermark Reverse Order Page Options FineZoom Settings and Preview Switchingcan no longe...

Страница 185: ... to the printer driver help AFavorites Printing favorites you have created are listed with Default Settings favorites Using Favorites P 152 BSettings Details Displays details of the favorite selected in the AFavorites CComment Displays notes registered in the favorite DApply Favorite Click to change the current print settings to those of the favorite selected in the AFavorites EApplication Setting...

Страница 186: ... sheet For details on the utilities refer to the relevant utility help AMaintenance Click to start the imagePROGRAF Status Monitor which offers the following maintenance for the printer Nozzle ink ejecting outlet check Nozzle ink ejecting outlet cleaning Head alignment adjustment Feed amount adjustment BColor imageRUNNER Enlargement Copy Click to launch Color imageRUNNER Enlargement Copy iR enlarg...

Страница 187: ...the Internet and display the printer user s manual CSettings Summaries Click to display the View Settings dialog box which enables you to confirm the settings for the Main Page Setup Layout and Favorites sheets Settings Summaries Dialog Box Settings Summaries Dialog Box The Settings Summaries dialog box enables you to confirm the settings for the Main Page Setup Layout and Favorites sheets ACopy C...

Страница 188: ... margins depending on the paper size being printed Always check Printing by Automatically Switching Between Upper and Lower Roll Paper P 32 before us ing the function BColor Compatibility Click to display the Color Compatibility dialog box which enables you to adjust colors if you have selected Color Mode Color CAD For details on color settings see Specifying Colors and Printing CAD Drawings P 57 ...

Страница 189: ... will be instantly applied on the preview screen and you can print the preview screen as it is seen Note The media type image size detailed media settings and the printer settings can cause the actual print output to differ from the Preview settings Starting Preview Starting Preview Follow the procedure below to start the Preview 1 Start the apllication software which you use 2 From the applicatio...

Страница 190: ...iew main window consists of the menu and tool bars preview and dialog area and status bar Note You can use the View menu to show or hide the tool bar Menu Bar This allows you to select menus required for operations Tool Bar This allows you to select tool buttons required for major operations Preview Main Window iPF850 User s Guide Windows Software Preview 190 ...

Страница 191: ...tings you made in this area Dialog Area This allows you to set the print conditions and perform a print job For more information about Dialog Area see Dialog Area P 192 iPF850 Preview Main Window User s Guide Windows Software Preview 191 ...

Страница 192: ...print which conserves paper by selecting the layout For more information about Layout Selection see Printing with Selecting the Layout P 195 Center Originals Across Roll You can print on the center of the media loaded in the printer For more information about Center Originals Across Roll see Print on the Center P 197 Note Available only if rolls are selected in Paper Source Dialog Area iPF850 User...

Страница 193: ...t Zoom from the View menu Setting Details Fit Screen Display all Fit to Width Display to the width of the paper Reduce Display at half of the standard size Standard Display at the standard size Enlarge Display with the double of the standard size Enlarge More Display with the triple of the standard size Note This item can be selected even if you have clicked the button in the toolbar Zoom Moving a...

Страница 194: ... Options menu Setting Details Rotate 90 Degrees If Possible Rotates pages in portrait orientation 90 degrees before printing Pages are only rotated if they can fit lengthwise across the roll Use Driver Settings Follows printer driver settings when determining whether to rotate pages Selecting Rotate 90 Degrees If Possible or Placing a checkmark for Rotate Page 90 degrees Conserve Paper on the prin...

Страница 195: ...rves paper by selecting the layout 1 In Layout Selection click the layout button to use Button Details Upper Button Turn at the position of Right Button Turn at the position of Left Button Turn at the position of iPF850 Printing with Selecting the Layout User s Guide Windows Software Preview 195 ...

Страница 196: ...ton you can save paper by printing in landscape orientation on roll paper You can select only Upper Button or Lower But ton if Cut Sheet is selected Button Details The button is selected currently The button can be selected The button can not be selected 2 Click the Print button Printing on the selected layout begins Printing with Selecting the Layout iPF850 User s Guide Windows Software Preview 1...

Страница 197: ...of the media loaded in the printer 1 Click the Center Originals Across Roll check box on 2 Click the Print button Printing on the center begins Note Available only if rolls are selected in Paper Source iPF850 Print on the Center User s Guide Windows Software Preview 197 ...

Страница 198: ... paper for the empty spaces when the print data contains spaces at the top or bottom 1 Click the No Spaces at Top or Bottom check box on 2 Click the Print button Printing on the settings with no spaces at top or bottom begins Not Print Spaces at the Top Bottom iPF850 User s Guide Windows Software Preview 198 ...

Страница 199: ...ures of Free Layout The Features of Free Layout The main features of Free Layout are as follows Allows you to lay out at will and print a document created with application software You can not only lay out multiple pages on one page but also lay out and print a multiple file document on one page or lay out and print a document created with multiple application programs on one page Any two pages ca...

Страница 200: ...cted in the lower left area of this screen 4 In the Layout sheet click on the Page Layout check box and select Free Layout from the list Click the OK button to save the settings Note When you select Free Layout all other setting items will be disabled 5 On the Print dialog box in the apllication software click the Print button Free Layout main window is displayed Starting Free Layout iPF850 User s...

Страница 201: ...yout area and status bar Note You can use the View menu to show or hide the tool and status bar Menu Bar This allows you to select menus required for operations Tool Bar This allows you to select tool buttons required for major operations iPF850 Free Layout Main Window User s Guide Windows Software Free Layout 201 ...

Страница 202: ...ttings from the File menu The printer driver is used to con figure basic settings to match the type of media loaded in the printer Refer to Printer Driver P 158 for details on the printer driver Note When you select the Detailed Settings the only three sheets displayed are the Main sheet the Page Setup sheet and theLayout sheet Some of the printer driver settings may be disabled Detailed Settings ...

Страница 203: ...ut between 1 and 10 You can change the numbers by clicking either button or button Grid Color Select the grid line color Auto Arrange Spacing Change the object to object spacing to be applied in the operation of laying out objects automatically Note You can input between 0 0 and 100 0 mm between 0 00 and 3 94 inch You can change the numbers by clicking either button or button Object Frame Style Yo...

Страница 204: ...ed in Paper Source You can input between 203 2 and 18000 0 mm between 8 00 and 708 66 inch You can change the numbers by clicking either button or button Order Set the object layout order The following settings are available for order Setting Details Upper Left to Right The objects are laid out from upper left to right Upper Left to Bottom The objects are laid out from upper left to bottom Upper R...

Страница 205: ...r reduce the screen dis play Scaling Set the magnification for enlargement or reduction of the screen display Note You can input between 25 and 400 You can change the numbers by clicking button Format Dialog Box Format Dialog Box This dialog box appears when you select Format from the Object menu after you select an object Size Sheet You can rotate enlarge or reduce an object Note When the objects...

Страница 206: ...e enlarged or reduced so that the width of each object matches the width of the roll paper Fit Photo Size Prints all of the objects at the specified photo size Note You can input between 25 and 600 You can change the numbers by clicking either button or button Position Sheet You can rotate enlarge or reduce an object Note When the objects are not selected you can not select Format Object Position ...

Страница 207: ...ple file document on one page 1 From the application software s File menu select the printer setup menu to open the Print dialog box Note Normally select Print from the File menu 2 Click Properties to open the Properties dialog box 3 In the Page Setup sheet select Paper Source Note Your printer is depicted in the lower left area of this screen iPF850 Laying out a Multiple File Document on One Page...

Страница 208: ...K button to save the settings 6 In the Print dialog box select the pages to print and the number of copies and click the OK button Free Layout starts laying out the document created with application software in the layout area as an ob ject 7 Leaving Free Layout running open other files with the application software and repeat the above steps Laying out a Multiple File Document on One Page iPF850 ...

Страница 209: ... 1 From the application software s File menu select the printer setup menu to open the Print dialog box Note Normally select Print from the File menu 2 Click Properties to open the Properties dialog box 3 In the Page Setup sheet select Paper Source Note Your printer is depicted in the lower left area of this screen iPF850 Laying out a Document Created with Multiple Application Programs on One Page...

Страница 210: ...e the settings 6 In the Print dialog box select the pages to print and the number of copies and click the OK button Free Layout starts laying out the document created with application software in the layout area as an ob ject 7 Leaving Free Layout running open other files with other application software and repeat the above steps Laying out a Document Created with Multiple Application Programs on ...

Страница 211: ...trl key To select all objects select Select All from the Edit menu When you specify the area with dragging the mouse the object in the area is selected Changing the Object Size Changing the Object Size You can change the object size by means of mouse operation or by specifying a scaling value Note The vertical to horizontal ratio remains unchanged when the object is enlarged or reduced Resizing by...

Страница 212: ...he numbers by clicking either button or button 3 Click the OK button Moving an Object Moving an Object You can move the object position 1 Select an object 2 Place the pointer inside the selection box of the ob ject to show the crosshair handle and drag it to move the object Alternatively you can move the Object Position by changing the values in Vertical Pos Horizontal Pos and Page Pos in the Form...

Страница 213: ... lays out objects Alternatively you may select Auto Arrange Object from the Object menu Note The object layout order varies depending on the Order setting in the Page Options Dialog Box P 204 dialog box Aligning Objects Aligning Objects You can align objects systematically 1 Select multiple objects 2 Click the align button from the toolbar Alternatively you may select the align menu from the Objec...

Страница 214: ...r Align Bottom Lays out the objects justifying them to the bot tom Align Left Lays out the objects justifying them to the left Center Horizontally Lays out the objects justifying them to the hori zontal center Aligning Objects iPF850 User s Guide Windows Software Free Layout 214 ...

Страница 215: ...t the Overlapping Order menu from the Object menu Note The order of overlapping affects the order of objects automatically laid out You can also select by clicking the right button of the mouse on an object Bring to Front Moves the object to the frontmost position Send to Back Moves the object to the backmost position iPF850 Changing the Object Overlapping Order User s Guide Windows Software Free ...

Страница 216: ...ick Paste from the toolbar Alternatively you may select Paste from the Edit menu Note The copied or cut object is laid out at the end of the page You can also select by clicking the right button of the mouse on an object In order to paste an object on any position that you like you can paste the object with Pointed Paste by clicking the right button of the mouse on any position that you want Pasti...

Страница 217: ...nes added The Folded Duplex window consists of the menu and tool bars layout area and status bar Note The toolbar and status bar can be toggled between hidden and displayed from the View menu Menu Bar This allows you to select menus required for operations Tool Bar This allows you to select tool buttons required for major operations iPF850 Folded Duplex Window User s Guide Windows Software Free La...

Страница 218: ...inished Size Settings from the Edit menu This allows you to con figure finished size settings Finished Size Selects the method for setting the finished size The following settings are available for the finished size Setting Details Fit Roll Paper Width Prints by automatically enlarging or reducing the entire document so that the width of the document matches the roll paper width Finished Size Sett...

Страница 219: ...inding edge Setting Details Bottom Prints by placing the binding margin gutter at the bottom of the document Top Prints by placing the binding margin gutter at the top of the document Binding Configures the binding margin gutter Prints by creating a binding margin gutter of the specified size Enter the margin size as a number Note The values that can be entered are 0 to 50 mm Print Fold Lines Conf...

Страница 220: ...log box from the Edit menu 4 Select Fit Roll Paper Width orSpecify Folded Size in Finished Size Note Rotate Page 90 degrees Conserve Paper is also available whenSpecify Folded Size is selected 5 Click OK to save the settings 6 Open the Binding Settings dialog box from the Edit menu 7 Select Bottom or Top in Binding Edge 8 Specify the Binding width in Binding 9 Configure the Fold Line Color and Fol...

Страница 221: ...tching methods in addition to borderless printing and enlargement reduction process without growing through the printer driver Note The media type image size detailed media settings and the printer settings can cause the actual print output to differ from the Color imageRUNNER Enlargement Copy settings Starting Color imageRUNNER Enlargement Copy Starting Color imageRUNNER Enlargement Copy Follow t...

Страница 222: ...gement Copy from the start button 1 From the Windows start button select Color imageRUN NER Enlargement Copy 2 The Color imageRUNNER Enlargement Copy dia log box displays Color imageRUNNER Enlargement Copy Dialog Box Color imageRUNNER Enlargement Copy Dialog Box The explanation below is on the Color imageRUNNER Enlargement Copy dialog box Note For the step to open the Color imageRUNNER Enlargement...

Страница 223: ... button to display the name and the version number of the utility Operation Guide Button Click the button to display the Color imageRUNNER Enlargement Copy Setup Manual Hot Folder Hot Folder Hot folder refers to a folder used for Color imageRUNNER Enlargement Copy When transferred to the PC s hot folder the document data scanned with the Color imageRUNNER is printed in enlarged size from the print...

Страница 224: ...the Next button 4 Select the media type to print Note If the Borderless Printing checkbox is checked only media types that can be used for borderless print ing are displayed in the list Click the Next button Creating a New Hot Folder iPF850 User s Guide Windows Software Color imageRUNNER Enlargement Copy 224 ...

Страница 225: ...share a folder Enter the folder shared name in Shared Name Click the Next button Note This shared name is used as the name of the hot folder You cannot use the Back button after clicking the Next button here 7 Click Finish button to close the Easy Setup Wizard dialog box iPF850 Creating a New Hot Folder User s Guide Windows Software Color imageRUNNER Enlargement Copy 225 ...

Страница 226: ... to specify as a hot folder 2 Open the Color imageRUNNER Enlargement Copy dialog box and then click the Add button Note For the step to open the Color imageRUNNER Enlargement Copy dialog box see Starting Color im ageRUNNER Enlargement Copy P 221 3 The Easy Setup Wizard dialog box displays Click the Manual Settings button Specifying an Existing Shared Folder as a Hot Folder iPF850 User s Guide Wind...

Страница 227: ...n with selecting Specify a folder to set the existing shared folder 5 The location of the folders will appear Select the folder to specify a hot folder and click the OK button iPF850 Specifying an Existing Shared Folder as a Hot Folder User s Guide Windows Software Color imageRUNNER Enlargement Copy 227 ...

Страница 228: ...arge ment Copy dialog box Setting the Print Parameters Setting the Print Parameters The printer driver opens when you click the Properties button in the Add Edit Hot Folder dialog box The printer driver is used to configure basic settings to match the type of media loaded in the printer Refer to Printer Driver P 158 for details on the printer driver Setting the Print Parameters iPF850 User s Guide...

Страница 229: ...NNER to send scanned originals to the hot folder After these settings are complete you can print enlarged copies of scanned originals from the Color imageRUN NER Completing the scanning settings on the Color imageRUNNER Configure the Color imageRUNNER to send scanned originals to the hot folder It is easy to send scanned originals to the hot folder if you assign the scanning settings and destinati...

Страница 230: ...ce It is displayed on the toolbar ribbon so it is easily accessible It can be set by just selecting from the Wizard Large Format Printing custom size can also be set in the Wizard from Microsoft Word or Microsoft Power Point Custom size can be set automatically from Microsoft Excel The layout can be checked before printing by starting the preview screen Note 64 bit edition Windows OS operates only...

Страница 231: ...ot appear automatically open the CD ROM drive icon of your computer and double click the iPFInst exe icon 2 Click the imagePROGRAF Print Plug In button 3 Click the Nextbutton 4 Read the License Agreement and click the Yes but ton iPF850 Steps to install User s Guide Windows Software Print Plug In for Office 231 ...

Страница 232: ...ay be displayed in Windows 8 or a later OS If this happens install the NET Frame work by following the procedure 7 Click the Exit button The installation for Print Plug In for Office is com plete Steps to install iPF850 User s Guide Windows Software Print Plug In for Office 232 ...

Страница 233: ...nning When Print Plug In for Office is not displayed When Print Plug In for Office is not displayed Buttons such as Start imagePROGRAF Print Plug In sometimes do not appear in the Word PowerPoint and Excel Office applications and the Print Plug In for Office functions are not available In this event re install Print Plug In for Office If you are using Microsoft Office 2003 or later you can also en...

Страница 234: ...oolbar ribbon Use the procedure below to restore the add ins disabled by Microsoft Office For Microsoft Office 2010 or later 1 Select Options from the File menu 2 From the list on the left side of the application name options dialog box select Add ins 3 Select Disabled Items in the Manage combo box and click the Go button 4 If Addin imageprograf print plug in ipfaddinif dll is dis played in the Di...

Страница 235: ...t Disabled Items in the Manage combo box and click the Go button 4 If Addin imageprograf print plug in ipfaddinif dll is dis played in the Disabled Items dialog box select it and click the Enable button 5 Close all the dialog boxes and restart the Office application For Microsoft Office 2003 iPF850 When Print Plug In for Office is not displayed User s Guide Windows Software Print Plug In for Offic...

Страница 236: ...estart the Office application To start from Microsoft Word To start from Microsoft Word Below are the steps to start Print Plug In for Office from Microsoft Word 1 Start Microsoft Word 2 If Start imagePROGRAF Print Plug In is displayed on the toolbar ribbon click it Important If the imagePROGRAF Print Plug In toolbar ribbon is not displayed refer to the following When Print Plug In for Office is n...

Страница 237: ...ant to display all printer drivers or update the display PrintButton The print Wizard is displayed The settings Print Matching Roll Width Borderless Printing Multi Page Printing and Print Using Registered Settings can be set Paper Settings Button Large Format Wizard is displayed Settings for Portrait or Landscape Orientation can be set Printing Wizard dialog box Important If you want to change the...

Страница 238: ... the edge of the roll width You can print large exhibits and posters and also print Portrait and Landscape orientations made in Large Format Printing Wizard 1 Start Microsoft Word 2 If Start imagePROGRAF Print Plug In is displayed click it 3 Click Print from the imagePROGRAF Print Plug In toolbar ribbon The Printing Wizard dialog box is displayed Important If you want to change the display to anot...

Страница 239: ...on is selected you can print posters etc vividly The settings are registered when the One Touch Registration is pressed This is convenient if you to need print multiple times using the same setting Press the Print Preview button to display the preview screen You can check and make changes to the layout in the preview screen When you print to the edge of the roll width the maximum length will be th...

Страница 240: ... to another file or application while the Printing Wizard is open close the Printing Wizard dialog box Otherwise you may not be able to change displays or operate the tool bar ribbon 4 Click Borderless Printing 5 A confirmation dialog box is displayed If the data fills up the page confirm that Continue using the plug in is selected in Choose how to proceed and press OK Note To adjust the data sele...

Страница 241: ...on is selected you can print posters etc vividly Press the One Touch Registration button to register the settings This is useful for multiple printing using the same settings Press the Print Preview button to display the preview screen You can confirm and make changes to the layout in the preview screen The maximum length for Borderless Printing is the lesser of 5 587 times the roll paper width or...

Страница 242: ...oolbar ribbon The Printing Wizard dialog box is displayed Important If you want to change the display to another file or application while the Printing Wizard is open close the Printing Wizard dialog box Otherwise you may not be able to change displays or operate the tool bar ribbon 4 Click Multi Page Printing 5 Select Roll Paper Width that is set in the printer 6 Select layout from Layout Selecti...

Страница 243: ...e preview screen The maximum length for Multi Page Printing is the lesser of 5 587 times the roll paper width or 18 0m 11 Press Print to start printing Register the settings Word Register the settings Word If you are going to print multiple times using the same setting you can select One Touch Registration Registered settings can be recalled from Print Using Registered Settings 1 Set up to the Pri...

Страница 244: ... Using Registered Settings Word Prints using the registered settings 1 Start Microsoft Word 2 If Start imagePROGRAF Print Plug In is displayed click it 3 Click Print from the imagePROGRAF Print Plug In toolbar ribbon The Printing Wizard dialog box is displayed Important If you want to change the display to another file or application while the Printing Wizard is open close the Printing Wizard dial...

Страница 245: ...rint quality is poor When Saturation is selected you can print posters etc vividly Press the Print Preview button to display the preview screen You can check and make changes to the layout in the preview screen The maximum print length when printing with the registered settings is the lesser of 5 587 times the roll paper width or 18 0m 9 Press Print to start printing iPF850 Print Using Registered ...

Страница 246: ...art imagePROGRAF Print Plug In is displayed click it 3 Click Paper Settings from the imagePROGRAF Print Plug In toolbar ribbon The Large Format Printing Wizard dialog box is displayed Note If you want to change the display to another file or application while the Large Format Printing Wizard is open close the Large Format Printing Wizard dialog box Otherwise you may not be able to change displays ...

Страница 247: ...t Important If the imagePROGRAF Print Plug In toolbar ribbon is not displayed refer to the following When Print Plug In for Office is not displayed P 233 3 Check that the imagePROGRAF Print Plug In toolbar ribbon is displayed 4 Click the buttons on the toolbar ribbon according to the items you want to set Icon Contents Menu Displays the About Help and Special Settings dialog boxes See Configuring ...

Страница 248: ...izard cannot be run Large Format Printing Wizard dialog box Important If you want to change the display to another file or application while the Large Format Printing Wizard is open close the Large Format Printing Wizard dialog box Otherwise you may not be able to change displays or operate the toolbar ribbon The layout may collapse if you create a form using existing data If that is the case modi...

Страница 249: ...rom the imagePROGRAF Print Plug In toolbar ribbon The Printing Wizard dialog box is displayed Important If you want to change the display to another file or application while the Printing Wizard is open close the Printing Wizard dialog box Otherwise you may not be able to change displays or operate the tool bar ribbon 4 Click Print Matching Roll Width 5 Select Roll Paper Width that is set in the p...

Страница 250: ...me setting Press the Print Preview button to display the preview screen You can check and make changes to the layout in the preview screen When you print to the edge of the roll width the maximum length will be the lesser of 14 22 times the roll paper width or 18 0m 12 Press Print to start printing Borderless Printing PowerPoint Borderless Printing PowerPoint Prints up to the border of the media P...

Страница 251: ... not be able to change displays or operate the tool bar ribbon 4 Click Borderless Printing 5 A confirmation dialog box is displayed If the data fills up the page confirm that Continue using the plug in is selected in Choose how to proceed and press OK Note To adjust the data select Return to application and press OK Exit Print Plug In for Office and return to the application iPF850 Borderless Prin...

Страница 252: ... multiple printing using the same settings Press the Print Preview button to display the preview screen You can confirm and make changes to the layout in the preview screen The maximum length for Borderless Printing is the lesser of 14 22 times the roll paper width or 18 0m 12 Press Print to start printing Multi Page Printing PowerPoint Multi Page Printing PowerPoint Prints multiple pages as one p...

Страница 253: ...on while the Printing Wizard is open close the Printing Wizard dialog box Otherwise you may not be able to change displays or operate the tool bar ribbon 4 Click Multi Page Printing 5 Select Roll Paper Width that is set in the printer 6 Select layout from Layout Selection 7 Select Next iPF850 Multi Page Printing PowerPoint User s Guide Windows Software Print Plug In for Office 253 ...

Страница 254: ... settings PowerPoint If you are going to print multiple times using the same setting you can select One Touch Registration Registered settings can be recalled from Print Using Registered Settings 1 Set up to the Print screen from Print Matching Roll Width Borderless Printing or Multi Page Printing of Printing Menu Note Up to 20 items can be registered The available settings are as follows Print Ma...

Страница 255: ... Print Plug In toolbar ribbon The Printing Wizard dialog box is displayed Important If you want to change the display to another file or application while the Printing Wizard is open close the Printing Wizard dialog box Otherwise you may not be able to change displays or operate the tool bar ribbon 4 Click Print Using Registered Settings iPF850 Print Using Registered Settings PowerPoint User s Gui...

Страница 256: ...roll paper width or 18 0m 9 Press Print to start printing Portrait Orientation Landscape Orientation PowerPoint Portrait Orientation Landscape Orientation PowerPoint Print to the edge of the roll width You can print large exhibits and posters or print the Landscape or Portrait Orien tation Page Sizes made in the Large Format Printing Wizard Create Page Size in Portrait or Landscape Orientation Use...

Страница 257: ...zard dialog box Otherwise you may not be able to change displays or operate the toolbar ribbon 4 Click Portrait Orientation or Landscape Orientation Note The steps taken to create a Portrait Page Size will be used as an example to explain the procedure 5 Adjust Length from the list box or slide bar 6 Click the Create Page button 7 ClickOK if the message is displayed iPF850 Portrait Orientation Lan...

Страница 258: ...rint Plug In toolbar ribbon is not displayed refer to the following When Print Plug In for Office is not displayed P 233 3 Check that the imagePROGRAF Print Plug In toolbar ribbon is displayed 4 Click the buttons on the toolbar ribbon according to the items you want to set Icon Contents Menu Displays the About Help and Special Settings dialog boxes See Configuring Spe cial Settings P 265 Printer l...

Страница 259: ...rinting If you click No you will return to the application If you do not use the set page break check the page break preview and change the setting If you click the Print button with a page range set a message dialog box will appear asking if you want to continue printing If you click No you will return to the application If you do not use the set page range check the page break preview and change...

Страница 260: ...the entire sheet cancel the setting of the print area The Printing Wizard dialog box is displayed 4 Click Print Entire Sheet A message will appear informing you that analysis is in progress Print Entire Sheet Excel iPF850 User s Guide Windows Software Print Plug In for Office 260 ...

Страница 261: ...oll Paper Width that is set in the printer 6 Select image size 7 Select layout 8 To configure Binding click the Binding Settings button Refer to Configuring Binding Excel P 264 for details on the procedure for configuring Binding 9 Select Next 10 Select Media Type 11 Enter Copies iPF850 Print Entire Sheet Excel User s Guide Windows Software Print Plug In for Office 261 ...

Страница 262: ... the range you select You cannot run Print or Print Preview if you select it for a worksheet with no data displayed Print Selected Area Excel Print Selected Area Excel For resizing the selected range of cells to fit the roll width Choose this option to enlarge a particular part of the sheet before printing 1 Start Microsoft Excel 2 If Start imagePROGRAF Print Plug In is displayed click it 3 Click ...

Страница 263: ...ssage will appear informing you that analysis is in progress The Layout menu will appear automatically Important If the range selected in Excel 2007 or later is too large it will not be possible to analyze the data Select a smaller range and then run the analysis iPF850 Print Selected Area Excel User s Guide Windows Software Print Plug In for Office 263 ...

Страница 264: ...d you can print posters etc vividly Press the Print Preview button to display the preview screen You can check and make changes to the layout in the preview screen When you print to the edge of the roll width the maximum print length is 18 0m 13 Press Print to start printing Important If divided into plural pages try reducing the data size or the range you select You cannot run Print or Print Prev...

Страница 265: ...ayout screen Check that the Binding settings are applied in the preview screen 7 Configure the settings in the Printing Wizard dialog box Configuring Special Settings Configuring Special Settings You can configure Special Settings from the imagePROGRAF Print Plug In toolbar 1 Click imagePROGRAF in the toolbar and select Special Settings 2 Turn the checkbox for the item you want to change on or off...

Страница 266: ...ts are created at the maximum size This reduces the enlargement ratio during actual printing which minimizes deg radation of the quality of photos etc This function is only valid in Microsoft PowerPoint Correct the print area when analyzing For data that cannot be processed with usual data analysis the print area is corrected and then the data is processed When data analysis fails you may be able ...

Страница 267: ...ree Layout 307 Printmonitor 505 Media Configuration Tool 405 Handling and Use of Paper 331 Control Panel 429 Printer Parts 467 Network Setting 481 Print Job Management 501 Adjustments for Better Print Quality 555 Maintenance and Consumables 573 Troubleshooting 617 Error Message 651 Specifications 673 Appendix 677 imagePROGRAF Mac OS Software 267 ...

Страница 268: ... Driver Settings For instructions on accessing the Mac OS printer driver refer to the following topics Accessing the Printer Driver Dialog Box from Applications P 272 For information on the Mac OS printer driver settings refer to the following topics Main Pane P 272 You can specify the media type color processing print quality print preview and other settings Choose Easy Settings to specify basic ...

Страница 269: ...een For details see Preview P 286 Specifying Paper in the Printer Driver Specifying Paper in the Printer Driver If you have replaced the paper you must complete the following settings in the printer driver 1 Choose Page Setup from the application menu to display the Page Attributes dialog box Note Page Setup might not be displayed in the menu de pending on the OS you are using and the applica tion...

Страница 270: ...printing applications For details on available printing conditions see Printer Driver Settings P 268 Confirming Print Settings Confirming Print Settings The ways to confirm what printing conditions have been specified are as follows Checking a print preview You can check an image of the original just as it will be printed Confirming the image of print jobs beforehand helps prevent printing errors ...

Страница 271: ...w check box 4 Click MPrint 5 The Canon imagePROGRAF Preview window is displayed 6 Check the layout and adjust settings in the Canon imagePROGRAF Preview window as desired 7 Print from the Canon imagePROGRAF Preview menu Note For details on imagePROGRAF Preview functions see Preview P 286 Using Favorites Using Favorites You can use the Presets function in Mac OS for favorite based printing iPF850 C...

Страница 272: ... choose the printer specify the range of pages number of copies and so on 2 Select the printer in the Printer list 3 Click Print to start printing As shown in the following illustration you can switch to other panes in this dialog box to complete settings for various methods of printing including enlarged and reduced printing borderless printing and so on Main Pane Main Pane The following settings...

Страница 273: ...o match the type of media such as the ink drying time Paper Detailed Settings Dialog Box P 276 OPrint Preview When the check box is selected imagePROGRAF Preview is launched before printing This allows you to check on screen previews of documents before printing Important When Free Layout is selected on the Page Setup panel Free Layout is disabled Checking the Layout in a Preview Before Printing P...

Страница 274: ... Choose the level of print quality GView set Click to display the View set dialog box which enables you to confirm the settings for the selected item from the EPrint Target list or change the order of items listed in EPrint Target View set Dialog Box for the Printing Application P 278 Configuration using Advanced Settings Main Pane iPF850 User s Guide Mac OS Software Printer Driver 274 ...

Страница 275: ...ality settings this mode may not be available Note If you set FPrint Quality to Fast you can select KEconomy Printing However depending on AMedia Type you may not be able to select KEconomy Printing RFast Graphic Process Select this option to print faster than usual when possible HColor Mode Choose the color mode Giving Priority to Particular Graphic Elements and Colors for Printing P 66 ISet Clic...

Страница 276: ...r paper in the Output Stacker with the ink dried even if Cutting Mode is set to Automatic Setting Item Details Printer Default The setting of the control panel of the printer is applied None Paper is ejected immediately after printing completes 30 sec 1 min 3 min 5 min 10 min 30 min 60 min Paper is ejected when the set time elapses after printing completes DBetween Scans You can set the time to wa...

Страница 277: ...s applied High Speed When the Standard setting does not result in a clean cut surface select this Standard Select this when you do not have any problems in automatic cutting Low Speed This helps prevent adhesive from sticking to the cutter and keeps the cutter sharp if you select it when using adhesive paper HAutomatic Cutting Set whether to perform roll cutting automatically or print a cut line T...

Страница 278: ... and an icon CDetails Here you can confirm detailed settings values for each item selected in the Print Target list Matching pane Matching pane On the Matching pane you can specify color matching to compensate for differences in the appearance of colors on various devices Important The Matching pane is not displayed when No color correction or Monochrome is selected in Color Mode Note To display t...

Страница 279: ...ent to be printed Various BMatching Method options are available depending on your selection in AMatching Mode EGamma You can adjust the gradation of intermediate tones in an image 2 2 is normally selected If you want a softer impression than 2 2 select 1 8 ICC Matching Mode The following options are available when you select ICC Matching Mode in the AMatching Mode list Note To display the Matchin...

Страница 280: ...e Printer Driver P 60 Color Settings Pane Color Color Settings Pane Color In general make any needed adjustments to the color of documents in the application used to create them Howev er if the color tone as printed is not as you expected you can also adjust the color in the printer driver If the color tone as printed is not as you expected you can adjust it on the Color Adjustment pane Note To di...

Страница 281: ... more subdued KObject Adjustment Select this option to display the Object Adjustment dialog box in which you can specify objects subject to color adjustment Object Adjustment dialog box Color P 281 Object Adjustment dialog box Color Object Adjustment dialog box Color In the Object Adjustment dialog box you can specify what type of print jobs to apply color adjustment to If an original comprises im...

Страница 282: ...agenta FYellow Not available GGray Tone Not available HBrightness Adjust the overall image brightness as desired You can adjust the brightness if the printed document is lighter or darker than the original image that is the original photo that was scanned or the original graphic as it ap pears on the computer screen IContrast Adjust the contrast of the darkest and lightest portions relative to eac...

Страница 283: ...stment to image areas such as photos BGraphics Select this option to apply color adjustment to graphics such as lines and circles CText Select this option to apply color adjustment to text Page Setup Pane Page Setup Pane The following settings are available on the Page Setup pane For details on settings items refer to the printer driv er help APaper Source Choose how paper is supplied Options disp...

Страница 284: ...red on Sheets P 132 KNo Spaces at Top or Bottom Select this checkbox to print the next image skipping blank areas above and below printable data in docu ments which enables you to conserve the paper Conserving Roll Paper by Printing Originals Without Top and Bottom Margins P 140 LRotate Page 90 degrees Select this checkbox to rotate the document image by 90 degrees before printing Conserving Roll ...

Страница 285: ...s complete You can prevent degradation of print quality that occurs when receiving a print job is interrupted and printing is aborted in the middle iPF850 Additional Settings Pane User s Guide Mac OS Software Printer Driver 285 ...

Страница 286: ... main features of Preview are as follows While viewing this screen you can adjust layout settings of a document created with application software You can not only adjust layout settings but also your changes will be instantly applied on the preview screen and you can print the preview screen as it is seen Note The media type image size detailed media settings and the printer settings can cause the...

Страница 287: ...box 5 Preview main window is displayed Preview Main Window Preview Main Window The Preview main window consists of the menu and tool bars and preview dialog drawer and status area iPF850 Preview Main Window User s Guide Mac OS Software Preview 287 ...

Страница 288: ...Bar This allows you to select menus required for operations Tool Bar This allows you to select tool buttons required for major operations Preview Area You can check the settings you made in this area Preview Main Window iPF850 User s Guide Mac OS Software Preview 288 ...

Страница 289: ...rea This allows you to display the thumbnails of a document This area appears when you click Drawer from the tool bar Alternatively you may select Drawer from the View menu Status Area This shows Input Size and Output Size iPF850 Preview Main Window User s Guide Mac OS Software Preview 289 ...

Страница 290: ...tings available on each mode are as follows Easy Settings P 291 Advanced Settings P 292 Paper Source You can select the paper source The following settings are available for paper source Setting Details Cut Sheet Select to print on the cut sheet Roll Paper 1 Select to print on the roll paper of Roll Paper 1 Upper Roll Paper 2 Select to print on the roll paper of Roll Paper 2 Lower Roll Paper Width...

Страница 291: ...st Setting Details Default Settings Suitable for printing normal documents that contain a mixture of text photographs and graphics Poster The best setting for posters Prints using vivid and high impact colors CAD Color Line Drawing Prints the fine lines of CAD drawings and other such documents sharp and clear CAD B W Line Drawing Suitable for printing CAD drawings with sharp dark lines Perspective...

Страница 292: ...etermined by the media type and print priority selections Printing time is longer and more ink is consumed with High than with Fast however print quality is higher Printing time is shorter and less ink is consumed with Fast than with High however print quality is lower For Highest quality the resolution is not displayed Advanced Settings Advanced Settings Presents detailed settings for the print q...

Страница 293: ...d The level of the print quality and resolution settings are displayed in the following combinations Setting Details Print Quality Highest quality Highest High Standard Fast Resolution 1200dpi 600dpi 300dpi Note The availability of settings is determined by the media type and print priority selections Printing time is longer and more ink is consumed with High than with Fast however print quality i...

Страница 294: ...rint Centered Paper Size You can select the size of the print media Note This is not displayed when Fit Roll Paper Width is set in Enlarged Reduced Printing Print Centered You can print on the center of the media loaded in the printer For more information about Print Centered see Print on the Center P 303 Note This is not displayed when a checkmark is placed in Borderless Printing No Spaces at Top...

Страница 295: ... mono chrome Color CAD Prints lines in the best color possible so they are easy to see Monochrome Bitmap Prints all colors other than white in black Monochrome BK ink Select to print all lines with black ink No color correction Prints without performing color matching in the printer driver Select this when color match ing is performed by the application such as Adobe Photoshop or when you want to ...

Страница 296: ...olor on Color Mode in the Color Settings panel 2 Select Color Adjustment 3 Drag each slider to the left or right to adjust Setting Details Cyan Adjusts the strength of colors to compensate the hues Magenta Adjusts the strength of colors to compensate the hues Yellow Adjusts the strength of colors to compensate the hues Brightness Adjusts the brightness of the entire image When the results of the p...

Страница 297: ...the Color Settings panel 2 Select Color Adjustment 3 Drag each slider to the left or right to adjust Setting Details Brightness Adjusts the brightness of the entire image When the results of the printout are brighter than the original images such as the original photo before scanning and graphics cre ated on the display or when you want to print in different degrees of brightness use this feature ...

Страница 298: ...es for digital cameras and scanners ICC profiles created using the profile creation tool etc ColorSync P 301 Enables color matching by using the ColorSync function of OS X Select this if you want to perform soft proofing using ColorSync before printing Note You need to set each correction on the printer driver ColorSync needs to be selected in the Color Matching panel of the driver in order to sel...

Страница 299: ...etails Auto Automatically selects the best color matching method for each Image Graphics Text Perceptual Color matching optimized for printing typical photos attractively Smooth gradation is a feature This is also an easy to use mode when performing color adjustment using ap plication software Saturation Color matching optimized for printing posters etc vividly Colorimetric Color matching optimize...

Страница 300: ... colors in input color space This is the easiest to use mode when you want to adjust the color and print However gradation may be lost for colors of wider range than the color reproduction range of the printer Generally this is also called relative colorimetric Colorimetric No White Point Cor rection The processing method of color matching is identical to Colorimetric Use this when you want to fur...

Страница 301: ...ferences from the imagePROGRAF Advanced Preview menu You can set the preferences for Preview Units Set the unit for paper length margins and so on Zoom Dialog Box Zoom Dialog Box This dialog box appears when you select Zoom from the View menu You can enlarge or reduce the screen dis play Scaling Set the magnification for enlargement or reduction of the screen display iPF850 ColorSync User s Guide ...

Страница 302: ...orderless printing function to print without margins surrounding the image Note With some media borderless printing can be performed only between two edges To use the borderless printing function the specified media must be set to the printer Do not perform borderless printing when using the stacker Doing so may cause a paper jam 1 On the Paper Settings Panel P 290 select Roll Paper in Paper Sourc...

Страница 303: ...ot Print Spaces at the Top Bottom You can save paper on not to feed roll paper for the empty spaces when the print data contains spaces at the top or bottom Note This is not displayed when a checkmark is placed in Borderless Printing 1 On the Paper Settings Panel P 290 select Roll Paper in Paper Source 2 On the Output Settings Panel P 293 click the No Spaces at Top or Bottom check box on 3 Click t...

Страница 304: ...Left 90 Degrees 4 Click the Print button Printing on rotating 90 degrees begins Display with Fitting to the Width of the Paper Display with Fitting to the Width of the Paper In the preview area you can display to the width of the paper 1 Select Fit to Width from the tool bar 2 Fitting to the width of the paper it is displayed Display with All Display with All In the preview area you can display al...

Страница 305: ...om the tool bar 2 Actual size is displayed Moving a Page Moving a Page You can move a page to display in the preview area 1 Select each button in Go to Page on the tool bar Setting Details Go to the first page Go to the previous page Go to the next page Go to the last page iPF850 Display with Actual Size User s Guide Mac OS Software Preview 305 ...

Страница 306: ...2 The target page appears Note You can also move a page by clicking the page on the thumbnails Moving a Page iPF850 User s Guide Mac OS Software Preview 306 ...

Страница 307: ...f Free Layout The Features of Free Layout The main features of Free Layout are as follows Allows you to lay out at will and print a document created with application software You can not only lay out multiple pages on one page but also lay out and print a multiple file document on one page or lay out and print a document created with multiple application programs on one page Note The media type im...

Страница 308: ...isplayed Free Layout Main Window Free Layout Main Window The Free Layout main window consists of the menu and tool bars layout area and dialog areas Note You can use the View menu to show or hide the tool Free Layout Main Window iPF850 User s Guide Mac OS Software Free Layout 308 ...

Страница 309: ... select tool buttons required for major operations Layout Area This allows you to lay out objects and edit the object size and orientation Dialog Area This allows you to set the print conditions and perform a print job iPF850 Free Layout Main Window User s Guide Mac OS Software Free Layout 309 ...

Страница 310: ...ngs available on each mode are as follows Easy Settings P 311 Advanced Settings P 312 Paper Source You can select the paper source The following settings are available for paper source Setting Details Cut Sheet Select to print on the cut sheet Roll Paper 1 Select to print on the roll paper of Roll Paper 1 Upper Roll Paper 2 Select to print on the roll paper of Roll Paper 2 Lower Roll Paper Width T...

Страница 311: ... Default Settings Suitable for printing normal documents that contain a mixture of text photographs and graphics Poster The best setting for posters Prints using vivid and high impact colors CAD Color Line Drawing Suitable for printing fine lines such as drawings clearly CAD B W Line Drawing Suitable for printing CAD drawings with sharp dark lines Perspective GIS Suitable for attractive printing o...

Страница 312: ...mined by the media type and print priority selections Printing time is longer and more ink is consumed with High than with Fast however print quality is higher Printing time is shorter and less ink is consumed with Fast than with High however print quality is lower For Highest quality the resolution is not displayed Advanced Settings Advanced Settings Presents detailed settings for the print prior...

Страница 313: ...f the printed image and printing speed The level of the print quality and resolution settings are displayed in the following combinations Setting Details Print Quality Highest quality Highest High Standard Fast Resolution 1200dpi 600dpi 300dpi Note The availability of settings is determined by the media type and print priority selections Printing time is longer and more ink is consumed with High t...

Страница 314: ...lity of settings depends on the print priority and media type selections Color Adjustment Matching You can set the color adjustment and matching Color Adjustment P 314 Matching P 316 Note Matching is not displayed if No color correction has been selected in Color Mode Restore Defaults Button Click the button to reset to the setting when starting Free Layout Print Button Click the button to begin p...

Страница 315: ...ness use this feature Contrast Adjusts the relative brightness between the brightest and darkest portions of the image For soft gradation decrease the contrast For hard gradation increase the contrast Saturation Adjusts the hues for vivid color or dark color Gray Tone Adjusts gray from cool black bluish tones to warm black reddish tones Note You can also click the up or down arrow or enter the num...

Страница 316: ...fferent degrees of brightness use this feature Contrast Adjusts the relative brightness between the brightest and darkest portions of the image For soft gradation decrease the contrast For hard gradation increase the contrast Note You can also click the up or down arrow or enter the number directly to increase or decrease the value Matching Matching You can set the matching Important If No color c...

Страница 317: ...nc function of OS X Select this if you want to perform soft proofing using ColorSync before printing Note You need to set each correction on the printer driver ColorSync needs to be selected in the Color Matching panel of the driver in order to select ColorSync Matching Method You can select a matching method to suit the print job Gamma You can adjust the gradation of intermediate tones in an imag...

Страница 318: ...cs Text Perceptual Color matching optimized for printing typical photos attractively Smooth gradation is a feature This is also an easy to use mode when performing color adjustment using ap plication software Saturation Color matching optimized for printing posters etc vividly Colorimetric Color matching optimized for printing image data with accurate colors in input color space This is the easies...

Страница 319: ...olors in input color space This is the easiest to use mode when you want to adjust the color and print However gradation may be lost for colors of wider range than the color reproduction range of the printer Generally this is also called relative colorimetric Colorimetric No White Point Cor rection The processing method of color matching is identical to Colorimetric Use this when you want to furth...

Страница 320: ...he imagePROGRAF Advanced Preview menu You can set the preferences for Free Layout Units Set the unit for paper length margins and so on Gridlines You can input a grid line width value in numerical characters so that they serve as a guide to laying out ob jects Note You can input between 10 0 and 200 0 mm between 0 39 and 7 87 inch You can change the numbers by clicking either button or button Colo...

Страница 321: ...cing Change the object to object spacing to be applied in the operation of laying out objects automatically Note You can input between 0 0 and 100 0 mm between 0 00 and 3 94 inch You can change the numbers by clicking either button or button Page Setup Dialog Box Page Setup Dialog Box This dialog box appears when you select Page Setup from the File menu This dialog box provides selections for sett...

Страница 322: ...upper left to bottom Note When you have selected Roll Paper Length Auto Settings and Paper Orientation Vertical you can choose only Upper Left to Right When you have selected Roll Paper Length Auto Settings and Paper Orientation Horizontal you can choose only Upper Left to Bottom Paper Size You can select the size of the print media Note You cannot display this if Roll Paper is selected in Paper S...

Страница 323: ...and 400 You can change the numbers by clicking either button or button Object Size You can confirm the object size Note When several objects are selected you cannot display Object Size Laying out a Multiple File Document on One Page Laying out a Multiple File Document on One Page You can lay out and print a multiple file document on one page 1 From the application software s File menu select the p...

Страница 324: ...eated with application software in the layout area as an ob ject 4 Leaving Free Layout running open the files with other application software and repeat the above steps Selecting an Object Selecting an Object When an object is selected a select box blue border appears around the object Note To select an object click that object To select multiple successive objects click them while holding down th...

Страница 325: ...nlargement or reduction You either enter numbers directly Note You can input between 25 and 400 You can change the numbers by clicking either button or button 4 Click the OK button Moving an Object Moving an Object You can move the object position 1 Select an object 2 Place the pointer inside the selection box of the ob ject to show the crosshair handle and drag it to move the object Rotating an O...

Страница 326: ...ly Click Auto Arrange in the tool bar This automatically lays out objects Alternatively you may select Auto Arrange Object from the Object menu Note The object layout order varies depending on the Order setting on the Page Setup Dialog Box P 321 Aligning Objects Aligning Objects You can align objects systematically 1 Select multiple objects 2 Select the align menu from the Object menu Align Top La...

Страница 327: ...er Align Bottom Lays out the objects justifying them to the bot tom Align Left Lays out the objects justifying them to the left Center Horizontally Lays out the objects justifying them to the hori zontal center iPF850 Aligning Objects User s Guide Mac OS Software Free Layout 327 ...

Страница 328: ...object overlapping order 1 Select an object 2 Select the overlapping order menu from the Object menu Bring to Front Moves the object to the frontmost position Send to Back Moves the object to the backmost position Bring Forward Moves the object one position to the front Changing the Object Overlapping Order iPF850 User s Guide Mac OS Software Free Layout 328 ...

Страница 329: ...ick Copy or Cut from the toolbar Alternatively you may select Copy or Cut from the Edit menu 2 Click Paste from the toolbar Alternatively you may select Paste from the Edit menu Note The copied or cut object is laid out at the end of the page iPF850 Pasting a Copied or Cut Object User s Guide Mac OS Software Free Layout 329 ...

Страница 330: ...iPF850 User s Guide 330 ...

Страница 331: ... Handling sheets 369 Stacker 375 Media Configuration Tool Windows 383 Media Configuration Tool Mac OS 405 Control Panel 429 Printer Parts 467 Network Setting 481 Print Job Management 501 Adjustments for Better Print Quality 555 Maintenance and Consumables 573 Troubleshooting 617 Error Message 651 Specifications 673 Appendix 677 imagePROGRAF Handling and Use of Paper 331 ...

Страница 332: ...ee Displaying the Paper Reference Guide P 335 Method of Updating Supported Paper Paper that is supported by the printer may be newly released on the Canon website To use newly released paper register the latest paper information on the printer with the Media Configuration Tool See Updating paper information P 338 Important Even if you are not using the printer driver you should install the Media C...

Страница 333: ...6 54 23 39 in ISO A2 431 8 609 6 mm 17 00 24 00 in ISO A3 297 0 420 0 mm 11 69 16 54 in ISO A3 329 0 483 0 mm 12 95 19 02 in ISO A4 210 0 297 0 mm 8 27 11 69 in ISO B0 1000 0 1414 0 mm 39 37 55 67 in ISO B1 707 0 1000 0 mm 27 83 39 37 in ISO B2 500 0 707 0 mm 19 69 27 83 in ISO B3 353 0 500 0 mm 13 90 19 69 in ISO B4 250 0 353 0 mm 9 84 13 90 in JIS B0 1030 0 1456 0 mm 40 55 57 32 in JIS B1 728 0 ...

Страница 334: ...ine Paper and feed confirmed Paper Using Paper Other Than Genuine Paper and feed confirmed Paper When using this printer to print on paper other than genuine Canon paper and feed confirmed paper use paper that meets the following conditions Note Refer to Paper Reference Guide for details on genuine Canon paper and feed confirmed paper See Displaying the Paper Reference Guide P 335 Paper where the ...

Страница 335: ...90 g m 0 13 mm 0 0051 in LW Coated Paper Lightweight Coated Paper 170 g m 0 22 mm 0 0087 in HW Coated Paper Heavyweight Coated Paper Photo Paper 180 g m 0 18 mm 0 0071 in LW Photo Paper Lightweight Photo Paper LWPhotoPaper LI 1 Lightweight Photo Paper LowInk 1 260 g m 0 26 mm 0 010 in HW Photo Paper Heavyweight Photo Paper HWPhotoPaper LI 1 Heavyweight Photo Paper LowInk 1 Proof 80 g m 0 10 mm 0 0...

Страница 336: ...nce Guide Mac OS The basic instructions for displaying the Paper Reference Guide from the imagePROGRAF Printmonitor are as follows 1 Click the System Preferences icon in the Dock 2 Click Print Scan This is identified as Printers Scanners or Print Fax in other versions of Mac OS X Displaying the Paper Reference Guide iPF850 User s Guide Handling and Use of Paper Paper 336 ...

Страница 337: ...printer from the list of printers and click Op tions Supplies 4 Click Utility 5 Click Open Printer Utility 6 Click Support iPF850 Displaying the Paper Reference Guide User s Guide Handling and Use of Paper Paper 337 ...

Страница 338: ...n website A computer that is able to connect to the Internet is required in order to download the Media Information File If you are using the Media Configuration Tool the Media Information File is downloaded automatically To download it manually access the Canon website The Canon website can be accessed from the link in the in stalled software Windows The basic instructions for accessing the Canon...

Страница 339: ...or accessing the Canon website from imagePROGRAF Printmonitor are as follows 1 Click the System Preferences icon in the Dock 2 Click Print Scan This is identified as Printers Scanners or Print Fax in other versions of Mac OS X 3 Select the printer from the list of printers and click Op tions Supplies iPF850 Updating paper information User s Guide Handling and Use of Paper Paper 339 ...

Страница 340: ...4 Click Utility 5 Click Open Printer Utility 6 Click Support Updating paper information iPF850 User s Guide Handling and Use of Paper Paper 340 ...

Страница 341: ... Click the Support Information button The default browser on your computer is started and the Canon website is displayed iPF850 Updating paper information User s Guide Handling and Use of Paper Paper 341 ...

Страница 342: ...ttaching the Roll Holder to Rolls Attaching the Roll Holder to Rolls When printing on rolls attach the Roll Holder to the roll Rolls have a two or three inch paper core Use the correct attachment for the paper core The printer comes equipped with the 2 Inch Paper Core Attachment installed Using the 2 Inch Paper Core Attachment Using the 3 Inch Paper Core Attachment Roll Holder Side Holder Stopper ...

Страница 343: ...ms Note For details on supported sizes and types of roll paper see Paper Sizes or the Paper Reference Guide See Paper Sizes P 332 See Displaying the Paper Reference Guide P 335 To view instructions as you attach the Roll Holder press the Navigate button See How to View Instructions With Navigate P 436 1 Lift the Holder Stopper lever a from the shaft side to un lock it Holding the Holder Stopper at...

Страница 344: ...ful to avoid hitting the printer hard with the roll This may damage the Roll Holder 4 Insert the attachments for the roll paper core on the Holder Stopper Align the tips a of the attachment with the holes b of the Holder Stopper and insert it firmly 3 Inch Paper Core Attachment 2 2 Inch Paper Core Attachment a a b a b Attaching the Roll Holder to Rolls iPF850 User s Guide Handling and Use of Paper...

Страница 345: ...ou turn the printer on Before loading a roll confirm whether the inside of the Top Cover or the Ejection Guide is soiled If soiled we recommend cleaning in advance See Cleaning Inside the Top Cover P 599 Loading rolls in the Roll 1 Upper holder 1 Press the Load button 2 Press or to select Roll 1 Upper and then press the OK button Note If any cut sheet has been fed or roll paper that will not be us...

Страница 346: ... and hurt yourself when loading it Be careful not to pinch your fingers between the Roll Holder shaft a and the guide grooves b when loading rolls Note For instructions on attaching the Roll Holder to rolls see Attaching the Roll Holder to Rolls P 342 5 Using both hands pull out the roll evenly on both ends and insert it in the Paper Feed Slot a Advance the roll until the buzzer sounds b a b a a a...

Страница 347: ...printing surface a 7 Close the Top Cover 8 Press the OK button The paper is now advanced 9 Once paper feeding starts you will need to do the following based on the ManageRemainRoll setting and the barcode printed on rolls See Keeping Track of the Amount of Roll Paper Left P 358 ManageR emainRoll Barcodes Printer Operation After the Paper is Fed Off Printed A menu for selection of the type of paper...

Страница 348: ... detach the Roll Unit in the following cases During printing Vibration from removing the Roll Unit may affect the printing quality If a sheet is loaded in the printer The sheet may be ejected and rarely it may be bent 1 Press the Load button 2 Press or to select Roll 2 Lower and then press the OK button Note If any cut sheet has been fed or roll paper that will not be used has been fed from Roll 2...

Страница 349: ...Attaching the Roll Holder to Rolls P 342 5 Pull out the roll evenly on both ends and insert it in the Pa per Feed Slot a Advance the roll until the buzzer sounds Important Be careful not to soil the printing surface of roll paper as you insert it in the slot This may affect the printing quality We recommend wearing clean cloth gloves when handling rolls to protect the printing surface If the paper...

Страница 350: ...Guide P 335 Adjusting the printhead alignment with the type of paper to be used in printing may enhance printing quali ty See Automatic Adjustment to Straighten Lines and Colors P 556 Changing the Type of Paper Changing the Type of Paper Follow these steps to change the type of paper specified on the printer after you have loaded paper If you will continue using this type of paper later selecting ...

Страница 351: ...nt Be sure to select the correct paper type If this setting does not match the loaded paper it may cause feed errors and affect printing quality Note For details on types of paper see the Paper Reference Guide See Types of Paper P 332 By de fault Plain Paper is selected If you move the Release Lever the setting automatically reverts to the previously selected paper Using the Same Type of Paper Reg...

Страница 352: ...the Menu button 2 Press the OK button The Paper Menu is displayed 3 Press or to select Chg Paper Size and then press the OK button 4 Press the button or the button to select Roll1 Uppr Lngth or Roll2 Lwr Lngth and then press the OK button 5 Press or to select the length of paper loaded in the printer and then press the OK button Specify the roll length as follows 1 Press the or button to move to t...

Страница 353: ... OK button The roll is rewound Important If you have selected ManageRemainRoll On in the Control Panel menu a barcode is printed on the leading edge of the roll Do not remove the roll before the barcode is prin ted You will be unable to keep track of the amount of roll paper left See Keeping Track of the Amount of Roll Paper Left P 358 6 Open the Top Cover and lift the Ejection Guide 7 Using both ...

Страница 354: ...g paper See Cleaning Inside the Top Cover P 599 Removing rolls from the Roll 2 Lower position 1 On the Tab Selection screen of the Control Panel press or to select the Paper tab Note If the Tab Selection screen is not displayed press the Menu button 2 Press the OK button The Paper Menu is displayed 3 Press or to select Remove Roll and then press the OK button 4 Press or to select Roll 2 Lower and ...

Страница 355: ...k that No Paper Loaded is displayed on the Display Screen and then grasp the Roll Unit Lever a and pull out the Roll Unit 7 Using both hands rotate the Roll Holder in the direction of the arrow to rewind the roll 8 Holding the Roll Holder flange a remove the holder from the Roll Holder Slot Note For instructions on removing the Roll Holder from rolls see Removing the Roll Holder from Rolls P 356 T...

Страница 356: ... shaft side to un lock it Holding the Holder Stopper at the position indicated b remove it from the Roll Holder 2 Remove the Roll Holder from the roll 3 When removing attachments push the tips a in as you remove the attachment 3 Inch Paper Core Attachment 1 Roll Holder side a b Removing the Roll Holder from Rolls iPF850 User s Guide Handling and Use of Paper Handling rolls 356 ...

Страница 357: ...button to advance or retract the roll Press to retract the roll manually Press to advance the roll manually Note If you hold down or for less than a second the roll will move about 1 mm 0 04 in If you hold down or for more than a second the roll will move until you release the button Release the button when the Display Screen indicates End of paper feed Cannot feed paper more Paper can be fed even...

Страница 358: ...and then press the OK button Specifying the Ink Drying Time for Rolls Specifying the Ink Drying Time for Rolls When you are using paper that takes longer for ink to adhere ink may be transferred onto the paper surface during ejection soiling it In that case you may be able to improve the condition by setting the time to wait for the ink to dry after printing Note If the Cutter touches the print su...

Страница 359: ...ttings values in BBe tween Pages and CBetween Scans in ADrying Time and then click OK See Paper Detailed Settings Dialog Box Win dows P 170 Mac OS 1 Choose Print in the application menu 2 Select the Main pane and click CSettings in AMe dia Type iPF850 Specifying the Ink Drying Time for Rolls User s Guide Handling and Use of Paper Handling rolls 359 ...

Страница 360: ...an cut by holding the paper with your hand so that the paper does not fall when cutting Also since you can cut while visually confirming the drying of the ink you can avoid ejecting paper be fore the ink has dried To cut the roll with the Cutter Unit press the Cut button Eject Yes Manual when us ing media that cannot be cut with the Cutter Unit Select this for paper that cannot be cut with the Cut...

Страница 361: ...e Important When cutting wide printed documents after ejection have two people support the documents If the paper drops printed documents may be damaged Do not lift the paper when holding printed documents before cutting If the paper rises it may affect the printing quality or cause rough cut edges Note Once the following step has been performed the procedure can be started from step 7 the next ti...

Страница 362: ...g after replacing with the same type of paper 1 On the Tab Selection screen of the Control Panel press or to select the Paper tab Note If the Tab Selection screen is not displayed press the Menu button 2 Press the OK button The Paper Menu is displayed 3 Press or to select Paper Details and then press the OK button 4 Press or to select the type of paper and then press the OK button 5 Press or to se...

Страница 363: ...n by pressing the Feed button and cut manually Print Select Manual Manual R o s e W in e R o s e W in e 㩷 Note Once the following step has been performed the procedure can be started from step 10 the next time Printing the second and subsequent times Printing after replacing with the same type of paper 1 On the Tab Selection screen of the Control Panel press or to select the Paper tab Note If the ...

Страница 364: ...to Do not perform printing will start at the position at which the roll was set for the first printing after replacing a roll Thus the margin of the paper leading edge will enlarge See Loading Rolls in the Printer P 345 8 Press the Feed button 9 Press or to align the paper leading edge with the a position 10 Print the job The printer stops advancing the paper after printing Note The printer can co...

Страница 365: ... retainer 13 Press the OK button After the roll is rewound it stops automatically Paper cutting to have the roll cut at your specified position Feed paper the cutting position by pressing 䂥 or 䂯 Paper Cutting Cut the paper Yes 1 Press the Feed button 2 Press the button to advance the roll to the position for cutting 3 Press the Cut button iPF850 Specifying the Cutting Method for Rolls User s Guide...

Страница 366: ...ce Guide See Displaying the Paper Reference Guide P 335 On Input Length The amount to cut from the leading edge of paper is specified in the control panel The amount to cut from the leading edge can be specified in the range of lengths displayed in the control panel The range of lengths dif fers between each media type Note The amount to cut from the leading edge of paper cannot be set shorter tha...

Страница 367: ... for CutDustReduct to be activated for particular types of paper Important Do not set CutDustReduct to On for paper that wrinkles easily such as Plain Paper or lightweight paper This may impair cutting and cause paper jams Borderless printing is not available when CutDustReduct is set to On To use borderless printing select Cut DustReduct Off Set CutDustReduct to On as follows 1 On the Tab Selecti...

Страница 368: ...Inch Paper Core Attachment Using the 3 Inch Paper Core Attachment 2 Inch Paper Core Attachment 3 Inch Paper Core Attachment 1 3 Inch Paper Core Attachment 2 Automatic Roll Switching Automatic Roll Switching With this printer you can load roll paper in both the upper roll paper 1 and lower roll paper 2 rolls and print by automatically switching between roll paper 1 and roll paper 2 depending on the...

Страница 369: ...clean cloth or paper on the floor so that the cut sheets do not touch the floor directly Note Before loading sheets make sure the printer is clean inside the Top Cover and around the Ejection Guide If these areas are dirty we recommend cleaning them in advance See Cleaning Inside the Top Cover P 599 Store unused paper in the original package away from high temperature humidity and direct sunlight ...

Страница 370: ...ith the Paper Alignment Line c at right 2 Align the inserted edge of the sheet with the leading edge of the Paper Alignment Line d as shown d c c b a When inserted sheets are automatically held by suction against the Platen Important Load a sheet so that it is parallel to the Paper Alignment Line at right c Loading paper askew will cause an error Warped paper may rub against the Printhead Straight...

Страница 371: ... sheet during this time pull the sheet away and reinsert it to start the suction again 4 Lower the Release Lever and close the Top Cover If a print job was received Pressing the OK button will advance the paper and then printing will begin If no print job was received A menu for selection of the type of paper is shown on the Display Screen Press or to select the type of paper and then press the OK...

Страница 372: ...select the type of paper and then press the OK button Note If a print job was received before paper was advanced the media type and size specified by the job are shown on the Display Screen Go to step 2 2 Width Detection OFF OK to continue is now shown on the Display Screen Press or to select Leave OFF and then press the OK button 3 After a menu for selection of the paper size is displayed press o...

Страница 373: ... Cover Removing Sheets Removing Sheets Remove sheets from the printer as follows 1 On the Tab Selection screen of the Control Panel press or to select the Paper tab Note If the Tab Selection screen is not displayed press the Menu button 2 Press the OK button The Paper Menu is displayed 3 Press or to select Eject Paper and then press the OK button 4 Press or to select Cut Sheet and then press the O...

Страница 374: ... the OK button The paper is ejected from the front of the printer 6 As you hold the sheet lift the Release Lever and remove the sheet 7 Lower the Release Lever Removing Sheets iPF850 User s Guide Handling and Use of Paper Handling sheets 374 ...

Страница 375: ...hen ejecting to the Stacker Use with the Stacker installed on the printer This can be used when printing on supported roll paper See Ejecting to the Stacker P 380 When ejecting to the Output Stacker Use with the Stacker removed from the printer This can be used when printing on cut sheets and roll paper which is not supported by the stacker See Ejecting to the Output Stacker P 381 iPF850 Stacker U...

Страница 376: ...nter off attach the cable and then turn the printer on again The Stacker Canopy may become difficult to open depending on how it is stored If this happens have two peo ple hold the handles on the left and right side of the Canopy and open the left and right sides simultaneously while ensuring that the Canopy does not bend Note For information on paper that is supported for ejecting to the Stacker ...

Страница 377: ... of the Docking unit left and Docking unit right Caution Do not move the Stacker by holding at positions other than the specified ones Moving it by holding at other positions may cause injuries or damage the stacker Important Before moving the Stacker clear away all of the paper contained in the stacker If you move the Stacker while it still contains paper the printed documents may become scratche...

Страница 378: ...straight If you do not push it in straight the printer or stacker may be dam aged 5 Turn the Stacker on and check that both of the lamps on the Stacker are lit If only one of the lamps on the Stacker is lit the Stacker might not be installed correctly on the printer Check that the Stacker is installed at the correct posi tion in step 4 6 Lock the two front casters on the Stacker stand a b c a b ON...

Страница 379: ... on the Stacker stand Important If the Stacker contains printed documents open the Canopy and clear away all of the printed docu ments then close the Canopy If you move the Stacker while it still contains paper the printed docu ments may become scratched or misaligned and the next ejection may not be performed properly 3 Holding the Stacker outer frame a pull the Stacker and remove it away from th...

Страница 380: ... rotating after a fixed time after paper is detected in the Stacker Note For information on paper that is supported for ejecting to the Stacker refer to the Paper Reference Guide See Displaying the Paper Reference Guide P 335 The operation may not function correctly for paper not listed here The Stacker can hold 100 sheets of A0 size When the AutoCAD LT2004 sample image Cottage Plan and Eleva tion...

Страница 381: ...ocuments misaligned from the ejected position the next ejection may not be performed proper ly Remove printed documents after opening the Canopy If you attempt to remove them while closed the printed documents may become scratched Ejecting to the Output Stacker Ejecting to the Output Stacker 1 Remove the Stacker from the printer See Installing and Removing the Stacker On the Printer P 376 2 Go bet...

Страница 382: ...ts etc Close the Output Stacker when you are not using the Output Stacker If you install it on the Stacker while the Output Stacker is open the Output Stacker will touch the printer and may cause damage Depending on the type of paper the edge may curl or bend during ejection In this case straighten out the paper If the paper is curled or bent it may damage printed documents Store the Output Stacke...

Страница 383: ...ange lists of the types of paper on the printer control panel and in printer driver dialog boxes and rename them in addition to other functions Important Normally when the printer driver is installed from the User Software CD ROM the Media Configuration Tool is also installed and the media information is also configured Use this software if you are not using the User Soft ware CD ROM or to add new...

Страница 384: ... used Select a country or territory then click the Next but ton 3 The License Agreement is displayed If you accept the agreement click Yes 4 The Change Installation Location screen appears Select the destination folder then click the Next but ton Installation Procedures iPF850 User s Guide Handling and Use of Paper Media Configuration Tool Windows 384 ...

Страница 385: ...municating with the printer 1 From the start menu select All Programs imagePROGRAF Media Configuration Tool imagePROG RAF Media Configuration Tool 2 The Select Printer dialog box is displayed Select the printer for which to configure the media informa tion and then click the Next button Note If you are using the printer without installing the printer driver click the Specify a printer that is not ...

Страница 386: ...utomatically From the Internet P 387 4 The Media Configuration Tool main window is dis played Click the Add Genuine Paper button 5 In the Edit Media Types dialog box click the Update button 6 The Confirm Update dialog box is displayed Configure Update Target and click the Execute but ton The printer control panel and printer driver media in formation is updated Note You should normally select Upda...

Страница 387: ...following message is displayed configure the settings by using the following procedure 1 Open a web browser on a computer that can access the Internet and access the Canon website 2 Download the media information file amx file corresponding to the printer to update from the Canon web site 3 Copy the downloaded media information file amx file to the computer where the Media Configuration Tool is in...

Страница 388: ...or mation File field in the Add Media Type dialog box Select the check box for the media information file name and click the OK button 7 The Media Configuration Tool main window is dis played Click the Add Genuine Paper button 8 In the Edit Media Types dialog box click the Update button Updating Media Information After Installation iPF850 User s Guide Handling and Use of Paper Media Configuration ...

Страница 389: ...The explanation below is on the Media Configuration Tool main window Use the following procedure to open Media Configuration Tool main window Important Do not attempt to print or turn the printer off while the program is communicating with the printer 1 From the start menu select All Programs imagePROGRAF Media Configuration Tool imagePROG RAF Media Configuration Tool 2 The Select Printer dialog b...

Страница 390: ...ion Link to User Manual Button Displays the printer user s manual Editing Media Type Information for Genuine Paper and Feed Confirmed Paper Editing Media Type Information for Genuine Paper and Feed Confirmed Paper When adding genuine paper and feed confirmed paper to the printer control panel and printer driver and when edit ing media type information click the Add Genuine Paper button in the Medi...

Страница 391: ...e display order of media types see Changing the Display Order of Media Types P 401 Important When you update the media type information perform the same update on all of the PCs that are using that printer Note It may not be possible to deleting showing hiding and changing the display order under some conditions Adding Media Types Adding Media Types You can register media information files amx fil...

Страница 392: ... update the media information the paper display order and Show Hide settings return to their default values If the message on the right is displayed at this time the latest media information is already applied to your printer driver There is normally no need to up date To exit without updating click the No button To con tinue with the update click the Yes button If the message on the right is disp...

Страница 393: ... The media information is saved as a media information file amx file For the method for loading a saved media information file in another computer see Applying a Saved Media Information File on Another Computer P 403 If the Media Information File Does Not Download Automatically From the Internet If the following message is displayed configure the settings by using the following procedure 1 Open a ...

Страница 394: ...g box and then click the Browse button 6 Select the folder that contains the media information file amx file you downloaded and click the OK button 7 The names of the media information files contained in the selected folder are displayed in the Media Infor mation File field in the Add Media Type dialog box Select the check box for the media information file name and click the OK button 8 Click OK ...

Страница 395: ...e current media information in a file click the Yes button If you do not want to save it click the No button Note The media information is saved as a media information file amx file For the method for loading a saved media information file in another computer see Applying a Saved Media Information File on Another Computer P 403 Changing Media Names Changing Media Names Important Do not attempt to ...

Страница 396: ...me Media dialog box is displayed Edit the names in Name in Printer Driver and Name on Control Panel and click the OK button Note To restore the original names click the Restore button The characters that can be entered for Name in Printer Driver and Name on Control Panel are stated below alphanumeric space _ For Name in Printer Driver up to 32 one Byte characters can be entered and for Name on Con...

Страница 397: ...r click the Cancel button 7 The message on the right is displayed If you want to save the current media information in a file click the Yes button If you do not want to save it click the No button Note The media information is saved as a media information file amx file For the method for loading a saved media information file in another computer see Applying a Saved Media Information File on Anoth...

Страница 398: ... Main Window P 389 2 The Edit Media Types dialog box is displayed 3 In the Media Type list select the name of the media to delete Click the Delete button Note Only paper for which Status in the Media Type is Add can be deleted 4 In the Edit Media Types dialog box click the Update button Deleting Media Types You Have Added iPF850 User s Guide Handling and Use of Paper Media Configuration Tool Windo...

Страница 399: ...button Note The media information is saved as a media information file amx file For the method for loading a saved media information file in another computer see Applying a Saved Media Information File on Another Computer P 403 Switching Media Types Display Show Hide Switching Media Types Display Show Hide Important Do not attempt to print or turn the printer off while the program is communicating...

Страница 400: ...the Show Hide button the display mode cycles from showing both the printer driver and printer panel to hiding both the printer driver and printer panel and then to showing only the printer panel 4 In the Edit Media Types dialog box click the Update button 5 The Confirm Update dialog box is displayed Configure Update Target and click the Execute but ton The printer control panel and printer driver ...

Страница 401: ...mx file For the method for loading a saved media information file in another computer see Applying a Saved Media Information File on Another Computer P 403 Changing the Display Order of Media Types Changing the Display Order of Media Types Important Do not attempt to print or turn the printer off while the program is communicating with the printer 1 Click the Add Genuine Paper button in the Media ...

Страница 402: ...en setting a data to the printer that differs from the data to be updated the selected media informa tion file is updated When you would like to remain the data that is set to the printer click the Cancel button 6 The message on the right is displayed If you want to save the current media information in a file click the Yes button If you do not want to save it click the No button Note The media in...

Страница 403: ...matches the media information file you are attempting to import 4 Select Specify the Media Information File in the Add Media Type dialog box click the Browse but ton and then specify the folder that contains the amx file you copied Select the check box for the media information file name and click the OK button Note If the Media Configuration Tool main window is displayed at this time click the Ad...

Страница 404: ...e printer in the control panel of the printer 1 Click the About button in the Media Configuration Tool main window to open the About dialog box 2 Check the value xx xx xxxx of MIT DB Version 3 Check the value xx xx xxxx of MIT in Set Adj Menu Printer Info System Info in the printer control panel If the values in Steps 2 and 3 are the same the update has been applied to the printer Checking the upd...

Страница 405: ...rearrange lists of the types of paper on the printer control panel and in printer driver dialog boxes and rename them in addition to other functions Important Normally when the printer driver is installed from the User Software CD ROM the Media Configuration Tool is also installed and the media information is also configured Use this software if you are not using the User Soft ware CD ROM or to ad...

Страница 406: ...ter you have read Canon Software License Agree ment click the Continue button 3 The next screen presents selections for the country or area where the printer is used Select a country or territory then click the Continue button 4 Click the Install button Procedures for Installing iPF850 User s Guide Handling and Use of Paper Media Configuration Tool Mac OS 406 ...

Страница 407: ...ol panel and printer driver Important You do not need to perform this procedure if you installed the printer driver using the User Software CD ROM Do not attempt to print or turn the printer off while the program is communicating with the printer 1 From the Applications menu select Canon Utilities imagePROGRAF Media Configuration Tool CNWIMCT 2 The Select Printer dialog box is displayed Select the...

Страница 408: ...ration is not needed Important If the message on the right is displayed the media in formation file cannot be downloaded automatically from the Internet Configure the settings by referring to If the Media Information File Does Not Download Automatically From the Internet P 409 4 The Media Configuration Tool main window is dis played Click the Add Genuine Paper button 5 In the Edit Media Types dial...

Страница 409: ...d media information file in another computer see Applying a Saved Media Information File on Another Computer P 426 If the Media Information File Does Not Download Automatically From the Internet If the following message is displayed configure the settings by using the following procedure 1 Open a web browser on a computer that can access the Internet and access the Canon website 2 Download the med...

Страница 410: ...The names of the media information files contained in the selected folder are displayed in the Media Infor mation File field in the Add Media Type dialog box Select the check box for the media information file name and click the OK button 7 The Media Configuration Tool main window is dis played Click the Add Genuine Paper button Updating Media Information After Installation iPF850 User s Guide Han...

Страница 411: ... as a media information file amx file For the method for loading a saved media information file in another computer see Applying a Saved Media Information File on Another Computer P 426 Media Configuration Tool Main Window Media Configuration Tool Main Window The explanation below is on the Media Configuration Tool main window Use the following procedure to open Media Configuration Tool main windo...

Страница 412: ...ia Information After Installation P 407 Add Genuine Paper button When this button is clicked the Edit Media Types dialog box is displayed which allows you to add media information files released by Canon to the printer control panel and printer driver You can also change names toggle between displaying and hiding and delete added media types You can also change the display order of the paper types...

Страница 413: ...Changing Media Names P 418 Delete Button To delete added genuine paper and feed confirmed paper from the printer control panel and printer driver se lect the paper to delete and click this button For details on the procedure for deleting added media types see Deleting Media Types You Have Add ed P 421 Show Hide Button To change whether or not genuine paper or feed confirmed paper is displayed in t...

Страница 414: ...guration Tool main window see Media Configuration Tool Main Window P 411 If the Add Media Type dialog box is displayed after you select the printer without the main window ap pearing configure the setting by referring to Updating Media Information After Installation P 407 When a newer version of media information file than the me dia information file that is applied to your printer driver is re le...

Страница 415: ...lly no need to update To exit without updating click the No button To contin ue with the update click the Yes button If the message on the right is displayed the media in formation file cannot be downloaded automatically from the Internet Configure the settings by referring to If the Media Information File Does Not Download Automatically From the Internet P 416 4 Click OK when the confirmation mes...

Страница 416: ...d Media Information File on Another Computer P 426 If the Media Information File Does Not Download Automatically From the Internet If the following message is displayed configure the settings by using the following procedure 1 Open a web browser on a computer that can access the Internet and access the Canon website 2 Download the media information file amx file corresponding to the printer to upd...

Страница 417: ...e Open button 7 The names of the media information files contained in the selected folder are displayed in the Media Infor mation File field in the Add Media Type dialog box Select the check box for the media information file name and click the OK button 8 Click OK when the confirmation message is displayed iPF850 Adding Media Types User s Guide Handling and Use of Paper Media Configuration Tool M...

Страница 418: ...e current media information in a file click the Yes button If you do not want to save it click the No button Note The media information is saved as a media information file amx file For the method for loading a saved media information file in another computer see Applying a Saved Media Information File on Another Computer P 426 Changing Media Names Changing Media Names Important Do not attempt to ...

Страница 419: ...figuration Tool Main Window P 411 2 The Edit Media Types dialog box is displayed 3 In the Media Type list select the name to change Click the Rename button 4 The Rename Media dialog box is displayed Edit the names in Name in Printer Driver and Name on Control Panel and click the OK button iPF850 Changing Media Names User s Guide Handling and Use of Paper Media Configuration Tool Mac OS 419 ...

Страница 420: ...ormally select Update the printer control panel and printer driver Important When setting a data to the printer that differs from the data to be updated the selected media informa tion file is updated When you would like to remain the data that is set to the printer click the Cancel button 7 The message on the right is displayed If you want to save the current media information in a file click the...

Страница 421: ...te For more information on the procedure for opening the Media Configuration Tool main window see Media Configuration Tool Main Window P 411 2 The Edit Media Types dialog box is displayed 3 In the Media Type list select the name of the media to delete Click the Delete button Note Only paper for which Status in the Media Type is Add can be deleted iPF850 Deleting Media Types You Have Added User s G...

Страница 422: ...right is displayed If you want to save the current media information in a file click the Yes button If you do not want to save it click the No button Note The media information is saved as a media information file amx file For the method for loading a saved media information file in another computer see Applying a Saved Media Information File on Another Computer P 426 Switching Media Types Display...

Страница 423: ... for display Click the Show Hide button The selected paper is alternately shown or hidden Note You can select multiple paper The names of media switched for non display appear grayed out in the Media Type list Each time you click the Show Hide button the display mode cycles from showing both the printer driver and printer panel to hiding both the printer driver and printer panel and then to showin...

Страница 424: ...the Cancel button 6 The message on the right is displayed If you want to save the current media information in a file click the Yes button If you do not want to save it click the No button Note The media information is saved as a media information file amx file For the method for loading a saved media information file in another computer see Applying a Saved Media Information File on Another Compu...

Страница 425: ...ration Tool Main Window P 411 2 The Edit Media Types dialog box is displayed 3 Select the paper in the Media Type list for which to change the display order and then click the buttons to move the item or The selected item moves one line up or down for ev ery button click iPF850 Changing the Display Order of Media Types User s Guide Handling and Use of Paper Media Configuration Tool Mac OS 425 ...

Страница 426: ...utton If you do not want to save it click the No button Note The media information is saved as a media information file amx file For the method for loading a saved media information file in another computer see Applying a Saved Media Information File on Another Computer P 426 Applying a Saved Media Information File on Another Computer Applying a Saved Media Information File on Another Computer You...

Страница 427: ...ox for the media information file name and click the OK button Note If the Media Configuration Tool main window is displayed at this time click the Add Genuine Paper but ton and then click the Add button on the screen that opens 5 The Media Configuration Tool main window is dis played Click the Add Genuine Paper button Note If the Edit Media Types dialog box is displayed without the main window ap...

Страница 428: ... of the printer 1 Click the About button in the Media Configuration Tool main window to open the About dialog box 2 Check the value xx xx xxxx of MIT DB Version 3 Check the value xx xx xxxx of MIT in Set Adj Menu Printer Info System Info in the printer control panel If the values in Steps 2 and 3 are the same the update has been applied to the printer Checking the update iPF850 User s Guide Handli...

Страница 429: ...ng and Use of Paper 331 Control Panel Operations and Display Screen 430 Printer Menu 439 Printer Parts 467 Network Setting 481 Print Job Management 501 Adjustments for Better Print Quality 555 Maintenance and Consumables 573 Troubleshooting 617 Error Message 651 Specifications 673 Appendix 677 imagePROGRAF Control Panel 429 ...

Страница 430: ...is off c Message Lamp orange On A warning message is displayed Flashing An error message is displayed Off The printer is off or is operating normally d Menu button Displays the Tab Selection screen See Menu Settings P 449 e Arrow buttons button Press this button on the Tab Selection screen to move to another tab In menu items requiring numerical input press this button to move to another digit but...

Страница 431: ... and removing paper or replacing ink tanks or printheads as well as other operations See How to View Instructions With Navigate P 436 j Back button Displays the screen before the current screen k Cut button Pressing this button when rolls are loaded cuts the paper if you have specified Automatic or Eject in Cutting Mode in the Control Panel menu See Specifying the Cutting Method for Rolls P 360 l ...

Страница 432: ...ghted Middle line displayed Indicates the printer status and shows menu names Bottom line displayed Here the remaining ink level is indicated See Checking Ink Tank Levels P 583 Ready OK Ink Menu M Y M B K B K C Job tab A tab indicating status and showing menus related to print jobs Pressing the OK button when this tab is highlighted will display the Job Menu menu Top line displayed The job icon is...

Страница 433: ...automatically enters Sleep mode to conserve power when idle for a specific period by default five minutes that is if no print jobs are received or buttons are pressed while all covers are closed You can specify the period before the printer enters Sleep mode in the Sleep Timer menu See Menu Settings P 449 After entering Sleep mode from Standby mode the printer automatically recovers if print jobs ...

Страница 434: ...ceived or buttons are pressed while all covers are closed However it does not enter Sleep mode while error messages are displayed or when a roll can be manually advanced by pressing the Feed but ton 2 When the printer is in Sleep mode you can press any button except the Power button to recover from Sleep mode Sleep mode is also terminated if a print job is received or a command is issued from Remo...

Страница 435: ... tab and Settings Adj tab the error message switches every four seconds within each tab Printing 㻥㻦㻡㻥㻦㻡㻥 Printing 㻥㻦㻡㻥㻦㻡㻥 OK Ink Menu Printing 㻥㻦㻡㻥㻦㻡㻥 㻥㻦㻡㻥㻦㻡㻥 OK Job Menu x x x x x x x x x x Plain Paper ISO A2 Plain Paper ISO A2 Printing 㻥㻦㻡㻥㻦㻡㻥 OK Job Menu MediaType Mismatch button button button 4 sec 4 sec Printing OK Setting Adj Menu Tot Print Area m2 Maint C Remain OK Paper Menu 4 sec 4 sec 12...

Страница 436: ...s lock is set the navigation menu does not appear if you press the Navigate but ton Contact the printer administrator See Setting Control panel access lock P 465 1 Press the Navigate button 2 Press or to select the desired navigation menu 3 Press or to select View Op Guide and then press the OK button Instructions are now displayed How to View Instructions With Navigate iPF850 User s Guide Control...

Страница 437: ...r Pause select Cut Sheet then and press OK Press Pause Open top cover Pause Lift release lever then press OK Select Load Paper Pause the paper menu then to show press OK Pause Press display Menu screen Press Menu and Pause Pause Pause OKbutton View Op Guide Back Load Cut Sheet Execute OKbutton Load Roll Paper Navigate Eject Paper Roll Pap Feeding Roll Pap Cutting Load Cut Sheet No Paper Loaded OK ...

Страница 438: ... ink tank lock lever until it stops and push it down Lift ink tank lock lever until it stops and push it down Remove the ink tank holding grip press OK To install a new ink tank Shake tank in bag slowly 7 8 times press OK Take out tank set on holder color label on back side Push down holder until you hear a click Close ink tank cover after replacing ink tanks Automatically detected by the printer ...

Страница 439: ...per Menu Paper menu settings Ink Menu Ink menu operations Job Menu Menu operations to manage print jobs Set Adj Menu Menu operations for printer adjustment and maintenance For a description of specific menu items available see Menu Settings P 449 For instructions on selecting menu items see Menu Operations P 440 Note By default menu settings apply to all print jobs However for settings that are al...

Страница 440: ...e If the Tab Selection screen is not displayed press the Menu button Simply press buttons on the Control Panel to access menus on various tabs from the Tab Selection screen and set or execute Menu items The following section describes menu operations Accessing menus P 440 Specifying menu items P 441 Specifying numerical values P 442 Executing menu commands P 442 Accessing menus Printer menus are g...

Страница 441: ...lect the menu and press the OK button Specifying menu items Menu items can be set as follows 1 Press or to select the desired setting and then press the OK button After two seconds the display reverts to the upper level menu Note If a confirmation message is displayed regarding the setting you entered follow the on screen instruc tions If you have changed the Interface Setup menu settings a messag...

Страница 442: ...n Note If a confirmation message is displayed regarding the setting you entered follow the on screen instruc tions If you have changed the Interface Setup menu settings a message confirming whether to register the settings is displayed if you press Back button or Menu button Follow the instructions shown on the screen Executing menu commands Menu commands can be executed as follows 1 Press or to s...

Страница 443: ...evel Load Paper Roll 1 Upper Roll 2 Lower Cut Sheet Eject Paper Roll 1 Upper Roll 2 Lower Cut Sheet Chg Paper Type 1 Roll 1 Upper The paper type is displayed here 1 Roll 2 Lower The paper type is displayed here 1 Cut Sheet The paper type is displayed here 1 Chg Paper Size Sheet Size 4 The size of paper is displayed here 2 CustomPaperSize Set the length and width Roll1 Uppr Lngth 3 Set the length R...

Страница 444: ... A Job Menu First Level Second Level Third Level Fourth Level Fifth Level Print Job Job List Choose a print job Delete Preempt Jobs 1 Stored Job Mailbox List Enter a password if one has been set Job List Print Delete Print Job List Job Log 2 3 Choose from information about the latest three print jobs Document Name User Name Page Count Job Status OK CANCELED Print Start Time yyyy mm dd hh mm ss Pri...

Страница 445: ...ft Change Settings A High B Standard Draft Mainte nance Head Cleaning Head Cleaning A Head Cleaning B Nozzle Check Replace P head Repl maint cart Head Info GL2 Set tings Quality Manager Color Mode Monochrome Color CAD 1 Color CAD 2 Color CAD 3 Color CAD 4 Color CAD 5 Color CAD 6 Print Quali ty Fast Standard High Input Reso lution 600dpi 300dpi Print Econ omy Off On Paper Man ager Paper Source Auto...

Страница 446: ...moothing Software Smooth ThickenFi neLines Off On Adjust FaintLines Off On Ln wdth correct Black gray Color Processin gOption Warning Off On On the Fly Off On Detect img size Off Command priority Detected size GL2 Set Print Interface Setup 8 EOP Tim er 8 10 sec 30 sec 1 min 2 min 5 min 10 min 30 min 60 min TCP IP 8 IPv4 8 IPv4 Mode 8 Automatic Manual Protocol 5 8 DHCP 8 On Off BOOTP 8 On Off RARP ...

Страница 447: ... Adj 4 3 2 1 0 1 2 3 4 Date Time 8 Date yyyy mm d d 7 Time hh mm Date For mat 8 yyyy mm dd dd mm yyyy mm dd yyyy Language English 日本語 Français Italiano Deutsch Español Português Русский 中文 简体字 한 국어 Time Zone 8 0 London GMT 1 Paris Rome 2 Athens Cairo 3 Moscow 4 Eerevan Baku 5 Islama bad 6 Dacca 7 Bangkok 8 Hong Kong 9 Tokyo Seoul 10 Canberra 11 NewCaledo nia 12 Wellington 12 Eniwetok 11 Midway is ...

Страница 448: ...r you have used Standard or Initial adjustmt in Head Posi Adj once 2 Available if Adj Priority is Automatic or Print Quality 3 Available if Adj Priority is Automatic or Print Length 4 Available only if Use Nesting is On 5 Not displayed if IPv4 Mode is Manual 6 Not displayed if Auto Detect is On 7 Follows the setting in Date Format 8 Restrictions apply if a password is configured using Change Passw...

Страница 449: ...ode can be used in managing the amount of roll paper left Choose Off if you prefer not to print the barcode See Keeping Track of the Amount of Roll Paper Left P 358 Paper Details The type of pa per is displayed here 1 Head Height Adjust the Printhead height See Troubleshooting Paper Abra sion and Blurry Images P 562 Skew Check Lv If you print on Japanese paper washi or other handmade paper that ha...

Страница 450: ...curacy The printed surface may be scratched and ink may adhere to the leading edge It may also cause the Platen to become soiled NearEnd Sht Mrgn Specify a margin at the leading edge of sheets to ensure better printing quality at the leading edge Note that if you choose 3mm it may lower the printing quality at the leading edge and affect feeding accuracy The printed surface may be scratched and in...

Страница 451: ...ng results Print Start Time Indicates when the print job was started Print End Time Indicates when the print job was finished Print Time Indicates the time required to print the job Output Img Size Indicates the image size in the print job Media Type Indicates the type of paper in the print job Paper Consumed Indicates the total amount of paper consumed Paper Length Indicates the length of paper P...

Страница 452: ...inter Head Posi Adj Standard An adjustment pattern is printed and the print position is automatically adjusted to fix misaligned printing Select Standard if vertical lines in printed material are warped or colors are out of alignment Select Standard also if the printing results are not improved by executing Simple See Automatic Adjustment to Straighten Lines and Col ors P 556 Simple An adjustment ...

Страница 453: ... stretching or shrinkage after which you enter the amount of adjustment See Adjusting Line Length P 568 B Standard Draft Change Settings A High Displayed when you have selected Feed Priority Adj Priority Print Length Adjustment relative to the amount of stretching or shrink age of the current paper Enter either the adjustment results from AdjustmentPrint or the discrepancy that you measured as a p...

Страница 454: ...n for the trail ing edge of sheets is 23 mm 0 9 in However if you have specified the leading margin in Pa per Details the larger of the setting values has priority Oversize Set the position of the margin relative to the image range Choose Off to set the margin inside the image range The image may be missing depending on the layout Choose On to set the margin outside the image range Although the im...

Страница 455: ...s pen values choose Software Palette A Palette B or Factory Choose Software to print according to software settings Choose Palette A or Palette B to print using the value specified in Define Palette Define Palette Specify the Width Color and Line Attributes in the pa lette Pen no Choose Factory to confirm the values when Factory is selected in Select Palette In Line Attributes choose No Setting or...

Страница 456: ...um roll paper width of the printer for the width and 1 5 times the maxi mum roll paper width for the length is used If Command priority is selected and the data contains image range information the image range information is followed If Command priority is selected and the data does not contain image range information the detected minimum image area is used If Detected size is selected the detecte...

Страница 457: ...t Print interface settings information Return Defaults Choose OK to restore Interface Setup settings to the de fault values System Setup Sleep Timer Specify the period before the printer enters sleep mode Shut Down Timer Sets the time until the printer turns off automatically If no operations are performed on the printer for the duration of the time set in Shut Down Timer after entering Sleep mode...

Страница 458: ...e margin specified in the printer driver does not match the margin in the printer menu Roll Switching If you have selected Use Optimal Size printing is per formed by selecting the paper size that minimizes waste paper If you have selected No RollSwitching printing is per formed on the paper fed to the platen TrimEdge Reload Specify whether to trim the leading edge of the currently retracted roll w...

Страница 459: ...from software other than the printer driver When using the printer driver configure settings on the printer To print as usual select Print Selecting Print Auto Del will print the job and then delete the data from the printer s hard disk Selecting Save Box 01 will only save the print job in the box without printing it Print Auto Del Save Box XX Print After Recv A setting for jobs received from soft...

Страница 460: ...rent The average margin of error for estimates calculated according to Canon measurement conditions for ink costs is 15 Canon does not guarantee the accuracy of these estimates Estimates may vary depending on conditions of use Calculation of these esti mates does not include ink consumed when cleaning printheads by forceful ejection of ink 2 Displayed as the menu during printing while printing is ...

Страница 461: ...per Menu Information on the loaded paper Paper Type Roll1 Uppr Media Roll2 Lwr Media Cut Sheet ManageRemainRoll Keep Paper Type Job Menu Job related information Job Log A counter for maintenance purposes Various information about previous jobs HDD Information Indicates the total hard disk capacity and the mail box free space Total capacity Box free space Set Adj Menu Settings and adjustment inform...

Страница 462: ...ious jobs Adjust Log Printer Info Ink information RAM usage and a record of errors Ink Info Ink related information MC Maintenance Cartridge capacity The ink color is dis played here Ink levels The remaining ink is displayed in a five level scale System Info Indicates the total amount of RAM RAM Error Log The past five error codes HEAD LOT NUMBER DATE OF INSTALLATION The printhead lot number and d...

Страница 463: ... the Settings Adj tab Note If the Tab Selection screen is not displayed press the Menu button 3 Press the OK button The Set Adj Menu is displayed 4 Press or to select Test Print and then press the OK button 5 Press or to select Interface Print and then press the OK button Confirming Interface Print information The following information is included in the Interface Print report Canon imagePROGRAF i...

Страница 464: ... ServiceName SNMPv1 SNMPv3 TCP IPv6 Use IPv6 IPv6 settings values Use DHCPv6 Stateful Address Prefix Length Primary DNS Server Address Secondary DNS Server Address Use a stateless address Stateless Address 1 Prefix Length 1 Stateless Address 2 Prefix Length 2 Stateless Address 3 Prefix Length 3 Stateless Address 4 Prefix Length 4 Stateless Address 5 Prefix Length 5 Stateless Address 6 Prefix Lengt...

Страница 465: ...ication Ethernet Type Spanning Tree Use the Jumbo Frame Function Setting Control panel access lock Setting Control panel access lock This section describes the procedure for setting and releasing the control panel access lock Note The setting can only be changed in administrator mode 1 Start RemoteUI and log on to it Start the web browser and enter the following URL in the Location or Address box ...

Страница 466: ...er s IP address As a result the Remo teUI page cannot be displayed in the web browser after this procedure Because of this if you initialize the network settings while the Control panel access lock is set the Control panel access lock can no longer be set to Off If this happens configure the IP address again using the imagePROGRAF Device Setup Utility See Configuring the IP Address Using imagePROG...

Страница 467: ...and Use of Paper 331 Control Panel 429 Printer Parts Printer parts 468 Hard Disk 475 Optional accessories 479 Network Setting 481 Print Job Management 501 Adjustments for Better Print Quality 555 Maintenance and Consumables 573 Troubleshooting 617 Error Message 651 Specifications 673 Appendix 677 imagePROGRAF Printer Parts 467 ...

Страница 468: ...gnment unit right d Stacker cable This cable connects the Stacker and Printer e Docking unit right Install the Stacker on the Printer using the markings in this area as a guide f Docking unit left Install the Stacker on the Printer using the markings in this area as a guide g Alignment unit right Adjust this part to set the vertical position of the Stacker relative to the Printer h Alignment unit ...

Страница 469: ... Holder Load the roll on this holder e Ejection Support Prevents printed documents from winding around the Roll Holder or being drawn into the Paper Feed Slot f Paper Feed Slot When loading a roll insert the edge of the roll paper here You can load rolls in two positions on the printer side in the Roll 1 Upper position and on the roll unit side in the Roll 2 Lower position g Holder Stopper Secure ...

Страница 470: ...acilitate moving it o Stand L The left leg of the Stand p Stand R The right leg of the Stand q Leg Covers Covers for Stand L and Stand R r Roll Unit Lever Hold this lever to pull out the Roll Unit s Roll Unit A unit for loading two rolls t Stopper Locks the Stand casters Always release the Stopper before moving the printer Moving the printer while the Stopper is locked may scratch the casters or t...

Страница 471: ... Turns the Stacker on and off Back Back f e d c b a a h g a Carrying Handles When carrying the printer have six people hold it by these handles under both sides b USB Port Connect a USB cable to this port The printer is compatible with Hi Speed USB connections c Ethernet Port Connect an Ethernet cable to this port The lamp is lit if the Ethernet cable is connected correctly and commu nication is p...

Страница 472: ...ker Top Cover Inside Top Cover Inside l k j i h g f e d c b a a Top Cover Roller Prevents paper from rising when ejected b Paper Alignment Line Align paper with this line when loading it c Carriage Moves the Printhead The carriage serves a key role in printing See Carriage P 473 d Carriage Shaft The Carriage slides along this shaft e Paper Retainer Important in supplying the paper This retainer ho...

Страница 473: ...ar scale serves a key role in detecting the Carriage position Be careful not to touch this part when cleaning inside the Top Cover or clearing paper jams l Switch Set the switch to the side opposite if the edges of printed images are blurred Set the switch to the side before borderless printing See Setting the Blue Switch on the Platen P 638 Carriage Carriage d c b a a Printhead Fixer Cover Holds ...

Страница 474: ...the lever until it stops and then push it down toward the front To close it push it down until it clicks into place c Ink Lamp Red Indicates the state of the Ink Tank as follows when the Ink Tank Cover is opened On The Ink Tank is installed correctly Off No Ink Tank is installed or the ink level detection function is disabled Flashing Slowly Not much ink is left Flashing Rapidly Ink tank is empty ...

Страница 475: ...ng print jobs Save in mail box Yes No No No Do Not Save Print Jobs in the Common Box No No No Yes Save print jobs sent from sources other than the printer driver No No No Yes Operations with saved jobs Print saved jobs No Yes Yes Yes Delete saved jobs No Yes Yes Yes Job queue manage ment Display job queue No Yes Yes Yes Delete No Yes Yes Yes Preempt Jobs No Yes Yes Yes Operations with held jobs No...

Страница 476: ...Panel press or to select the Job tab Note If the Tab Selection screen is not displayed press the Menu button 2 Press the OK button The Job Menu is displayed 3 Press or to select HDD Information and then press the OK button Using RemoteUI To view the box list select Stored Job in Job Management On the Stored Job page the free hard disk space is shown in the upper right corner when boxes are listed ...

Страница 477: ... only the file management data is erased the print job data itself is not erased Note that it may be possible to read this data using commercial data recovery software Secure High Spd Overwrites the entire hard disk with random data No verification is performed to check if the data was correctly written Choose this method to erase highly confidential data Note that it may be possible to read the o...

Страница 478: ...Setup and then press the OK button 4 Press or to select Erase HDD Data and then press the OK button 5 Press or to select High Speed Secure High Spd or Secure and then press the OK button to dis play the confirmation screen Note If a password has been set on the printer the Admin Pswd screen is displayed In this case enter the password and press the OK button to go to the next step As for the time ...

Страница 479: ...Optional accessories Optional accessories Roll Holder Set 368 iPF850 User s Guide Printer Parts Optional accessories 479 ...

Страница 480: ...iPF850 User s Guide 480 ...

Страница 481: ...inter Parts 467 Network Setting Network Environment 482 Using RemoteUI 484 Initial Settings 486 Mac OS Settings 493 Other Settings 494 Device Setup Utility Windows 497 Print Job Management 501 Adjustments for Better Print Quality 555 Maintenance and Consumables 573 Troubleshooting 617 Error Message 651 Specifications 673 Appendix 677 imagePROGRAF Network Setting 481 ...

Страница 482: ...TCP IP network when using IPv6 Compatible operating systems Windows Vista Windows Vista x64 Windows Server 2008 Windows Server 2008 x64 Windows 7 Windows 7 x64 Windows Server 2008 R2 x64 Windows 8 Windows 8 x64 Windows Server 2012 x64 Windows 8 1 Windows 8 1 x64 Windows Server 2012 R2 x64 OS X v10 6 8 or later Note When using IPv6 you must specify IPv6 on the Control Panel or in RemoteUI For instr...

Страница 483: ...indows networks print over TCP IP Note NetBIOS is not supported Example of a Mac OS network In Mac OS networks print over TCP IP using the Bonjour function iPF850 Network Environment User s Guide Network Setting Network Environment 483 ...

Страница 484: ...P address see Configuring the IP Address on the Printer P 486 What You Can Do With RemoteUI With RemoteUI you can access the printer via a network configure network settings and display the current status of the printer various types of information the processing status of jobs etc Starting RemoteUI Start RemoteUI by the following operations 1 Start your Web browser 2 Enter the following URL in Ad...

Страница 485: ...e sure the DNS settings are correctly configured Depending on the network environment you may not be able to start RemoteUI Confirm whether System Setup Use RemoteUI is set to On on the Control Panel of the printer Note RemoteUI also offers many other features You can display the ink levels check error messages and other status information and cancel print jobs By factory default the English scree...

Страница 486: ...7 Important If you use a DHCP server for automatic assignment of the printer s IP address printing may no longer be possi ble after the printer is turned off and on This is because an IP address different from before has been assigned Thus when using DHCP server functions consult your network administrator and configure the settings in one of the following ways Configure the setting for dynamic DN...

Страница 487: ...plete the settings and then press the OK button 11 Press the Menu button If you have changed the settings a confirmation message is displayed Press or to select Yes and then press the OK button Important Be sure to complete step 11 This will activate the values you have entered If an error message is displayed check the settings and correct any invalid values Note You can also specify the subnet m...

Страница 488: ...rinter and configure it ping IP address as specified in the ARP command l 479 Example ping xxx xxx xxx xxx l 479 Note In l the l is the letter l In Mac OS when using Terminal enter the ping command in the format ping s 479 xxx xxx xxx xxx For details refer to the help file for the command line Note The subnet mask and default gateway are set to 0 0 0 0 Use RemoteUI to change the subnet mask and de...

Страница 489: ...the Devices and Printers window 2 Right click the icon of this printer and choose Printer Properties to open the printer properties window 3 Click the Port tab to display the Port sheet 4 Click Add Port to display the Printer Ports dialog box 5 In the Available Port list select Standard TCP IP Port 6 Click New Port After the wizard starts a window is displayed for the Welcome to the Add Standard T...

Страница 490: ...nfiguring the IP address Off Use RARP Activate this setting to use RARP for configuring the IP address Off Enable DNS Dynamic Update Activate this setting to perform DNS server registration automatically Off Use Zeroconf Func tion Activate this setting to use Bonjour On IP Address Specify the printer s IP address 0 0 0 0 Subnet Mask Specify the printer s subnet mask 0 0 0 0 Gateway Address Specify...

Страница 491: ...vers and DNS domain name in Primary DNS Server Address Secondary DNS Server Address and DNS Domain Name respectively When using an IPv6 IP address 1 Start the web browser and enter the following URL in the Location or Address box to display the Remo teUI page http printer IP address or name Example http xxx xxx xxx xxx 2 Select Administrator Mode and click Logon Note If a password has been set on ...

Страница 492: ...or the last character blank Perform dynamic updating of state ful addresses Activate this setting to automatically register the stateful ad dress with the DNS server Off Dynamically update the stateless address Activate this setting to automatically register the stateless ad dress with the DNS server Off Dynamically update the manual ad dress Activate this setting to automatically register the man...

Страница 493: ...njour Network Configuring the Destination for Bonjour Network If you use the printer in a network that uses the Bonjour function register the printer in Print Scan This is identi fied as Printers Scanners or Print Fax in other versions of Mac OS in the Mac OS System Preferences Note For details on how to register a printer using Bonjour see the OS User Manual Important Bonjour and IP Print Auto do...

Страница 494: ...in the Security group 5 Refer to the table of settings for device information and security as you complete these settings Security setting items are displayed when you click the Change Password button in the Security group Device Information Settings Item Details Default Setting Device Name Enter a device name 0 32 characters blank Location Enter the location where the device is installed 0 32 cha...

Страница 495: ...r menu 7 Press or to select Comm Mode and then press the OK button 8 Press or to select the communication mode and then press the OK button The display reverts to the Ethernet Driver menu 9 Press or to select Ethernet Type and then press the OK button 10 Press or to select the Ethernet type and then press the OK button The display reverts to the Ethernet Driver menu 11 Press or to select Spanning ...

Страница 496: ...estore the network settings to the default values as follows Important Initializing the network settings will also restore the default value of the printer s IP address As a result the Re moteUI page cannot be displayed in the web browser after this procedure For instructions on reconfiguring the IP address see Configuring the IP Address on the Printer P 486 For details on RemoteUI see Using Remot...

Страница 497: ...AF Device Setup Utility For details refer to the imagePROGRAF Device Setup Utility help Installing imagePROGRAF Device Setup Utility Installing imagePROGRAF Device Setup Utility Install imagePROGRAF Device Setup Utility from the User Software CD ROM provided with the printer as fol lows 1 Insert the User Software CD ROM in the CD ROM drive 2 On the Setup Menu window click Install Individual Softwa...

Страница 498: ...l 6 Enter the IP address assigned to the printer and click the Set button 7 Click OK after the Confirmation message is displayed 8 Exit imagePROGRAF Device Setup Utility Note To configure the IP address automatically choose Auto in the Setting IP Address list and select DHCP BOOTP or RARP You can also specify the subnet mask and default gateway Configuring the IP Address Using imagePROGRAF Device ...

Страница 499: ...nment select On in Stateless Address Additionally when there is an DHCPv6 compatible server in the network environment select On in DHCPv6 Note When there is no IPv6 compatible router or DHCPv6 compatible server select On in Manual and enter the IPv6 Address and Prefix Length 7 Click Set 8 Click OK after the Confirmation message is displayed 9 Exit imagePROGRAF Device Setup Utility iPF850 Configur...

Страница 500: ...iPF850 User s Guide 500 ...

Страница 501: ...r Parts 467 Network Setting 481 Print Job Management Status Monitor Windows 502 Printmonitor Mac OS 505 Accounting Windows 507 Basic Print Job Operations 519 Advanced Print Job Operations 538 Adjustments for Better Print Quality 555 Maintenance and Consumables 573 Troubleshooting 617 Error Message 651 Specifications 673 Appendix 677 imagePROGRAF Print Job Management 501 ...

Страница 502: ...r status can be checked in real time on a computer monitor Displays the ink level of every color in the printer An icon and warning message will notify you when ink levels are low The type of paper loaded in each media source is identified You can also check to see if paper has run out This way the utility enables you to check printer information and take care of printer maintenance for optimal pr...

Страница 503: ...Print Jobs Selecting a print job and clicking the Pause button pauses printing of the selected job To resume printing of a paused print job select the print job and click the Resume button Note Once all the print data for a print job has been sent to the printer the job can no longer be paused resumed Canceling Print Jobs Selecting a print job and clicking the Cancel Job button cancels printing of...

Страница 504: ...ue to print button The printing behavior when the paper specified by the driver does not match the paper currently loaded in the printer can be changed by using Detect Mismatch in the operation panel menu Refer to Menu Set tings P 449 for details Job Management Using imagePROGRAF Status Monitor iPF850 User s Guide Print Job Management Status Monitor Windows 504 ...

Страница 505: ...ou des ignate in advance You can check the status of the hard disk and the documents saved on the hard disk Note If the status of the desired printer is not shown in imagePROGRAF Printmonitor select the printer again as follows 1 Make sure the printer is on and connected to the network or to a local port 2 In the Printer menu select the name of the desired printer After the printer is detected the...

Страница 506: ...ng of the selected job Note You cannot cancel other users print jobs Preempting Other Jobs If you select a print job and click the button the selected job is printed ahead of the job that currently precedes it in the print queue Printing Held Jobs Printing of the job with a Status of Holding is paused because the paper specified by the driver does not match the paper currently loaded in the printe...

Страница 507: ...nted from each printer who printed them and when Calculation of the Total Pages Used and the Total Cost This allows you to use the collected print job logs to calculate totals for items such as the number of pages printed the amount of paper used and the printing costs incurred Regular Data Acquisition for Print Jobs Job logs can be automatically collected periodically Exporting Print Job Data Thi...

Страница 508: ...password can be set or cleared using Chg Admin Pswd Init Admin Pswd in the Admin Menu in the Set Adj Menu in the printer The administrator menu can only be displayed and configured by the administrator Accounting Manager Main Window Accounting Manager Main Window The Accounting Manager main window consists of a title bar menu bar toolbars listed job selection area job list area totals area and sta...

Страница 509: ...of the jobs in the printers or periodically acquired jobs See Job List Area P 510 Note You can change the items that are displayed and the display order using the Advanced Display Settings dialog box The Advanced Display Settings dialog box can be displayed by selecting Advanced Display Settings from the Show menu Totals Area Displays the total costs for the selected job and the amounts of paper a...

Страница 510: ...ocess was not executed Media Type This is the type of paper used in printing Output Image Size The size of the image used for printing Note If the job has multiple pages the size of the last page is displayed Paper Consumed The area of paper used for printing Note The Paper Consumed may differ from the product of Paper Width and Paper Length Paper Width The width of paper used for printing Note If...

Страница 511: ...Unit Costs in Accounting Manager P 511 2 Set options such as the units displayed For details of the unit settings see Configuring Units and Display Settings in Accounting Manag er P 515 3 If you are using Regular Data Acquisition configure the Regular Data Acquisition settings For details of the Regular Data Acquisition settings see Automatically Acquiring Print Job Logs at Regular Intervals P 515...

Страница 512: ...k checkbox 2 Enter the Tank Capacity and corresponding Price 3 Click the OK button Important Your settings are not applied until you click the OK button To set different unit costs for each ink color 1 Select the ink color to be costed 2 Enter the Tank Capacity and corresponding Price 3 Click the Overwrite button 4 Repeat steps 1 to 3 for all the inks 5 Click the OK button Important Your settings ...

Страница 513: ...red width x height 3 Click the Add button To change the unit cost of a media type that has already been configured click the Overwrite button 4 Click the OK button Important The settings are not applied until you click the OK button Specifying Price by Roll Paper 1 Select the media type in Media Type 2 Click the Roll Paper Width Settings button to display the Roll Paper Width Settings dialog box i...

Страница 514: ...ngs dialog box The settings are not applied until you click the OK button Setting the Unit Cost for Items Other Than Ink and Paper Setting the Unit Cost for Items Other Than Ink and Paper Open the Other sheet Use this sheet to set any price for items other than inks and paper 1 Enter any name in the Name field 2 Enter a value in Unit Cost 3 Use Allocated to specify whether the costs are allocated ...

Страница 515: ...sed for ink consumption Paper Width Use this to select the unit used for paper width Paper Length Use this to select the unit used for paper length Area Display Format Use this to select the unit used for paper area Automatically Acquiring Print Job Logs at Regular Intervals Automatically Acquiring Print Job Logs at Regular Intervals This feature collects print job logs from the printer at regular...

Страница 516: ...held on printers You can change the number of jobs displayed per page using the Print Jobs Shown Per Page setting in the View menu or the toolbar You can skip to a particular page using the Go to option in the View menu or the toolbar Note For printers with built in hard disks you can view up to 500 print jobs per printer For printers without built in hard disks you can view up to 32 print jobs pe...

Страница 517: ...hen selecting Show Job Proper ties or by using the icon in the toolbar Displaying the Period Properties Dialog Box Select a period from the Regularly Acquired Jobs list and then select Show Period Properties from Job properties in the File menu You can also select multiple periods at once Note You can also display the dialog box by selecting and right clicking a period and then selecting Show Peri...

Страница 518: ...ved as a file Load Unit Cost Data Selecting Load Unit Cost Data in the File menu loads saved unit cost data Showing the Total Amount of Ink and Paper Consumed Showing the Total Amount of Ink and Paper Consumed Select Show Ink and Paper Consumed in the File menu to open the Show Ink and Paper Consumed dialog box This lists the total amounts of ink and paper consumed by the printer so far You can co...

Страница 519: ... a computer again Simplify reprinting if any errors occur If errors occur in the middle of printing as when paper runs out you can resume printing after clearing the error without resending the print job from a computer Streamline printing work Without using a computer you can select print jobs and print in the desired quantity You can also select multi ple print jobs to print during the same peri...

Страница 520: ...p to 100 print jobs can be saved here but they will be deleted one after another starting with the oldest job in the following situations If there are more than 100 jobs queued and saved in the shared mailbox combined If no more temporary storage space is available when jobs for which you have selected Print in Output Method in Windows or Send job to in Mac OS are received If there is not enough s...

Страница 521: ...w P 189 Configuring the Printer Driver in Windows 1 Access the Page Setup sheet 2 Click Output Method to display the Output Method dialog box 3 Make your selection in Output Method Print Save print jobs on the printer s hard disk after printing Save in mail box Save print jobs on the printer s hard disk iPF850 Saving Print Jobs on the Printer Hard Disk User s Guide Print Job Management Basic Print...

Страница 522: ...er a name in Name 5 Click OK to close the Output Method dialog box Configuring the printer driver in Mac OS 1 Access the Additional Settings pane 2 Make your selection in Send job to Print Save print jobs on the printer s hard disk after printing Save in mail box Save print jobs on the printer s hard disk The Destination dialog box is displayed if you select Save in mail box Here specify the name ...

Страница 523: ...in RemoteUI imagePROGRAF Status Monitor and image PROGRAF Printmonitor Delete Note that only jobs that are not currently being deleted can be deleted from the job queue HDD Print jobs Preempting other jobs You can preempt other jobs by printing jobs that are currently being received or prepared for processing first HDD Print job A Print job B Print job C Note For information on managing jobs being...

Страница 524: ...and then press the OK button 2 Press or to select the job to print first and then press the OK button 3 Press or to select Preempt Jobs and then press the OK button Using RemoteUI Manage jobs as needed on the Print Job page For details refer to the RemoteUI help file Using imagePROGRAF Status Monitor Windows Manage jobs as needed on the Job sheet For details refer to the imagePROGRAF Status Monito...

Страница 525: ...long as you do not manage held jobs from the Control Panel imagePROGRAF Status Monitor or imagePROG RAF Printmonitor they will remain in the job queue In this case the printer processes the next job in the queue without pausing To print held jobs replace the loaded paper with the paper specified in the print job See Loading Rolls in the Printer P 345 See Loading Sheets in the Printer P 369 Using t...

Страница 526: ...button If you choose Delete Press or to select Yes or No and then press the OK button Using RemoteUI Manage jobs as needed on the Print Job page For details refer to the RemoteUI help file Using imagePROGRAF Status Monitor Manage jobs as needed on the Job sheet For details see Job Management Using imagePROGRAF Status Moni tor P 503 Managing Pending Jobs Printing or Deleting Jobs on Hold iPF850 Use...

Страница 527: ...intmonitor HDD Print Print jobs Using the Control Panel 1 On the Tab Selection screen of the Control Panel press or to select the Job tab Note If the Tab Selection screen is not displayed press the Menu button 2 Press the OK button The Job Menu menu is displayed 3 Press or to select Stored Job and then press the OK button 4 Press or to select the box number in the range 00 29 and then press the OK...

Страница 528: ...number of copies and press the OK button Using RemoteUI 1 On the Stored Job page choose the box Note Enter a password if one has been set 2 Select the print job and click Resume 3 On the Print Saved Document page enter the quantity to print in Copies and click OK For details refer to the RemoteUI help Printing Saved Jobs iPF850 User s Guide Print Job Management Basic Print Job Operations 528 ...

Страница 529: ... Open Note Enter a password if one has been set 2 In the Documents dialog box select the print job and click Print 3 In the Print dialog box enter the quantity to print in Copies and click OK iPF850 Printing Saved Jobs User s Guide Print Job Management Basic Print Job Operations 529 ...

Страница 530: ...ng the previous print job multiplied by the number of copies For details refer to the imagePROGRAF Status Monitor help file Using imagePROGRAF Printmonitor 1 On the Hard Disk pane click by Inbox No Name Note Enter a password if one has been set The password is a four digit number 2 Select the saved job and click Resume Printing Printing Saved Jobs iPF850 User s Guide Print Job Management Basic Pri...

Страница 531: ...Job tab Note If the Tab Selection screen is not displayed press the Menu button 2 Press the OK button The Job Menu is displayed 3 Press or to select Stored Job and then press the OK button 4 Press or to select the box number in the range 00 29 and then press the OK button Note Enter a password if one has been set and then press the OK button 5 Press or to select Job List and then press the OK butt...

Страница 532: ... if one has been set 2 Select the print job and click Delete For details refer to the RemoteUI help file Using imagePROGRAF Status Monitor 1 On the Hard Disk sheet select a box and click Open Deleting Saved Jobs iPF850 User s Guide Print Job Management Basic Print Job Operations 532 ...

Страница 533: ...r details refer to the imagePROGRAF Status Monitor help file Using imagePROGRAF Printmonitor 1 In the Hard Disk pane click next to Inbox No Name Note Enter a password if one has been set The password is a four digit number iPF850 Deleting Saved Jobs User s Guide Print Job Management Basic Print Job Operations 533 ...

Страница 534: ...the shared mailbox This operation is available in RemoteUI imagePROGRAF Status Monitor and imagePROGRAF Printmonitor Important Jobs stored in the shared mailbox may be automatically deleted under some conditions To prevent jobs from being deleted move them from the shared mailbox to personal boxes See Using the Printer Hard Disk P 519 Using RemoteUI 1 On the Stored Job page choose the box Note Ent...

Страница 535: ...onal box in the Desti nation mail box list and click OK For details refer to the RemoteUI help file Using imagePROGRAF Status Monitor Windows 1 On the Hard Disk sheet select a box and click Open Note Enter a password if one has been set iPF850 Moving Saved Jobs User s Guide Print Job Management Basic Print Job Operations 535 ...

Страница 536: ...select the destination per sonal box and click OK For details refer to the imagePROGRAF Status Monitor help file Using imagePROGRAF Printmonitor Mac OS 1 In the Hard Disk pane click next to Inbox No Name Moving Saved Jobs iPF850 User s Guide Print Job Management Basic Print Job Operations 536 ...

Страница 537: ...ber 2 Select the print job and click Move 3 In the Move Document dialog box select the desti nation personal box and click OK For details refer to the imagePROGRAF Printmonitor help file iPF850 Moving Saved Jobs User s Guide Print Job Management Basic Print Job Operations 537 ...

Страница 538: ...ings in the Control Panel menu HDD Print jobs Note Contact the software or system developer for information about support for this printer function Specifying Output Method In Output Method specify how to manage jobs regarding printing and saving them Print Save print jobs automatically at the same time they are printed This is the default format Print Auto Del Save print jobs temporarily at the s...

Страница 539: ...on 2 Press the OK button The Set Adj Menu is displayed 3 Press or to select System Setup and then press the OK button 4 Press or to select Print After Recv and then press the OK button 5 Press or to select On or Off and then press the OK button Printing Without Saving Jobs in the Common Box Printing Without Saving Jobs in the Common Box Jobs sent from a computer for which you have selected Print i...

Страница 540: ...ove and modify jobs saved in the personal box This operation is available in RemoteUI imagePROGRAF Status Monitor and imagePROGRAF Printmonitor Personal mail box Modify settings Enter the password Print jobs in the personal mail box Display Print Delete Move Modify settings Note By default no passwords are set for personal boxes A password cannot be set for the shared mailbox Enter a four digit nu...

Страница 541: ... box click Settings 3 In the Settings dialog box specify the password and click OK Set password Select the check box Password Enter the password This field is limited to four digits in the range 0001 9999 Re enter to confirm Re enter the password to confirm it iPF850 Setting Passwords for Personal Boxes User s Guide Print Job Management Advanced Print Job Operations 541 ...

Страница 542: ...In the Settings dialog box specify the password and click OK Set password Select the check box Password Enter the password This field is limited to four digits in the range 0001 9999 Verify Re enter the password to confirm it For details refer to the imagePROGRAF Printmonitor help file Setting Passwords for Personal Boxes iPF850 User s Guide Print Job Management Advanced Print Job Operations 542 ...

Страница 543: ...ROGRAF Printmonitor Using RemoteUI 1 On the Stored Job page choose the personal box Note Enter a password if one has been set for the per sonal box 2 Click Edit 3 In the Set Register User s Inbox dialog box enter the name in Inbox Name and click OK For details refer to the RemoteUI help file iPF850 Naming Personal Boxes User s Guide Print Job Management Advanced Print Job Operations 543 ...

Страница 544: ...r a password if one has been set for the per sonal box 2 In the Documents dialog box click Settings 3 In the Settings dialog box enter the name and click OK For details refer to the imagePROGRAF Status Monitor help file Naming Personal Boxes iPF850 User s Guide Print Job Management Advanced Print Job Operations 544 ...

Страница 545: ...and click OK For details refer to the imagePROGRAF Printmonitor help file Displaying a List of Saved Jobs Displaying a List of Saved Jobs Print jobs stored on the printer s hard disk saved jobs can be listed by box as follows These operations are available from the Control Panel or in RemoteUI imagePROGRAF Status Monitor and im agePROGRAF Printmonitor iPF850 Displaying a List of Saved Jobs User s ...

Страница 546: ...red Job and then press the OK button 4 Press or to select the box number in the range 00 29 and then press the OK button Note Enter a password if one has been set and then press the OK button 5 Press or to select Job List and then press the OK button Using RemoteUI On the Stored Job page choose the box Note Enter a password if one has been set Displaying a List of Saved Jobs iPF850 User s Guide Pr...

Страница 547: ...AF Status Monitor Windows On the Hard Disk sheet select a box and click Open Note Enter a password if one has been set Jobs saved in that box are displayed in the Documents dialog box iPF850 Displaying a List of Saved Jobs User s Guide Print Job Management Advanced Print Job Operations 547 ...

Страница 548: ...aved Jobs Printing a List of Saved Jobs The list of print jobs stored on the printer s hard disk saved jobs can be printed by box as follows 1 On the Tab Selection screen of the Control Panel press or to select the Job tab Note If the Tab Selection screen is not displayed press the Menu button 2 Press the OK button The Job Menu is displayed 3 Press or to select Stored Job and then press the OK but...

Страница 549: ...ored on the printer s hard disk saved jobs can be displayed as follows This operation is available in RemoteUI imagePROGRAF Status Monitor and imagePROGRAF Printmonitor Using RemoteUI 1 On the Stored Job page choose the box Note Enter a password if one has been set 2 Select the print job and click Details The Details of the saved document page is dis played For details refer to the RemoteUI help f...

Страница 550: ...password if one has been set 2 In the Documents dialog box select the print job and click Properties The Properties dialog box is displayed For details refer to the imagePROGRAF Status Monitor help file Displaying Details of Saved Jobs iPF850 User s Guide Print Job Management Advanced Print Job Operations 550 ...

Страница 551: ...help file Renaming Saved Jobs Renaming Saved Jobs Print jobs stored on the printer s hard disk saved jobs can be renamed as follows This operation is available in RemoteUI imagePROGRAF Status Monitor and imagePROGRAF Printmonitor Using RemoteUI 1 On the Stored Job page choose the box Note Enter a password if one has been set iPF850 Renaming Saved Jobs User s Guide Print Job Management Advanced Pri...

Страница 552: ...nt 4 In the Rename Saved Document dialog box enter the name and click OK For details refer to the RemoteUI help file Using imagePROGRAF Status Monitor Windows 1 On the Hard Disk sheet select a box and click Open Renaming Saved Jobs iPF850 User s Guide Print Job Management Advanced Print Job Operations 552 ...

Страница 553: ...s 3 In the Properties dialog box enter the new name and click OK For details refer to the imagePROGRAF Status Monitor help file Using imagePROGRAF Printmonitor Mac OS 1 In the Hard Disk pane click next to Inbox No Name iPF850 Renaming Saved Jobs User s Guide Print Job Management Advanced Print Job Operations 553 ...

Страница 554: ...digit number 2 Select the print job and click Set 3 In the Settings dialog box enter the new name and click OK For details refer to the imagePROGRAF Printmonitor help file Renaming Saved Jobs iPF850 User s Guide Print Job Management Advanced Print Job Operations 554 ...

Страница 555: ...aper 331 Control Panel 429 Printer Parts 467 Network Setting 481 Print Job Management 501 Adjustments for Better Print Quality Adjusting the Printhead 556 Adjusting the feed amount 564 Maintenance and Consumables 573 Troubleshooting 617 Error Message 651 Specifications 673 Appendix 677 imagePROGRAF Adjustments for Better Print Quality 555 ...

Страница 556: ... Installing the Printhead P 559 If adjusting the printhead position has not been performed such as due to an error during initial setup If Rep P head Print in the Control Panel menu is set to Off and adjusting the printhead position has not been performed when replacing the printhead Paper rubs against the printhead or image edges are blurred Selecting Head Height in the Control Panel menu and cha...

Страница 557: ...r one sheet when using A3 or larger Simple One sheet of unused paper A4 Letter size Perform adjustment as follows 1 Load paper Attaching the Roll Holder to Rolls P 342 Loading Rolls in the Printer P 345 Loading Sheets in the Printer P 369 Important Always make sure the loaded paper matches the type of paper specified on the printer Adjustment can not be completed correctly unless the loaded paper ...

Страница 558: ...l adjustmt See Adjustment When Installing the Printhead P 559 Items to Prepare When Using Rolls An unused roll at least 254 0 mm 10 00 in wide When Using Sheets Two sheets of unused paper of at least A4 Letter size or one sheet when using A2 or larger Perform adjustment as follows 1 Load paper Attaching the Roll Holder to Rolls P 342 Loading Rolls in the Printer P 345 Loading Sheets in the Printer...

Страница 559: ... 13 Press the Back button 14 Press or to select Register Setting and then press the OK button 15 Press or to select Yes and then press the OK button The adjustment value is now registered and adjustment is complete Adjustment When Installing the Printhead Adjustment When Installing the Printhead Printhead position adjustment is executed when the printhead is first installed This adjustment should ...

Страница 560: ...o select Other and then press the OK button 7 Press or to select Initial adjustmt and then press the OK button A test pattern is printed for adjustment Adjustment is now finished if you have printed on a roll 8 If you are printing on sheets a confirmation message is displayed requesting you to continue printing Press the OK button and follow the instructions Adjusting Line Misalignment Adjusting L...

Страница 561: ...tab Note If the Tab Selection screen is not displayed press the Menu button 4 Press the OK button The Set Adj Menu is displayed 5 Press or to select Adjust Printer and then press the OK button 6 Press or to select Head Inc Adj and then press the OK button After the Carriage is moved a message is displayed requesting you to open the Top Cover 7 Open the Top Cover 8 Align the Angle Adjustment Lever ...

Страница 562: ... or be tween the number and the square of the two sets of lines that are least misaligned 11 Close the Top Cover The Printhead is now straight and adjustment is complete 12 Install the Stacker on the printer See Installing and Removing the Stacker On the Printer P 376 Troubleshooting Paper Abrasion and Blurry Images Troubleshooting Paper Abrasion and Blurry Images The Printhead height setting affe...

Страница 563: ...f paper and then press the OK button Note When Head Height is set to Automatic the setting value selected for the previous print job is displayed to the right of Automatic once you select the type of paper currently supplied Note that this is not displayed if any of the following is executed Turning off the power Replacing paper Entering sleep mode 5 Press or to select Head Height and then press t...

Страница 564: ...st Adj Priority to suit your particular printing application Print Quality Adjusts the feed amount to reduce banding across the sheet in printed documents Adj Quality settings are applied When Adj Fine Feed is executed the Adj Fine Feed settings are applied in addition to the Adj Quality settings Print Length Adjusts the feed amount for better accuracy of lines in printed documents The settings of...

Страница 565: ...nePpr does not eliminate banding See Types of Paper P 332 Important Adjustment is not possible with Auto GenuinePpr and Auto OtherPaper when using highly transparent media In this case use Manual adjustment See Manual Banding Adjustment P 566 If you are using cut sheets remove the Stacker from the printer See Installing and Removing the Stacker On the Printer P 376 Note We recommend executing the ...

Страница 566: ... the Display Screen requesting you to continue printing Press the OK button and follow the instructions on the Display Screen Manual Banding Adjustment Manual Banding Adjustment If printed images are affected by banding in different colors execute Adj Quality for adjustment of the paper feed amount Use Manual adjustment with highly transparent media or other paper for which Auto GenuinePpr or Auto...

Страница 567: ...the OK button The Set Adj Menu is displayed 4 Press or to select Adjust Printer and then press the OK button 5 Press or to select Feed Priority and then press the OK button 6 Press or to select Adj Quality and then press the OK button 7 Press or to select Manual and then press the OK button Test pattern A is printed for manual adjustment Note When printing on sheets follow the instructions on the ...

Страница 568: ...d Once you execute Adj Quality the Adj Fine Feed value will revert to 0 See Automatic Banding Adjustment P 565 See Manual Banding Adjustment P 566 Perform adjustment as follows 1 On the Tab Selection screen of the Control Panel press or to select the Settings Adj tab Note If the Tab Selection screen is not displayed press the Menu button 2 Press the OK button The Set Adj Menu is displayed 3 Press ...

Страница 569: ...re When Using Rolls An unused roll at least 254 0 mm 10 00 in wide High precision ruler When Using Sheets One sheet of unused paper of at least A4 Letter size High precision ruler Perform adjustment as follows 1 Load the paper Attaching the Roll Holder to Rolls P 342 Loading Rolls in the Printer P 345 Loading Sheets in the Printer P 369 Important Always make sure the loaded paper matches the type ...

Страница 570: ...he Printhead rubs against paper ad justing the level of suction against paper on the Platen may improve results Important Paper rubbing against or becoming caught on the Printhead may jam or result in printed documents that are soiled 1 On the Tab Selection screen of the Control Panel press or to select the Paper tab Note If the Tab Selection screen is not displayed press the Menu button 2 Press t...

Страница 571: ...6 Press or to select the desired setting value and then press the OK button iPF850 Adjusting the Vacuum Strength User s Guide Adjustments for Better Print Quality Adjusting the feed amount 571 ...

Страница 572: ...iPF850 User s Guide 572 ...

Страница 573: ...anel 429 Printer Parts 467 Network Setting 481 Print Job Management 501 Adjustments for Better Print Quality 555 Maintenance and Consumables Ink Tanks 574 Printheads 585 Maintenance Cartridge 593 Cleaning the Printer 599 Other Maintenance 606 Troubleshooting 617 Error Message 651 Specifications 673 Appendix 677 imagePROGRAF Maintenance and Consumables 573 ...

Страница 574: ...07 M Yellow PFI 707 Y Note For instructions on Ink Tank replacement see Replacing Ink Tanks P 574 Replacing Ink Tanks Replacing Ink Tanks Compatible ink tanks For information on the compatible ink tanks for this printer see Ink Tanks P 574 Replacement ink tanks in 330 ml 11 2 fl oz and 700 ml 23 7 fl oz capacities are supported Note Depending on the color you can also use an ink tank with a differ...

Страница 575: ...Tank 330 ml P 576 Remove the Ink Tank 700 ml P 577 4 Load the new Ink Tank Load the Ink Tank 330 ml P 578 Load the Ink Tank 700 ml P 580 Confirm the message When the ink level becomes low a message is displayed on the Display Screen According to the message replace the ink tank or prepare a new ink tank See When to Replace Ink Tanks P 583 Printing OK Ink Menu Printing OK Ink Menu Not much ink is l...

Страница 576: ...k the Ink Lamp The Ink Lamp flashes quickly if there is no ink left Important Avoid hitting the printer when replacing an Ink Tank Handle the printer gently when replacing tanks Jolting the printer during printing may deteriorate print quality 2 Lift the stopper a of the Ink Tank Lock Lever for the color to replace Lift the Ink Tank Lock Lever until it stops and then push it down to the front Note...

Страница 577: ...00 ml 1 Open the Ink Tank Cover of the tank for replacement and check the Ink Lamp The Ink Lamp flashes quickly if there is no ink left Important Avoid hitting the printer when replacing an Ink Tank Handle the printer gently when replacing tanks Jolting the printer during printing may deteriorate print quality 2 Lift the stopper a of the Ink Tank Lock Lever for the color to replace Lift the Ink Ta...

Страница 578: ...pose of used ink tanks according to local regulations Load the Ink Tank 330 ml 1 Before opening the pouch tilt the Ink Tank to the left and right gently seven or eight times Important Do not remove and agitate ink tanks that have already been installed in the printer Ink may leak out If you do not agitate the Ink Tank the ink may settle which may affect printing quality Note If the Ink Tank is col...

Страница 579: ...ant Ink tanks cannot be loaded in the holder if the color or orientation is incorrect If the Ink Tank does not fit in the holder do not force it into the holder Make sure the color of the Ink Tank Lock Lever matches the color of the Ink Tank and check the orientation of the Ink Tank before reloading it 4 Lift the Ink Tank Lock Lever until it stops and then push it down until it clicks into place i...

Страница 580: ...ink tank lock levers are fully closed To close the Ink Tank Cover when no Ink Tank is in stalled as when moving the printer push the release lever a as shown while returning the Ink Tank Lock Lever to the original position BK MBK G Y Y M a Load the Ink Tank 700 ml 1 Before opening the pouch hold the new Ink Tank with both hands and tilt it to the left and right as shown shaking gen tly it seven or...

Страница 581: ...r 2 Open the pouch and remove the Ink Tank Important Never touch the ink holes or electrical contacts This may cause stains damage the Ink Tank and affect printing quality 3 Press the OK button and insert the Ink Tank into the holder facing as shown with the ink holes down Important Ink tanks cannot be loaded in the holder if the color or orientation is incorrect If the Ink Tank does not fit in th...

Страница 582: ...ways close the Ink Tank Cover If the Ink Tank Cover cannot close some Ink Tank Lock Lever may not be closed completely Make sure all ink tank lock levers are fully closed To close the Ink Tank Cover when no Ink Tank is in stalled as when moving the printer push the release lever a as shown while returning the Ink Tank Lock Lever to the original position BK MBK G Y Y M a M Replacing Ink Tanks iPF85...

Страница 583: ...u have deactivated ink level detection The remaining ink level is indicated as shown below If the Display Screen indicates to replace the Ink Tank replace the Ink Tank If a message is displayed indicating to check the remaining ink levels or after tasks that consume a lot of ink such as large format printing or head clean ing check the remaining levels and replace Ink Tank as needed See Replacing ...

Страница 584: ...before maintenance OK Replace ink tank Ink insufficient C M Y M B K B K If a message for ink replacement is shown on the Display Screen When ink runs out the Message Lamp flashes a message regarding Ink Tank replacement is shown on the Dis play Screen and printing is disabled Replace the Ink Tank at this point OK Replace ink tank No ink left C M Y M B K B K When to Replace Ink Tanks iPF850 User s ...

Страница 585: ...rn to check the nozzles Note By default nozzles are checked at fixed intervals Configure the settings on the Control Panel menu in Nozzle Check See Menu Settings P 449 Paper to Prepare When Using Rolls An unused roll at least 254 0 mm 10 00 in wide When Using Sheets One sheet of unused paper of at least A4 Letter size 1 Load paper Attaching the Roll Holder to Rolls P 342 Loading Rolls in the Print...

Страница 586: ...Printhead cleaning modes Head Cleaning A or Head Cleaning B depending on the prob lem to resolve Head Cleaning A Use this mode if printing is faint or contains foreign substances This method of cleaning consumes the least amount of ink It takes about three minutes to complete Head Cleaning B Use this mode if no ink is ejected at all or if Head Cleaning A does not solve the problem It takes about t...

Страница 587: ...on For safety keep the Printhead out of the reach of children If ink is accidentally ingested contact a physician immediately Do not touch the Printhead immediately after printing The Printhead becomes extremely hot and there is a risk of burns Important There may be ink around the nozzles of the Printhead you remove Handle the Printhead carefully during re placement The ink may stain clothing Do ...

Страница 588: ... drawn in When it finishes instructions are displayed on the Display Screen It takes about two minutes to complete Replace the Printhead 1 Remove the Stacker from the printer See Installing and Removing the Stacker On the Printer P 376 2 Open the Top Cover Instructions are now shown on the Display Screen regard ing Printhead replacement 3 If the Printhead Fixer Cover or Printhead Fixer Lever is di...

Страница 589: ... you have wrung out completely to wipe it clean Move the Car riage out of the way manually if the Carriage is concealing the ventilation duct and then clean the duct 5 Pull the Printhead Fixer Lever forward all the way to open it completely 6 Pull up the Printhead Fixer Cover to open it completely a iPF850 Replacing the Printhead User s Guide Maintenance and Consumables Printheads 589 ...

Страница 590: ...ve it from the pouch Important When handling the Printhead always hold it by the grips a Never touch the nozzles b or metal con tacts c This may damage the Printhead and affect printing quality Never touch the ink supply section d This may cause printing problems d c b a 9 While firmly holding the Printhead you have removed use your other hand to remove the orange Protective Part a Squeeze the gri...

Страница 591: ...acts facing down If the nozzles or metal contacts are damaged it may affect the printing quality Do not reattach the removed Protective Part Dispose of these materials in accordance with local regula tions 10 With the nozzles facing down and the metal contacts toward the back insert the Printhead into the Carriage Carefully push the printhead firmly into the Carriage ensuring that the noz zles and...

Страница 592: ...l adjustmt in Head Posi Adj in the Control Panel menu See Adjustment When Installing the Printhead P 559 14 Feed paper by following the instructions on the Display Screen After the paper has advanced Initial adjustmt in Head Posi Adj is executed automatically 15 Install the Stacker on the printer See Installing and Removing the Stacker On the Printer P 376 Replacing the Printhead iPF850 User s Gui...

Страница 593: ... precautions when handling the Maintenance Cartridge Caution For safety keep the Maintenance Cartridge out of the reach of children If ink is accidentally ingested contact a physician immediately Important Do not remove the Maintenance Cartridge except to replace it Ink may leak out Do not remove an Maintenance Cartridge during initialization immediately after turning on the printer during Printhe...

Страница 594: ...e Cartridge 㻞㻛㻞 Ⴑ3DXVH keeping it level MaintCart Replace the 㻝㻛㻞 Ⴑ3DXVH cartridge full Maintenance Access the menu for Maintenance Cartridge replacement 1 On the Tab Selection screen of the Control Panel press or to select the Settings Adj tab Note If the Tab Selection screen is not displayed press the Menu button 2 Press the OK button The Set Adj Menu is displayed 3 Press or to select Maintenanc...

Страница 595: ...he Maintenance Cartridge to hold it firmly on the bottom keeping it level as you pull it out Important Used maintenance cartridges are heavy Always grasp the cartridge firmly and keep the cartridge level during removal and storage If you drop a used Maintenance Cartridge or store it at an angle ink may leak and cause stains The remaining Maintenance Cartridge capacity is recorded on each printer D...

Страница 596: ...sed Maintenance Cartridge in the plastic bag of the new cartridge and dispose of it in accord ance with local regulations 6 Wipe away any soiling on the Maintenance Cartridge Cov er Important Support the Maintenance Cartridge Cover from underneath as you wipe it 7 Keeping the new Maintenance Cartridge level insert it all the way in The printer now initializes the Maintenance Cartridge Important Do...

Страница 597: ...een To check remaining Maintenance Cartridge capacity access the Tab Selection screen on the Control Panel and press or to select the Settings Adj tab Note If the Tab Selection screen is not displayed press the Menu button If the Display Screen indicates to replace the Maintenance Cartridge replace the Maintenance Cartridge If a mes sage is displayed indicating to check the remaining capacity of t...

Страница 598: ...replacement and preparations to transfer the printer deplete much of the Mainte nance Cartridge capacity In particular preparing to move the printer depletes a lot of the capacity Check the remaining Maintenance Cartridge capacity before this maintenance and replace the Maintenance Car tridge if necessary If a message for the Maintenance Cartridge replacement is shown on the Display Screen When th...

Страница 599: ...paper when the paper is cut We recommend cleaning the Ejection Guide even if it does not appear dirty because it may actually be covered with paper dust See Cleaning Inside the Top Cover P 599 4 Plug the power cord into the outlet Cleaning Inside the Top Cover Cleaning Inside the Top Cover Clean inside the Top Cover about once a month to maintain better printing quality and help prevent problems A...

Страница 600: ...derless Printing Ink Grooves b use the Cleaning Brush c provided with the printer to wipe it away Important Do not touch the Linear Scale a Carriage Shaft b or Ink Tube Stabilizer c Touching these parts may damage them Avoid cleaning where the Carriage is retracted in position d or e c a b d e c b a Cleaning Inside the Top Cover iPF850 User s Guide Maintenance and Consumables Cleaning the Printer ...

Страница 601: ...me into con tact with electrical components inside the printer there is a risk of fire or electrical shock Important Do not use a dry cloth to wipe inside the Top Cover This may create a static charge which may attract dust and affect the printing quality Do not touch the clear sheet on the side of the Top Cover Roller This may damage the roller 5 Close the Top Cover 6 Install the Stacker on the p...

Страница 602: ...that you have wrung out completely wipe away ink and paper dust from the Paper Retainer a roller b and rubber roller c which become soiled easily At this time also wipe away soiling from the entire tray d 4 Close the Canopy 5 Turn the printer on a b c d Cleaning the Stacker iPF850 User s Guide Maintenance and Consumables Cleaning the Printer 602 ...

Страница 603: ...message is displayed on the Display Screen If you are unable to execute paper advance feed the paper using the following procedure 1 Press the Back button to display the Tab Selection screen 2 Press the Load button 3 When a message is displayed press or to select Reload Roll Paper and then press the OK button 10 Press the button to advance the roll paper until approxi mately 20 cm 7 87 in is eject...

Страница 604: ... tray 14 Press the button and rewind the roll paper until End of paper feed is displayed on the Display Screen Note The entire roll paper feed components a are cleaned by moving the roll paper backwards and forwards a a a 15 Repeat steps 13 and 14 16 Eject the leading edge of the roll paper until it reaches the end of the tray Cleaning the Stacker iPF850 User s Guide Maintenance and Consumables Cl...

Страница 605: ...17 Press the Cut button to cut the roll paper 18 Open the Canopy and remove the two sheets of cut roll paper iPF850 Cleaning the Stacker User s Guide Maintenance and Consumables Cleaning the Printer 605 ...

Страница 606: ...described in the following table Prepare the Maintenance Cartridge in advance Always follow the instructions of the service representative when transferring the printer under Level 3 conditions Level Transport and Storage In Low Tem perature En vironments Permitted Angle of Inclination Amount of Ink to Dispose of Required Maintenance Cartridg es 1 Usage Examples 1 No Lengthwise 0 30º Rotation 0 10...

Страница 607: ... Selection screen is not displayed press the Menu button 3 Press the OK button The Set Adj Menu is displayed 4 Press or to select Prep MovePrinter and then press the OK button 5 Press or to select the level of transfer and then press the OK button Displays the confirmation screen 6 Press or to select Execute and then press the OK button The printer is now prepared for transfer Level 1 Once prepara...

Страница 608: ...ss the OK button and contact your Canon dealer for assistance Removing Ink Tanks 1 Open the Ink Tank Cover 2 Lift the stopper a of the Ink Tank Lock Lever a Lift the Ink Tank Lock Lever until it stops and then push it down to the front 3 Hold the Ink Tank by the handle a and remove it a BK a Preparing to Transfer the Printer iPF850 User s Guide Maintenance and Consumables Other Maintenance 608 ...

Страница 609: ... Important Do not remove the Maintenance Cartridge except when the message for replacing it is displayed If you remove the Maintenance Cartridge while ink is being drawn out the ink may leak out 7 When the process is finished Preparations for moving the printer finished Turn the power off is dis played When this happens replace the Maintenance Cartridge currently being used with a new Maintenance ...

Страница 610: ... If you accidentally unplug the printer plug it in again reinstall the ink tanks and follow this procedure again 2 Open the Top Cover and lift the Ejection Guide 3 Remove the four ejection supports and lower the Ejection Guide 4 Grasp the Belt insert it between the Belt Stopper and affix the Belt Stopper with a hex screw at the position indicated Preparing to Transfer the Printer iPF850 User s Gui...

Страница 611: ...uring installation 7 Remove and package the Stand by reversing the installation procedure when it was attached to the printer 8 Disassemble and repackage the Stand by following the installation procedure in reverse 9 Repack the Roll Holder Holder Stopper and printer in shipping materials and then package them in a shipping box Reinstalling the Printer Reinstalling the Printer The basic workflow fo...

Страница 612: ...d poses a risk of injury or damage to the location site 2 Attach the Roll Unit to the Stand Install the printer 1 Mount the printer on the assembled Stand and tighten the screws firmly Caution Moving the printer requires at least six people holding it on both sides Be careful to avoid back strain and other injuries When moving the printer firmly grasp the Carrying Handles a under each side The pri...

Страница 613: ...back of the Ejection Guide 4 Connect the power cord to the Power Supply Connector on the back of the printer 5 Plug the power cord into the outlet 6 Press the power button to turn the printer on When the message Has printer been reinstalled Do not load ink tanks yet is displayed select Yes and press the OK button a iPF850 Reinstalling the Printer User s Guide Maintenance and Consumables Other Main...

Страница 614: ...e Roll Media in the printer See Loading Rolls in the Printer P 345 10 Install the software Note that the driver installation procedure varies depending on the type of connection 11 Install the Stacker on the printer by referring to the Stacker Setup Guide Reinstalling the Printer iPF850 User s Guide Maintenance and Consumables Other Maintenance 614 ...

Страница 615: ...button The Set Adj Menu is displayed 3 Press or to select Printer Info and then press the OK button 4 Press or to select System Info and then press the OK button The firmware version is displayed Updating the Firmware To obtain the latest firmware visit the Canon website If the firmware available online is newer than the installed firmware update the printer firmware For details on downloading and...

Страница 616: ...iPF850 User s Guide 616 ...

Страница 617: ...stments for Better Print Quality 555 Maintenance and Consumables 573 Troubleshooting Frequently Asked Questions 618 Problems Regarding Paper 619 Printing does not start 630 The printer stops during a print job 632 Problems with the printing quality 633 Cannot print over a network 642 Installation problems 643 HP GL 2 problems 644 Other problems 646 Error Message 651 Specifications 673 Appendix 677...

Страница 618: ...likewise on the printer See Specifying the Ink Drying Time for Rolls P 358 See Menu Structure P 443 How do I print without borders When printing on rolls you can perform borderless printing by configuring the printer driver when print ing on cut sheets you cannot perform borderless printing See Borderless Printing on Paper of Equivalent Size P 92 See Borderless Printing by Resizing Originals to Fi...

Страница 619: ... not find any scraps or jams see Troubleshooting When Paper Jams are not Found P 625 If the paper becomes jammed while ejecting to the stacker see If There is a Paper Jam while Using the Stack er P 624 1 Turn the printer off See Turning the Printer On and Off P 17 2 Open the Top Cover Note If the leading edge of the roll jams in the carriage such as when the paper curls strongly you may be able to...

Страница 620: ...s out move the Cutter to the right side away from the paper Important If the Cutter is on the left side be sure to move it to the right If the Cutter is on the left side when you turn the printer on the printer may rip the paper 5 Lift the Release Lever Clearing Jammed Roll Paper iPF850 User s Guide Troubleshooting Problems Regarding Paper 620 ...

Страница 621: ...r may occur when you turn on the printer 8 Hold the edge of the roll paper in the middle as you gently pull it evenly to the position of the Ejection Guide a Align the right side of the roll paper with the Paper Alignment Line b keeping this side parallel to the line and then low er the Release Lever Important Do not force the roll paper into alignment with the Paper Alignment Line b This may prev...

Страница 622: ...hod for Rolls P 360 Clearing a Jammed Sheet Clearing a Jammed Sheet If a sheet jams follow the steps below to remove it 1 Turn the printer off See Turning the Printer On and Off P 17 2 Open the Top Cover 3 If the Carriage is out move the Carriage out of the way away from the paper Important Do not touch the Linear Scale a Carriage Shaft b or Ink Tube Stabilizer c Touching these parts may damage th...

Страница 623: ...n the left move the Carriage to the right until it stops Important Always move the Carriage to the right side If the Carriage is on the left a Carriage error may occur when you turn on the printer 7 Lower the Release Lever and close the Top Cover 8 Turn the printer on See Turning the Printer On and Off P 17 iPF850 Clearing a Jammed Sheet User s Guide Troubleshooting Problems Regarding Paper 623 ...

Страница 624: ... canopy clear the ejected paper and close the canopy again 2 Turn the stacker off 3 Check that the Stacker Canopy a is closed and then un lock all of the casters on the Stacker stand 4 Turn the printer off See Turning the Printer On and Off P 17 5 Holding the stacker outer frame a pull the stacker and re move it away from the printer OFF a a If There is a Paper Jam while Using the Stacker iPF850 U...

Страница 625: ...er that is jammed in the stacker out from the op posite side to the printer and close the canopy 2 Make it ready to print on roll paper by referring to step 7 and later in Clearing Jammed Roll Pa per P 619 Troubleshooting When Paper Jams are not Found Troubleshooting When Paper Jams are not Found If you cannot find a paper jam search for the paper as follows If the Stacker is installed on the prin...

Страница 626: ...ft the Ejection Guide 4 Check for paper in the lower part of the printer Remove any jammed paper here by pushing it to the floor with your fingers 5 Lift the Release Lever a Troubleshooting When Paper Jams are not Found iPF850 User s Guide Troubleshooting Problems Regarding Paper 626 ...

Страница 627: ... the printer push it to the floor with your fingers If the paper does not drop to the floor or to the lower part of the printer fold an A4 sheet three times insert it through the gap of the Platen a and the Paper Retainer b and push the jammed paper out a b 7 Lower the Release Lever and close the Top Cover iPF850 Troubleshooting When Paper Jams are not Found User s Guide Troubleshooting Problems R...

Страница 628: ...osition be fore it is cut Reload the paper correctly You are using paper that cannot be cut with the Cutter Unit Specify Manual in Cutting Mode in the Control Panel menu and use scissors or a cutting tool to cut the roll after printing See Specifying the Cutting Method for Rolls P 360 Cut Speed is not configured correctly in the Control Panel menu Change the Cut Speed setting in the Control Panel ...

Страница 629: ...rn the Stacker power switch off The size of clear film cannot be detected The size of clear film cannot be detected Cause Corrective Action The Platen is soiled with ink or other substances Open the Top Cover and clean the entire Platen See Cleaning Inside the Top Cover P 599 iPF850 The Stacker continues to rotate User s Guide Troubleshooting Problems Regarding Paper 629 ...

Страница 630: ...rt the print job as follows 1 Click Print Scan This is identified as Printers Scanners or Print Fax in other versions of Mac OS 2 Choose the printer 3 Click Open Print Queue to open a window 4 Click Resume Printer or Resume The printer does not respond even if print jobs are sent The printer does not respond even if print jobs are sent Cause Corrective Action In the Control Panel menu Pause Print ...

Страница 631: ...led with ink The display screen indicates Agitating The display screen indicates Agitating Cause Corrective Action Ink agitation is in progress Please wait until ink agitation is finished The time for agitation varies depending on how long the printer has been off iPF850 Ink Filling is displayed User s Guide Troubleshooting Printing does not start 631 ...

Страница 632: ...ve Action The leading edge of the roll paper was cut to straighten it The leading edge of rolls may be cut to straighten it if Trim Edge First is set to a value other than Off in the Control Panel menu See Cutting the Leading Edge of Roll Paper Automatically P 366 The Printhead nozzles are clogged Print a test pattern to check the nozzles and make sure the Printhead is in good condition for printi...

Страница 633: ...n printing may stop depending on the content of the warn ing See Menu Settings P 449 Because the printer was left without ink tanks installed for some time ink has become clogged in the ink supply sys tem After the ink tanks have been installed for 24 hours run Head Cleaning B from the Control Pan el See Cleaning the Printhead P 586 Paper is jammed inside the Top Cover Follow the steps below to re...

Страница 634: ...4 in thick or less choose a VacuumStrngth setting of Weakest in the Control Panel menu If rubbing still occurs in the Control Panel menu use a higher Head Height setting See Adjusting the Vacuum Strength P 570 See Troubleshooting Paper Abrasion and Blurry Images P 562 When you have loaded paper the paper you have loaded does not match the type selected on the Con trol Panel Be sure to select the c...

Страница 635: ...complete the settings for Dry time and Area in Scan Wait Time However note that printing will now take longer See Menu Settings P 449 The Stacker is dirty Clean the Stacker See Cleaning the Stacker P 601 The back side of the paper is dirty The back side of the paper is dirty Cause Corrective Action The Platen has become dirty after borderless printing or printing on small paper Open the Top Cover ...

Страница 636: ...e Stacker tray using the following proce dure 1 Press the Feed button 2 Press the button to advance until the leading edge of the paper is ejected into the tray See Installing and Removing the Stacker On the Printer P 376 See Automatic Banding Adjustment P 565 See Manual Banding Adjustment P 566 Printing does not proceed smoothly be cause print jobs are interrupted during transmission Exit other a...

Страница 637: ...uneven colors To avoid uneven colors we recommend drying each sheet separately Density may be uneven if you use Glossy Paper or Coated Paper In Advanced Settings of the printer driver choose Highest or High in Print Quality The type of paper specified in the print er driver does not match the type loa ded in the printer Load paper of the same type as you have specified in the printer driver See Lo...

Страница 638: ...ge edges are affected by white banding Important Always set all of the blue Switches on the Platen to the side for borderless printing If the Switch are not set correctly the print quality may deteriorate 1 Remove the Stacker from the printer See Installing and Removing the Stacker On the Printer P 376 2 Remove any loaded paper that will not be used Rolls See Removing the Roll from the Printer P 3...

Страница 639: ...ing Number Dimensions 2 254 0 mm 10 00 in 3 355 6 mm 14 00 in 4 431 8 mm 17 00 in 5 515 0 mm JIS B2 or B3 6 594 0 mm ISO A1 or A2 or 609 6 mm 24 00 in 7 841 0 mm ISO A0 or A1 8 914 4 mm 36 00 in 9 1030 0 mm JIS B0 or B1 10 1066 8 mm 42 00 in 11 1117 6 mm 44 00 in 10 11 9 7 8 6 5 4 3 2 a iPF850 Setting the Blue Switch on the Platen User s Guide Troubleshooting Problems with the printing quality 639...

Страница 640: ...P 369 Make sure the same type of paper is specified in the printer driver as you have loa ded in the printer 1 Press the Stop button and stop printing 2 Change the type of paper in the printer driver and try printing again The length of printed images is inaccurate in the feeding direction The length of printed images is inaccurate in the feeding direction Cause Corrective Action In the Control Pa...

Страница 641: ... 2 Clear the option Page Layout on the Layout sheet 3 Click the Special Settings button in the Layout sheet open the Special Settings dia log box and set Fast Graphic Process to Off The type of paper specified in the printer driver does not match the type loaded in the printer Load paper of the same type as you have specified in the printer driver See Loading Rolls in the Printer P 345 See Loading...

Страница 642: ... In this case configure the connection method manually specifying the communi cation mode in use See Configuring the Communication Mode Manually P 495 Cannot print over a TCP IP network Cannot print over a TCP IP network Cause Corrective Action The printer s IP address is not config ured correctly Make sure the printer s IP address is configured correctly See Configuring the IP Address Using image...

Страница 643: ...onitor Windows Remove imagePROGRAF Status Monitor as follows Note The following procedure is for Windows 7 The method of removing printer drivers varies depending on the version of Windows 1 Select Control Panel from the start menu 2 Select Uninstall a program Note If the User Account Control dialog box is displayed click Yes 3 Select imagePROGRAF Status Monitor and then click the Uninstall button...

Страница 644: ...e is On in the Control Pan el menu In the Control Panel set Auto Rotate to Off and print again See Menu Settings P 449 The plotter origin is incorrect Set Detect img size to Command priority or Detected size in the Con trol Panel menu See Menu Settings P 449 Oversize in the Control Panel menu is set to Off Set Oversize to On in the Control Panel menu See Menu Settings P 449 Lines are printed too t...

Страница 645: ...ect img size to Command priority or Detected size in the Control Panel menu See Menu Settings P 449 Set Conserve Paper to On in the Control Panel menu See Menu Settings P 449 HP GL 2 printing takes a long time HP GL 2 printing takes a long time Cause Corrective Action Large print jobs with a lot of data take longer to print Please wait a while until printing is finished A job was printed when Inpu...

Страница 646: ...l Panel Cannot operate from the Control Panel Cause Corrective Action The control panel access lock is set Release the control panel access lock See Setting Control panel access lock P 465 The printer takes time to start up The printer takes time to start up Cause Corrective Action The printer may have shut down incorrectly last time This may hap pen after power outages or if the printer is unplug...

Страница 647: ...inte nance Cartridge that was used to replace the old one Remove the new Maintenance Cartridge you have just installed and insert it again firmly See Replacing the Maintenance Cartridge P 593 The printer consumes a lot of ink The printer consumes a lot of ink Cause Corrective Action Many full page color images are printed In print jobs such as photos images are filled with color This consumes a lo...

Страница 648: ...mage the printer Releasing ink level detection 1 On the Display Screen a message indicates that the ink level cannot be detected After checking the message press the button 2 Press or to select Information and then press the OK button 3 A confirmation message is shown on the Display Screen about re leasing ink level detection After checking the message press the button 4 After checking the message...

Страница 649: ...9 A confirmation message about updating ink information is shown on the Display Screen After checking the message press the button 10 Press or to select Yes and then press the OK button Ink level detection is now released iPF850 Ink Level Detection User s Guide Troubleshooting Other problems 649 ...

Страница 650: ...iPF850 User s Guide 650 ...

Страница 651: ... Better Print Quality 555 Maintenance and Consumables 573 Troubleshooting 617 Error Message Error Messages 652 Messages regarding paper 654 Messages regarding ink 663 Messages regarding printing or adjustment 665 Messages regarding printheads 666 Messages regarding the maintenance cartridge 668 Messages regarding the hard disk 669 Messages regarding HP GL 2 670 Other Messages 671 Specifications 67...

Страница 652: ...epresents a letter or number 671 Ink insufficient 663 Ink tank is empty 663 Insert the maintenance cartridge 668 Insufficient paper for job 656 Mail box full Delete unwanted data 669 Mail box full Now printing without saving data 669 Mail box nearly full 669 Maint cart The level is low 668 Maintenance cartridge full 668 Maintenance cartridge problem 668 Maximum jobs stored 669 MediaType Mismatch 6...

Страница 653: ...1 Upper or 2 Lower 660 Sheet printing is selected 659 Sheet removed 659 Stacker not ready 662 The following ink tanks cannot be recognized 664 The mail box is full 669 The paper is too small 655 The paper is too small 655 The roll feed unit is loose 662 This paper cannot be used as size is not supported 657 This type of paper is not compatible with HP GL 2 670 Top cover is open 671 Unknown file 67...

Страница 654: ...e Mismatch MediaType Mismatch Cause Corrective Action You tried to print a test pattern for printer ad justment on several sheets but sheets of dif ferent types of paper were used When printing a test pattern for adjustment use sheets of the same type of paper in the required quantity Replace the paper as follows and perform adjustment again 1 Lift the Release Lever and stop printing 2 Replace the...

Страница 655: ...th paper of a size that matches the size setting in the printer driver as follows 1 Press or to select Change Paper and then press the OK button to stop printing 2 Replace the loaded paper to match the settings in the printer driver and try printing again See Loading and Printing on Rolls P 18 See Loading and Printing on Sheets P 21 When Detect Mismatch in the Control Panel menu is set to Warning ...

Страница 656: ... the Print er P 369 If Not finished printing Finish printing remaining jobs is displayed on the Dis play Screen press the OK button Printing will resume starting from the page on which the error occurred If this error recurs after you reload the roll remove the Roll Holder from the printer push the roll firmly in until it touches the Roll Holder flange and reload the Roll Holder in the printer See...

Страница 657: ... attempted to print on a roll but no roll is loaded Press or to select Load Roll Paper and then press the OK button Load the roll and then print See Attaching the Roll Holder to Rolls P 342 See Loading Rolls in the Printer P 345 Press or and select Stop Printing or press the Stop button to stop printing Roll printing is selected but sheets are loaded Roll printing is selected but sheets are loaded...

Страница 658: ...hing the Roll Holder to Rolls P 342 See Loading Rolls in the Printer P 345 3 If no barcode was printed on the roll specify the type of paper See Changing the Type of Paper P 350 4 If no barcode was printed on the roll specify the paper length See Specifying the Paper Length P 352 5 If Not finished printing Finish printing remaining jobs is shown on the Display Screen press the OK button Printing w...

Страница 659: ...ing the Roll from the Printer P 352 See Loading and Printing on Sheets P 21 Press or to select Stop Printing and then press the OK button to stop printing Paper jam Paper jam Lift the release lever Cause Corrective Action A paper jam occurred in the printer during printing 1 Lift the Release Lever and remove the jammed paper See Clearing Jammed Roll Paper P 619 See Clearing a Jammed Sheet P 622 2 ...

Страница 660: ...Holder to Rolls P 342 Important To disable this message if it is displayed repeatedly despite reloading paper for example choose Off or Loose in the Skew Check Lv setting of the printer menu However this may cause jams and printing problems because paper may be askew when printed Also the Platen may become soiled which may soil the back of the next document when it is printed Paper cutting failed ...

Страница 661: ...e print job to enable borderless printing 1 Press or to select Stop Printing and then press the OK button 2 Make sure the correct printer driver for the printer is selected and try printing again For information on types of paper compatible with borderless printing refer to the Paper Reference Guide See Displaying the Paper Reference Guide P 335 Press or to select Print With Border and then press ...

Страница 662: ...e The roll feed unit is loose Cause Corrective Action The Roll Unit is detached from the printer Push the Roll Unit firmly all the way in Stacker not ready Stacker not ready Cause Corrective Action The Stacker is not ready When printing using the Stacker check the following The Stacker Power is on The Stacker is installed in the right position on the Printer Once the preparation is finished start ...

Страница 663: ...tor Press the OK button open the Ink Tank Cover and replace the Ink Tank for the color that is out of ink See Replacing Ink Tanks P 574 Remaining level of the ink cannot be correctly detected Check ink tank Remaining level of the ink cannot be correctly detected Check ink tank Cause Corrective Action Ink level detection cannot work correctly if you use refill ink tanks The refill ink tank can no l...

Страница 664: ...There is a problem with the Ink Tank Replace it with a new Ink Tank See Replacing Ink Tanks P 574 The following ink tanks cannot be recognized The following ink tanks cannot be recognized Cause Corrective Action An Ink Tank that is incompatible with the printer is loaded Load an Ink Tank that is compatible with the printer See Replacing Ink Tanks P 574 Wrong ink tank Wrong ink tank Cause Correctiv...

Страница 665: ...itions are met For details on environmental condi tions for various paper see the Paper Reference Guide See Displaying the Paper Reference Guide P 335 Before borderless printing move the blue platen switch Before borderless printing move the blue platen switch Cause Corrective Action The blue Switch on the platen was set to the side oppo site when a borderless print job was received Before borderl...

Страница 666: ...n execute Head Posi Adj again 1 Press the OK button to clear the error 2 Use Head Inc Adj to adjust the angle of inclination of the Printhead See Adjusting Line Misalignment P 560 3 Execute Head Posi Adj again See Automatic Adjustment to Straighten Lines and Colors P 556 Wrong printhead Wrong printhead Cause Corrective Action An incompatible Printhead has been installed Open the Top Cover and repl...

Страница 667: ...op Printing 2 Clean the Printhead See Cleaning the Printhead P 586 If the message is still displayed when printing replace the Printhead See Replacing the Printhead P 587 Press or to select Print and then press the OK button to resume printing However note that this error may affect the printing quality iPF850 Execute printhead cleaning User s Guide Error Message Messages regarding printheads 667 ...

Страница 668: ...ull You can continue to print but prepare a new Maintenance Cartridge to use when the message for replacement is displayed No Maintenance Cartridge capacity No Maintenance Cartridge capacity Cause Corrective Action The Maintenance Cartridge cannot absorb enough ink for Printhead cleaning or other oper ation After confirming that the printer has stopped operating replace the Maintenance Cartridge S...

Страница 669: ...n personal boxes See Deleting Saved Jobs P 531 Mail box full Now printing without saving data Mail box full Now printing without saving data Cause Corrective Action No more space is available on the printer s hard disk so jobs are now printed without sav ing them Print jobs can no longer be saved on the hard disk After printing this message is cleared Mail box nearly full Mail box nearly full Caus...

Страница 670: ...ms and affect the printing quality GL2 Wxxxx The memory is full xxxx is 0501 0903 or 0904 GL2 Wxxxx The memory is full xxxx is 0501 0903 or 0904 Cause Corrective Action The printer memory is full Because the entire print job could not be received the printer may not be able to print the entire original Check the printing results In the Control Panel menu setting On the Fly to On may enable printin...

Страница 671: ... a letter or number Hardware error xxxxxxxx xxxx x represents a letter or number Cause Corrective Action The last portion of roll paper was used during a print job The paper was not advanced because the trailing edge is taped to the roll Turn off the printer and remove the roll from the printer before restoring power Fastening tape or the Belt Stopper has not been removed inside the Top Cover Turn...

Страница 672: ...off the printer and wait a while before restoring power and then resend the data You have uploaded firmware for a different model Check the firmware version Turn off the printer and wait a while before re storing power and then resend the firmware If the message is displayed again contact your Canon dealer for assistance Multi sensor error Multi sensor error Cause Corrective Action Direct sunlight...

Страница 673: ... 267 Handling and Use of Paper 331 Control Panel 429 Printer Parts 467 Network Setting 481 Print Job Management 501 Adjustments for Better Print Quality 555 Maintenance and Consumables 573 Troubleshooting 617 Error Message 651 Specifications Printer Specifications 674 Appendix 677 imagePROGRAF Specifications 673 ...

Страница 674: ...ting Green Purchasing GPN Japan RoHS EPEAT Silver technical compliance 1 The printer uses a trace amount of power even when turned off To stop all power consumption turn off the printer and unplug the power cord 2 Calculation based on ISO 7779 Operating conditions On the Main sheet of the printer driver Media Type Plain Paper Advanced Settings Print Priority Line Drawing Text and Print Quality Sta...

Страница 675: ...ee Displaying the Paper Reference Guide P 335 Paper width For information on the paper widths the printer supports see Paper Sizes P 332 Minimum paper length Rolls 203 mm 8 0 in Sheets When the Stacker is used 210 mm 8 3 in Maximum printable length 1 Rolls 18 m 19 7 yd Sheets 1 600 mm 63 0 in Thickness Rolls 0 07 0 8 mm 0 0028 0 031 in Sheets 0 07 0 8 mm 0 0028 0 031 in Roll maximum outer diameter...

Страница 676: ...m 0 0 12 in 0 3 mm 0 0 12 in 20 mm 0 79 in 5 mm 0 20 in 5 mm 0 20 in Sheets Printable Area a margin of 3 mm 0 12 in on top 23 mm 0 91 in on bottom and 3 mm 0 12 in on left and right sides is required Recommended Print Area A margin of 20 mm 0 79 in on top 23 mm 0 91 in on bottom and 5 mm 0 20 in on left and right sides is required Rolls Printable Area A margin of 3 mm 0 12 in on all sides is requi...

Страница 677: ...f Paper 331 Control Panel 429 Printer Parts 467 Network Setting 481 Print Job Management 501 Adjustments for Better Print Quality 555 Maintenance and Consumables 573 Troubleshooting 617 Error Message 651 Specifications 673 Appendix Safety Precautions 678 Manuals for this printer 682 Disposal of the product 684 imagePROGRAF Appendix 677 ...

Страница 678: ...nter or cause malfunction Power Supply Warning Never handle the power cable with wet hands Doing so may cause electrical shock Insert the power cable securely and completely into the power source If the power cable is not inserted complete ly this could cause a fire or electrical shock Do not use any power cable other than the one provided This could cause a fire or electrical shock Never use the ...

Страница 679: ...ing to work around the printer Moving the Printer Caution Moving the printer requires at least six people holding it on both sides Be careful to avoid back strain and other injuries When moving the printer firmly grasp the Carrying Handles under each side The printer may be unsteady if you hold it at other positions which poses a risk of injury from dropping the printer Printhead Ink Tanks and Mai...

Страница 680: ...e space for installation Legal Notices Legal Notices FCC Regulations U S A Canon Large Format Printer iPF850 This device complies with Part 15 of the FCC Rules Operation is subject to the following two conditions 1 This device may not cause harmful interference and 2 this device must accept any interference received including interference that may cause undesired operation Note This equipment has ...

Страница 681: ...registered trademarks or trademarks of Microsoft Corporation in the U S and or other countries Mac Mac OS Bonjour Safari and OS X are trademarks of Apple Inc registered in the U S and other coun tries Adobe RGB a trademark of Adobe Systems Incorporated is color space proposed by Adobe Systems Incor porated Copyright Unauthorized reproduction of this user manual in whole or part is prohibited Legal...

Страница 682: ...nd explanations on restric tions or precautions in use Warning Indicates warning items for which operating error poses a risk of death or serious injury To ensure safe use always follow these warnings Caution Indicates caution items for which operating error poses a risk of injury To ensure safe use always follow these cautions Important Indicates important information and restrictions that defini...

Страница 683: ...p Figures and software screens Figures in this user manual may be different from the actual appearance of the printer in some cases Screens depicted in this user manual for the printer driver or other software may be different from the ac tual screens because of subsequent updates May we request The information in this user manual is subject to change without notice We strive to ensure accuracy of...

Страница 684: ...bedeutet dies gemäß der Batter ien Richtlinie dass in dieser Batterie oder diesem Akkumulator ein Schwermetall Hg Quecksilber Cd Cadmi um Pb Blei in einer Konzentration vorhanden ist die über einem in der Batterien Richtlinie angegebenen Grenz wert liegt Dieses Produkt muss bei einer dafür vorgesehenen Sammelstelle abgegeben werden Dies kann z B durch Rück gabe beim Kauf eines neuen ähnlichen Prod...

Страница 685: ...t officiële dienst voor klein chemisch afval of afvalstortplaats of kunt u terecht op www canon europe com weee of www canon europe com battery Sólo para la Unión Europea y el Área Económica Europea Noruega Islandia y Liechtenstein Estos iconos indican que este producto no debe desecharse con los residuos domésticos de acuerdo con la Direc tiva sobre RAEE 2012 19 UE y la Directiva sobre Pilas y Ac...

Страница 686: ...urope com weee ou www canon europe com battery Gælder kun i Europæiske Union og EØS Norge Island og Liechtenstein Disse symboler betyder at produktet ikke må bortskaffes sammen med dagrenovation i henhold til WEEE direktivet 2012 19 EU batteridirektivet 2006 66 EF og eller den lokale lovgivning som disse direktiver er gennemført i Hvis der i overensstemmelse med batteridirektivet er trykt et kemis...

Страница 687: ... lyijy enemmän kuin paristodirektiivin salliman määrän Tuote on vietävä asianmukaiseen keräyspisteeseen esimerkiksi kodinkoneliikkeeseen uutta vastaavaa tuotetta os tettaessa tai viralliseen sähkö ja elektroniikkalaiteromun tai paristojen ja akkujen keräyspisteeseen Sähkö ja elek troniikkalaiteromun virheellinen käsittely voi vahingoittaa ympäristöä ja ihmisten terveyttä koska laitteet saattavat s...

Страница 688: ...y használatához A termék újrahasznosítását illetően informálódjon a helyi polgármesteri hivatalnál a helyi közterület fenntartó válla latnál a hivatalos hulladéklerakó telephelyen vagy a háztartási hulladék begyűjtését végző szolgáltatónál illetve látogasson el a www canon europe com weee vagy www canon europe com battery internetes oldalra Tylko dla krajów Unii Europejskiej oraz EOG Norwegia Isla...

Страница 689: ...ālus Hg dzīvsudrabs Cd kadmijs Pb svins un to koncentrācijas līmenis pārsniedz direktīvā par baterijām un akumulatoriem minēto piemērojamo slieks ni Šis izstrādājums ir jānodod piemērotā savākšanas vietā piemēram apstiprinātā veikalā kur iegādājaties līdzīgu jaunu produktu un atstājat veco vai apstiprinātā vietā izlietotu elektrisko un elektronisko iekārtu un bateriju un aku mulatoru pārstrādei Ne...

Страница 690: ...ия относно това къде можете да предадете за рециклиране на този продукт моля свържете се с Вашите местни власти с органа отговорен за отпадъците с одобрената система за ИУЕЕО или с Вашата местна служба за битови отпадъци или посетете www canon europe com weee или www canon europe com battery Doar pentru Uniunea Europeană şi EEA Norvegia Islanda şi Liechtenstein Aceste simboluri indică faptul că ac...

Страница 691: ...les substàncies potencialment perilloses que normalment estan associades a l RAEE La vostra cooperació a l hora de rebutjar correctament aquest producte contribuirà a la utilització efectiva dels re cursos naturals Els usuaris tenen dret a retornar les bateries o els acumuladors usats sense cap càrrec El preu de venda de les bateries i els acumuladors inclou el cost de la gestió ambiental dels res...

Страница 692: ...iPF850 User s Guide 692 ...

Страница 693: ...artridge 593 597 598 668 Menu Operations 439 440 Menu Structure 443 N Navigate 436 Nozzle 585 O Orientation 148 149 150 246 256 Output Method 180 Oversize 83 P Page Setup Pane 283 Page Setup Sheet 177 Paper Feed Slot 628 Personal Box 540 543 PosterArtist 50 Power 247 249 250 252 254 255 256 Preparing to Transfer the Printer 606 Print Job Log 515 516 Printer Driver Settings 158 268 Printer Hard Dis...

Страница 694: ...iPF850 User s Guide ENG CANON INC 2015 ...

Отзывы: