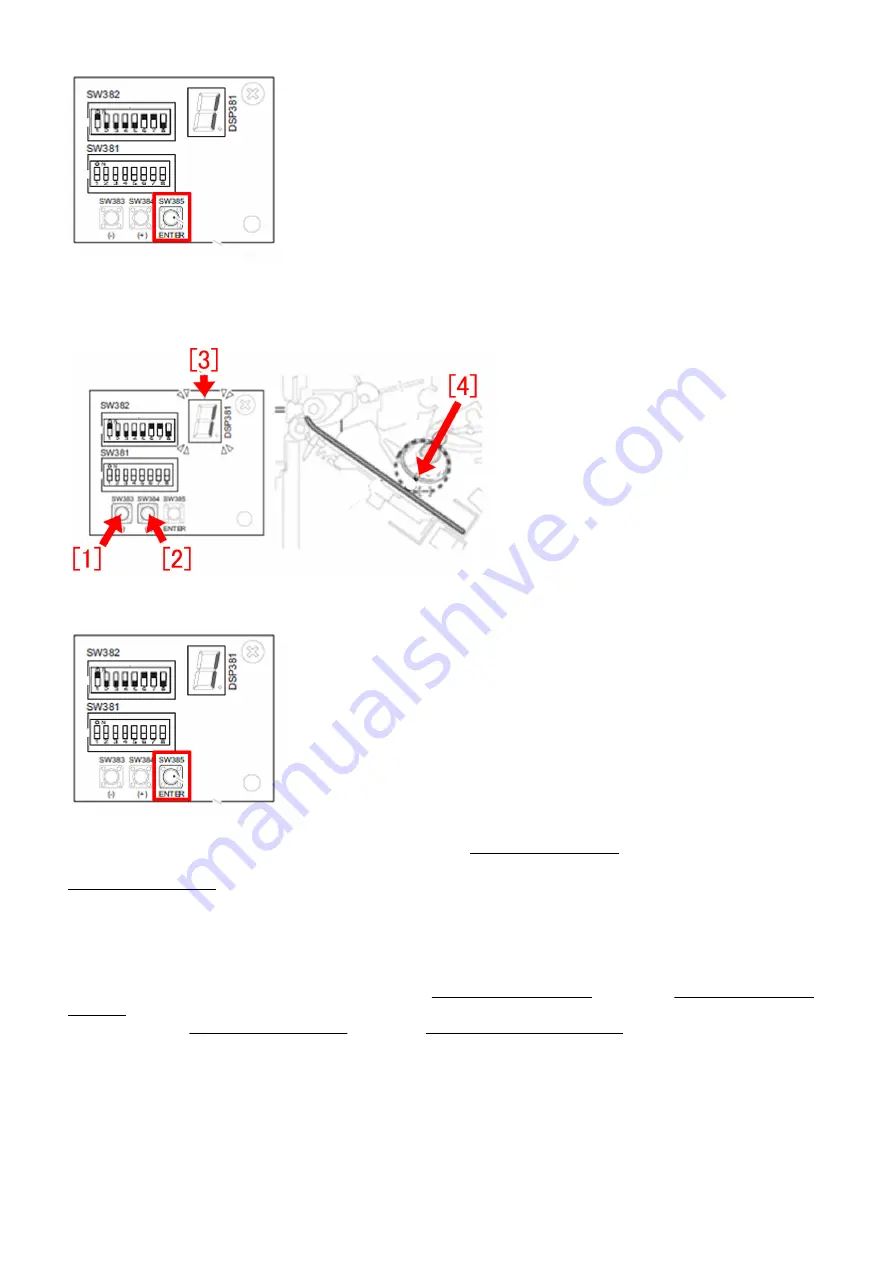
C-3) Press SW383[1] or SW384[2] a few times to have the LED [3] to indicate "-2".
[Reference] The default value is "0". When setting it "-2", the distance between the belt [4] and the paper becomes smaller and
feeding force increases.
C-4) Press switch SW385 again to complete the feed belt adjustment.
C-5) Return all the bit switches in SW382 to OFF. Next, proceed to Checking the adjustment.
Checking the adjustment
1) To check the state, print multiple stapled sets.
2) Check staple quality of the printed document. The specification of staple misalignment for finisher is within 2mm depending
on installation environment of the machine and papers used. After having the alignment plate and the paddle height adjusted to
"-1" and the feed belt position to "-2", staple misalignment should improve to be within 2mm. If staple misalignment on all sets of
the printed document is within 2mm, the work completes here.
3) If staple misalignment is more than 2mm, refer to the step B. Adjusting Paddle Height and the step C. Adjusting Position of
Feed Belt and change the paddle height adjustment value to "-2" and the feed belt position adjustment value to "-4"
[Caution] In the step B. Adjusting Paddle Height and the step C. Adjusting Position of Feed Belt, be sure to first change the paddle
height adjustment value to "-1" and the feed belt position adjustment value to "-2". If no improvement is seen, then change the
paddle height adjustment value to "-2" and the feed belt position adjustment value to "-4". When changing the paddle height
adjustment value to "-2" and the feed belt position adjustment value to "-4" from the beginning, the feeding force may become
too strong causing the paper to hit the trailing edge push-on plate and bounces back. This may result in misalignment. It is difficult
to distinct misalignment caused by the paper not reaching the trailing edge push-on plate from the one caused by the paper
bouncing back because both types of misalignment looks the same in stapled sets. For this reason, the feeding force is set and
adjusted in steps.
4) Print multiple stapled sets again.
96
Содержание imagePRESS C10000VPSeries
Страница 1: ...Troubleshooting Guide imagePRESS C10000VPSeries July 16 2019 Canon U S A Inc ...
Страница 28: ...4 If the symptom does not improve then check other factors 23 ...
Страница 42: ...3 Output about 10 test prints to verify the effect 37 ...
Страница 142: ...Model Serial number PAPER DECK UNIT_ F1 A4 WES05369 137 ...
Страница 164: ...4 5 Make some prints and check that the above issue does not occur 159 ...
Страница 173: ...Model Serial No Document Insertion Folding Unit K1 EU O WGK00631 Document Insertion Folding Unit K1 CN WGL01726 168 ...
Страница 179: ...C 2 24VB system C 3 24VC system C 4 24VD system C 5 24VE system 174 ...
Страница 180: ...C 6 24VF system C 7 24VH system C 8 24VI system C 9 24VJ system 175 ...
Страница 181: ...176 ...
Страница 261: ... Service parts CABLE MOTOR CONNECTING FM1 T808 256 ...


