


Chapter 16
16-98
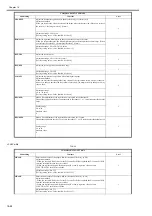
10. FEED-ADJ
T-16-97
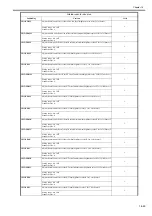
11. CST-ADJ
T-16-98
12. MISC
COPIER>ADJUST>FEED-ADJ
Subheading Contents
Level
REGIST
Adjust the timing of turning ON the registration roller clutch.
Adjustment method
- When you increase the value by 1, the image moves toward the lead edge of the paper by 0.1mm.
- When you executed 'RAM clear' for the DC controller PCB or replaced the DC controller PCB,
enter the value indicated in the service label.
1
Adjustment range: -50 to 50 (Unit: 0.1mm)
[Factory setting value / Value after RAM clear: 0]
ADJ-REFE
Adjust the horizontal registration for double sided copy. (for factory use)
Adjustment method
When you increase the value, the second side image moves to the rear side. (When you increase
the value by 1, the image moves by 0.1mm.)
1
Adjustment range: -100 to 100
[Factory setting value / Value after RAM clear: 0]
REG-SPD
Make a fine adjustment of the registration motor speed at constant speed.
Change the registration speed at constant speed in the range of + or - 10 scales against the default
value.
2
Setting range
-10 to 10
Standard value
0
REG-SPD2
Make a fine adjustment of the registration motor speed at 1/3 speed.
Change the registration speed at 1/3 speed in the range of + or - 10 scales against the default value.
2
Setting range
-10 to 10
Standard value
0
COPIER>ADJUST>CST-ADJ
Subheading Contents
Level
MF-A4R
Enter the basic value of the paper width for the manual feed tray. (A4R)
Adjustment method
- When you executed 'RAM clear' for the DC controller PCB or replaced the DC controller PCB,
enter the value indicated in the service label.
- When you replace the paper width detection VR or newly register a value, execute
FUNCTION>CST in the Service Mode.
1
Adjustment range: 0 to 255
[Factory setting value / Value after RAM clear: 125]
MF-A6R
Enter the basic value of the paper width for the manual feed tray. (A6R)
Adjustment method
- When you executed 'RAM clear' for the DC controller PCB or replaced the DC controller PCB,
enter the value indicated in the service label.
- When you replace the paper width detection VR or newly register a value, execute
FUNCTION>CST in the Service Mode.
1
Adjustment range: 0 to 255
[Factory setting value / Value after RAM clear: 193]
MF-A4
Enter the basic value of the paper width for the manual feed tray. (A4)
Adjustment method
- When you executed 'RAM clear' for the DC controller PCB or replaced the DC controller PCB,
enter the value indicated in the service label.
- When you replace the paper width detection VR or newly register a value, execute
FUNCTION>CST in the Service Mode.
1
Adjustment range: 0 to 255
[Factory setting value / Value after RAM clear: 42]
Содержание imagePRESS C1
Страница 1: ...Oct 22 2008 Service Manual imagePRESS C1 Series ...
Страница 2: ......
Страница 6: ......
Страница 38: ...Contents ...
Страница 39: ...Chapter 1 Introduction ...
Страница 40: ......
Страница 42: ......
Страница 72: ...Chapter 1 1 30 F 1 18 ...
Страница 85: ...Chapter 1 1 43 T 1 26 ...
Страница 88: ......
Страница 89: ...Chapter 2 Installation ...
Страница 90: ......
Страница 94: ......
Страница 234: ......
Страница 235: ...Chapter 3 Basic Operation ...
Страница 236: ......
Страница 238: ......
Страница 244: ......
Страница 245: ...Chapter 4 Main Controller ...
Страница 246: ......
Страница 248: ......
Страница 276: ...Chapter 5 Original Exposure System ...
Страница 277: ......
Страница 332: ...Chapter 6 Laser Exposure ...
Страница 333: ......
Страница 342: ...Chapter 6 6 8 F 6 10 1 Laser Light 2 Laser Shutter 3 Laser Shutter Lever 1 1 2 2 1 2 3 3 3 3 ...
Страница 344: ...Chapter 7 Image Formation ...
Страница 345: ......
Страница 431: ...Chapter 7 7 82 ...
Страница 462: ...Chapter 8 Pickup Feeding System ...
Страница 463: ......
Страница 503: ...Chapter 8 8 38 4 F 8 49 5 F 8 50 B Duplexing re pickup stop position 6 F 8 51 2 1 3 2 1 B 1 3 2 ...
Страница 504: ...Chapter 8 8 39 7 F 8 52 8 F 8 53 9 F 8 54 1 3 2 1 2 4 3 1 2 4 3 ...
Страница 505: ...Chapter 8 8 40 10 F 8 55 11 F 8 56 12 F 8 57 1 4 2 3 5 4 1 3 2 1 4 2 5 3 ...
Страница 506: ...Chapter 8 8 41 13 F 8 58 14 F 8 59 15 F 8 60 5 1 2 3 4 1 2 3 5 4 1 2 3 4 5 ...
Страница 507: ...Chapter 8 8 42 16 F 8 61 1 2 3 4 5 ...
Страница 509: ...Chapter 8 8 44 3 F 8 64 A Duplexing reversal position 4 F 8 65 2 1 A 2 1 ...
Страница 510: ...Chapter 8 8 45 5 F 8 66 6 F 8 67 2 1 2 1 ...
Страница 511: ...Chapter 8 8 46 7 F 8 68 8 F 8 69 3 2 1 3 2 1 ...
Страница 512: ...Chapter 8 8 47 9 F 8 70 10 F 8 71 3 2 1 2 3 1 ...
Страница 513: ...Chapter 8 8 48 11 F 8 72 B Duplexing re pickup stop position 12 F 8 73 3 2 B 1 3 1 2 ...
Страница 514: ...Chapter 8 8 49 13 F 8 74 14 F 8 75 1 2 3 1 2 3 ...
Страница 516: ...Chapter 8 8 51 F 8 77 SL3 M10 PS17 ...
Страница 533: ...Chapter 8 8 68 F 8 154 1 2 4 3 2 3 4 ...
Страница 534: ...Chapter 9 Fixing System ...
Страница 599: ...Chapter 10 Externals and Controls ...
Страница 642: ...Chapter 11 MEAP ...
Страница 643: ......
Страница 645: ......
Страница 695: ...Chapter 12 Maintenance and Inspection ...
Страница 696: ......
Страница 698: ......
Страница 700: ...Chapter 12 12 2 F 12 1 28 9 10 14 13 29 29 11 12 27 6 3 1 2 5 4 7 8 15 16 ...
Страница 701: ...Chapter 12 12 3 F 12 2 17 20 24 23 25 26 19 18 24 21 22 ...
Страница 704: ...Chapter 12 12 6 F 12 3 1 2 3 4 9 6 5 7 8 11 12 13 14 15 10 ...
Страница 715: ...Chapter 12 12 17 F 12 18 1 1 2 2 ...
Страница 716: ...Chapter 13 Standards and Adjustments ...
Страница 717: ......
Страница 719: ......
Страница 732: ...Chapter 14 Correcting Faulty Images ...
Страница 829: ...Chapter 14 14 94 F 14 93 J406 J206 J209 J203 J92 J3802 J57 J84 J91 J52 J79 J203 J204 J208 J201 J551 J1168 J115 ...
Страница 834: ...Chapter 14 14 99 F 14 98 J420 J432 J423 J422 J3417 J3415 J421 J427 J426 J454 J430 J425 J3410 J431 J425 J429 J433 J3416 ...
Страница 848: ...Chapter 14 14 113 F 14 112 J406 J206 J209 J203 J92 J3802 J57 J84 J91 J52 J79 J203 J204 J208 J201 J551 J1168 J115 ...
Страница 862: ...Chapter 15 Self Diagnosis ...
Страница 894: ...Chapter 16 Service Mode ...
Страница 895: ......
Страница 1222: ...Chapter 17 Upgrading ...
Страница 1223: ......
Страница 1225: ......
Страница 1256: ...Chapter 17 17 31 F 17 65 2 Turn off the main power switch and remove the USB device ...
Страница 1257: ...Chapter 18 Service Tools ...
Страница 1258: ...Contents Contents 18 1 Service Tools 18 1 18 1 1 Special Tools 18 1 18 1 2 Solvents and Oils 18 2 ...
Страница 1262: ......
Страница 1263: ......
Страница 1264: ...Oct 22 2008 ...
Страница 1265: ......