Chapter 19
19-61
3. LASER
T-19-46
4. CST
T-19-47
COPIER>FUNCTION>LASER
Sub item
Description
level.
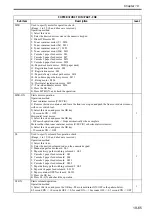
LD-ADJ-Y/M/C Making the tilt correction motor return to the initial position automatically.
Operating Instructions
1) Select this mode.
2) Press the OK key.
- The operation starts. It automatically stops when it is completed.
Reference:
The tilt correction motor may get locked when the tilt amount in the horizontal scanning
direction exceeds the expected range, and consequently color displacement cannot be
corrected even though automatic registration is conducted.
When this symptom occurs, use this mode to make the tilt correction motor return to the center
position automatically.
(If you try to do this operation manually by opening the scanner unit, you may touch the lens.
For this reason, be sure to do it by the automatic operation.)
This Service Mode is used to correct the tilt of Y, M, and C against BK, which is used as a
reference, when the tilt is large (when the horizontal lines are higher at the right).
2
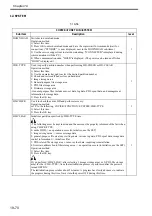
COPIER>FUNCTION>CST
Sub item
Description
level.
MF-A4R, MF-
A6R, MF-A4
Registers basic value of manual feeder's (DADF's) paper width.
A4R width: 210mm, A6R width: 105mm, A4 width: 297mm
- Once registered, the basic value can be fine-tuned by performing COPIER> ADJUST > CST-
ADJ > MF-A4R, MF-A6R or MF-A4.
Operation method
1) Place A4R size paper in the manual feeder, and set the size guide to the A4R width.
2) In this service mode, select 'MF-A4R' to display the item in reverse. Press the OK key to
perform automatic adjustment and register the value.
3) Repeat Steps 1) and 2) to register the basic values for the A6R and A4 sizes.
1
Содержание Color imageRUNNER C5180 Series
Страница 22: ...Chapter 1 INTRODUCTION...
Страница 64: ...Chapter 2 INSTALLATION...
Страница 110: ...Chapter 3 BASIC OPERATION...
Страница 119: ...Chapter 4 BASIC OPERATIONS AS A PRINTER...
Страница 129: ...Chapter 5 MAIN CONTROLLER...
Страница 132: ...Chapter 5 5 2 F 5 1 A Reader Unit B DC controller Circuit Board C Printer Unit A B C HDD 1 2 3 3 4 5 6 7 8 9...
Страница 138: ...Chapter 5 5 8 F 5 8 CPU HDD ROM access to the program at time of execution...
Страница 165: ...Chapter 6 ORIGINAL EXPOSURE SYSTEM...
Страница 209: ...Chapter 7 IMAGE PROCESSING SYSTEM...
Страница 210: ...Contents Contents 7 1 Digital Image Processing 7 1 7 1 1 Overview 7 1 7 1 2 Shading Correction 7 1...
Страница 212: ...Chapter LASER EXPOSURE 8...
Страница 239: ...Chapter 9 IMAGE FORMATION...
Страница 324: ...Chapter 10 PICKUP FEEDING SYSTEM...
Страница 355: ...Chapter 10 10 28 F 10 30 F 10 31 9 1 2 3 4 5 1 2 3 4 5 10 thereafter repeats 7 through 10 11 1 2 3 4 5 12 1 2 3 4 5...
Страница 358: ...Chapter 10 10 31 F 10 36 F 10 37 5 1 2 6 1 2 in wait for re pickup point of reversal 9 1 2 3 10 1 2 3...
Страница 435: ...Chapter 11 FIXING SYSTEM...
Страница 460: ...Chapter 11 11 23 F 11 13 SEN3 SEN2 SEN1 SEN2 SEN3 SEN1 SEN2 SEN3 SEN1...
Страница 491: ...Chapter 12 EXTERNALS CONTROLS...
Страница 498: ...Chapter 12 12 5 F 12 2 FM1 FM7 FM9 FM2 FM13 FM14 FM12 FM11 FM10 FM5 FM3 FM4 FM8 FM6...
Страница 512: ...Chapter 12 12 19 2 Remove the check mark from SNMP Status Enabled F 12 10...
Страница 553: ...Chapter 13 MEAP...
Страница 557: ...Chapter 14 RDS...
Страница 569: ...Chapter 15 MAINTENANCE INSPECTION...
Страница 578: ...Chapter 16 STANDARDS ADJUSTMENTS...
Страница 597: ...Chapter 17 CORRECTING FAULTY IMAGES...
Страница 612: ...Chapter 17 17 14 F 17 7 PLG1 ELCB1 SP1 H4 H3 H2 H1 H1 H2 LA1...
Страница 617: ...Chapter 18 SELF DIAGNOSIS...
Страница 644: ...Chapter 19 SERVICE MODE...
Страница 778: ...Chapter 20 UPGRADING...
Страница 823: ...Chapter 21 SERVICE TOOLS...
Страница 824: ...Contents Contents 21 1 Service Tools 21 1 21 1 1 Special Tools 21 1 21 1 2 Solvents and Oils 21 2...
Страница 828: ...APPENDIX...
Страница 851: ......


