


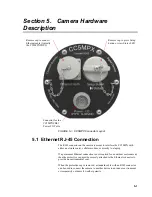


Section 5. Camera Hardware Description
5-4
5.4 SD Memory Card
The camera is internally equipped to use an SD memory card, which is
available as an option for the CC5MPX.
If you choose to use your own memory card, the memory card will need to be
formatted with a PC using the FAT32 format.
Image files can be stored on the SD memory card as JPEG files and video files
are stored as AVI files. Individual image and video files are uniquely named
with a sequence number, or with a date and time stamp. The directory location
will correspond to the camera capture configuration and the method of
triggering (i.e., motion detection).
The use of the card for image and video storage is entirely configurable to fit
the needs of a given application. Each individual image or video capture
feature can be configured to manage memory card files as either fill and stop,
or with a ring memory.
Access to the SD card requires the removal of the camera backplate. Insertion
or removal should only be done when power is removed. See Section 5.4.2 for
more information on image and video retrieval from the SD card. It is
generally recommended to delete older image files from the memory card after
downloading them to a permanent storage location.
5.4.1 Accessing SD Memory Card
In order to access an SD memory card, you will need to remove the backplate
of the CC5MPX. Before starting this process, press the setup button for 10
seconds, which will power down the camera. While the camera is powered
down, remove the CC5MPX from any power supply and disconnect any
attached cabling.
Refer to Section 20 for details on removing the camera backplate.
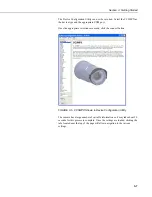
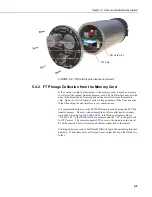
The SD memory card is installed by placing it into the housing and pushing it
in until you hear a click (see FIGURE 5-2). The SD card can be removed by
first pressing the card into the housing until you hear a click. The card can
now be pulled from the card housing.
Once finished with the SD card, replace the backplate. First ensure that the O-
ring is still seated properly on the backplate (refer to Section 19.3). This is
very important as the O-ring is required to properly seal the camera.
The backplate can only be seated in the orientation that aligns the flat surfaces
of the backplate and the bottom of the camera body. This will also help align
the screw holes. The six screws can now be threaded and hand tightened. Be
sure the two plastic washers are located between the tether chains and the
backplate.
Содержание CC5MPX 6HULHV
Страница 2: ......
Страница 10: ...CC5MPX Table of Contents vi ...
Страница 12: ...Section 1 Introduction 1 2 ...
Страница 22: ...Section 3 Getting Started 3 8 FIGURE 3 7 CC5MPX Device Configuration Utility Settings Editor ...
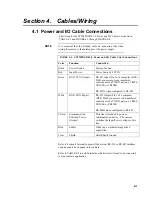
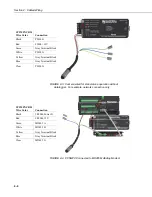
Страница 28: ...Section 4 Cables Wiring 4 6 ...
Страница 36: ...Section 6 Camera Configuration 6 2 ...
Страница 69: ...Section 7 Camera Operation Using Web Browser Interface 7 33 FIGURE 7 30 External Trigger Setup Page ...
Страница 72: ...Section 7 Camera Operation Using Web Browser Interface 7 36 FIGURE 7 31 Motion Detection Page ...
Страница 84: ...Section 10 RS 485 Communications 10 2 ...
Страница 86: ...Section 11 PakBus Communications 11 2 ...
Страница 88: ...Section 12 Device Configuration Utility 12 2 FIGURE 12 2 Device Configuration Utility Screen ...
Страница 90: ...Section 13 Image Quality 13 2 ...
Страница 98: ...Section 15 Power Calculations and Timings 15 4 ...
Страница 104: ...Section 17 Remote Image Retrieval 17 4 ...
Страница 110: ...Section 19 Maintenance 19 4 FIGURE 19 5 Desiccant Location Location of Desiccant ...
Страница 116: ...Section 21 System Limitations 21 2 ...
Страница 122: ...Section 23 Quick Notes 23 4 ...
Страница 128: ...Appendix B CC5MPXWD Window Defroster Description B 2 FIGURE B 2 CC5MPXWD Window Defroster with Lens Tube Installed ...
Страница 129: ......


