


Section 16. CR1000 Interface Guide
16-2
•
DDD – Is the destination drive on the CR1000
o
USR for the user drive
o
CRD for the compact flash memory card
•
NAME – Is any name string that will be used to name the files
•
EXT – The file extension of the incoming file must match. In the case of
the camera this must always be either “JPG” or “AVI”.
•
NNNN – The number of files kept in the ring memory. This number
should be low enough so that the memory required for the files is less than
what is available in the corresponding drive. However, for the internal
USR drive this would normally be between 3 and 10 images and for CRD
drive (memory card) this can be larger. When communications are used to
retrieve images, it is suggested to limit the number of files in the ring
memory to 200 in order to avoid long communication delays.
An example of Files Manager setting is as follows:
(55,USR:SkySouth.JPG,3)
o
Camera PakBus address is 55
o
The files will be stored in the USR: director with a name
SkySouth####.JPG where #### is an incrementing number. Entering
a zero for this parameter will disable the automatic numbering and
produce a fixed file name.
o
The three most recent files will be kept. A new incoming file will
cause the oldest to be deleted.
16.3 CR1000 COM Port (Control Port)
Communications
On the CR1000 the control ports can be configured to function as RS-232
communication ports. Any of these four COM ports can be configured as
PakBus ports and used to communicate with the camera.
The COM ports can be activated as PakBus ports using the Device
Configuration utility or by using the SerialOpen instruction in the CR1000
program.
The following SerialOpen instruction configures COM port 2.
•
BAUD rate - 115200
•
PakBus Port – 4
•
Transmit delay - 0,
•
Buffer size - 1000.
SerialOpen (Com2,115200,4,0,1000)
Содержание CC5MPX 6HULHV
Страница 2: ......
Страница 10: ...CC5MPX Table of Contents vi ...
Страница 12: ...Section 1 Introduction 1 2 ...
Страница 22: ...Section 3 Getting Started 3 8 FIGURE 3 7 CC5MPX Device Configuration Utility Settings Editor ...
Страница 28: ...Section 4 Cables Wiring 4 6 ...
Страница 36: ...Section 6 Camera Configuration 6 2 ...
Страница 69: ...Section 7 Camera Operation Using Web Browser Interface 7 33 FIGURE 7 30 External Trigger Setup Page ...
Страница 72: ...Section 7 Camera Operation Using Web Browser Interface 7 36 FIGURE 7 31 Motion Detection Page ...
Страница 84: ...Section 10 RS 485 Communications 10 2 ...
Страница 86: ...Section 11 PakBus Communications 11 2 ...
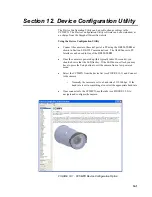
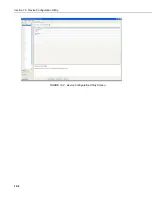
Страница 88: ...Section 12 Device Configuration Utility 12 2 FIGURE 12 2 Device Configuration Utility Screen ...
Страница 90: ...Section 13 Image Quality 13 2 ...
Страница 98: ...Section 15 Power Calculations and Timings 15 4 ...
Страница 104: ...Section 17 Remote Image Retrieval 17 4 ...
Страница 110: ...Section 19 Maintenance 19 4 FIGURE 19 5 Desiccant Location Location of Desiccant ...
Страница 116: ...Section 21 System Limitations 21 2 ...
Страница 122: ...Section 23 Quick Notes 23 4 ...
Страница 128: ...Appendix B CC5MPXWD Window Defroster Description B 2 FIGURE B 2 CC5MPXWD Window Defroster with Lens Tube Installed ...
Страница 129: ......


