


20-1
Section 20. Backplate Removal
Procedures
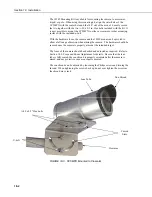
It will be necessary to remove the backplate for the following reasons:
•
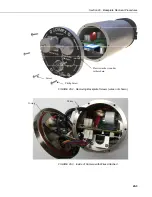
Access to the SD memory card
•
Change Internal Jumper Positions
•
Replace Desiccant
•
Inspect O-rings
If the camera is powered up and operating (LED is flashing), properly
shutdown the camera by holding down the setup button for more than 10
seconds continuously. Alternatively the Shutdown button can be used from the
Live Video Home page of the camera. Once the camera LED stops flashing,
remove the CC5MPX from any power supply and disconnect any attached
cabling.
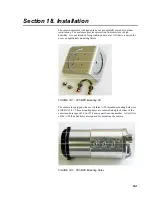
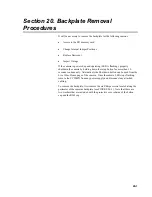
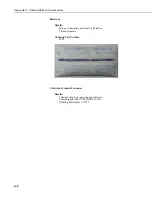
To remove the backplate, first remove the six Philips screws located along the
perimeter of the cameras backplate (see FIGURE 20-1). Note that there are
two washers that are included with the protective cover chains of the button
cap and the RJ45 cap.
Содержание CC5MPX 6HULHV
Страница 2: ......
Страница 10: ...CC5MPX Table of Contents vi ...
Страница 12: ...Section 1 Introduction 1 2 ...
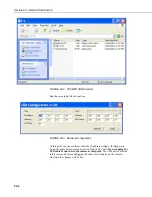
Страница 22: ...Section 3 Getting Started 3 8 FIGURE 3 7 CC5MPX Device Configuration Utility Settings Editor ...
Страница 28: ...Section 4 Cables Wiring 4 6 ...
Страница 36: ...Section 6 Camera Configuration 6 2 ...
Страница 69: ...Section 7 Camera Operation Using Web Browser Interface 7 33 FIGURE 7 30 External Trigger Setup Page ...
Страница 72: ...Section 7 Camera Operation Using Web Browser Interface 7 36 FIGURE 7 31 Motion Detection Page ...
Страница 84: ...Section 10 RS 485 Communications 10 2 ...
Страница 86: ...Section 11 PakBus Communications 11 2 ...
Страница 88: ...Section 12 Device Configuration Utility 12 2 FIGURE 12 2 Device Configuration Utility Screen ...
Страница 90: ...Section 13 Image Quality 13 2 ...
Страница 98: ...Section 15 Power Calculations and Timings 15 4 ...
Страница 104: ...Section 17 Remote Image Retrieval 17 4 ...
Страница 110: ...Section 19 Maintenance 19 4 FIGURE 19 5 Desiccant Location Location of Desiccant ...
Страница 116: ...Section 21 System Limitations 21 2 ...
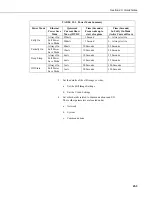
Страница 122: ...Section 23 Quick Notes 23 4 ...
Страница 128: ...Appendix B CC5MPXWD Window Defroster Description B 2 FIGURE B 2 CC5MPXWD Window Defroster with Lens Tube Installed ...
Страница 129: ......


