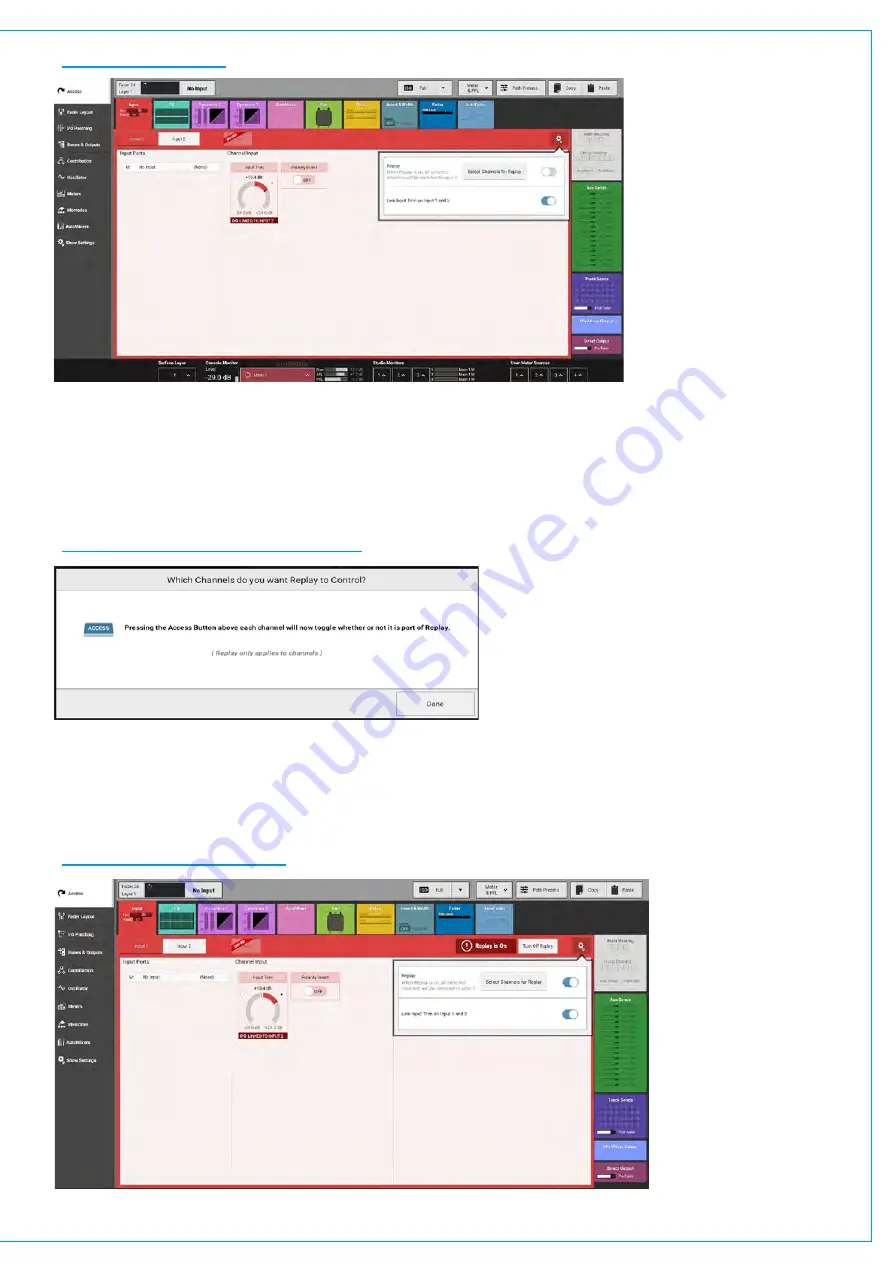
FIGURE 5 -LINK TRIMS
Replay
Replay allows the user to select a number of channels to switch between input 1 and input from one control which can
be a user button or be controlled from the screen. This is also achieved from the Tools menu on the Access>Input screen
shown in Figure 5 above. The user then selects paths for replay using the ACCESS keys. see Figure 6 below.
The fader displays change to say ‘REPLAY’ rather that not in replay’ as appropriate.
FIGURE 6 -REPLAY CHANNEL SELECTOR
When Replay is active these channels will switch to Input 2 , when Replay is turned off the input channels switch back
to input 1. Replay makes setting up a virtual soundcheck easy. With the sources connected to input 1 each source is
sent to a recorder and its returns are connected to input 2. When the talent leaves the user can turn replay on play the
recording and continue the soundcheck. On completion the replay is turned off to switch all the inputs back to the live
sources. Note: Replay can also be controlled from a GPI if required. Figure 7 shows system in Replay.
FIGURE 7 -SYSTEM IN REPLAY
Содержание SUMMA
Страница 1: ...calrec com Putting Sound in the Picture Networked Audio Production System SUMMA USER MANUAL V3 2...
Страница 11: ...V3 0 196 V3 1 197 V3 1 1 197 V3 2 197 CALREC Putting Sound in the Picture 11...
Страница 12: ...12 SUMMA Networked Audio Production System CONTENTS...
Страница 13: ...PRODUCT INFORMATION calrec com Putting Sound in the Picture SUMMA...
Страница 20: ...20 SUMMA Networked Audio Production System PRODUCT INFORMATION...
Страница 21: ...SYSTEM OVERVIEW calrec com Putting Sound in the Picture SUMMA...
Страница 33: ...CALREC Putting Sound in the Picture 33...
Страница 38: ...38 SUMMA Networked Audio Production System SYSTEM OVERVIEW...
Страница 52: ...52 SUMMA Networked Audio Production System SYSTEM OVERVIEW...
Страница 53: ...SETTING UP calrec com Putting Sound in the Picture SUMMA...
Страница 55: ...FIGURE 1 SYNCHRONISATION OPTIONS CALREC Putting Sound in the Picture 55...
Страница 74: ...74 SUMMA Networked Audio Production System SETTING UP...
Страница 75: ...GETTING SIGNALS IN AND OUT calrec com Putting Sound in the Picture SUMMA...
Страница 78: ...FIGURE 3 FADER LAYOUT SETTINGS 78 SUMMA Networked Audio Production System GETTING SIGNALS IN AND OUT...
Страница 93: ...FIGURE 4 SOURCE AND DESTINATION POP UP MEMORY LOAD CALREC Putting Sound in the Picture 93...
Страница 98: ...FIGURE 1 THE DIRECT OUTPUT WINDOW 98 SUMMA Networked Audio Production System GETTING SIGNALS IN AND OUT...
Страница 105: ...MONITORING calrec com Putting Sound in the Picture SUMMA...
Страница 107: ...FIGURE 2 EXAMPLE LOUDSPEAKERS SETUP CALREC Putting Sound in the Picture 107...
Страница 110: ...FIGURE 1 THE MONITORING POP UP 110 SUMMA Networked Audio Production System MONITORING...
Страница 113: ...METERING calrec com Putting Sound in the Picture SUMMA...
Страница 121: ...calrec com Putting Sound in the Picture SUMMA PROCESSING...
Страница 153: ...COMMUNICATIONS calrec com Putting Sound in the Picture SUMMA...
Страница 161: ...FIGURE 4 MIX MINUS CONTRIBUTION POP UP CALREC Putting Sound in the Picture 161...
Страница 163: ...ROUTING calrec com Putting Sound in the Picture SUMMA...
Страница 165: ...FIGURE 1 CONFIGURING BUSES AND OUTPUTS CALREC Putting Sound in the Picture 165...
Страница 171: ...EXTERNAL INTERFACING calrec com Putting Sound in the Picture SUMMA...
Страница 179: ...FIGURE 2 LAN CONFIGURATION WINDOW CALREC Putting Sound in the Picture 179...
Страница 180: ...180 SUMMA Networked Audio Production System EXTERNAL INTERFACING...
Страница 181: ...CONSOLE FACILITIES calrec com Putting Sound in the Picture SUMMA...
Страница 187: ...TERMINOLOGY calrec com Putting Sound in the Picture SUMMA...
Страница 195: ...FEATURES BY SOFTWARE VERSION calrec com Putting Sound in the Picture SUMMA...


