SSL Private Key (server.key)
This file is the server private key, and it is usually not revealed. The server.key file is paired with the server.crt file to
decrypt data encrypted by the SSL certificate.
Note:
The passphrase for the private key must be removed before importing to the LinkStation.
Updating SSL Key Files
To update a server certificate and a private key for SSL, follow this procedure.
1
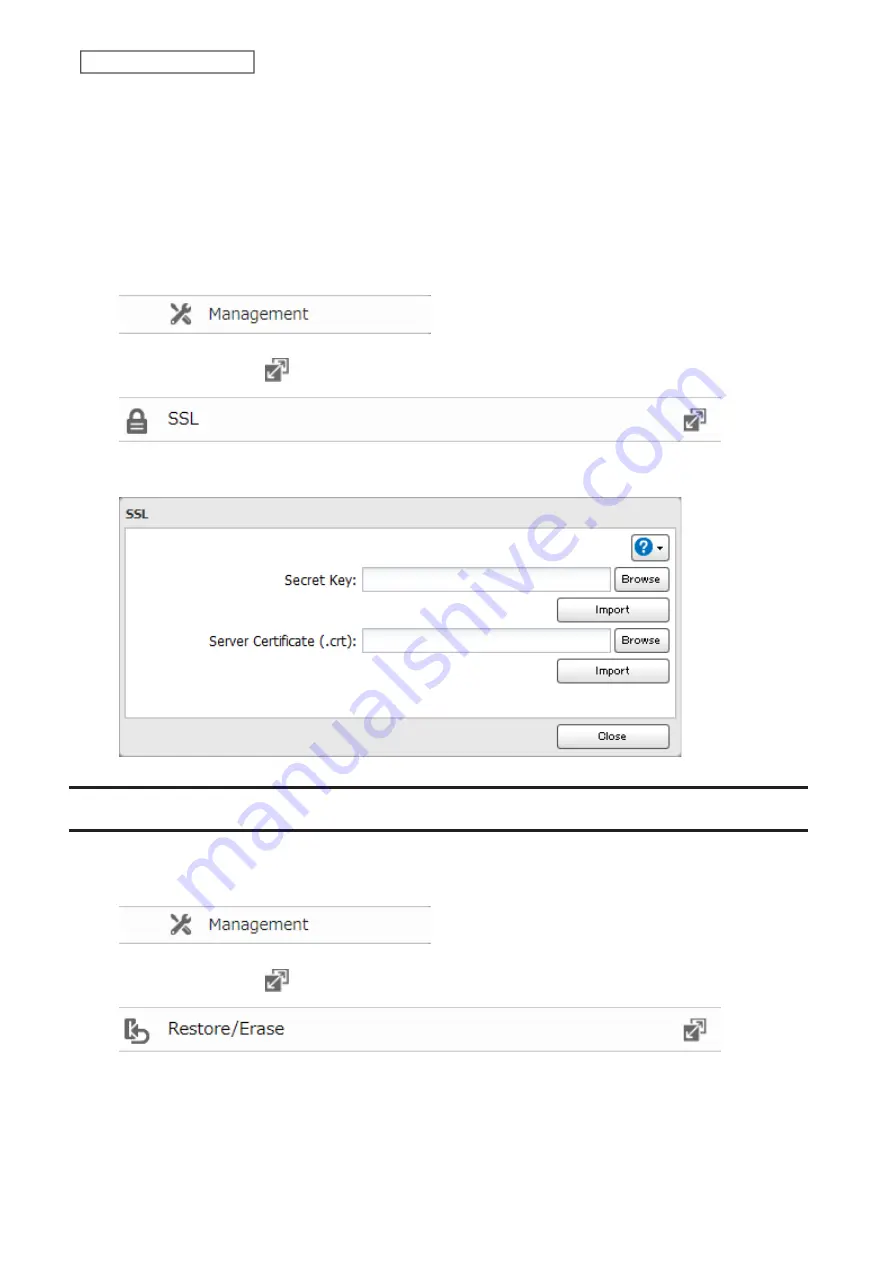
From Advanced Settings, click
Management
.
2
Click the settings icon (
) to the right of “SSL”.
3
Register “server.key” for “Secret Key” and “server.crt” for “Server Certificate (.crt)”, then click
Import
.
Restoring Factory Defaults
The settings on the LinkStation can be restored to factory defaults using Settings.
1
From Advanced Settings, click
Management
.
2
Click the settings icon (
) to the right of “Restore/Erase”.
115
Chapter 7 Advanced Features
Содержание LinkStation 200 Series
Страница 27: ...4 Configure the desired settings then click OK 26 Chapter 2 File Sharing...
Страница 28: ...Using a Mobile Device 1 From Settings tap Folder Setup 27 Chapter 2 File Sharing...
Страница 29: ...2 Tap Create Folder 28 Chapter 2 File Sharing...
Страница 33: ...4 Enter the desired settings then click OK 32 Chapter 2 File Sharing...
Страница 34: ...Using a Mobile Device 1 From Settings tap Users 33 Chapter 2 File Sharing...
Страница 35: ...2 Tap Create User 34 Chapter 2 File Sharing...
Страница 38: ...3 Click Add Group 37 Chapter 2 File Sharing...
Страница 42: ...Using a Mobile Device 1 From Settings tap Folder Setup 41 Chapter 2 File Sharing...
Страница 43: ...2 Tap the shared folder that you want to set access restrictions for 42 Chapter 2 File Sharing...
Страница 67: ...10Click at the top right of Settings and choose Restart 66 Chapter 3 RAID Modes and Drive Management...
Страница 74: ...73 Chapter 4 Remote Access...
Страница 90: ...6 Click Time Machine 89 Chapter 5 Backup...
Страница 91: ...7 Click Select Backup Disk 8 Select the shared folder then click Use Disk 90 Chapter 5 Backup...
Страница 130: ...6 Replace the four screws 7 Insert the new drive back into the empty slot 129 Chapter 8 Drive Replacement...


