


4. ADJUSTMENT
RH-981A
48
4. ADJUSTMENT
CAUTION
Maintenance and inspection of the sewing
machine should only be carried out by a
qualified technician.
Ask your Brother dealer or a qualified
electrician to carry out any maintenance and
inspection of the electrical system.
Turn off the power switch and disconnect the
power cord from the wall outlet at the
following times, otherwise the machine may
operate if the start switch is pressed by
mistake, which could result in injury.
•
When carrying out inspection, adjustment
and maintenance
•
When replacing consumable parts such as
the loopers and knife
Disconnect the air hoses from the air supply
and wait for the needle on the pressure gauge
to drop to “0” before carrying out inspection,
adjustment and repair of any parts which use
the pneumatic equipment.
If the power switch and air need to be left on
when carrying out some adjustment, be
extremely careful to observe all safety
precautions.
Use only the proper replacement parts as
specified by Brother.
If any safety devices have been removed, be
absolutely sure to re-install them to their original
positions and check that they operate correctly
before using the machine.
Any problems in machine operation which result
from unauthorized modifications to the machine
will not be covered by the warranty.
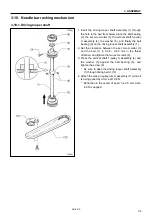
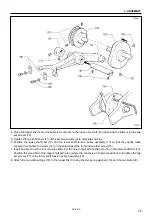
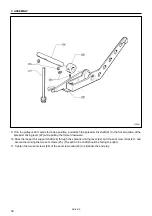
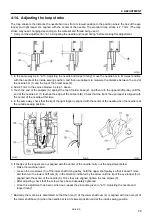
4-1. Adjusting the work clamp lift height
The work clamp lift height is adjusted to 16 mm.
(The lift height includes the clearance between clamp lever B (1) and clamp lever L (R) (2).)
1. Insert the block or the thickness gage (5) between the work clamp L (R) (3) and the needle plate (4).
2. Loosen the screw (7) of the driving lever (6), and put the end (8) of clamp lever B (1) on the end of clamp lever L
(R) (2). Then re-tighten the screw (7).
Note:
Make sure that work clamp L (R) (3) securely holds the block or the thickness gage (5).
Make sure that work clamp cylinder is fully extended.
3774Q
3775Q
Clamp arm
Содержание RH-981A
Страница 8: ...RH 981A ...
Страница 23: ...2 DISASSEMBLY RH 981A 15 2 7 Needle bar thread take up and zigzag mechanisms 3710Q 3711Q 3709Q 3708Q ...
Страница 92: ...5 POWER SUPPLY EQUIPMENT RH 981A 84 Control circuit board Power supply circuit board 3530Q 3531Q ...
Страница 119: ...6 AIR PRESSURE MECHANISM RH 981A 111 5 Cloth opener cylinder 6 Lower thread trimming cylinder 3554Q 3555Q ...
Страница 136: ...7 SOFTWARE RH 981A 128 7 6 Control circuit block diagram 1 3842Q ...
Страница 137: ...7 SOFTWARE RH 981A 129 7 7 Control circuit block diagram 2 3843Q ...
Страница 138: ...SERVICE MANUAL Printed in Japan RH 981A I3080846H 2003 10 H 1 http www brother com ...


