M
y D
es
ign
Ce
nt
er
8
PATTERN DRAWING SCREEN
341
■
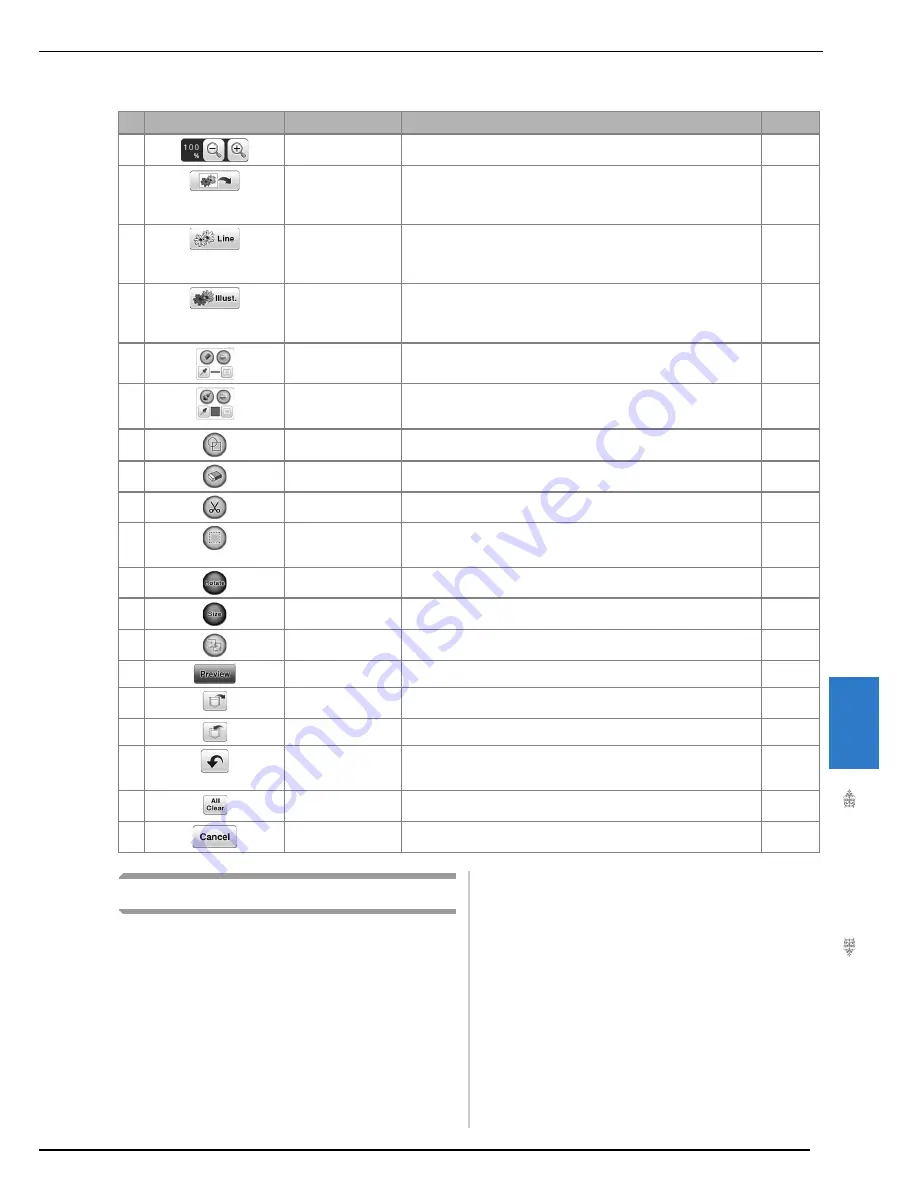
Key functions
Before Creating Designs
The pattern preview displays the design smaller
than the actual size. You can view the actual
pattern size by setting the “Embroidery Frame
Display”.
No.
Display
Key Name
Explanation
Page
c
Magnify key
Press this key to magnify the pattern by both 200% and 400% in the
screen.
234
d
Image scan key
Press this key to scan the attached frame and display on the screen as
the background while using the My Design Center. You can scan the
fabric as the background or scan the picture as the reference when
creating the pattern.
—
e
Line design key
Press this key to scan the line drawing to edit and convert to the
embroidery data using the built-in camera. You can also import the line
drawing image from the USB media or the computer and create the
embroidery design.
354
f
Illustration design key Press this key to scan the illustration to edit and convert to the
embroidery data using the built-in camera. You can also import the
illustration from the USB media or the computer and create the
embroidery design.
357
g
Line tool key
Draw lines and set the color. You can select the line type and color as
you need.
342
h
Brush tool key
Paint with brush and set the color. You can select the brush type and
color as you need. Painted lines and areas will be converted to the
pattern embroidered with fill stitch.
343
i
Stamp key
Press this key to select the stamp shape for pattern drawing. You can
set the fill/stroke setting.
344
j
Erase key
Press this key to erase lines and shapes that have been drawn. You
can select the size/shape of the eraser.
345
k
Cut key
Press this key to cut out the selected section.
346
l
Select key
Press this key to select a section for moving by finger or pen, copying,
deleting, changing size and rotating lines and shapes that have been
drawn.
346
m
Rotate key
Press this key to rotate the selected section.
346
n
Size key
Press this key to change the size of the selected section.
346
o
Duplicate key
Press this key to duplicate the selected section.
—
p
Preview key
Press this key to convert the image data to embroidery data.
—
q
Recall key
Press this key to recall image data from the machine’s memory, USB
media or the computer.
—
r
Store key
Press this key to store the pattern being created.
—
s
Undo key
Press this key to undo the last operation that was performed and
return to the previous operation. Each press of this key undoes one
operation.
—
t
All Clear key
Press this key to clear all the lines and shapes and start from the
beginning.
—
u
Cancel key
Press this key to end the My Design Center. All lines and shaped are
erased when you press this key.
—
Содержание 82-W20
Страница 2: ......
Страница 30: ...NAMES OF MACHINE PARTS AND THEIR FUNCTIONS 28 ...
Страница 82: ...NEEDLE CALIBRATION USING THE BUILT IN CAMERA 80 ...
Страница 170: ...SEWING THE STITCHES 168 ...
Страница 190: ...COMBINING STITCH PATTERNS 188 Press Press ...
Страница 198: ...USING THE MEMORY FUNCTION 196 ...
Страница 210: ...USING STORED CUSTOM STITCHES 208 ...
Страница 264: ...ATTACHING THE EMBROIDERY FRAME 262 b Pull the embroidery frame toward you ...
Страница 286: ...ADJUSTMENTS DURING THE EMBROIDERY PROCESS 284 ...
Страница 338: ...RESUME FEATURE 336 ...
Страница 362: ...ILLUSTRATION SCAN 360 ...
Страница 418: ......
Страница 419: ......


