USING SENSOR FUNCTIONS WITH SEWING STITCH
102
Specifying the Needle Drop
Position With the Sensor Pen
a
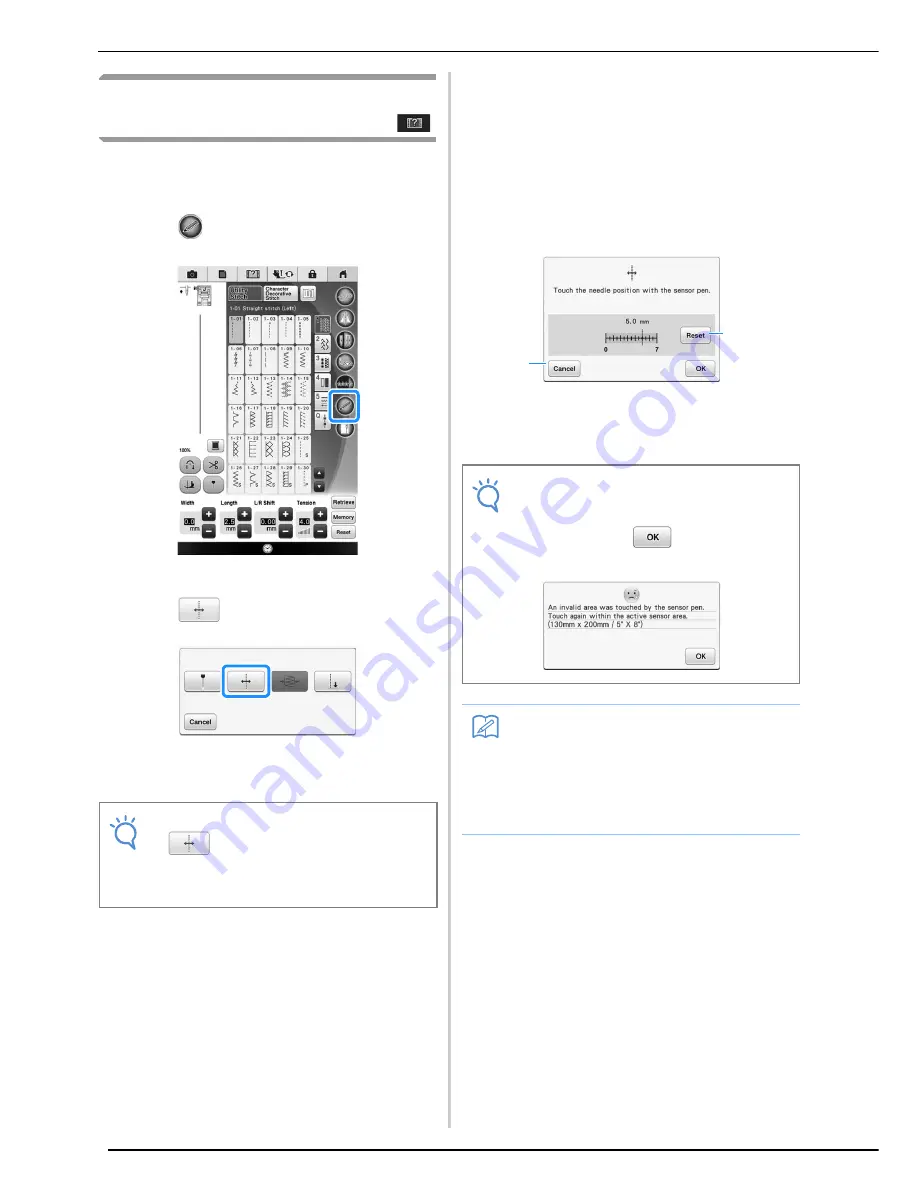
Select a stitch pattern.
b
Press .
→
The sensor functions screen appears.
c
Press .
→
The reference position setting screen appears, and
the red guideline marker flashes at the machine’s
sewing position.
d
With the sensor pen, touch the location to
be specified as the needle drop position.
→
The guideline marker moves to the touched position
and flashes.
→
The distance from the left reference line to the
touched position appears in the reference position
setting screen.
→
The stitch preview on the upper left side of the
screen is updated according to the specified setting.
a
Press to return the needle drop position to its
default setting.
b
Press to stop specifying a setting with the sensor
pen.
Note
• If
is not available, the sewing
reference position cannot be specified with
the selected stitch pattern. Select a different
stitch pattern.
Note
• The following error message appears if the
area outside of the sensor pen touch range
is touched. Press
, and then touch
within the sensor pen touch range.
Memo
• The position can be precisely adjusted by
touching the adjustment areas with the
sensor pen.
• To change the setting, use the sensor pen
to touch the desired location for the
reference position.
a
b
Содержание 82-W20
Страница 2: ......
Страница 30: ...NAMES OF MACHINE PARTS AND THEIR FUNCTIONS 28 ...
Страница 82: ...NEEDLE CALIBRATION USING THE BUILT IN CAMERA 80 ...
Страница 170: ...SEWING THE STITCHES 168 ...
Страница 190: ...COMBINING STITCH PATTERNS 188 Press Press ...
Страница 198: ...USING THE MEMORY FUNCTION 196 ...
Страница 210: ...USING STORED CUSTOM STITCHES 208 ...
Страница 264: ...ATTACHING THE EMBROIDERY FRAME 262 b Pull the embroidery frame toward you ...
Страница 286: ...ADJUSTMENTS DURING THE EMBROIDERY PROCESS 284 ...
Страница 338: ...RESUME FEATURE 336 ...
Страница 362: ...ILLUSTRATION SCAN 360 ...
Страница 418: ......
Страница 419: ......


