


14
4.5
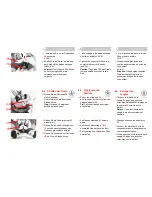
Voici comment votre
enfant est bien protégé
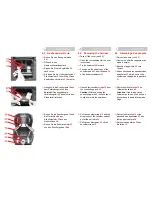
Vérifiez, pour la protection de
votre enfant, que...
• les sangles du siège auto sont bien
posées contre le corps sans le
comprimer,
• les bretelles
19
sont correctement
ajustées,
• les sangles ne sont pas torsadées,
• les languettes
25
sont enclenchées
dans le fermoir
24
,
• les épaulières
23
sont bien en
contact avec le corps de votre
enfant.
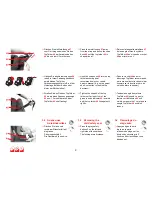
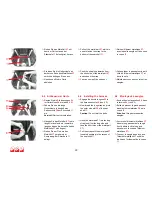
5.
Position de couchage du
siège auto
Voici comment vous pouvez
incliner la coque du siège auto vers
l'arrière :
Þ
Poussez la poignée de réglage
10
vers le haut et tirez la coque
11
vers
l'avant.
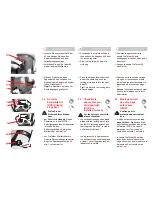
Attention ! La coque
11
doit
s'enclencher correctement dans
toutes les positions. Tirez sur la
coque
11
afin de vérifier que celle-ci
est correctement fixée.
4.5
Checklist to ensure that
your child is buckled up
correctly
For the safety of your child,
please check that...
• the straps of the child safety seat
are comfortable but FIRM fit around
your child,
• the shoulder straps
19
are adjusted
correctly,
• the straps are not twisted,
• the buckle tongues
25
are engaged
in the harness buckle
24
,
• the shoulder pads
23
are in the right
position on your child's body.
5.
Reclining position of the
child safety seat
To place the seat shell in the
reclining position:
Þ
Pull up on the adjustment handle
10
and pull the seat shell
11
forward.
Caution! The seat shell
11
must
engage securely regardless of its
position. Pull on the seat shell
11
to
ensure that it is engaged.
4.5
So ist Ihr Kind richtig
gesichert
Prüfen Sie zur Sicherheit
Ihres Kindes, dass...
• die Gurte des Auto-Kindersitzes
körpernah anliegen, ohne Ihr Kind
einzuengen,
• die Schultergurte
19
richtig
eingestellt sind,
• die Gurte nicht verdreht sind,
• die Schlosszungen
25
im
Gurtschloss
24
eingerastet sind,
• die Schulterpolster
23
richtig am
Körper anliegen.
5.
Ruhestellung des Auto-
Kindersitzes
So können Sie die Sitzschale nach
hinten neigen:
Þ
Drücken Sie den Verstellgriff
10
hoch und ziehen Sie die Sitzschale
11
nach vorne.
Vorsicht! Die Sitzschale
11
muss in
jeder Position fest einrasten. Ziehen
Sie an der Sitzschale
11
um das
Einrasten zu überprüfen.
19
25
24
28


