16
Breaker/Fuse mode automatically adjusts sensitivity of the AT-6000-RE. As a result, the AT-
6000-RE will pinpoint and indicate just one correct Breaker/Fuse. This enhancement helps to
remove signal strength analysis from the breaker identification process that is typical for less
advanced wire tracers.
3.2 Identifying Breakers and Fuses (Energized and de-energized)
Note: For Breaker/Fuse locating, a simplified direct connection to line/phase and neutral
wires can be used because these wires are separated at the breaker/fuse panel. There
is no risk of signal cancellation effect if wires are at least a few centimeters away from
each other in the area where the breaker/fuse is located. However the separate ground
connection as shown in Wire Tracing modes should be used for superior results specifically
if wires need to be traced in addition to breaker identification.
The simplified direct connection to line/phase and neutral wire will NOT trip the RCD protection.
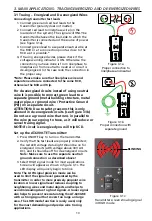
Figure 3.2a
Connecting transmitter test leads:
1. Use red and green test leads either with probe tips or alligator clips.
2. Plug test leads into Transmitter. Polarity is not important.
3. Connect red and green test leads to line/phase and neutral wires of the same receptacle
or cable (see figure 3.2a).
4. If tracing energized breakers/fuses, please check if the voltage warning indicator is ON.
Otherwise the connection you have done is wrong or circuit is de-engergized. In this
case redo the connection in the proper way.
Set up the AT-6000-TE Transmitter:
1. Press ON/OFF key to turn on the transmitter.
2. Verify that the test leads are properly connected - the red LED voltage status light
should on for circuits with voltage above 30V AC/DC, and it should be off for de-
energized circuits.
3. Select HIGH signal mode for breaker/fuse tracing.
3. MAIN APPLICATIONS – LOCATING BREAKERS/FUSES


