13
3.1 Tracing – Energized and De-energized Wires
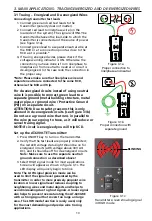
Connecting transmitter test leads
1. Connect green and red test leads to the
transmitter (polarity does not matter).
2. Connect red lead to line/phase wire (on the
load side of the system). The signal will ONLY be
transmitted between the load-side to which the
transmitter is connected and the source of power
(see figure 3.1a).
3. Connect green lead to a separate neutral wire at
the RCD or at a connection point as close to the
RCD as it is possible.*
4. If tracing energized wires, please check if the
voltage warning indicator is ON. Otherwise the
connection you have done is from line/phase to
line/phase or from neutral to neutral or circuit is
de-engergized. In this case redo the connection in
the proper way.
*Note: Please make sure that line/phase wire and
separate neutral are connected to the same RCD,
otherwise the RCD will trip.
For de-energized circuits insted of using neutral
wire it is possible to connect green lead to a
separate ground (metal building structure, metal
water pipe, or ground wire / Protective Ground
(PE)) on a separate circuit.
ATTENTION: Due to safety reasons this is only
allowed in de-energized circuits. (see figure 3.1b)
Do not use a ground wire that runs in parallel to
the wire you are going to trace, as it will reduce or
cancel tracing signal.
NOTE:If circuit is energized you will trip RCD.
Set up the AT-6000-TE Transmitter:
1. Press ON/OFF key to turn on the transmitter.
2. Verify that the test leads are properly connected;
the red LED voltage status light should be on for
energized circuits (with voltage above 30V AC/
DC), and it should be off for de-energized circuits.
Note: Make sure to use the separate neutral/
ground connection as described above!
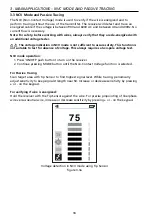
3. Select HIGH signal mode for most applications.
Screen will appear as shown in figure 3.1c. The
LED display will quickly begin to blink.
Note: The LOW signal precision mode can be
used to limit the signal level generated by the
transmitter in order to more precisely pinpoint wire
location. A lower signal level reduces coupling to
neighboring wires and metal objects and helps to
avoid misreading due to ghost signals. A lower signal
also helps to prevent oversaturating the AT-6000-RE
with a strong signal that covers too large an large
area. The LOW mode function is rarely used, only
for the most demanding and precise wire tracing
applications.
3. MAIN APPLICATIONS - TRACING ENERGIZED AND DE-ENERGIZED WIRES
Figure 3.1a
Proper connection to
line/phase and neutral
Figure 3.1b
Proper connection with
separate ground
AT-6000-T
TRANSMITTER
ON
HI
LO
SIGNAL
>
2s
BLINKING
Figure 3.1c:
Transmitter screen showing signal
in HIGH mode


