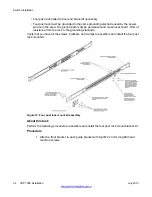
b. Use two M4 low profile undercut flat head hex machine screws to attach the
rear of each guide bracket to the switch chassis.
c. Verify that the rear screws seat flush in the guide brackets.
d. Test fit the rear mounting brackets in the guide brackets and verify that the rear
brackets can slide in the channels. Remove the rear brackets.
3. Install the switch into the equipment rack, temporarily using only the front rack
mounts and screws.
Figure 13: Install switch in rack using front rack mounts
4. Attach the rear mounting brackets and secure the switch to the rear rack posts.
a. Slide a rear mounting bracket into each guide bracket channel until flush with
the rear rack posts.
b. Secure the rear mounting brackets to the rear rack posts with screws.
c. Secure the rear mounting brackets to the switch chassis with the clamp plates
and pan head screws.
d. Optional — If you have access to the sides of the switch in your rack, use the
extra pan head screws to provide additional strength to the rear brackets.
Switch installation
36 VSP 7000 installation
July 2013
Содержание VSP 7000 Series
Страница 4: ...4 VSP 7000 installation July 2013 Comments infodev avaya com ...
Страница 6: ...Installing an MDA 66 Appendix A Hardware reliability 67 6 VSP 7000 installation July 2013 ...
Страница 19: ...Figure 1 Fan trays Figure 2 AC power supply Cooling fans and power supplies VSP 7000 installation July 2013 19 ...
Страница 28: ...Installation preparation 28 VSP 7000 installation July 2013 Comments infodev avaya com ...
Страница 56: ...Fabric Interconnect connectivity 56 VSP 7000 installation July 2013 Comments infodev avaya com ...
Страница 68: ...Hardware reliability 68 VSP 7000 installation July 2013 Comments infodev avaya com ...


