background image

14

MegaCode® Receiver 

Owner Installation Instructions

Remote Code Set Procedure 

New 
transmitter

PRESS

23

fi g

Viewing And Editing Parameters 

This section illustrates how to locate, view and adjust 
parameters. 

Locating parameters 

Refer to MENU STRUCTURE on Page 8. Locate the 
required parameter and note the MENU number. The 
example used in 

(Fig. 24)

 displays “1: Output Pulse 

Time”

Changing setting 

1. Press NEXT/PREV to navigate to the required menu. 
2. Press SET to show the sub-menu. 
3. Press NEXT/PREV to go to required sub-menu. 
4. Press SET to enter edit mode. 
5. Press UP/DOWN to change the parameter setting 

(Fig. 25)

. Holding the button down causes the 

parameter’s value to change rapidly. The longer the 
button is held, the faster the value changes. 

6. Press SET to SAVE setting. 

Reload default Value 

1. Press NEXT/PREV buttons to display LOAD 

DEFAULT screen. 

2. Press SET to load the default value. 

Return to menu 

If the parameter’s value is not to be changed, press 
EXIT to return to the sub menu. Press EXIT again to 
return to the MAIN SCREEN.

24

fi g

1: Output Pulse

Time   

 1.0

25

fi g

1: Output Pulse

Time   

 1.0

Parameter name

Parameter 
value

Displays next 
parameter 
in list

Parameter number in list

Enter Edit 
Mode

Displays previous 
parameter in list

Returns back to menu

Enter Edit Mode

View Mode (No cursor)

Edit Mode (Cursor shown)

Increase 
value

Displays “Load 
Default?” screen, 
giving option of 
loading default value

Exits back to View Mode 
with no changes made

Decrease 
value

Saves new 
value and exits 
back to View 
Mode

Displays “Load 
Default?” screen, 
giving option of 
loading default 
value

Cursor shown

6. Test operation 

The new transmitter button should now function 
identically to the existing transmitter. 

NOTE: 

When a transmitter is remote coded, its ID 

label is set to that of the existing transmitter. If the 
existing transmitter does not have an ID label assigned, 
then the ID label of the new transmitter is set to: R/C 
Tx ###, where ### is the existing transmitters store 
number. This ensures that the originator of any remote 
coded transmitter can be identifi ed.

Содержание MegaCode

Страница 1: ...MegaCode Receiver Multi Frequency Four Channel Receiver INSTALLATION INSTRUCTIONS OWNERS COPY Featuring TrioCode Technology 10 05 12 STD MON OFF OFF OFF OFF Part 13291 Manual v1 01 ...

Страница 2: ...quence 15 Menu 2 6 Output One Inverted 15 Menu 2 7 Trigger 1 Input 15 Menu 2 8 Trigger 1 Input Contact 15 Menu 2 9 Disable 1 Input Contact 15 Menus 3 Output Two Setup 15 Menu 3 1 Output Pulse Time 15 Menu 3 2 Pulse Time Units 15 Menu 3 3 Flash On Time 15 Menu 3 4 Flash Off Time 15 Menu 3 5 Complete Flash Sequence 15 Menu 3 6 Output Two Inverted 16 Menu 3 7 Trigger 2 Input 16 Menu 3 8 Trigger 2 Inp...

Страница 3: ... Function 17 Menu 6 5 Remote Code 17 Menu 6 6 Activity Report 17 Menu 6 7 Activity Report ID 17 Menu 6 8 Vacation 17 Menu 6 9 Password Protection 18 Menu 6 10 Tx Grouping 18 Menu 7 Time Clock 18 Time Clock Operation 18 Time Clock Settings 18 Menu 7 1 Set Time date 18 Menu 7 2 View Programs 18 Menu 7 3 Settings 19 Menu 7 3 1 Run Programs 19 Menu 7 3 2 Disable 4 Input 19 Menu 7 3 3 Disable 4 Input C...

Страница 4: ...orced off or released for transmitter or trigger input control The Time Clock has 32 programs which select the output to be controlled and the time and days of the week it is to be activated Console Incorporated into the MegaCode receiver is a simple to use console which consists of several buttons and a display With the addition of the console facilities which were only available on previous rece...

Страница 5: ...y transmitters to be coded without the need for the installer to touch any console buttons during the coding process Status Indication The status of the receiver outputs and the last event are displayed whenever the main screen is shown Information provided includes the status of each output the last transmitter or input that was activated the last output affected the time remaining before an outp...

Страница 6: ... 2 can also be controlled via trigger two 2 independently The trigger input can be programmed to activate its output similar to a transmitter button Trigger Input Three 3 the output three 3 can also be controlled via trigger three 3 independently The trigger input can be programmed to activate its output similar to a transmitter button Trigger Input Four 4 the output four 4 can also be controlled ...

Страница 7: ...Owner Installation Instructions MegaCode Receiver 7 08 06 07 05 02 03 04 01 18 16 17 15 12 13 14 11 26 24 25 23 20 21 22 19 10 09 28 29 30 27 ...

Страница 8: ...emory Usage Control input status display See page 19 Transmitter testing See page 19 Event history display See page 20 See page 20 Memory usage See page 20 NOTES 1 Press PREV NEXT buttons to move Left Right 2 Press OPEN CLOSE buttons to change setting 3 Press SET button to save changes 4 Press EXIT to return to MENU without saving changes Note System will automatically return to the main screen af...

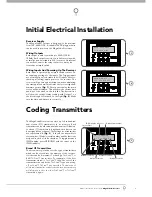
Страница 9: ... through to Output 4 on the right Fig 2 Make sure the time and day are set correctly Initial Electrical Installation Coding Transmitters The MegaCode receiver can store up to five hundred and eleven 511 transmitters in its memory Each transmitter can be allocated an alpha numeric ID label up to eleven 11 characters in length and each button can be assigned to any channel The settings for a transmit...

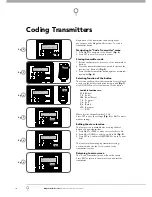
Страница 10: ...e function for the button Available functions are M_ Mimic P_ Pulse PR Pulse Reset T_ Toggle S_ Set R_ Reset VAC Vacation OFF Where is the output Number 1 2 3 4 Press SET to save the settings Fig 8 or EXIT to abort without saving Editing the store location This feature is only available when coding the first button of a new transmitter 1 Press NEXT or PREV to move cursor over Store No 2 Press UP or...

Страница 11: ...transmitter to go direct to list Accessing the list menu 1 Press NEXT to navigate to Menu 1 2 Press SET to enter the transmitter edit procedure Fig 10 3 Press transmitter once Fig 12 4 Press NEXT to view transmitter parameters Fig 13 This is used for quick navigation if the transmitter is available The transmitter details will be shown Fig 14 NOTE VIEW will not be shown if the transmitter is not s...

Страница 12: ...on functions and name of the existing transmitter will be transferred to the new transmitter This procedure is of great convenience when replacing a lost transmitter Menu 1 2 Delete Operation The delete operation is used to remove a transmitter from memory along with the name and button function settings Menu 1 3 Edit Operation The edit operation displays the transmitter record for editing purpose...

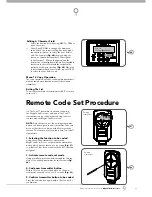
Страница 13: ...I PRESS Remote Code Set Procedure If a TrioCode transmitter is already coded into the MegaCode receiver additional TrioCode transmitters can be coded without being in direct contact with the MegaCode receiver NOTE Only the function of the existing transmitter button can be assigned to new transmitter Take into account that there is a time out facility for security reasons This feature is only avai...

Страница 14: ... value is not to be changed press EXIT to return to the sub menu Press EXIT again to return to the MAIN SCREEN 24 fig 1 Output Pulse Time 1 0 25 fig 1 Output Pulse Time 1 0 Parameter name Parameter value Displays next parameter in list Parameter number in list Enter Edit Mode Displays previous parameter in list Returns back to menu Enter Edit Mode View Mode No cursor Edit Mode Cursor shown Increase ...

Страница 15: ...ctivate its output similar to a transmitter button Menu 2 8 Trigger One Input Contact Trigger One input is configured for N O operation This parameter allows its operation to be changed to N C Menu 2 9 Disable One Input Contact This input can be used to disable the output in software regardless of the state of the transmitters wired inputs or time clock The disable input is normally configured for N...

Страница 16: ...sets the units used for the output time settings The options are Sec Min or Hrs Menu 4 3 Flash On Time Menu 3 4 Flash Off Time A flash on an output is created by repeatedly turning the output on and off The Flash On Time sets the duration of the on phase while the Flash Off Time sets the duration of the off phase For a steady output state which does not flash set the Flash On Time 0 0s The Flash Off...

Страница 17: ...ger Four Input Output Four can also be controlled via independent Trigger Four input The trigger input can be programmed to activate its output similar to a transmitter button Menu 5 8 Trigger Four Input Contact Trigger Four input is configured for N O operation This parameter allows its operation to be changed to N C Menu 5 9 Disable Four Input Contact This input can be used to disable the output ...

Страница 18: ... used Note that the most recent program that applies to an output remains active until a new program takes effect The program is not just executed at the programmed time but from the programmed time until another program takes over This also means that each output s state is correctly restored after power failure Vacation Mode and output disabling If a Time Clock program does not have a day select...

Страница 19: ...ID or serial numbers are to be displayed The opener will then beep each time a transmission is received If the transmitter button is stored in the controller memory and has a function assigned to it a second screen will be displayed that shows the transmitter details along with the button pressed Fig 30 The example shows the case when transmitter number 3 is activated by button 1 Note ID is select...

Страница 20: ...3 F M_1 Event 64 Menu 8 3 Display history The MegaCode keeps a record of the last 64 events that have taken place The events include outputs turning off on and by what cause power failures etc When this tool is selected a screen displays the last event that occurred The NEXT and PREV buttons can be used to view each event The EVENT field shows the sequence of the events with 64 being the first and 1...

Страница 21: ...r 21 Technical Specifications Power supply 12 24V AC DC Number of Outputs Four 4 Continuous Load Current Per Output 100 mA 40 VAC DC Receiver type TrioCode or Tri Tran type Receiver code storage capacity 511 X 4 button Transmitter Codes Specifications ...

Страница 22: ...y cost relating to damage caused by misuse negligence or failure to maintain the equipment in a proper working order as per clauses d through h g installation adjustment or use which is not in accordance with the instructions set out in installation instruction manual h attempted or complete modification or repairs to the product carried out by a person who is not authorised or has not been trained...

Страница 23: ...Ltd Tri Tran is a trademark of B D Doors No part of this document may be reproduced without prior permission In an ongoing commitment to product quality we reserve the right to change specification without notice E OE Automatic Technololgy Australia Pty Ltd ABN 11 007 125 368 6 8 Fiveways Boulevard Keysborough Victoria 3173 Australia P 1300 133 944 61 2 9722 5666 International Enquiries Only E sale...

Отзывы: