background image

ATLAS North America Proprietary

Sea Scan® ARC Explorer™ Manual

1 of 1

Page: 35

Issue: 4.2.1

2SFT1-0001

Manual

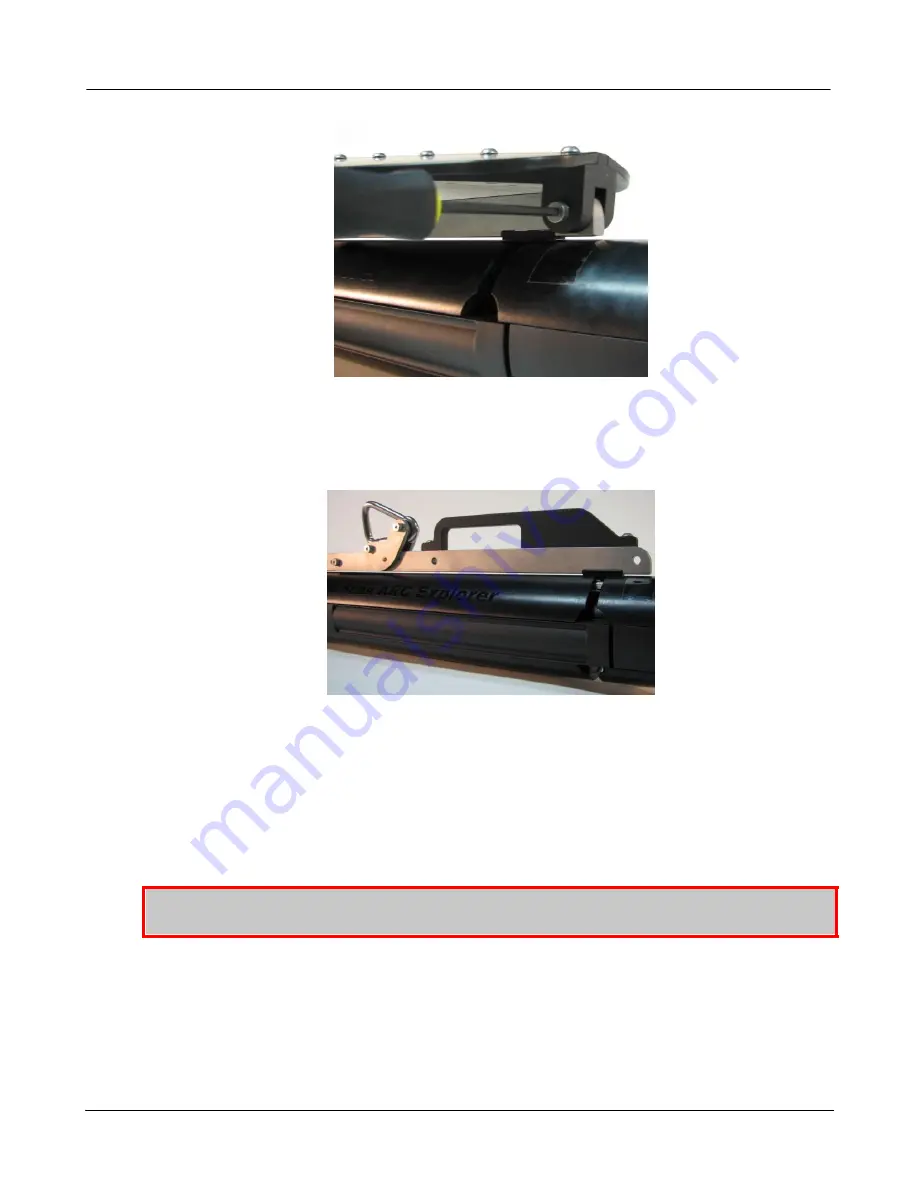
Figure 49: Remove the Depressor Tow Rail Screws

·

Using a 5/32" hex key driver install the depressor wing handle on the top of the tow rail.

Figure 50:Install the Depressor Wing Handle

4.2.6.1.2  Depressor Operation

Using the tow fish with the depressor wing will require some changes from the normal methods of
operation.  The load applied by the depressor wing is speed dependent.  As the tow speed is
increased the pull force is increased.  This does not mean that the faster you go the deeper you can
operate the tow fish.  The drag force that causes the fish to lift up will also increase with speed. 
This increased drag force will reduce the effective weight that the depressor wing adds to the cable.
 The depressor wing is most effective with speeds ranging from 2 to 4 knots.

WARNING: 

The depressor wing is capable of applying over 100lbs of force on the cable.  To ensure

safe operation please read over and abide by the following precautions:

·

Inspect all tow cable strain reliefs for proper attachment and wear and replace as necessary.

·

Inspect the boat strain relief attachment line for wear and ensure that it is adequately rated.

Содержание ATLAS NORTH AMERCA Marine Sonic Sea Scan ARC Explorer

Страница 1: ...Sea Scan ARC Explorer Manual V4 2 1 2017 Marine Sonic Technology Doc 2SFT1 0001 Marine Sonic Technology A Brand of ATLAS North America...

Страница 2: ...r web site at http www marinesonic com This manual and the hardware software described in it are copyrighted with all rights reserved Under the copyright laws neither this manual nor the hardware soft...

Страница 3: ...Section 3 System Quick Start 12 12 1 Step by Step 12 System Components 13 Software and Driver Installation 13 Towfish Setup 14 Topside Communications Unit TCU 15 Your First Survey 16 The Global Positi...

Страница 4: ...essor Operation 36 Keel Weight 36 Installing the Keel weight 40 Auxiliary Interface Ports 40 Hardware Identification 42 Removing the Auxiliary Port Cover 44 Depth Sensor and Altimeter 46 Software Oper...

Страница 5: ...st processing that allow additional data perspectives These include an A Mode view of the sonar data a data status window that shows range delay ping rate Speed over Ground SOG Course over Ground COG...

Страница 6: ...power is on Ensure that the connectors are CLEAN AND DRY before they are mated to one another When finished for the day rinse the system with clean fresh water 1 2 Minimium System Requirments Sea Scan...

Страница 7: ...neers continually review and improve upon the company s hardware firmware and software procedures and capabilities Revisions and updates may be frequent and can significantly streamline operation Cont...

Страница 8: ...ime it takes for their echo to return after hitting the object 2 2 How Side Scan Sonar Works Because of their flexibility side scan systems can be used in many applications some of which involve highl...

Страница 9: ...osely relates to the platform s track It communicates details about objects encountered before the first bottom return and can include things such as surface returns debris fish and objects protruding...

Страница 10: ...e ping spacing The slower the vessel moves the more overlapping coverage that will be obtained This approach yields more data for a higher quality image Figure 7 The horizontal beam width 2 2 1 2 Surf...

Страница 11: ...should be out of the propeller s wash and the picture quality will improve A shallow water solution to this problem is to tow the system ahead of the propeller from either the front or sides of the s...

Страница 12: ...eated Just as with a sun created shadow the height of an object determines the length of the shadow Figure 12 A sonar shadow This shadow example in In Figure 12 is an image of a bridge pylon In this i...

Страница 13: ...o have operated the system previously but need a quick refresher For more detailed system information please refer to the other parts of this manual Figure 13 ARC Explorer System 3 1 1 System Componen...

Страница 14: ...drive into your computer 2 Select Open Files in a Folder If Windows doesn t offer you options for opening use Windows Explorer to find the Flash Drive 3 Locate the Sea Scan ARC Explorer Towed System s...

Страница 15: ...twork cable Connect the power cable to the power source CAUTION Do not plut of unplug the towcable if the TCU power is ON Plug the power cable into the TCU Plug the power cable into the TCU Power on t...

Страница 16: ...refer to troubleshooting reference at the end of this manual If the sonar status remains red please refer to the Quick Troubleshooting Reference at the end of this manual or to the Sea Scan Survey so...

Страница 17: ...1 5 1 The Global Position System GPS Plug the GPS into the computer in Sea Scan Survey click Tools click Settings select Navigation and Fathometer and then select NMEA Data Input from the list that a...

Страница 18: ...ter is inside the connector a quick blow of air from either a can of compressed air or a spray of WD 40 should be sufficient to avoid corrosion Disconnect the towfish cable from the TCU Disconnect the...

Страница 19: ...tow cable if the power is on to the topside communication unit TIP Make sure the connector s O Rings are in their proper place and that they are free of debris and dirt If you happen to lose an O Ring...

Страница 20: ...he TCU is turned off it still draws power Bright Blue Power is on Network Status Off The network configuration has Not Completed Possibly the Ethernet connector isn t connected properly Blinking It ha...

Страница 21: ...rdware with the power on CAUTION The power is being drawn from the source at all times regardless of whether TCU power is on 4 1 2 2 Tow Cable Verify that the covers of both the TCU end of the cable a...

Страница 22: ...2 Towfish 4 2 1 Tail Assembly 4 2 1 1 Fin Removal The tail assembly stores the fins of the system and is the access point to the system s inner electronics Remove the fins by loosening the large bolt...

Страница 23: ...is clean and clear of debris A spray of silicone based lubricant can be used to clean off any debris and displace the water it can also be used to make the connector easier to seat Figure 25 Towfish t...

Страница 24: ...ce Midship is an alternative but the bow is preferred Allow only enough cable for the towfish to run at about 1 to 2 feet 30 to 61 cm below the surface of the water The towfish distance should be at a...

Страница 25: ...t the towfish by the rigged towcable while checking the roll measurement on the Sea Scan Survey program to determine if it is at the correct angle Adjust the rail by the appropriate amount to set the...

Страница 26: ...er with both hands lifting the back of the transducer out first and then sliding the front out from under the spacer lip The back is where the transducer connects to the towfish body so it might need...

Страница 27: ...lease mechanism on the rear of the tow fish rail This action shifts the towing angle toward the tail fin section causing the tow fish to pull up tail first Generally by shifting the angle of pull aft...

Страница 28: ...Depressor Wing The depressor wing will allow you to operate at greater depths without the need to add large amounts of weight to the tow cable or tow fish The depressor is designed to exert a downwar...

Страница 29: ...gure 36 Sea Scan ARC Explorer Tow Fish with a Depressor Wing and Keel Weight 4 2 6 1 1 1 Tools The tools required to install your depressor wing were included with your system s accessory kit 5 32 Hex...

Страница 30: ...installed on the depressor tow rail Using a 5 32 hex key driver and a 7 16 nut driver remove the rear safety release screw Figure 37 Safety Release Rear Screw Removal Using a flat head screw driver a...

Страница 31: ...l s center mark with the tow fish top center index mark Figure 40 Angle Adjustment Decal Installation Loosen both depressor tow rail nuts by hand until they stop and align them with the tow fish angle...

Страница 32: ...e 41 Tow Rail Nut Aligned with the Tow Fish Angle Adjustment Groove Using a 3 16 hex key driver tighten the rear tow rail screw Figure 42 Tighten the Rear Tow Rail Screw Using a 5 32 hex key driver re...

Страница 33: ...forward tow rail screw using a 3 16 hex key driver WARNING Hold the wing assembly up during the next steps to prevent it from falling possibly causing personal injury Figure 44 Lift the Wing and Tight...

Страница 34: ...le of applying 60lbs to over 150lbs of weight on the cable dependent on speed The modularity of the ARC Explorer tow fish design will allow you to reconfigure the hardware to best meet your operationa...

Страница 35: ...or wing tow rail screws using a 5 32 hex key driver Check and adjust the tow fish balance in water after removing the depressor Ensure to perform this step while towing the the tow fish at the desired...

Страница 36: ...pull force is increased This does not mean that the faster you go the deeper you can operate the tow fish The drag force that causes the fish to lift up will also increase with speed This increased d...

Страница 37: ...m suggested tow speed for the tow fish with the depressor attached is 5 knots 4 2 6 2 Keel Weight The keel weight attaches to the bottom of the tow fish and provides an integrated and easily handled s...

Страница 38: ...n Complete the following steps to install your keel weight Remove the tow cable protective plug Figure 52 Remove the Tow Cable Protective Plug Place the tow fish upside down in it s shipping case Plac...

Страница 39: ...Figure 54 Install the Nut on the Screw Install one tow rail nut in each angle adjustment groove through the openings at the transducers Slide both nut and screw assemblies to the center of the tow fis...

Страница 40: ...1 0001 Manual Figure 56 Remove the Screw Place the keel weight on the tow fish and start to install the screws by hand You may have to shift the keel around to get the screws started Figure 57 Place t...

Страница 41: ...rts provide an integrated interface for add on sensors such as altimeters and depth sensors The sensors are designed to be field installable swappable similar to the transducers All ARC Explorer tow f...

Страница 42: ...and you may order or install your auxiliary sensor If the x is a number less than 3 then your tow fish will require a factory hardware upgrade For information on obtaining a hardware upgrade please c...

Страница 43: ...hich auxiliary port cover you need to remove please refer to the installation instructions for your specific device The removal instructions are the same for both auxiliary port covers To remove the a...

Страница 44: ...1 4 20 screws into the empty auxiliary port cover screw holes by hand until they just stop They will not fully seat into the auxiliary port cover Do not over tighten or damage to the auxiliary port c...

Страница 45: ...r reinstalling your sensor Figure 66 Towfish Auxiliary Connection Auxiliary Sensor Connectors 4 2 6 3 3 Depth Sensor and Altimeter To install the depth sensor or altimeter depth sensor on your tow fis...

Страница 46: ...Removing the Auxiliary Port Cover section of the manual Inspect o rings and mating surfaces for contamination damage or corrosion prior to installing or reinstalling your sensor Figure 67 Towfish Aux...

Страница 47: ...ure sensor that converts water pressure into depth data Care must be taken to ensure the reliability and accuracy of you sensor Do not place any objects into the sensor port or permanent damage to the...

Страница 48: ...rom the main menu Select Sonar Interface Then click on the Advanced Settings Button Click on the Zero Pressure Reading Button This offset is stored in the arc_sonar ini file and will be used every tim...

Страница 49: ...e The Water Depth data is from an external echo sounder that is connected to the computer that Sea Scan Survey is running on Below is a screen shot of the Status Window with the Sonar Depth and Altitu...

Страница 50: ...01 Manual 4 2 7 2 Depressor and Keel Weight Towing Characteristics Tow Fish Configuration Keel Weight and Depressor Figure 73 Tow Fish Depth vs Speed Per Cable Length 4 2 7 3 Keel Weight Towing Charac...

Страница 51: ...connector and ensure that they are tightly seated and undamaged before and after each use If necessary use a spare o ring from the spare parts kit or one that is stored in the connector cap Always re...

Страница 52: ...se see the Multimeter guide below for the procedure CAUTION Sometimes a fuse can appear to be OK However always use the multimeter from the included accessory kit to verify its resistance Using the Re...

Страница 53: ...plorer Driver TIP The Address for most Windows users should be set for auto detection 4 If using a static IP address make sure that the TCU is using a compatible IP address on the same network as the...

Страница 54: ...is plugged in 2 Check that the GPS port is open in Sea Scan Survey TIP It may be necessary to use the Windows Device Manager to determine which port the GPS is using 3 Check that the GPS is receiving...

Страница 55: ...ction will detail how to use the multimeter included with the accessory kit in the Sea Scan ARC Explorer system A multimeter is an electronic measuring instrument that combines several measurement fun...

Страница 56: ...igure 76 Towcable TCU Connection Pinout Figure 77 Towcable Wet Mate Connector Pinout 5 1 3 2 Power Cable 1 Set the multimeter on 2 Touch each of the pins on the other end with the other probe in the f...

Страница 57: ...allation and operation Added Auxillary Interface Ports section Updated Depressor Wing Information Added ARC Explorer Towing Characteristics Section November 2015 4 0 0 Added Depressor Wing and Keel We...

Страница 58: ...er second beam spreading The widening angle of a sonar beam as it moves farther from the transmitter BMP Bitmap a graphic file format commonly used in Microsoft Windows applications Bow The front sect...

Страница 59: ...ation Services GPS Global Positioning System Grazing angle The percentage of deviation from straight on at which the sonar beam strikes the vertical or concave surface Hertz A unit of measure represen...

Страница 60: ...int along the swath that is directly beneath the towfish a location in the acoustic pulse NMEA The National Marine Electronics Association NMEA Protocol 0183 A standardized protocol that allows marine...

Страница 61: ...hicle sea clutter The distortion of a reflected sonar beam that impacts the water s surface scattering The diffusion of a sonar beam in many directions because of sea conditions as a result the amount...

Страница 62: ...Data Stream the extension that the software attaches to the names of data files USB Universal Serial Bus UTM Universal Transverse Mercator a coordinate mapping system that maps to a grid rather than t...

Страница 63: ...ode view 4 angle guide 22 anodized billet aluminum housing 4 artificial reefs 22 autonomous underwater vehicles 7 B barges 22 bow 22 C Cannot connect to SONAR 50 Cannot Connect to Topside 50 Charts 13...

Страница 64: ...wer connector 19 Power light and network light are on 50 Power light is bright but no network light 50 Prop Wash 10 propeller turbulence 22 R range delay 4 range settings 7 Reading NMEA Strings 50 rea...

Страница 65: ...sducer 7 U Understanding NMEA Strings 50 unit housing 17 V variable angle tow point 4 Variable Angle Towrail 22 23 vector chart maps 4 Vertical Beam Angle 9 vertical structures 22 vertical surfaces 22...

Отзывы: