


32
Camera Preparation
5. Turn the lens clockwise (5) until the bayonet locks.
6. Turn the two bayonett levers clockwise (4) to tighten the lens to the lens mount.
NOTICE
Protect the sensor: Always keep a lens or a lens cap on the empty lens mount.
Change lenses in dry, dust-free environments only.
Never exceed the maximum lens dimensions.
Have every lens properly shimmed as prescribed by the manufacturer.
Lens Support
Heavy lenses (above 3kg/6.6lbs) require additional lens support. Using a lens support
guarantees that the weight of the lens will not influence the flange focal depth and
reduces stress on the lens mount. ARRI offers a wide range of lens supports for 15mm
and 19mm studio rods.
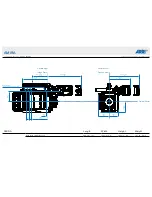
6.2
Changing the Lens Mount
The AMIRA's interchangeable PL lens mount can be easily replaced, allowing the use
of B4 video and EF mount lenses.
Required Tools and Precautions
3.0 mm Allen key
Camera switched off and power source disconnected
Lens removed and properly stored
Make sure to protect all optical surfaces when changing a lens mount
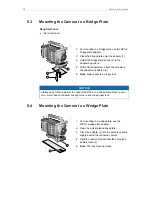
Deinstalling a Lens Mount (here: PL Mount)
3
1
2
2
1. Crosswise, loosen all four screws (2) with an
Allen key.
2. Carefully remove the mount (1).
3. Store the mount in a case for dust protection.
4.
Note:
To protect the sensor (3), immediately
install another original lens mount.