


22
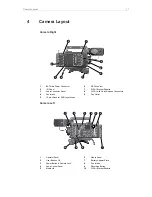
Basic Camera Operation
5
Basic Camera Operation
5.1
Power Supply
The AMIRA accepts an input voltage range from 10.5 to 34 V
DC. The camera can be powered through the 8-pin LEMO BAT
connector located at the back of the camera or through a battery
adapter plate. Do not supply power outside the specified voltage
range.
You can use a KC50-S (K2.75007.0) or KC50-SP-S (K2.0001275) power cable or one
of the various on-board adapter plates for V-mount and Gold Mount batteries to supply
the camera with power.
NOTICE
For maximum operation time, always use fully charged batteries with 10.5 to 34 V
DC (50 W minimum).
Always keep the BAT connector accessible so that the cable can be unplugged
quickly in case of emergency. Do not use power cables longer than 4m.
5.2
Powering Auxiliary Devices via the Camera
You can supply power to auxiliary devices from the camera using several connectors
(2.0 A max):
12 V
via 2-pin LEMO connector, 4-pin Hirose connector or via the D-tap connector
on the battery adapter
24 V
via the RS connector
Camera voltage
via the EXT connector
Note:
For connector pin-out information, see the user manual. When the power supply
level becomes critical, the camera switches off all auxiliary power supplies first.
5.3
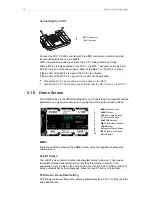
Switching On and Off
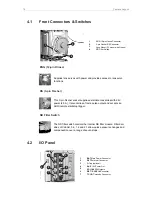
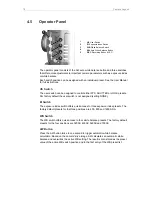
1
The power button (1) is located on the user
panel on the left side of the camera.
Switching On the Camera
► Press the power button (1).
The camera starts booting. While the camera is booting up, the ARRI logo is
shown in the monitor of the MVF-1 and the CCP-1 (if connected) and an AMIRA
logo is shown on the audio display.


