Aercus Instruments™
- WeatherSleuth®
31 |
P a g e
Wunderground.com), and set your weather station to match the official reporting station.
(4)
Only use this if you improperly installed the weather station sensor array, and did not point
the direction reference to true north if located in the Northern Hemisphere.
SOUTHERN HEMISPHERE USERS!!!
For stations located in the
Southern Hemisphere
you must follow the Southern
Hemisphere installation instructions in 3.3.4 and enter 180 for Wind Direction Offset
in the Calibration screen as shown in Figure 26 otherwise your wind direction
readings will be incorrect.
(5)
The default conversion factor based on the wavelength for bright sunlight is 126.7 lux / w/m
2
.
This variable can be adjusted by photovoltaic experts based on the light wavelength of interest,
but for most weather station owners, is accurate for typical applications, such as
calculating evapotransporation and solar panel efficiency.
(6)
Wind speed is the most sensitive to installation constraints. The rule of thumb for properly
installing a wind speed sensor is 4 x the distance of the tallest obstruction. For example, if
your house is 8m tall and you mount the sensor on a 2m pole:
Distance to mount away from house = 4 x (8 – 2) = 24m
Many installations are not perfect and installing the weather station on a roof can be difficult.
Thus, you can calibrate for this error with a wind speed multiplier.
In addition to the installation challenges, wind cup bearings (moving parts) wear over time.
Without a calibrated source, wind speed can be difficult to measure. We recommend using a
calibrated wind meter and a constant speed, high speed fan.
(7)
The rain collector is calibrated at the factory based on the funnel diameter. The bucket tips
every 0.3mm of rain (referred to as resolution). The accumulated rainfall can be compared to a
sight glass rain gauge with an aperture of at least 10cm.
Make sure you periodically clean the rain gauge funnel.
4.
Updating Firmware
You must own a PC or Mac to update the firmware, Linux products are currently not supported.
PC Users
1.
Download the latest version of firmware at:
www.aercusinstruments.com/downloads/
2.
Important Note: Close all of other applications while running the firmware update. This will
insure the upgrade process will not be interrupted.
3.
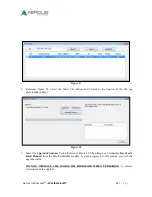
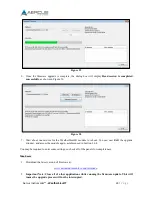
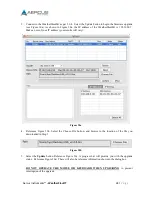
Connect to the WeatherSleuth® as per 3.6.4. Select the Upgrade button to begin the firmware
upgrade (see Figure 27). As shown in Figure 27, the IP address of the WeatherSleuth® is
192.168.0.7. Make a note of your IP address (your results will vary).
Содержание WeatherSleuth
Страница 1: ...v1 2 WeatherSleuth PROFESSIONAL IP WEATHER STATION WITH DIRECT REAL TIME INTERNET PUBLISHING ...
Страница 11: ...Aercus Instruments WeatherSleuth 11 P a g e Figure 6 ...
Страница 36: ...Aercus Instruments WeatherSleuth 36 P a g e Figure 30e ...
Страница 39: ...Aercus Instruments WeatherSleuth 39 P a g e Figure 32 Figure 33 ...
Страница 54: ...Aercus Instruments WeatherSleuth 54 P a g e Figure 6 ...
Страница 80: ...Aercus Instruments WeatherSleuth 80 P a g e Figure 30e ...
Страница 83: ...Aercus Instruments WeatherSleuth 83 P a g e Figure 32 Figure 33 ...


