background image

5   M a n a g i n g   M i c r o s o f t ®   P o c k e t   P C   2 0 0 2   c o m p a n i o n   p r o g r a m s

Pocket Word

 51

• To format existing text and to edit text, first select the text. You can select 

text as you do in a Word document, using your stylus instead of the mouse to 
drag through the text you want to select. 

• You can search a document to find text by tapping Edit and then Find/

Replace.

Writing mode

In writing mode, use your stylus to write directly on the screen. Ruled lines are 
displayed as a guide, and the zoom magnification is greater than in typing mode to 
allow you to write more easily.

For more information on writing and selecting writing, see "Writing on the screen" 
on page 21.

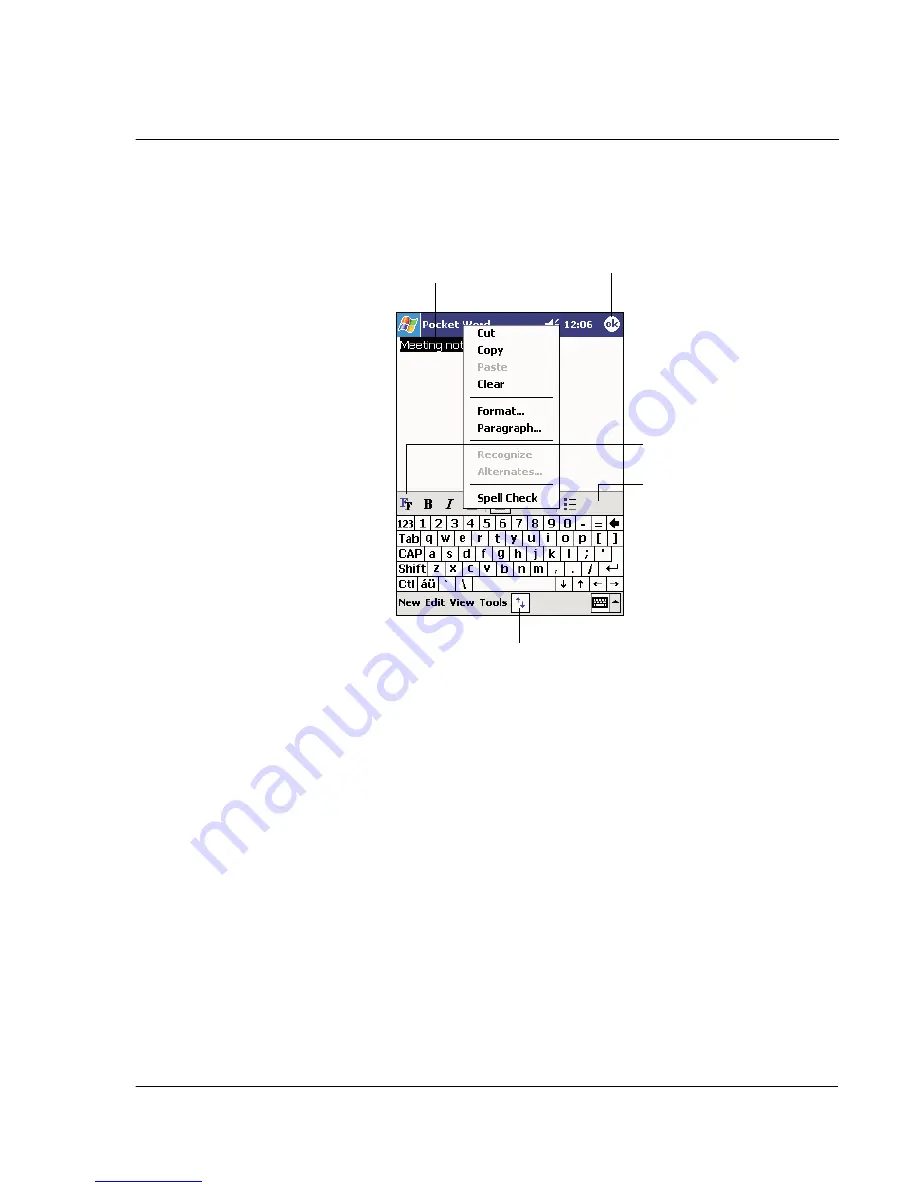
Tap to change
formatting options.

Tap to format text.

Tap and hold to see a
pop-up menu of actions.

Tap to show or hide
the toolbar.

Tap to return to the
document list (changes are
saved automatically).


Содержание n20

Страница 1: ...Manual for Acer n20 Handheld ...

Страница 2: ...ry documents and publications No part of this publication may be reproduced stored in a retrieval system or transmitted in any form or by any means electronic mechanical photocopy recording or otherwise without the prior written permission of Acer Inc DISCLAIMER AND LIMITATION OF LIABILITY Acer and its subsidiaries makes no representations or warranties either expressed or implied with respect to ...

Страница 3: ...n20 system tour Setup and maintenance procedures Viewing and entering data Using the application programs bundled with you handheld Taking advantage of your handheld s expansion features Synchronising data between your handheld and your computer Connecting your handheld to a computer a network or the Internet Personalising your handheld with your own preference settings This Manual introduces you ...

Страница 4: ...About this Manual iv ...

Страница 5: ...Microsoft Pocket Internet Explorer Create an on the go backup file Expand your handheld s capabilities using either the built in Memory Stick slot or the optional expansion sleeve Beam information to another IR enabled device Communicate using the built in wireless communication feature applicable to the Acer n20w model only Customise your handheld based on your personal requirements and preferenc...

Страница 6: ... tough construction is designed to provide you with years of reliable and trouble free service Observing the following general maintenance procedures will help ensure this Last minute updates and detailed technical information The Read Me files Located in the Microsoft ActiveSync folder on your computer and on the Acer n20 Handheld Companion CD Up to date information regarding your handheld http w...

Страница 7: ...u may damage it 4 Protect your handheld from temperature extremes For example do not leave your handheld on the dashboard of a car on a hot day or on a day when temperatures are below the freezing point Also keep it away from heaters and other sources of heat 5 Do not use or store your handheld in any location that is extremely dusty damp or wet 6 Use a soft damp cloth to clean your handheld If th...

Страница 8: ...o perform a hard reset do the following 1 Detach the battery pack from your handheld Refer to To uninstall the battery pack on page 9 for instructions 2 Slide up the hard reset switch located on the right side of the battery bay a then slide it down again b 3 After resetting your handheld reinstall the battery pack in its bay Refer to To install the battery pack on page 8 for instructions NOTE Whe...

Страница 9: ...etting gives you the option of assigning a lock password that will be required to access your handheld after a set period of inactivity To assign a lock password 1 Tap Settings 2 On the Personal tab tap Password 3 Select a password option Simple 4 digit password Strong alphanumeric password 4 Define the period of inactivity before the lock password will be required for access 5 Enter a password th...

Страница 10: ...First things first Locking your Acer n20 x ...

Страница 11: ...mics 2 Acer n20 tour 3 Front view 3 Left view 5 Top view 6 Bottom view 7 Preparing to use your Acer n20 7 Installing the Microsoft ActiveSync software 7 Installing the battery pack 8 Connecting the cradle 10 Charging your Acer n20 11 Setting up your Acer n20 12 Performing the first synchronisation process 13 Command interface 14 Hardware buttons and the stylus 14 Today screen 15 Navigation bar and...

Страница 12: ...ging Microsoft Pocket Outlook applications 33 Calendar 33 Scheduling an appointment 34 Creating a meeting request 36 Contacts 36 Creating a contact 37 Finding a contact 38 Tasks 39 Creating a task 40 Notes 42 Creating a note 42 Inbox 43 Synchronising email messages 44 Connecting directly to an email server 44 Using the Message list 45 Composing a message 46 Managing email messages and folders 47 5...

Страница 13: ...at Reader for Pocket PC 84 PocketTV Enterprise Edition 84 Command bar 85 Seek Progress bar 85 Status bar 86 Tools menu 87 7 Using expansion features 91 Memory Stick 91 Inserting a Memory Stick 91 Removing a Memory Stick 92 Acer Versatile Connector 93 Expansion sleeve 93 Attaching your Acer n20 to the expansion sleeve 94 Using the expansion sleeve 95 8 Exchanging and updating data using ActiveSync ...

Страница 14: ...3 10 Using Microsoft Pocket Internet Explorer 115 Mobile Favorites folder 115 Favorite links 115 Mobile favorites 116 AvantGo channels 117 Signing up for AvantGo 117 Using Pocket Internet Explorer 118 To view mobile favorites and channels 119 To browse the Internet 119 11 Customising your handheld 121 Adjusting handheld settings 121 Personal 122 System 126 Connections 132 Adding and removing progr...

Страница 15: ...ft Pocket PC 2002 Premium with Microsoft Outlook 2000 Display 3 8 Reflective TFT LCD Thin Film Transistor Liquid Crystal Display 240 x 320 resolution 16 bit or 64K colour support Microsoft ClearType technology for clearer crisper font display MediaQ graphics controller for enhanced graphics performance Audio Embedded AC 97 CODEC with CD quality stereo output Built in industry standard 3 5 mm earph...

Страница 16: ...y using the backlight or using power demanding applications will shorten the length of battery operation Charging time from empty to full capacity Acer n20 4 hours Acer n20w 8 hours Built in backup battery Design and ergonomics Stylish light and thin design User friendly navigation features Scroll wheel for one hand operation Directional pad for multi directional scrolling in various menus and app...

Страница 17: ...g red Alarm indicator email is received 2 Stylus holder Secures the stylus to your handheld To use the stylus remove it from its holder and hold it the same way you hold a pen or pencil 3 LCD touchscreen Displays the applications and data stored in your handheld It is touch sensitive and responds to the stylus or your finger 4 Quick button for Today Displays the Today screen For more information o...

Страница 18: ...t Press the power button and hold it down for about two seconds Release the button when the backlight turns on To turn off the backlight Press the power button and hold it down for two seconds Release the button when the backlight turns off 6 Directional pad Enables multi directional scrolling in various menus and applications Press the center of the pad on to simulate the function of the Enter ke...

Страница 19: ... how to use this program refer to page 26 2 Scroll wheel Scroll one page up or down to display the text and other information that extends beyond the area of the LCD touchscreen 3 Start hardware button Hardware button to display the Start menu 4 Hold switch Slide to lock all buttons from being accidentally pressed when handheld is placed in pocket or in a bag ...

Страница 20: ...emory install add on applications or use audio or text files stored in it for use with internal applications You can also use it to back up data from your handheld 2 Earphone jack Connects to audio line out devices earphones headphones 3 Infrared IR port Uses infrared technology to transmit and receive data from other IR enabled devices ...

Страница 21: ...ion on your handheld Synchronisation compares the data on your handheld with your computer and updates the information on both locations This will then served as a backup file in case something happens to your handheld No Component Description 1 Acer Versatile Connector Connects your handheld to the cradle which in turn connects to the back of your computer and through the AC adapter to the wall c...

Страница 22: ...r s CD ROM drive The CD s welcome page appears 3 Click the animated forward icon to go to the next screen 4 Click the Start Here tab on the right side of the screen 5 Read the instructions and installation notes indicated on the Start Here screen 6 Click the buttons on the left pane to install each of the individual applications Outlook 2000 recommended ActiveSync 3 5 After installation the Active...

Страница 23: ...ry pack reinstallation unless you intend to perform a hard reset For more information on performing a hard reset refer to page viii 4 Insert the battery pack into the battery bay a then slide the battery release switch to Lock position b To uninstall the battery pack 1 Turn the handheld over to access its rear panel 2 Slide the battery release switch to the Unlock position a then pull out the batt...

Страница 24: ...a on the internal memory of your handheld Connecting the cradle The cradle that comes with your handheld enables you to charge your handheld as well as synchronise the information on your handheld with those in your computer using ActiveSync technology To connect the cradle 1 Connect the AC adapter cord to the power socket at the back of the cradle 2 Plug the AC adapter into any AC current outlet ...

Страница 25: ...can use your handheld for eight straight hours of operation before you need to recharge the battery To charge your Acer n20 You use the cradle to charge your handheld Connect the AC adapter connector to the power socket at the back of the cradle then plug the other end of the AC adapter into any AC current outlet Insert your handheld into the cradle The bottom edge of your handheld should align sm...

Страница 26: ...is completely drained out you have about 30 minutes to recharge the battery before you lose all data on your handheld s internal memory The battery pack is removable Refer to the succeeding section for instructions on how to remove it from the battery bay NOTE You have the option to purchase a spare battery pack for your handheld Setting up your Acer n20 After you have initially charged your handh...

Страница 27: ...an synchronise information between your handheld and your computer Customise your synchronisation settings To perform the first synchronisation process 1 Connect the cradle For instructions refer to page 10 2 Insert your handheld in the cradle The bottom edge of your handheld should align smoothly with the cradle when it is inserted properly 3 Plug the cradle s USB connector into a USB port on you...

Страница 28: ...o your handheld and you didn t have to type a word Disconnect your handheld from your computer and you re ready to go Once you have set up ActiveSync and completed the first synchronisation process you can initiate synchronisation from your handheld To do so on your handheld tap then tap ActiveSync NOTE If you have a wireless LAN card you can synchronise remotely from your handheld For Acer n20w m...

Страница 29: ...n When you turn on your handheld for the first time each day or after 4 hours of inactivity you ll see the Today screen You can also display it by tapping and then Today On the Today screen you can see at a glance a list of important reminders for the day Status icons Following are some of the status icons you may see Your day at a glance Tap to create a new item Tap to switch to a program Tap to ...

Страница 30: ... at the top of the screen It displays the active program and current time and allows you to switch to other programs and close screens Main battery is charging Main battery is low Main battery is very low Main battery is full Connection is active Synchronisation is beginning or ending Synchronisation is occurring Notification1 that one or more instant messages were received Notification that one o...

Страница 31: ...item For example you can use the pop up menu in the Contact list to quickly delete a contact make a copy of a contact or send an email message to a contact The actions in the pop up menus vary from program to program To access a pop up menu 1 Tap and hold the stylus on the item that you want to perform the action on 2 When the menu appears lift the stylus then do any of the following Tap the actio...

Страница 32: ...u ll be notified in any of the following ways A message box appears on the screen A sound which you can specify is played The LED indicator on the front panel of your handheld flashes red To choose reminder types and sounds for your handheld tap and then Settings In the Personal tab tap Sounds Notifications The options you choose here are applied globally in your handheld Tap and hold to display t...

Страница 33: ...ion on using Microsoft ActiveSync Using the input panel Use the input panel to enter information in any program on your handheld You can either type using the soft keyboard or write using Letter Recognizer Block Recognizer or Transcriber In either case the characters appear as typed text on the screen NOTE Transcriber is available only for the English and European Acer n20 models To show or hide t...

Страница 34: ...e keys with your stylus To use Letter Recognizer With Letter Recognizer you can write letters using the stylus just as you would on paper 1 Tap the arrow next to the Input Panel button then Letter Recognizer 2 Write a letter in the box When you write a letter it is converted to typed text that appears on the screen NOTE For specific instructions on using Letter Recognizer with Letter Recognizer op...

Страница 35: ... characters 1 Tap the arrow next to the Input Panel button and then Transcriber 2 Write anywhere on the screen NOTE For specific instructions on using Transcriber with Transcriber open tap the question mark in the lower right hand corner of the screen To select and edit typed text If you want to edit or format typed text you must select it first 1 Drag the stylus across the text to select it 2 To ...

Страница 36: ... until the insertion point appears 2 Without lifting drag the stylus across the text you want to select If you accidentally write on the screen tap Tools then Undo and try again or Tap the Pen button to deselect it and then drag the stylus across the screen 3 You cut copy and paste written text in the same way you work with typed text a Tap and hold the selected words b Tap an editing command on t...

Страница 37: ...of alternate words appears 3 Do either of the following a Tap the word you want to use b Tap the writing at the top of the menu to return to the original writing NOTE Hyphenated words foreign words that use special characters such as accents and some punctuation cannot be converted If you add writing to a word to change it such as changing a 3 to an 8 after you attempt to recognise the word the wr...

Страница 38: ...ite the letters of a word closely and leave big gaps between words so that your handheld can easily tell where words begin and end Drawing on the screen You can draw on the screen in the same way that you write on the screen The difference between writing and drawing on the screen is how you select items and how they can be edited For example selected drawings can be resized while writing cannot T...

Страница 39: ... edit or format a drawing you must select it first Tap and hold the stylus on the drawing until the selection handle appears To select multiple drawings deselect the Pen button and then drag to select the drawings you want To edit a drawing To cut copy and paste selected drawings a Tap and hold the selected drawing b Tap an editing command on the pop up menu or tap a command on the Edit menu To re...

Страница 40: ...ar your mouth or other source of sound NOTE Refer to Front view on page 3 for the location of your handheld s microphone 2 Start recording by doing either of the following Press and hold do not release the Record hardware button on the left side of your handheld until you hear a beep Tap the Record button on the Recording toolbar 3 Make your recording 4 To stop recording Recording via Record hardw...

Страница 41: ...o the text entry area To insert a My Text message 1 Tap My Text on the screen s command bar 2 Tap a message NOTE You can add text after inserting a My Text message before sending it To edit a My Text message 1 In the Tools menu tap Edit and then tap My Text Messages 2 Select the message you wish to edit and make the desired changes Tap to select a prewritten message ...

Страница 42: ...2 Entering data in your Acer n20 Using My Text 28 ...

Страница 43: ...ont panel of your handheld The icons on the buttons identify the programs NOTE Based on your working style and common tasks you can reassign the Quick buttons to other applications on your handheld Refer to Personal on page 122 for instructions Switching between applications Choose from the following options to switch between applications Select another program from the menu Press any of the Quick...

Страница 44: ... Send and receive email messages Pocket Internet Explorer Browse Web and WAP sites and download new programs and files from the Internet Notes Create handwritten or typed notes drawings and recordings Tasks Keep track of your tasks Pocket Excel Create new workbooks or view and edit Excel workbooks created on your computer MSN Messenger Send and receive instant messages with your MSN Messenger cont...

Страница 45: ...uickly locate specific files 1 On the menu tap Find 2 Enter the text you want to find then select a data type TIP To quickly find information that is taking up storage space on your handheld select Larger than 64 KB in Type 3 Tap Go to start the search To use File Explorer Use File Explorer to locate files on your handheld and to organise these files into folders On the menu tap Programs and then ...

Страница 46: ...3 Managing applications and information Finding and organising information 32 Tap the folder name to open it Tap and hold to create a new folder Select the sort order for the list Tap to change folders ...

Страница 47: ...box write edit and view your emails on the road You can use these programs individually or in tandem with each other For example email addresses stored in Contacts can be used to address email messages in Inbox Calendar Calendar enables you to conveniently manage your schedules and appointments or any other activities associated with a time and date You can schedule appointments including meetings...

Страница 48: ...he week by tapping Options on the Tools menu Scheduling an appointment You can use Calendar to create an appointment schedule To create an appointment 1 If you are in Day or Week view tap the desired date and time for the appointment 2 Tap New Tap to go to today Tap to display or edit the appointment details Tap to create a new appointment ...

Страница 49: ...ting notes see Notes later in this chapter 7 After completing the details tap OK TIP If you select Remind me in an appointment your handheld will remind you according to the options set in Settings Personal tab Sounds Reminders To use the Calendar summary screen When you tap an appointment in Calendar a summary screen is displayed To change the appointment tap Edit Tap to select a date Tap to sele...

Страница 50: ...ointment details hide the input panel and then tap Attendees 3 From the list of email addresses you ve entered in Contacts select the meeting attendees The meeting notice is created automatically and placed in the Outbox folder For more information on sending and receiving meeting requests see the Help menu of Calendar and Inbox in your handheld Contacts Contacts maintains a list of your friends a...

Страница 51: ... tap Tools and then Options Creating a contact 1 Tap New 2 Using the input panel enter a name and other contact information You will need to scroll down to see all available fields Notes is a good place for maps and directions Tap to return to the contact list the contact is saved automatically Scroll to see more fields ...

Страница 52: ... show all contacts again clear text from the box or tap the button to the right of the box In the Contact list tap the category list labeled All Contacts by default and select the type of contact that you want displayed To show all contacts again select All Contacts To view a contact not assigned to a category select None To view the names of companies your contacts work for in the contact list ta...

Страница 53: ...sks 39 Tasks Use Tasks to keep track of what you have to do and prioritise them based on their importance and urgency To open Tasks Tap then Tasks Tasks will open to the Tasks list View contact details Tap to view notes Tap to change contact information ...

Страница 54: ... hide it to see all available fields 4 To assign the task to a category tap Categories and select a category from the list In the task list you can display tasks by category 5 To add notes tap the Notes tab You can enter text draw or create a recording For more information on creating notes see Notes later in this chapter Tap to create a new task Select the sort order of the list Indicates high pr...

Страница 55: ...task and enter your task information To use the Tasks summary screen When you tap a task in the task list a summary screen is displayed To change the task tap Edit Tap to return to the task list the task is saved automatically Tap to choose from predefined subjects Notes is a good place for maps and drawings View task details View notes Tap to show and hide additional summary information Tap to ch...

Страница 56: ...ill be created as a stand alone recording To open Notes Tap then Notes Notes will open to the Notes list Creating a note 1 Tap New 2 Create the note by writing drawing typing or recording NOTE For more information about using the input panel writing and drawing on the screen and creating recordings see 2 Entering data in your Acer n20 on page 19 Tap to open a note or play a recording Tap and hold ...

Страница 57: ... computer Send and receive email messages by connecting directly to an email server through an Internet service provider ISP or a network To open Inbox Press the Inbox Quick button on the front panel of your handheld Inbox will open to the Inbox folder navigator Tap to return to the note list the note is saved automatically Tap to write on the screen Tap to show or hide the input panel Tap to add ...

Страница 58: ...are transferred to Exchange or Outlook and then sent from those programs Email messages in subfolders must be selected in ActiveSync on your computer in order to be transferred TIP You can also synchronise email messages with your computer from a remote location For more information see the ActiveSync Help menu in your computer Connecting directly to an email server In addition to synchronising em...

Страница 59: ...n your handheld When working offline once you ve downloaded new message headers or partial messages you can disconnect from the email server and then decide which messages to download completely The next time you connect Inbox downloads the complete messages you ve marked for retrieval and sends the messages you ve composed Using the Message list The messages you receive are displayed in the Messa...

Страница 60: ...nces when you set up the service or select your synchronisation options You can change them at any time Change options for Inbox synchronisation using ActiveSync options For more information see ActiveSync Help To change options for direct email server connections In Inbox on your handheld a Tap Tools and then tap Options b On the Service tab tap the service you want to change c Tap and hold the s...

Страница 61: ...re displayed in one of five folders for each service you have created Inbox Deleted Items Drafts Outbox and Sent Items The behavior of the Deleted and Sent Items folders depends on the options you have chosen To set these options in the Message list a Tap Tools and then Options b On the Message tab select your options If you want to organise messages into additional folders tap Tools and then Mana...

Страница 62: ...sages while away from your computer If you use SMS messages are stored in the Inbox folder If you use POP3 and you move email messages to a folder you created the link is broken between the messages on your handheld and their copies on the email server The next time you connect the email server will see that the messages are missing from the handheld s Inbox and delete them from the server This pr...

Страница 63: ...s You can Create new documents on your handheld such as letters meeting minutes and trip reports or you can copy documents from your computer to your handheld Synchronise documents between your computer and your handheld so that you have the most up to date content in both locations For more information on using Pocket Word tap Programs Pocket Word then tap Help from the menu Creating a new file T...

Страница 64: ...e by tapping the Show Hide Toolbar button on the command bar If you re opening a Word document created on a computer select Wrap to Window on the View menu so that you can see the entire document TIP You can change the zoom magnification by tapping View and then Zoom Then select the percentage you want Select a higher percentage to enter text and a lower one to see more of your document Typing mod...

Страница 65: ...dit and then Find Replace Writing mode In writing mode use your stylus to write directly on the screen Ruled lines are displayed as a guide and the zoom magnification is greater than in typing mode to allow you to write more easily For more information on writing and selecting writing see Writing on the screen on page 21 Tap to change formatting options Tap to format text Tap and hold to see a pop...

Страница 66: ... your stylus to draw on the screen Gridlines appear as a guide When you lift your stylus off the screen after the first stroke you ll see a drawing box indicating the boundaries of the drawing Every subsequent stroke within or touching the drawing box becomes part of the drawing For more information on drawing and selecting drawings see Drawing on the screen on page 24 With Space button selected d...

Страница 67: ...kbooks on your handheld such as expense reports and mileage logs or you can copy workbooks from your computer to your handheld Synchronise workbooks between your computer and your handheld so that you have the most up to date content in both locations For more information on using Pocket Excel tap Programs Pocket Excel then tap Help from the menu Select Shape on the pop up menu to convert objects ...

Страница 68: ...st You can save a workbook you create or edit in a variety of formats including To use the Pocket Excel file list Pocket Excel contains a list of the files stored on your handheld Tap a file in the list to open it To delete make copies of and send files tap and hold a file in the list Then select the appropriate action from the pop up menu Displaying the toolbar Pocket Excel provides fundamental s...

Страница 69: ...orksheet to keep row and column labels visible as you scroll through a sheet a Select the cell where you want to freeze panes b Tap View and then Freeze Panes Split panes to view different areas of a large worksheet a Tap View and then Split b Then drag the split bar to where you want it To remove the split tap View and then Remove Split Show and hide rows and columns To hide a hidden row or colum...

Страница 70: ...ting up an account Before you can connect you must enter Passport or Exchange account information To set up an account and sign in 1 In the Tools menu tap Options 2 In the Accounts tab enter your Passport or Exchange account information 3 To sign in tap the sign in screen and enter your email address and password NOTE If you already use MSN Messenger on your computer your contacts will show up on ...

Страница 71: ...ar offline but will remain on the blocked contact s list To unblock a contact tap and hold the contact then tap Unblock on the pop up menu Chatting with contacts 1 Tap a contact name to open a chat window 2 Enter your message in the text entry area at the bottom of the screen or tap My Text to enter a preset message 3 Tap Send Tap and hold to display a pop up menu of actions Tap a contact to start...

Страница 72: ... button To revert back to your chat window tap Chats and select the person whom you were chatting with To know if the contact you are chatting with is responding look for the message under the text entry area Microsoft Windows Media Player for Pocket PC Use Microsoft Windows Media Player for Pocket PC to play digital audio and video files Windows Media and MP3 files that are Stored on your handhel...

Страница 73: ... book files to your handheld The books appear in the Reader Library where you can tap them in the list to open them NOTE Microsoft Reader is available only for the English and European Acer n20 models Using Guidebook Guidebook contains all the information you ll need to use the Microsoft Reader To open Guidebook Tap Help on the Reader command bar or On a book page tap and hold on the book title an...

Страница 74: ... Me file in the MSReader folder Using Library The Library is your Reader home page it displays a list of all books stored on your handheld or storage card To open Library On the Reader command bar tap Library or On a book page tap the book title and then tap Library on the pop up menu Opening a book Tap a book title in the Library list Reading a book Each book consists of a cover page an optional ...

Страница 75: ...ally taken to the last page read Using the Reader features Reading a book electronically gives you several options not available with paper books These options are available from any book page Select text by dragging across the text on the page Then tap an option on the pop up menu as described in the following sections To search for text 1 Tap Find on the pop up menu 2 Enter the word you want to ...

Страница 76: ...he right margin From anywhere in the book tap the bookmark icon to go to the bookmarked page NOTE You can add multiple bookmarks to a book Highlights When you highlight text it appears with a coloured background Notes When you attach a note to text you enter the text in a note pad that appears on top of the book page A Note icon will appear in the left margin To show or hide the note tap the icon ...

Страница 77: ...cluded To launch RecentDo simply tap its icon on the navigation bar NOTE To display the icon you need to enable the Show icon on the navigation bar command under the Setting menu located on the command bar Items in the RecentDo window are categorised into three Programs Documents and Websites Listed items are shown in hypertext format so you can easily launch them RecentDo Provides a quick way to ...

Страница 78: ...ing storage cards Memory Stick via the built in Memory Stick slot CompactFlash using the optional expansion sleeve PC Card using the optional expansion sleeve For more information on these expansion features refer to 7 Using expansion features on page 91 During a backup or restore operation All hardware buttons are disabled as well as the automatic handheld off feature The power button serve as a ...

Страница 79: ...your handheld to the expansion sleeve optional accessory sold separately Refer to page 94 for instructions on how to attach the expansion sleeve to your handheld 2 Tap Programs and then Backup Restore Note that when you attempt to launch Backup Restore without any storage card available in the system option for that unavailable storage card will be disabled When the selected storage card is remove...

Страница 80: ...e you can set to perform an automatic data backup when the system is running on x battery power x being the set battery capacity defined in the Advanced window Note that no backup procedure will be perform when the Advanced backup setting is activated and the specified storage card default Memory Stick is not attached to your handheld when x battery level is reached ...

Страница 81: ...tab choose whether to accept the default filename backup or type a new one by tapping the keyboard icon on the bottom of the screen 3 Select a storage card default Memory Stick from the Backup to radio buttons 4 Define the backup scope default PIM only from the Option radio buttons If free space in the selected storage card is less than the size of the data to be copied from the handheld s interna...

Страница 82: ...its free space or select a new storage card with a larger free space enough to accommodate the size of the intended backup data Refer to page 74 for instructions on how to delete a file from a storage card 5 Tap Start to proceed with the backup process If a backup file of the same filename as set exists in the selected storage card a pop up message appears ...

Страница 83: ...No then either define a new filename or select another storage card A pop up message will appear prior to Backup initialization 6 Tap OK During the backup process a progress screen will appear displaying backup status If a locked file is encountered during backup a warning message will pop up ...

Страница 84: ... then launch Backup Restore again When the backup process is completed a message box appears 7 Tap ok Restore function You can only restore backup files that are generated by Backup Restore file format is dbk To restore backup data 1 Close all running programs except for Backup Restore ...

Страница 85: ...le size and creation of each backup file are shown 3 Tap a filename to select the file you wish to restore If a dbk file generated by another application is selected a warning message will pop up Tap ok then select a dbk file generated by Backup Restore Once a valid dbk file is selected the window will shift to display related file information including Backup file filename of the selected dbk fil...

Страница 86: ...main memory This should be bigger than the file size of the selected dbk file for the restore process to proceed 4 Tap Start to proceed with the restore process A pop up message of restore reminders will appear 5 Tap OK If a corrupted backup file i e an error occurred during the backup process is encountered during restore a warning message will pop up ...

Страница 87: ... Restore If a locked file is encountered during restore a warning message will pop up Do any of the following Close the locked file then tap Retry to continue the restore process Tap Ignore to skip restoring the locked file and continue with the restore process Tap Cancel to abort the whole restore process ...

Страница 88: ...tus When the restore process is completed a message box appears 6 Tap ok Deleting a file from a storage card To increase the size of available free space in a storage card you can delete files that you no longer need 1 Tap the Restore tab 2 Select the storage card from which you want to delete a file 3 From the list tap a filename ...

Страница 89: ...plications IA Album LE 75 4 From the pop up menu tap Delete A message confirming deletion will appear 5 Tap OK IA Album LE IA Album LE Lite Edition is a convenient image viewing tool for file management browsing and viewing ...

Страница 90: ...y source BMP 2BP JPEG CMYK JPEG or GIF format whether or not they are screen capture files created by IA ScreenShot Image browsing and viewing modes include Thumbnail Select and Full Screen views Optimise colours for 24 bit 16 bit 12 bit 8 bit and grayscale displays Crop and Save function allows you to designate any portion of an image and then save that portion as a new file Option to Select one ...

Страница 91: ...tured screen image as a Bitmap GIF or JPEG file desired resolution between 60 and 300 dpi Specify a Home Folder and then quick jump to that folder or any other folder you have accessed during the current IA ScreenShot session IA Album LE menus The IA Album LE s user interface has three menus on the command bar File Tools and View File menu ...

Страница 92: ...ect the New Folder command 3 Enter the name for the new folder in the dialog box This command is also on the Toolbar and on the pop up menu that appears when you tap and hold in the folder pane while in Thumbnail View mode Delete Folder This command allows you to delete an existing folder on your handheld 1 Select the folder you want to delete 2 Select Delete Folder from the File menu or the pop u...

Страница 93: ...iew by selecting Thumbnail View from the View menu or by tapping its icon on the toolbar In this view images in the current folder are shown as thumbnails You can do the following in Thumbnail view Tap the upward pointing red triangle to display an additional row of thumbnail images Conversely each time you tap a downward pointing blue triangle a row of thumbnail images will be hidden Tap the styl...

Страница 94: ...to zoom out A different toolbar appears in Select view This toolbar provides convenient access to ten of the more common commands for Select view To learn the function of any toolbar icon press your stylus on the icon to view its tool tip Full Screen View Activate the Full Screen view by doing any of the following Select the Full Screen View command from the View menu Tap the Full Screen View icon...

Страница 95: ...of the Image Size Folder and System tabs When you have finished viewing the info click OK in the upper right corner of the screen TIP The Image Info feature is also available on the Toolbar in the form of an icon When an image is being displayed in its Actual Size in Select View mode the Image Info icon is shown as 1 1 instead of its standard appearance the letter i inside a blue circle Tools menu...

Страница 96: ... Settings This command allows you to set any of your handheld s hardware buttons to act as a capture button By simply pressing the capture button that you have designated whatever is currently displayed on your handheld screen will be saved as an image file Setting and configuring a capture button 1 Tap Capture Settings on the Tools menu or its icon on the toolbar 2 Make sure the Enable Screen Cap...

Страница 97: ...le for saving a screen on which a photo or video is displayed GIF can produce the smallest file size when used to store regular screen shots 10 Tap OK Capturing screens As long as the Enable Screen Capture check box is selected and IA Album LE is running even in the background you can perform a screen capture anytime you want by simply pressing the capture button you have specified When IA Album L...

Страница 98: ...Sync filter runs on the Windows platform It prepares untagged Adobe PDF files and transports them to your handheld The Reader is an application in your handheld designed to accommodate the characteristics of small screen devices Acrobat Reader for Pocket PC allows you to view Adobe PDF files in two modes View the Adobe PDF file exactly as intended View a tagged Adobe PDF file in a reflowed format ...

Страница 99: ...ol display pace and shows the playback progress Stop Play Pause Step Fast forward Volume control Mute Repeat loop Open file Fullscreen Landscape switch PocketTV automatically detects the screen orientation when a third party Landscape driver is used JSLandscape or Nyditot Virtual Display TIP You can also tap on the video to switch between normal mode and Fullscreen Landscape mode ...

Страница 100: ...sing third party applications PocketTV Enterprise Edition 86 Status bar Shows time information estimated time elapsed estimated total play time fps indicator actual frames per second and bit rate indicator ...

Страница 101: ...ocuments and in one level of subfolders Open URL Specify an http URL for streaming Built in streaming protocols include http and ftp Save Frame Capture and save the current frame The frame is saved in RGB Targa format and can be viewed or converted using the popular PQView image viewer Properties Show the file parameters Options Refer to the following subsection for details on this Tools command A...

Страница 102: ...aller than screen Fit screen Fullscreen 90 deg Left 90 deg Right Auto at Play switch to Fullscreen when it starts playing Always when Playing links play mode with Fullscreen Video Output Normal Voyager VGA Presenter to go VGA Color Adjust opens the Color Adjustment dialog You can adjust the Brightness Gamma Contrast Color saturation and colour balance red green and blue gamma There are options to ...

Страница 103: ...ng from a hard drive or Microdrive Open with tGetFile change the format of the Open File dialog Save with tGetFile change the format of the Save Frame dialog Remember Last last opened file before exiting PocketTV is automatically displayed on the next session File Association check file association NOTE If a PocketTV file association was modified by another application you have the option to resto...

Страница 104: ...6 Using third party applications PocketTV Enterprise Edition 90 ...

Страница 105: ...ripheral devices Connect to the Internet or to a network NOTE In using any peripheral device with your handheld refer to the documentation that accompany each device for information on how to install and operate it Memory Stick On the top of your handheld is a Memory Stick slot This allows you to expand your handheld memory and perform data backup Refer to Top view on page 6 for the location of th...

Страница 106: ...le system sound this will signal that the card is already properly seated within the slot Removing a Memory Stick 1 Hold your handheld securely 2 Release the card from the slot by using your finger to push against the top of the card as if you were pushing it further into the slot a An audible system sound will signal that the card has been released 3 Gently remove the card from the slot b ...

Страница 107: ...Acer s10 Handheld series including the Travel Charger and the USB Sync Charge Cable Refer to Front panel on page 2 for the location of the Acer Versatile Connector Expansion sleeve The expansion sleeve is an optional accessory designed for users who demand more features and functions It combines the ultimate flexibility in expansion increase battery capacity and adds more functionality all in a si...

Страница 108: ...ndheld s rear panel to the expansion sleeve then slide it in through the sleeve s arms b 3 Gently push your handheld downward until you feel it lock 4 Slide the battery release switch on the handheld to Lock position 3 CompactFlash Type II slot Accepts CompactFlash based peripheral devices 4 CompactFlash Type II slot eject button Press to pop out any installed CompactFlash based device 5 100 pin e...

Страница 109: ...pectively The extra capacity battery function of the expansion sleeve system provides your handheld with increased battery capacity to cope up with the more power demanding applications With the standard USB host connector you can easily attach USB peripheral devices to your handheld without consuming precious system resources The expansion sleeve can readily support USB keyboards For other USB de...

Страница 110: ...CompactFlash card 1 Hold your handheld securely 2 Press the slot eject button to pop out the card a then gently remove it from the slot b Inserting a PC Card 1 Hold your handheld securely 2 Insert the PC Card into its corresponding slot on the expansion sleeve 3 Push the card into the slot using your finger until you feel the card lock ...

Страница 111: ...7 Using expansion features Expansion sleeve 97 Removing a PC Card 1 Hold your handheld securely 2 Press the slot eject button to pop out the card a then gently remove it from the slot b ...

Страница 112: ...7 Using expansion features Expansion sleeve 98 ...

Страница 113: ...ise remotely from your handheld For the Acer n20w model you can use the built in IEEE 802 11b WLAN adapter For information on using ActiveSync see ActiveSync Help on the your computer You can also use ActiveSync to Back up and restore your handheld data Copy rather than synchronise files between your handheld and your computer Control when synchronisation occurs by selecting a synchronisation mode...

Страница 114: ...ct your computer s name Remote synchronisation with a computer will work only if you have set up a partnership with that computer through ActiveSync and have set ActiveSync to allow remote connections Other restrictions apply For more information on synchronising remotely see ActiveSync Help on the your computer Tap to connect and synchronize View synchronization status Tap to synchronize via IR o...

Страница 115: ...ging and fax services Connect to the network at your company or organisation where you work Once connected you can send and receive email messages by using Inbox view Web or WAP pages by using Microsoft Pocket Internet Explorer and synchronise with your computer Connect to your computer to synchronise remotely Once connected you can synchronise information such as your Pocket Outlook information I...

Страница 116: ...n to you Your handheld will automatically receive it Wireless communication Applicable only to the Acer n20w model this feature uses a built in IEEE 802 11b WLAN adapter to connect to an existing IEEE 802 11b wireless network This feature provides you with an Internet experience that is completely mobile to meet your fast paced lifestyle and with a high speed transmission rate of up to 11 Mbps you...

Страница 117: ...tap the Properties button IP Address page Use this page to view and edit the IP address the subnet mask and the default gateway settings You can use a server assigned IP address or you can set a specific one IP address Internet Protocol address This is a numeric address that the domain name server translates into a domain name Each node on the IP network has a unique IP address Subnet mask A numbe...

Страница 118: ...wsTM Internet Naming Service This service has two functions First the Microsoft Net BIO name server eliminates the broadcasts needed to resolve the computer names to IP addresses by providing a cache or database of translations The other function sets the IP address of the host computer you used when you set up the wireless utility for wireless ActiveSync operation NOTE You need to set the IP addr...

Страница 119: ...e default value being ANY Channel Displays the current channel used for Access Point or 802 11 Ad Hoc stations TxRate Displays the current data transmission rate BSSID Basic SSID Displays the current BSSID selected for Access Point or 802 11 Ad Hoc networks When your handheld is not connected to a wireless network the BSSID value would be Non associated You can view the BSSID list in the Scan page...

Страница 120: ...is a unique case sensitive name of up to 32 characters shared among all devices sharing a common wireless network You will be able to connect to an Access Point with the same SSID When operating under the 801 11 Ad Hoc mode the SSID must be the same among stations so that computers can communicate properly within the LAN Channel Under the 801 11 Ad Hoc mode the first station forms the 801 11 Ad Ho...

Страница 121: ...ses the rate of data transmission 64 bits ASCII 128 bits ASCII 64 bits HEX 128 bits HEX Key ID options When you enabled one of the ASCII or HEX WEP modes the Key ID setting would automatically be enabled as well You must choose Key ID for connection with an AP or peer site station You can choose Key 1 to Key 4 for your personal use Key options When you enabled one of the ASCII or HEX WEP modes the...

Страница 122: ...he correct character Transmission Rate Select a transmission rate option Fixed 1 Mbps Fixed 2 Mbps Fixed 5 5 Mbps Fixed 11 Mbps Auto Select 1 or 2 Mbps Fully Auto Choose this option to automatically adjust the transfer speed recommended Power Saving mode Select or clear the check box to enable or disable the power saving mode When you are in the 802 11 Ad Hoc mode you cannot enable the power savin...

Страница 123: ...operly within the LAN Signal Percentage values indicate the signal strength of AP Channel Indicates which channel is set to be used by the network Encryption Indicates whether encryption is enabled or disabled in the selected network Info page Use this page to view the MAC address and version information of your handheld s wireless utility MAC Media Access Control Address This refers to the physic...

Страница 124: ... not have a built in modem install a modem card or use or use a NULL modem cable and appropriate adapters to connect an external modem to your handheld through the Versatile Connector 3 Tap and then Settings 4 In the Connections tab tap Connections 5 Under The Internet settings select Internet Settings and tap Modify 6 In the Modem tab tap New 7 Enter a name for the connection such as ISP Connecti...

Страница 125: ...to the network by using a network cable NOTE For instructions on inserting and using the Ethernet card see the documentation that came with the card 6 Tap Settings Connections tab and then Connections 7 From the My network card connects to list select Internet Connecting to a network If you have access to a network at work you can send email messages view Intranet pages synchronise your handheld a...

Страница 126: ...handheld 1 Follow steps 1 to 6 on page 111 2 From the My network card connects to list select Work Starting a connection To start the connection simply start using one of the following programs Your handheld will automatically begin connecting Once connected you can Send and receive email messages by using Inbox Before you can use Inbox you need to provide the information it needs to communicate w...

Страница 127: ...ect to different mailboxes set up and name each mailbox connection To set up an email service 1 In Inbox on your handheld tap Services 2 Tap New Service 3 Follow the directions in the New Service wizard For an explanation of a screen tap and then Help When finished connecting to your email server tap Services and then Connect For more information on using the Inbox program see Inbox on page 43 Get...

Страница 128: ...9 Getting connected Getting help on connecting 114 ...

Страница 129: ...eate the connection first as described in 9 Getting connected on page 101 When connected to an ISP or network you can also download files and programs from the Internet or intranet Mobile Favorites folder Only items stored in the Mobile Favorites subfolder in the Favorites folder of Internet Explorer on your computer will be synchronised with your handheld This folder was created automatically whe...

Страница 130: ...ormation updated on both your computer and handheld Before synchronising with your handheld in Internet Explorer on your computer click Tools and then Synchronise You will see the last time content was downloaded to the computer and you can manually download content if needed 4 Click OK Internet Explorer downloads the latest version of the page to your computer TIP You can add a button to the Inte...

Страница 131: ...ndheld then you synchronise your handheld and computer or connect to the Internet to download the content For more information visit the AvantGo Web site Signing up for AvantGo 1 In ActiveSync options on your computer turn on synchronisation for the AvantGo information type 2 In Pocket Internet Explorer on your handheld tap the Favorites button to display your list of favorites 3 Tap the AvantGo C...

Страница 132: ...Pocket Internet Explorer You can use Pocket Internet Explorer to browse mobile favorites and channels that have been downloaded to your handheld without connecting to the Internet You can also connect to the Internet through an ISP or a network connection and browse the Web Hide pictures button Favorites button Home button Refresh button ...

Страница 133: ...et to view the page To browse the Internet 1 Set up a connection to your ISP or corporate network as described in 9 Getting connected on page 101 2 To connect and start browsing do one of the following Tap the Favorites button and then tap the favorite you want to view Tap View and then Address Bar In the address bar that appears at the top of the screen enter the Web address you want to visit and...

Страница 134: ...10 Using Microsoft Pocket Internet Explorer Using Pocket Internet Explorer 120 ...

Страница 135: ...owing Adjust the handheld settings Add or remove programs Adjusting handheld settings You can adjust the settings of your handheld to suit the way you work To access Settings Tap then Settings The Settings window has three tabs Personal System and Connections each of which has its own set of options The succeeding sections shows the configuration page of each the Settings options For detailed inst...

Страница 136: ...11 Customising your handheld Adjusting handheld settings 122 Personal Buttons Assign your favorite programs to any of the Quick buttons ...

Страница 137: ... your handheld Adjusting handheld settings 123 Input Select an input method options for word completion and other related settings Menus Customise what appears on the menu and enable a pop up menu from the New button ...

Страница 138: ...your handheld Adjusting handheld settings 124 Owner Information Enter personal information and customise text display when handheld is turned on Password Set a password to prevent unauthorized access to your handheld ...

Страница 139: ...handheld settings 125 Sounds Notification Select the types of action you want to hear sounds for and define how you want to be notified about different events Today Customise the look and the information that is displayed on the Today screen ...

Страница 140: ...11 Customising your handheld Adjusting handheld settings 126 System About Displays your handheld s version and copyright information includes an option to define a device ID ...

Страница 141: ...11 Customising your handheld Adjusting handheld settings 127 Backlight Define settings for backlight control Clock Change the time or set alarms ...

Страница 142: ...g your handheld Adjusting handheld settings 128 Memory Adjust allocation of storage and main memory Microphone Enable or disable the AGC Automatic Gain Control function volume control when making an audio recording ...

Страница 143: ...11 Customising your handheld Adjusting handheld settings 129 Power Define settings to minimise power consumption ...

Страница 144: ...11 Customising your handheld Adjusting handheld settings 130 Regional Settings Set default number and time display formats and other related options ...

Страница 145: ...11 Customising your handheld Adjusting handheld settings 131 Remove Programs Remove programs from storage memory Screen Align screen and enable the ClearType feature ...

Страница 146: ...11 Customising your handheld Adjusting handheld settings 132 Connections AvantGo Connect Set server settings and related options for AvantGo ...

Страница 147: ...11 Customising your handheld Adjusting handheld settings 133 Beam Define settings for the beam function Connections Adjust settings for connecting to the Internet or to a local network ...

Страница 148: ...m access memory You can install any program created for your handheld as long as it has enough memory The most popular place to find software for your handheld is on the Pocket PC Web site http www microsoft com mobile pocketpc Adding programs You could add programs to your handheld either by using ActiveSync or by downloading the program from the Internet To add programs using ActiveSync You ll n...

Страница 149: ...to your handheld If you cannot find any installation instructions for the program in the Read Me file or documentation use ActiveSync Explore to copy the program file to the Program Files folder on your handheld For more information on copying files using ActiveSync see ActiveSync Help 5 Once installation is complete tap Programs and then the program icon to launch it To add a program directly fro...

Страница 150: ...le Explorer on your handheld to locate the program 1 Tap and hold the program 2 Tap Delete on the pop up menu Adding a program to the Start menu Tap Settings Menus the Start Menu tab and then the check box for the program If you do not see the program listed you can either use File Explorer on your handheld to move the program to the Start Menu folder or use ActiveSync on your computer to create a...

Страница 151: ...the Windows folder tap and hold a blank area of the window 4 Tap Paste on the pop up menu 5 The program will now appear on the menu For more information on using File Explorer see To use File Explorer on page 31 To add a Start menu program using ActiveSync on your computer 1 Use the Explorer in ActiveSync to explore your handheld files and locate the program 2 Right click the program and then clic...

Страница 152: ...11 Customising your handheld Adding a program to the Start menu 138 ...

Страница 153: ...d 121 E email manage folders 47 synchronise 44 email server 113 email service 113 enter data 19 drawing on the screen 24 recording a message 26 using input panel 19 Block Recognizer 20 Letter Recognizer 20 soft keyboard 20 Transcriber 21 using My Text 27 writing on the screen 21 convert to text 22 expansion features 91 Acer Versatile Connector 93 expansion sleeve 93 attaching expansion sleeve 94 i...

Страница 154: ...2 Tasks 39 open 39 Microsoft Pocket PC 2002 49 companion programs 49 Microsoft Reader get book 60 read book 60 Reader features 61 remove book 62 use Guidebook 59 using Library 60 MSN Messenger 55 58 chat with contacts 57 requirements 56 set up 56 work with contacts 56 Pocket Excel 53 File list 54 protect workbook 55 Pocket Word 49 enter data drawing mode 52 recording mode 53 typing mode 50 writing...

Страница 155: ...7 Tools 81 screen capture preferences 82 View 79 select view 80 PocketTV 84 Command bar 85 Fullscreen Landscape switch 85 Menu 87 Options 88 Seek bar 85 Status bar 86 Transcriber 21 W Windows Media Player for Pocket PC 58 ...

Страница 156: ...142 ...

Отзывы: