Chapter 5
173
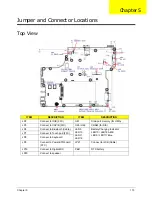
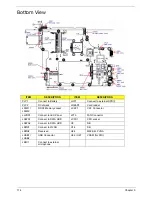
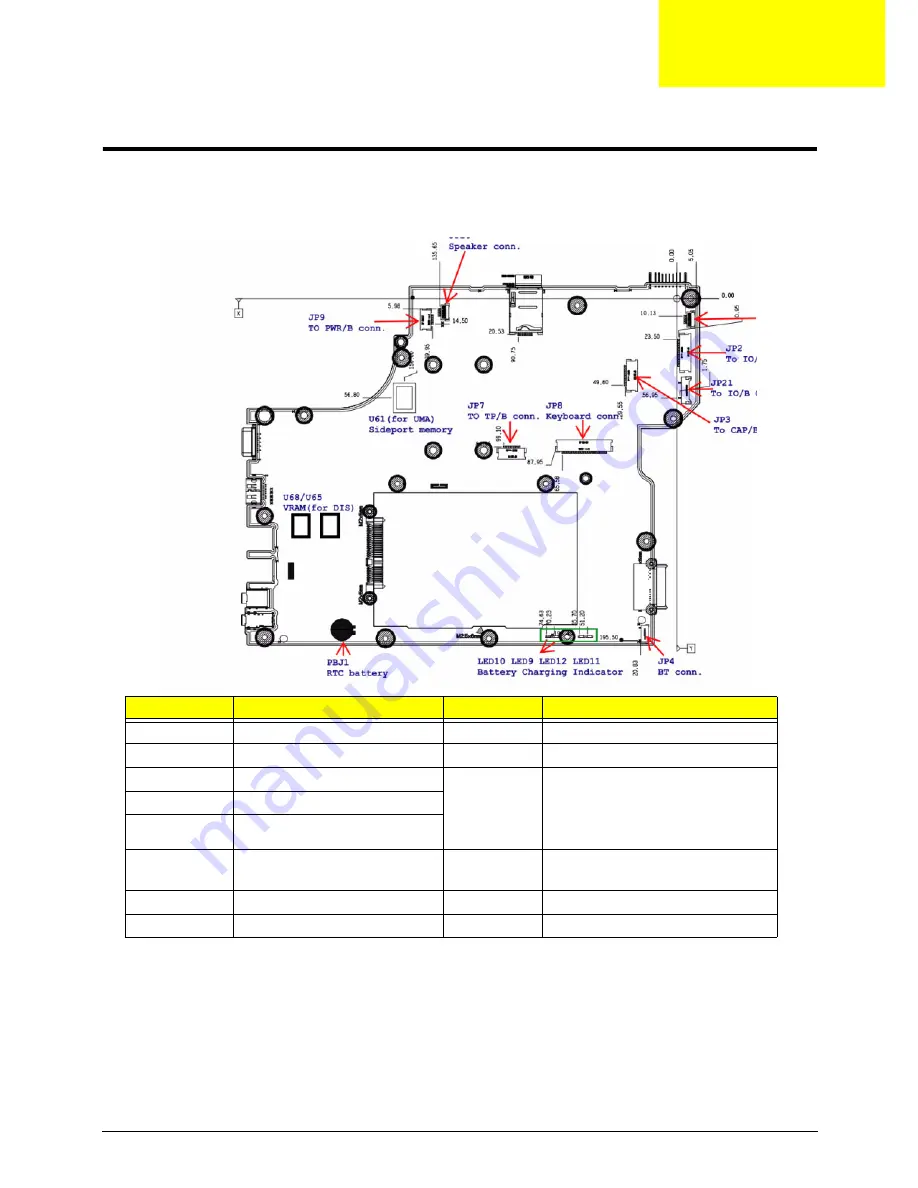
Jumper and Connector Locations
Top View
ITEM
DESCRIPTION
ITEM
DESCRIPTION
JP2
Connect to IO/B (FFC)
U61
Side-port memory (for UMA)
JP3
Connect to CAP/B (FFC)
U65 / U68
VRAM (for DIS)
JP4
Connect to Bluetooth (Cable)
LED9
LED10
LED11
LED12
Battery Charging Indicator
LED10 / LED12 AMB
LED9 / LED11?Blue
JP7
Connect to Touch pad (FFC)
JP8
Connect to Keyboard
JP9
Connect to Power BTN board
(FFC)
JP21
Connect to IO/B (Cable)
JP19
Connect to Digital MIC
PBJ1
RTC battery
JP20
Connect to speaker
Chapter 5
Содержание Aspire 5534 Series
Страница 6: ...VI ...
Страница 10: ...X Table of Contents ...
Страница 31: ...Chapter 1 21 Pack capacity 4400 mAh Number of battery cells 6 Package configuration 3S2P Item Specification ...
Страница 32: ...22 Chapter 1 ...
Страница 51: ...Chapter 2 41 ...
Страница 52: ...42 Chapter 2 ...
Страница 65: ...Chapter 3 55 ...
Страница 71: ...Chapter 3 61 6 Open the Keyboard FFC securing latch as shown then disconnect the FFC and remove the Keyboard ...
Страница 79: ...Chapter 3 69 ...
Страница 81: ...Chapter 3 71 5 Lift the Power Board from the Lower Cover ...
Страница 83: ...Chapter 3 73 6 Lift the right side speaker out from the Lower Cover as shown ...
Страница 89: ...Chapter 3 79 7 Disconnect the I O Board Cable from the I O Board ...
Страница 97: ...Chapter 3 87 ...
Страница 103: ...Chapter 3 93 ...
Страница 107: ...Chapter 3 97 6 Disconnect the LCD cable as shown and remove the cable from the LCD Panel ...
Страница 110: ...100 Chapter 3 ...
Страница 125: ...Chapter 3 115 3 Grasp the Thermal Module by the CPU heat sink and place onto the Mainboard as shown ...
Страница 197: ...Chapter 6 187 ...
Страница 224: ...214 ...

