

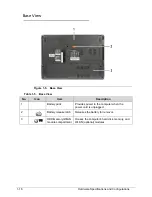


1-20
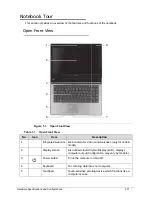
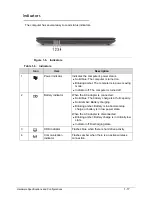
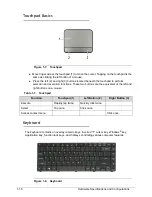
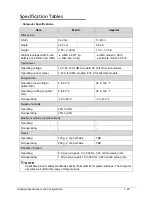
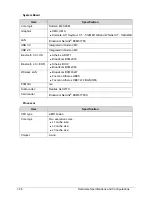
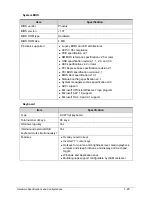
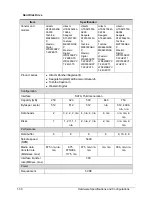
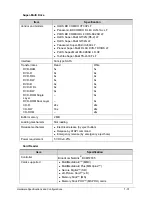
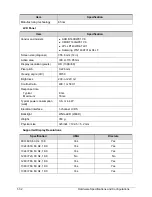
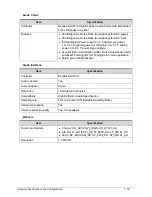
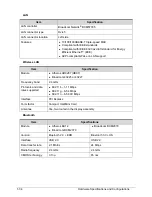
Hardware Specifications and Configurations
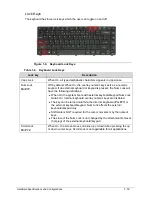
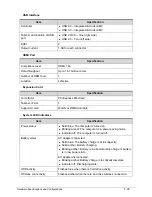
Windows Keys
0
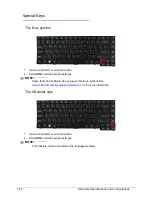
The keyboard has two keys that perform Windows-specific functions.
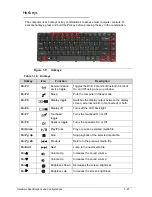
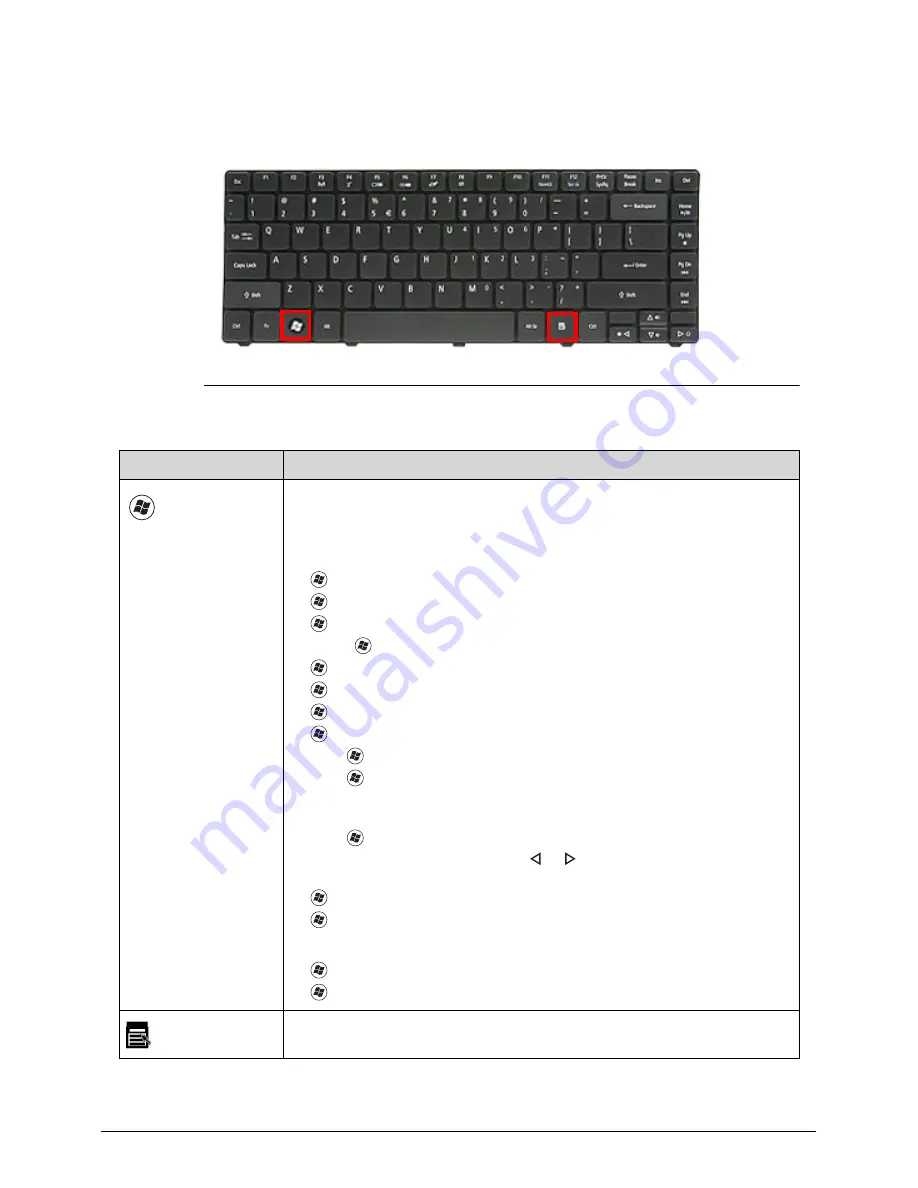
Figure 1-10. Windows-specific Keys
Table 1-9. Windows-specific Keys
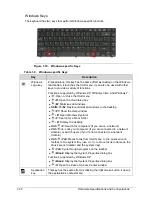
Key
Description
Windows
Logo key
Pressed alone, this key has the same effect as clicking on the
Windows
Start
button; it launches the
Start
menu. It can also be used with other
keys to provide a variety of functions.
Functions supported by Windows XP, Windows Vista, and Windows 7:
: Open or close the
Start
menu
+
R
: Open the
Run
dialog box
+
M
: Minimizes all windows
Shift
+
+
M
: Restore minimized windows to the desktop
+
F1
: Show the
Help
window
+
E
: Open
Windows Explorer
+
F
: Search for a file or folder
+
D
: Display the desktop
Ctrl
+
+
F
: Search for computers (if you are on a network)
Ctrl
+
+
L
: Lock your computer (if you are connected to a network
domain), or switch users (if you're not connected to a network
domain)
Ctrl
+
+
Tab
: Moves focus from
Start
menu, to the
Quick Launch
toolbar, to the system tray (use or to move focus to items on the
Quick Launch
toolbar and the system tray)
+
Tab
: Cycle through programs on the taskbar
+
Break
: Display the
System Properties
dialog box
Functions supported by Windows XP:
+
Break
: Display the
System Properties
dialog box
+
U
: Open the
Ease of Access Center
window
Application
key
This key has the same effect as clicking the right mouse button; it opens
the application's context menu.
Содержание Aspire 4560
Страница 1: ... Aspire 4560 4560G SERVICEGUIDE ...
Страница 10: ...x ...
Страница 11: ...CHAPTER 1 Hardware Specifications ...
Страница 14: ...1 4 ...
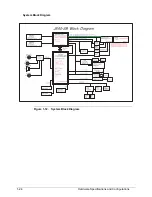
Страница 34: ...1 24 Hardware Specifications and Configurations System Block Diagram Figure 1 12 System Block Diagram ...
Страница 51: ...CHAPTER 2 System Utilities ...
Страница 67: ...CHAPTER 3 Machine Maintenance ...
Страница 70: ...3 4 ...
Страница 100: ...3 34 Machine Maintenance 4 Remove the USB board from the lower case Figure 3 44 USB Board ...
Страница 105: ...Machine Maintenance 3 39 4 Remove the thermal module from the mainboard Figure 3 53 Thermal Module ...
Страница 109: ...Machine Maintenance 3 43 6 Remove the LCD module from the lower cover Figure 3 60 LCD Module ...
Страница 128: ...3 62 Machine Maintenance 3 Secure the bezel with the two 2 screw covers Figure 3 90 LCD Bezel Screw Covers ...
Страница 162: ...3 96 Machine Maintenance ...
Страница 163: ...CHAPTER 4 Troubleshooting ...
Страница 193: ...CHAPTER 5 Jumper and Connector Locations ...
Страница 200: ...5 8 Jumper and Connector Locations ...
Страница 201: ...CHAPTER 6 FRU List ...
Страница 202: ...6 2 Aspire 4560 4560G Exploded Diagram 6 4 Main Assembly 6 4 LCD Assembly 6 6 FRU List 6 7 ...
Страница 217: ...CHAPTER 7 Model Definition and Configuration ...
Страница 218: ...7 2 Aspire 4560 4560G 7 3 ...
Страница 325: ...CHAPTER 8 Test Compatible Components ...
Страница 326: ...8 2 Microsoft Windows 7 Environment Test 8 4 ...
Страница 332: ...8 8 Test Compatible Components ...
Страница 333: ...CHAPTER 9 Online Support Information ...
Страница 334: ...9 2 Online Support Information 9 3 ...
Страница 336: ...9 4 Online Support Information ...


