


WORKING WITH PADS
Each pad in bitbox micro can be assigned a WAV file or a folder of WAV files. You can
configure playback options, such as trigger mode and looping, individually for each pad.
Once a pad is loaded, you can touch the pad on the main Pads screen to trigger it. You
can also use the Keys screen to play the currently selected pad. When you trigger a pad
from the Keys screen, a pad with a single WAV file is pitch shifted to correspond to the
note played. Multi-sample pads play the WAV file with a root note closest to the played
note, with pitch shifting if needed. We’ll talk more about multi-samples later.
Steps Common to All Pad Modes
The tasks in this section apply to all pads, no matter which pad mode you select. The
first task to create a new pad is to select the WAV file or files and then set the Pad
Mode.
To Select WAV Files and Assign Pad Modes:
Push HOME until you are on the Pads screen. This screen has two rows of 4 pads
each, for a total of 8 pads. A WAV file or folder of WAV files can be assigned to each of
these pads, and each pad is assigned a Pad Mode.
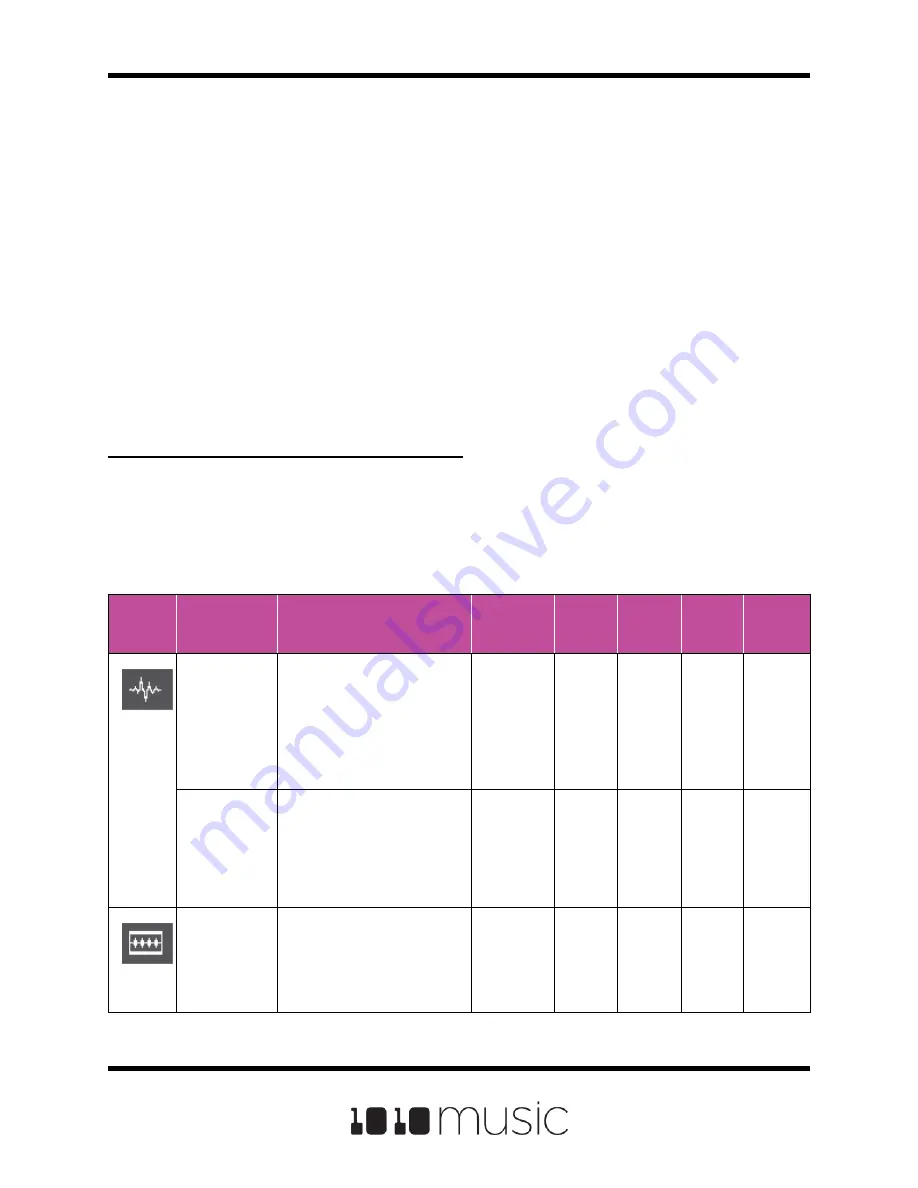
Bitbox micro supports the following pad modes:
Icon
Pad Mode
Description
Reverse
Playback
Beat
Sync
Set
Loop
Points
Play
Slices
Poly-
phony
Sample
Use to play single notes or
drum hits. You can control
start and end points for
playback and looping.
Supports reverse
playback, along with
forward and bidirectional
looping.
√
√
8 notes
Sample:
Multi-
Sample
Mode
Spread a folder full of wav
files across the keyboard
to get more realistic
instrument pitch shifting or
to map different sounds to
each key on the keyboard.
8 notes
Clip
Use for synchronized
loops and quantized
playback, e.g. drum loops
and guitar tracks between
one and eight measures
long.
√
2 notes
Page 18 of 88
Copyright 1010music LLC 2020
Bitbox Micro User Manual 1.0.7


