2660021166131 Rev. A 2018-112660021166131 Rev. A 2018-11
Humphrey
®
Field Analyzer 3 (HFA3)
Instructions for Use – Models 830, 840, 850, 860
Page 1: ...2660021166131 Rev A 2018 112660021166131 Rev A 2018 11 Humphrey Field Analyzer 3 HFA3 Instructions for Use Models 830 840 850 860...
Page 2: ...of Carl Zeiss Meditec Inc in the United States and or other countries Windows Windows Vista and Windows Server are registered trademarks of Microsoft Corporation in the United States and or other coun...
Page 3: ...7 Product Safety 1 7 Electromagnetic Compatibility EMC 1 9 2 Software Installation 2 1 Contents Software Kit 2 1 Steps to Upgrade Software 2 1 3 Getting Started 3 1 Instrument Overview 3 1 Startup 3 9...
Page 4: ...ice Network 7 2 Connect to a DICOM EMR Server 7 3 Connect to a Printer 7 8 8 Maintenance 8 1 Cleaning the Instrument 8 1 Replacing the Stimulus Projection Lamp 8 2 Liquid Trial Lens Care 8 4 Accessori...
Page 5: ...2018 11 v Guidelines for Trial Lens Selection B 1 How to Calculate the Spherical Equivalent B 1 C Troubleshooting C 1 Error Alerts C 1 Troubleshooting Table C 3 D Legal Notices D 1 Software Copyright...
Page 6: ...HFA3 Instructions for Use 2660021166131 Rev A 2018 11 vi...
Page 7: ...opters or perform custom scans automatically or step by step Intended Use The Humphrey Field Analyzer is an automatic perimeter which is intended to be used to measure the visual field of the eye Indi...
Page 8: ...given below This manual contains information that will aid in the proper instrument operation and interpretation of the resultant data Instrument Operation Demographic The user should be an adult and...
Page 9: ...esigned to be intuitive Note Trademarked terms terms related to DICOM usage and some networking terms are not translated from English on the user interface and in the instructions for use Models This...
Page 10: ...66131 Rev A 2018 11 1 4 Symbols and Labels WARNING CAUTION Must Follow Instructions For Use DisplayPort USB Port Network Port Power Switch Type B applied parts Patient Response Button Headphones Direc...
Page 11: ...symbols on the shipping carton specify the handling requirements and the transport and storage conditions for the HFA3 as it is shipped from the factory Note these symbols in the event that the HFA3...
Page 12: ...facilities For further information on disposal of this product please contact your local dealer or the manufacturer or its legal successor company Please read the latest Internet information provided...
Page 13: ...y while being examined HFA3 Licenses Each HFA3 is issued with two Windows operating system licenses an embedded version and a consumer version Product Compliance Complies with 93 42 EEC Medical Device...
Page 14: ...hock the instrument must be plugged into an earthed ground outlet Do not remove or disable the ground pin Only an authorized ZEISS service representative may install the instrument WARNING Do not use...
Page 15: ...d tipping Do not use the instrument on an uneven or sloped surface Do not roll the table from one location to another while the instrument is on the table Move the table alone to the new location and...
Page 16: ...tile If floors are covered with synthetic material the relative humidity should be at least 30 Electrical fast transient burst IEC 61000 4 4 2 kV for power supply lines 1 kV for input output lines 2 k...
Page 17: ...uld be less than the compliance level in each frequency range b Interference may occur in the vicinity of equipment marked with the following symbol Radiated RF IEC 61000 4 3 3 V m 80 MHz to 2 5 GHz 3...
Page 18: ...ance d in meters m can be estimated using the equation applicable to the frequency of the transmitter where P is the maximum output power rating of the transmitter in watts W according to the transmit...
Page 19: ...The blue USB drive with the UD label is the user documentation including the installation instructions and the Instructions for Use This content is for your reference and is not required for software...
Page 20: ...stallation please take a screenshot Print Screen and save in a graphics application such as Microsoft Paint of the information then call your local ZEISS customer service number shown on the back of t...
Page 21: ...d by the on screen prompts There may be screens that show a progress bar Occasionally the progress bar will stop for several seconds but the installation is still in progress There will be several pro...
Page 22: ...self 13 The instrument boots up and the screen may be black for several minutes Wait until the InstallShield Wizard screen appears again Allow the installer to complete the software update 14 The Inst...
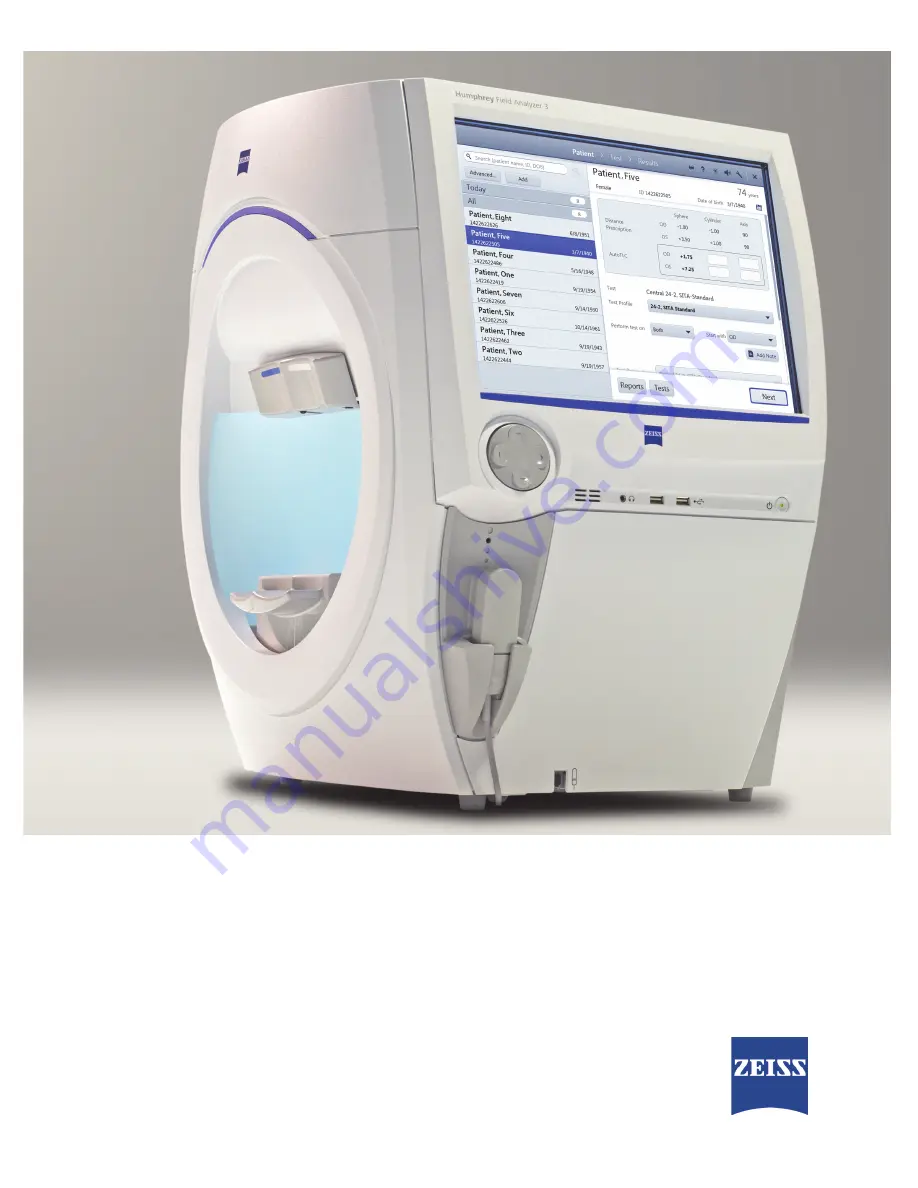
Page 23: ...rted This chapter describes instrument features general operation and settings of the HFA3 Instrument Overview 3 2 1 4 5 6 7 8 c PJN q ec P l s 1 Patient response button connection 4 Touch screen 7 Au...
Page 24: ...1 Getting Started Go to Contents HFA3 Instructions for Use 2660021166131 Rev A 2018 11 3 2 c PJO q ec P p m 1 Location Side Panel...
Page 25: ...1 2 3 4 HFA3 Instructions for Use 2660021166131 Rev A 2018 11 Go to Contents Getting Started 3 3 c PJP q ec P p m l 1 12V Power Outlet 2 Display Port 3 USB Port 4 Ethernet Port c PJQ _ m p...
Page 26: ...3 4 2 1 Getting Started Go to Contents HFA3 Instructions for Use 2660021166131 Rev A 2018 11 3 4 c PJR q ec P c s 1 Chin rest 3 Visor handle 2 Testing bowl 4 Forehead rest...
Page 27: ...ard Standard SITA SWAP No No Standard Standard Stimulus Size I V I V I V I V Auto Pupil Measurement No Standard Standard Standard Stimulus Color White White Red White Blue Red White Blue Red Foveal Th...
Page 28: ...ct an item touch on another area of the screen To return to a previous screen if applicable select the Back button on the lower left side Screen Keyboard The screen keyboard is used to fill out the te...
Page 29: ...election to the next on the HFA3 screen and enter data Select the intended data field with the touch screen or a mouse Use the Tab key to move the highlight from one data field to another in a forward...
Page 30: ...ck the Continue button to return to the patient data Tap the Help button to open the on screen user manual The Brightness button displays a control for adjusting the brightness Tap the Volume button t...
Page 31: ...ogin allows a person who does not have access privileges to log in and use the instrument Emergency logins are audited and usage of the instrument is restricted Emergency login users cannot view or pe...
Page 32: ...k button The device restarts automatically when you select the Back button System Information The System Information screen displays information about the software instrument and connections Setting O...
Page 33: ...e 2660021166131 Rev A 2018 11 Go to Contents Getting Started 3 11 General Settings Use the General Settings screen to configure general settings such as date and time format patient identification for...
Page 34: ...ame and ID or by ID only Patient ID issuer Identifies where the patient ID originates from Auto generate patient ID When this option is enabled the HFA3 automatically issues patient IDs for new patien...
Page 35: ...atterns on page 4 22 Not available for Model 830 Import Import patient tests from a shared network folder or USB storage device See Import Tests on page 6 5 HFA Data Transfer Transfer patient data fro...
Page 36: ...rent Flagged Match Different Match Separate Patients Match Different Different Separate Patients Different Match Match Separate Patients Different Match Different Separate Patients Different Different...
Page 37: ...n audible signal On Off at the beginning of test Successful Event Toggle signal On Off for a successful event Alert Warning Toggle signal On Off for an alert or warning Patient Switch Toggle signal On...
Page 38: ...850 and 860 Enables the RelEYE feature which records an image of the eye each time a stimulus is presented during a Threshold SITA Standard Suprathreshold Central 76 or Esterman Monocular test Auto Pu...
Page 39: ...18 11 Go to Contents Getting Started 3 17 Default Reports Settings Option Description Default Reports Under Default Reports for Printing or Saving set the desired GPA Qualified SFA Qualified and the K...
Page 40: ...u to choose output default Report Export File Type Set the default format for reports that are exported Note that DICOM OPV format is supported only for SFA Three In One Suprathreshold and Numeric rep...
Page 41: ...If the DHCP Dynamic Host Configuration Protocol is enabled the Host name IP address Subnet Gateway and DNS are filled in automatically and cannot be edited DHCP Disabled If the DHCP is disabled you ca...
Page 42: ...y a green check mark Reconnect Attempts to reconnect to the highlighted network drive Unmap Removes the highlighted network connection Map Opens a dialog for connecting to a network drive Requests a n...
Page 43: ...an automatic backup when shutting down Browse Click on Browse to set the storage path Backup Now Click on Backup Now to start the data backup Data Restore Restore set target path Click on Browse to s...
Page 44: ...n to configure security settings and add delete or modify user accounts Audit trail and log files Export audit trails Click on Export to open the dialogue requesting you to select a folder Export all...
Page 45: ...ete User Change Password To change a password highlight the user and click on Change Password Next screen asks you to fill in a new password to repeat the new password and click on Reset password HFA3...
Page 46: ...nse Activation Enter the Activation ID and click on Create request file or Import response file to open the dialogue Online License Activation Enter the Activation ID and click on Activate License Sup...
Page 47: ...e displayed at the bottom of the screen and can be used to print view export patient tests and test reports See Chapter 6 Data Tests Reports The Reports and Tests button are not displayed if data are...
Page 48: ...ttings on page 3 11 The patient is identified in the device by ID and DOB If the HFA3 is connected to FORUM the new patient is saved to the FORUM archive if data export has been enabled For EMR system...
Page 49: ...t the text box to view an error message Previously entered prescription values will appear automatically The HFA3 automatically calculates and displays Trial Lens values You can manually override the...
Page 50: ...Touch or click the to close the text box Select Test Parameters To change the parameters of a test scroll down on the screen and touch or click on the Test Parameters menu to view the current setting...
Page 51: ...to adapt to the yellow bowl for about three 3 minutes before testing A reminder will display to retract the visor when the test is complete Set up Patient for Testing To use manual trial lenses follow...
Page 52: ...e Live Eye monitor located on the left of the screen to move the chin rest back up to the approximate desired location for the patient Use Manual Trial Lenses To insert lenses into the manual trial le...
Page 53: ...n the left 3 Adjust chin rest to center eye monitor between patient s eyes Note You will not be able to monitor the patient s fixation during the Binocular test Position the Patient To facilitate pati...
Page 54: ...light is in focus If the fixation light is out of focus you may need to adjust the refractive correction Note The HFA3 saves the last chin rest position for each patient eye for a particular patient a...
Page 55: ...to look at the center of the lower diamond of fixation lights and press the response button whenever they see a light inside of the diamond 3 Select Start Foveal Threshold When Foveal Threshold is co...
Page 56: ...age 3 13 the pupil diameter will display with an asterisk To proceed with the test without Gaze Tracking select Skip Gaze Initialization If Head Tracking or Vertex Monitoring are on a pop up menu will...
Page 57: ...3 to set the default display Reliability Indices The reliability indices are displayed on the right side of the monitoring screen The types of indices displayed depends on test type and settings used...
Page 58: ...rn Off Vertex Monitoring if enabled Note Disabling Gaze Tracking will turn off Head Tracking and Vertex Monitoring if enabled Confirm or cancel your choice Note See the feature Note on page 4 4 Test S...
Page 59: ...with the patient exam data to FORUM When the instrument is in local database mode RelEye images can only be viewed during and directly at the end of a test prior to selecting Review Results see page R...
Page 60: ...the next screen select Review Results to view test results restart the test or cancel the test Note To cancel the entire test including results from the first eye you will need to manually delete the...
Page 61: ...on page 4 3 Select Eye Next to Perform test on select from the drop down menu which eye to test OD Right OS Left or Both default Next to Start with select from the drop down menu with which eye OD or...
Page 62: ...the test pattern with labeled meridians and radii Stimulus Value A maximum of 10 different types of stimuli can be used per test Each stimulus type is identified by a unique icon When three or more m...
Page 63: ...s and you choose to use a trial lens it is suggested you use manual trial lenses not the Liquid Trial Lens Test Mode Touch on a selection to change from one test mode to another Meridian Static Point...
Page 64: ...point 5 The stimulus immediately begins to move down the line to the center 6 The point along the line at which the patient responds is displayed by an icon Point to Point Mode While the Point to Poi...
Page 65: ...rop down menu becomes the Pattern drop down menu the visual field automatically zooms to 30 degrees 30 stimulus speed is automatically set to 2 degrees 2 sec speed and the scan radius is set to 10 deg...
Page 66: ...ng or end the test Note To cancel the entire test manually delete the results from the first eye See Delete Tests on page 6 4 to do this on the instrument If the instrument is set up to export data to...
Page 67: ...g the line to the center Coordinates are displayed above the test pattern C Select Pause to stop the test and choose from the following options Select Restart Test to delete current test responses and...
Page 68: ...t OK The next screen displays the following features Test Field Create test points by directly touching or clicking on the test field X Y values are displayed to the right Test Pattern Select either S...
Page 69: ...4 Confirm that you have entered all the points for the test 5 Place cursor in the text box and enter a name for the pattern 6 Select Save to save the pattern Select Cancel to cancel the pattern The c...
Page 70: ...pe 3 Select the Reports desired for the new test profile 4 Enter a name and select Save to add the new test profile to the list located on the left hand side of the screen Note To make a test the defa...
Page 71: ...a new value Press Enter to accept the value and move cursor to the next value box The Trial Lens AutoTLC value is automatically calculated based on the Distance Prescription and the patient s age The...
Page 72: ...t or Both Default is both 5 To add notes select Add Note 6 Change the default Reports by selecting or deselecting one or more Reports from the drop down menu 7 Enter IOP intraocular pressure and Visua...
Page 73: ...M and Bengtsson B 2012 Effective Perimetry Fourth Edition Carl Zeiss Meditec Inc 4 Touch the center of the pupil indicated by a red X when not centered to the lens in the Live Eye monitor or use the...
Page 74: ...tart Foveal Threshold 3 To proceed without this test select Skip Foveal Threshold Perform Gaze Initialization if selected 1 Make sure to adjust the eye position before you initialize 2 Read the on scr...
Page 75: ...image or you can use the chin rest direction controls on the instrument to manually move the chin rest It is recommended to leave the function Head Tracking ON and let the machine center The progress...
Page 76: ...add comments to the exam Change the output of Reports Select Save and Exit A confirmation message will display when exam data is saved 1 Selected Reports will be automatically printed and or exported...
Page 77: ...xported to the server archive if data export has been enabled FORUM Test Database setting On under the Report Output settings If the connection fails data are saved to the instrument and export contin...
Page 78: ...to a USB device or network location A data transfer summary screen will appear with details of the export process Save Reports Manually You can use the following procedure to save test reports to a US...
Page 79: ...s to generate reports Select Reports Once the desired tests are highlighted click on Select Reports A menu appears at the top with the following choices the choices vary depending on the kind of tests...
Page 80: ...he queued reports will print Select the printer icon displayed at the top of the screen to display the status of the print job Selecting the Cancel button in the Print dialog box will not cancel the p...
Page 81: ...t a patient and select the Reports button at the bottom of the Patient screen 2 In the following screen tests for the patient will be listed displaying Date Time Eye Parameters View and GPA Reliabilit...
Page 82: ...l patient record 5 Enter a reason for merging patient data and select Merge again Where there are conflicts between an imported patient record and a local record the local record is overwritten Delete...
Page 83: ...and the two previous Follow up tests and the GPA Alert See Numerical and Graphical GPA Plots on page 6 13 for further details Full GPA GPA GPA assists with detection of glaucoma progression Full GPA i...
Page 84: ...Contents 6 8 c SKN p c dm Epc dm F 2 1 3 4 5 6 7 8 9 10 11 1 Patient Data 4 Glaucoma Hemifield Test 7 Grayscale Results 10 Probability Symbols 2 Test and Report Type 5 Global Indices 8 GPA Informatio...
Page 85: ...ch test display Grayscale Numeric Total Deviation and Pattern Deviation Plots along with test date GHT and indices If available visual acuity and pupil size are located at the upper right of each Patt...
Page 86: ...PA Baseline tests along with key indices The VFI Plot and VFI Bar are located in the center of the page Results for the current visual field test are shown at the bottom of the report including the Gr...
Page 87: ...ssion Analysis key indices and the GPA alert The GPA Last Three Follow Up Report follows the same format but includes only the three most recent Follow up tests Three in One Report If threshold test p...
Page 88: ...s and the message Excessive High False Positives Otherwise the message Low Test Reliability is displayed on SITA test reports if Fixation Losses are 20 For non SITA tests the same message will display...
Page 89: ...the patient s measured field departs from the normal age corrected reference field P values are given to significant deviations Short term fluctuation SF SF is used with Full Threshold and FastPac te...
Page 90: ...lots are not shown for severely depressed visual fields MD less than or equal to 20 dB VFI Plot The VFI Plot graphs the VFI values of all tests included in GPA analysis as a function of the patient s...
Page 91: ...ts The type of test and test parameters are printed at the top of the report along with the patient data test date and test time Figure 6 5 Suprathreshold reports include the reliability indices see R...
Page 92: ...The Kinetic full field report shows all isopters mapped out to the periphery Some points may be hidden if they are too close together as is likely in the central 30 degrees of the full field The 30 d...
Page 93: ...nes However points that define the borders of a blind spot are not connected to each other Occasionally an isopter point will appear on the report that is not connected to other isopter points This si...
Page 94: ...HFA3 Instructions for Use 2660021166131 Rev A 2018 11 Data Tests Reports Go to Contents 6 18...
Page 95: ...ectivity Note Consult an IT System or DICOM EMR network administrator for help in entering correct configuration information For assistance in the U S call ZEISS at 800 341 6968 Outside the U S contac...
Page 96: ...cally assign an IP address to the instrument 4 If the network uses static IP addresses contact a network administrator to have the HFA3 added or set DHCP to Disabled and fill in the IP Address Subnet...
Page 97: ...A3 instrument to a DICOM EMR system including FORUM Once connected the instrument can display a list of patients who are scheduled for visual field exams from a worklist When a patient is selected fro...
Page 98: ...lete DICOM solution includes the following steps 1 DICOM Server Setup Set up the DICOM storage to recognize the AE titles of the instruments that will be connecting to the server Please consult your D...
Page 99: ...Settings 1 Select Settings Specific settings Report Output 2 In the End of Test Settings screen go to DICOM Output turn On FORUM Test Database to enable archiving to FORUM and subsequent deletion of...
Page 100: ...dy existing FTP File Transfer Protocol folder A Select FTP from the Folder drop down menu B Enter the FTP server address in FTP Server Begin the address with ftp Do not enter a backslash at the end or...
Page 101: ...ill appear if the connection is successful 8 Do not change the default values under Specific settings Enabled services display a check mark to the left Troubleshooting the Connection If the connection...
Page 102: ...return to the previous screen C Select Wireless Direct to access the Wireless Direct Settings Select On D Set Security to On E Select Security Passcode and record the printer passcode visible on the...
Page 103: ...ter a server path or select Browse again to search for a printer Once IP address is entered select Test to test the printer connection A green check mark will appear if the connection is good Paper si...
Page 104: ...in and log into the instrument as Administrator 4 Select Settings Network and note the HFA3 IP address The IP address should be in the range of 169 254 1 0 169 254 1 255 if the instrument has not pre...
Page 105: ...surfaces Never spray the cleaner directly on the exterior surfaces Bowl Please review the two cautionary Notes that follow this table Dust cloth Distilled water 70 Isopropyl alcohol in H2O Rubbing alc...
Page 106: ...tec Parts Department and order a Fan Filter PN 2660021149222 3 Return the new air filter or the clean and dry air filter to its proper location 4 Close and latch the air filter cover Replacing the Sti...
Page 107: ...portion of the lamp wipe the lamp clean with a soft cloth 6 Slide plate back into position tighten screw and replace connector cable 7 To replace the top access panel insert the panel into the openin...
Page 108: ...herical correction See Enter Distance Prescription and Trial Lens Data Optional on page 4 3 The full range of the Liquid Trial Lens is 8 00 to 8 00 D 3 Wait 5 seconds for the Liquid Trial Lens to posi...
Page 109: ...ories and Supplies List Note Item part numbers and descriptions are subject to change To order parts call ZEISS Customer Care at 1 800 341 6968 Outside the U S contact your local ZEISS distributor Par...
Page 110: ...Maintenance Go to Contents HFA3 Instructions for Use 2660021166131 Rev A 2018 11 8 6...
Page 111: ...onnected mode Set Up a Serial Transfer from an HFA II or HFA II i To set up a data transfer from an HFA II or HFA II i 1 Go to Settings Specific Settings HFA Data Transfer 2 Follow the detailed instru...
Page 112: ...ferences are due to retested points not being displayed on the HFA3 Name Splitting When patient records created in HFA II or HFA II i software versions before 5 0 are transferred to the HFA3 the entir...
Page 113: ...rnal database or software is required HFA3 instruments synchronize the test database HFA II i only contributes new tests to the HFA3 database which is then synchronized with other HFA3 instruments All...
Page 114: ...i cannot be used during software upgrade Upgrade all the HFA3 to version 1 5 and connect to the same network 0 5 1 hour HFA3 cannot be used during software upgrade Configure HFA II i to Data Synchroni...
Page 115: ...he Synchronization function is only available through the Service login 3 Select Settings Select Settings Service Go to Synchronization Start Stop Synchronization select Enabled Click on Back The circ...
Page 116: ...is changed you will need to restart the instrument to take affect Perform the same set up process on all HFA3 instruments that are to be synchronized Available Instruments shows the HFA3 instruments d...
Page 117: ...st data is synchronized and available to all instruments When new tests are run they are automatically synchronized between HFA3 instruments The duplicate record screen is automatically performed You...
Page 118: ...each HFA II i More than one HFA II i can be connected to one HFA3 If there are two or more HFA3 instruments choose one to connect the HFA II i The HFA3 instruments are synchronized and include the HF...
Page 119: ...D Remove USB drive when backup is completed 2 On the HFA3 Go to Settings Specific Settings HFA II i Configuration Take the USB drive to the HFA3 Do the following steps A Insert USB drive into USB por...
Page 120: ...the HFA3 2 On the HFA II i Go to File Functions Transfer Tests Select A Source Hard Drive B Destination DICOM Archive C Export Format Exam data D Current Range All files E Proceed F Enter G Select All...
Page 121: ...ction Data backup on Shutdown Use the slider to Enable or Disable the data backup It is strongly encouraged to set up the backup by enabling and setting a path to a back up location Backup set storage...
Page 122: ...he drive where backup files are located Backup list The most current backup is listed by date and time To restore the database refer to Restoring the Database To restore the database 1 Browse to selec...
Page 123: ...stem Windows 7 or 10 64 bit Intel Core i7 610E Internal storage 500 GB 6 external USB ports Type A USB 2 0 specification Ethernet Port 4KV isolated GbE DisplayPort video output 12V power outlet USB Ke...
Page 124: ...ature 10 to 40 C Relative Humidity 30 to 90 excluding condensation Atmospheric Pressure 700 to 1060 hPa Altitude Up to 3000 m above sea level Max wet bulb 78 F 26 C WARNING If any part of the system i...
Page 125: ...ested Number of Points Tested Application Central 30 2 30 degrees 76 point grid Glaucoma retinal neurological general Central 24 2 24 degrees 54 point grid Glaucoma general neurological Central 10 2 1...
Page 126: ...Test Patterns Parameters Go to Contents HFA3 Instructions for Use 2660021166131 Rev A 2018 11 A 2 c JP NMJO q m c JQ OQJO q m I o b c JR m SMJQ q m I o b c JS j q m c JT k p q m I o b...
Page 127: ...Full Field 81 Point 55 degrees 81 points General retinal glaucoma neurological Full Field 120 Point 55 degrees 120 points General retinal glaucoma neurological Full Field 135 Point 87 degrees 135 poin...
Page 128: ...tents HFA3 Instructions for Use 2660021166131 Rev A 2018 11 A 4 Suprathreshold Test Pattern Diagrams c JU QMJm q m I o b c JV SQJm q m I o b c JNM TSJm q m I o b This is the same pattern as the 30 2 T...
Page 129: ...HFA3 Instructions for Use 2660021166131 Rev A 2018 11 Go to Contents Test Patterns Parameters A 5 c JNO q m I o b c JNP c c q m I o b c JNQ k p q m I o b c JNR m SM q m I o b...
Page 130: ...Test Patterns Parameters Go to Contents HFA3 Instructions for Use 2660021166131 Rev A 2018 11 A 6 c JNS c c UN q m I o b c JNT c c NOM q m I o b c JNU c c NPR q m I o b c JNV c c OQS q m I o b...
Page 131: ...HFA3 Instructions for Use 2660021166131 Rev A 2018 11 Go to Contents Test Patterns Parameters A 7 c JOM p PS q m I o b c JON p SQ q m I o b c JOO b j q m I o b c JOP b _ q m...
Page 132: ...test pattern Full Threshold The test strategy used prior to the adoption of SITA Use with all Threshold test patterns In Full Threshold testing an initial stimulus is presented at a level the patient...
Page 133: ...igned to the patient based on the patient s age Age Corrected mode is used only with Size III White stimuli and can be used with all Suprathreshold test patterns except the Esterman tests Threshold Re...
Page 134: ...Diamond The Small Diamond is located below the Central target and should be used when a patient cannot see the central fixation light e g macular degeneration The patient should look in the center of...
Page 135: ...them prior to beginning testing Many 30 40 year olds may not need the full trial lens correction How to Calculate the Spherical Equivalent The spherical equivalent is equal to half of the power of the...
Page 136: ...needed No trial lens needed No trial lens needed No trial lens needed No trial lens needed Dist Rx 3 25 D for trial lens 40 44 1 00 D 0 50 D No trial lens needed No trial lens needed No trial lens nee...
Page 137: ...ppear on the HFA3 in response to certain issues Follow the directions stated in the alert text Alert Title Alert Text System Initialization Not Completed An unexpected error occurred during initializa...
Page 138: ...may be required Patient switch unplugged Verify switch is properly connected and reboot device If problem persists service may be required Patient switch not functioning Replace patient switch Test In...
Page 139: ...ngs on page 3 11 System hangs during printer configuration Invalid printer name or IP address entered Press the Esc button on the keyboard to exit the locked printer setup screen or restart the instru...
Page 140: ...eyelid ask patient to open eye wider during initialization Interfering eyelashes ask patient to open eye wider during initialization Small pupils Excessive eye movement or blinking Excessively large...
Page 141: ...test pattern used Choose a 24 2 Threshold test then turn Blue Yellow on Grayscale looks very dark May be normal for Blue Yellow The eye is less sensitive to the blue stimulus Gray scale is the same on...
Page 142: ...gs are incorrect Tests missing after data transfer Tests were ineligible to be transferred See Set Up a Serial Transfer from an HFA II or HFA II i on page 9 1 Data transfer to file server does not wor...
Page 143: ...eiss Meditec Inc ZEISS BY INSTALLING NEW SOFTWARE ON YOUR EXISTING HFA3 OR BY CREATING DATA ON A NEW HFA3 THAT ALREADY CONTAINS NEW SOFTWARE YOU ALSO AGREE TO BE BOUND BY THIS AGREEMENT IF YOU DO NOT...
Page 144: ...aw and then only after You have notified ZEISS in writing of Your intended activities disassemble or decompile the Software including but not limited to review of data structures or similar materials...
Page 145: ...Software with the applicable software package as set forth in the terms and conditions under which such software is licensed To the extent that the terms and conditions of such license are inconsisten...
Page 146: ...ity for damages hereunder exceed the amounts actually paid by You to ZEISS for HFA3 The parties acknowledge that the limitation of liability in this Section 5 and in the other provisions of this Agree...
Page 147: ...Software or any direct product thereof to any destination person or entity restricted or prohibited by the Export Controls 7 8 Use Restriction The Software including any integrated Third Party Softwa...
Page 148: ...ermission is hereby granted free of charge to any person obtaining a copy of this software and associated documentation files the OTS Software to deal in the OTS Software without restriction including...
Page 149: ...written permission THIS SOFTWARE IS PROVIDED BY COPYRIGHT HOLDER AS IS AND ANY EXPRESS OR IMPLIED WARRANTIES INCLUDING BUT NOT LIMITED TO THE IMPLIED WARRANTIES OF MERCHANTABILITY AND FITNESS FOR A P...
Page 150: ...ods or services loss of use data or profits or business interruption however caused and on any theory of liability whether in contract strict liability or tort including negligence or otherwise arisin...
Page 151: ...under sections 3 and 4 of this License without being bound by section 3 of the GNU GPL 2 Conveying Modified Versions If you modify a copy of the Library and in your modifications a facility refers to...
Page 152: ...ersion to produce a modified Combined Work in the manner specified by section 6 of the GNU GPL for conveying Corresponding Source 1 Use a suitable shared library mechanism for linking with the Library...
Page 153: ...etail to address new problems or concerns Each version is given a distinguishing version number If the Library as you received it specifies that a certain numbered version of the GNU Lesser General Pu...
Page 154: ...e such programs subject to the terms of the Agreement If You decide to use the additional programs after the thirty 30 day trial period You must obtain a license for such programs from ZEISS If You de...
Page 155: ......
Page 156: ...c Inc 5160 Hacienda Drive Dublin CA 94568 USA Toll Free 1 800 341 6968 Phone 1 925 557 4100 Fax 1 925 557 4101 info meditec us zeiss com www zeiss com med Carl Zeiss Meditec AG Goeschwitzer Strasse 51...