background image


DOC-USR-0135-01


___________________________________________________________________________________________


Z3 Technology, LLC 

 100 N 8

th

 ST, STE 250 

 Lincoln, NE 68508-1369 USA 

 +1.402.323.0702


51


(7)


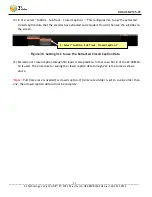
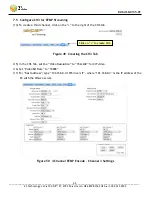
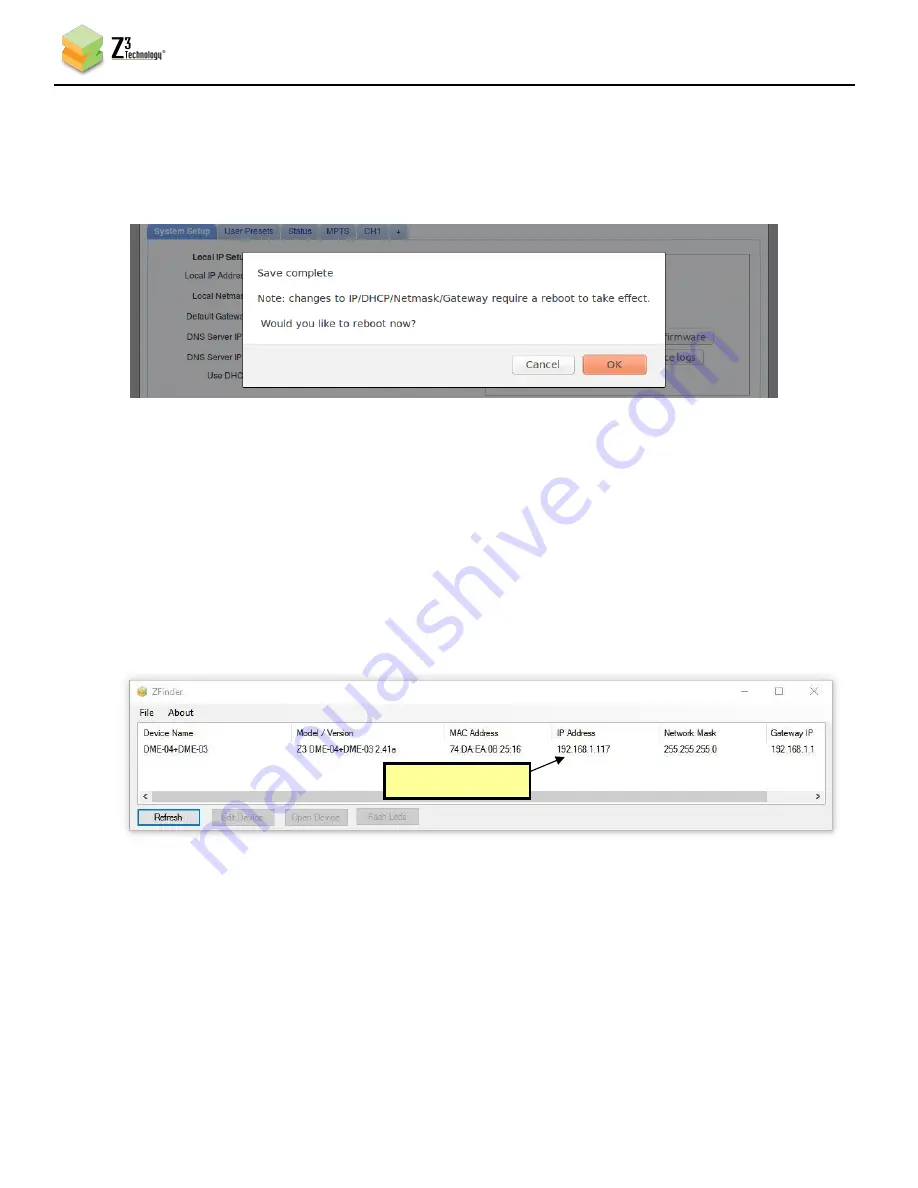
When you do this, a window pops up reminding the user that, for changes to IP Address/Netmask/ 

Gateway to take effect, a reboot is required and asking if a reboot is desired. Click “Ok” (and 
then “Ok” to the “Are you sure?” window after that) to start rebooting.


*

Note

:  

The very first time settings are saved it may take up to 30 seconds. This is due to some 

flash initialization which occurs on the very first configuration save.


8.2.4


Open the GUI Using ZFinder


(8)


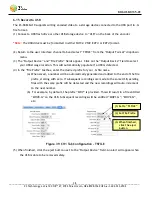
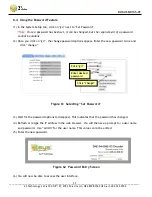
Run the “ZFinder” PC Utility on your Windows PC. The ZFinder window appears. ZFinder does a scan 

of the network and lists the location of all Z3 systems connected to the network. The Z3-SBE264-
10 appears with your manually entered IP address.


(9)


Select the Z3-SBE264-10 and then click “Open Device.”    


Figure 58  ZFinder with Z3-SBE264-10 DHCP Address


(10)


A web browser will then open at the IP address of the Z3-SBE264-10, and you will see the HTTP-

based user interface.


(11)


You can return to the use of DHCP by checking “Use DHCP” in the System Setup tab and saving that 

to the preset.  


8.2.5


Open the GUI Manually


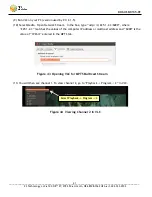
(12)


You can also access the GUI by manually typing your unit’s static IP address into a web browser.


New IP address


Figure 57  Reboot Reminder for Changing IP Settings


Summary of Contents for Z3-SBE264-10

Page 1: ...Z3 Technology LLC Z3 This document may not be used reproduced disclosed or disseminated to anyone without the prior written approval of an authorized representative of Z3 Z3 reserves the right to chan...

Page 2: ...______________________________________________________________________ Z3 Technology LLC 100 N 8th ST STE 250 Lincoln NE 68508 1369 USA 1 402 323 0702 2 REVISION HISTORY Version Date Change Note Autho...

Page 3: ...4 Configure Channel 1 Encode and UDP Streaming 14 6 5 Run VLC to View UDP Stream 16 6 6 Streaming RTP or RTSP 17 6 7 Run VLC to View RTSP Stream 17 6 8 Streaming RTMP 19 6 9 Changing the Bitrate Dyna...

Page 4: ...Z3 SBE264 10 48 8 1 Saving Current Settings 48 8 2 Using a Static IP Address 50 8 3 Making a Firmware Update 52 8 4 Using the Password Feature 53 9 0 SUMMARY OF OPTIONS 54 9 1 The System Setup Tab 54...

Page 5: ...n RTMP Streaming to the Wowza Streaming Engine 19 Figure 15 Getting to the Wowza Test Player 20 Figure 16 Viewing Content on Wowza 21 Figure 17 YouTube Live Dashboard Encoder Setup 22 Figure 18 CH1 Ta...

Page 6: ...1 to 3 Ch Mode 42 Figure 46 3 Channel RTMP Encode Channel 1 Settings 43 Figure 47 Creating the CH2 Tab 44 Figure 48 3 Channel RTMP Encode Channel 2 Settings 44 Figure 49 Creating the CH3 Tab 45 Figure...

Page 7: ...allows users to quickly stream video from any of those three sources to the web or internal clients PCs via UDP RTP RTSP or RTMP This solution is ideal for applications such as low cost broadcast enco...

Page 8: ...stream For encoding from HDMI or composite a second channel needs to be created This is described in detail on page 33 Details on streaming RTMP and also on using the Encode 1 to 3 Ch mode which allo...

Page 9: ...E 250 Lincoln NE 68508 1369 USA 1 402 323 0702 9 3 0 PACKAGE CONTENTS Z3 SBE264 10 5V Power Supply HDMI Cable Composite Adapter Cable Serial Cable Gender Changer BNC to BNC Cable Note The serial cable...

Page 10: ...for local storage HTTP based configuration software for user friendly configuration and control RS 232 serial port for technical configuration and control Operating Temp 0 to 60 degrees C at 20 80 rel...

Page 11: ...___________________ Z3 Technology LLC 100 N 8th ST STE 250 Lincoln NE 68508 1369 USA 1 402 323 0702 11 5 0 OPERATING CONTROLS Figure 3 Operating Controls Labelled SDI In Ethernet HDMI Out A V In HDMI...

Page 12: ...are required Encoding with an HDMI or a composite source is described later in Section 6 13 Please Note Actual version numbers for your Z3 product may differ from those pictured in this document 6 1 S...

Page 13: ...hnology product on your network If you have not yet downloaded this to your computer you can find it on the USB drive provided with your system 5 Verify your PC is set to DHCP If it is set to a static...

Page 14: ...3 SBE264 10 enabling the action buttons at the bottom of the window Click Open Device to open the web interface for the selected device in your default web browser Z3 Strongly recommends the latest ve...

Page 15: ...on stop near the bottom of the screen The status will then change to STOPPED Then click on start Once you do this the status will change to RUNNING If the encoder hadn t started already simply click o...

Page 16: ...PC 15 Select Media Open Network Stream In the box type udp 192 168 0 6 5004 where 192 168 0 6 matches the values of the computer IP address or multicast address entered for Dest Address and 5004 is t...

Page 17: ...sent Note As RTSP operates through port 554 it is advised never to set the Dest Port field to 554 when RTP RTSP is selected 20 Click on start to start the RTP RTSP encoding session 6 7 Run VLC to Vie...

Page 18: ...g used For example rtsp IP_Address z3 1m mp4 If you are using a unicast address as we are in the example pictured omit the letter m after z3 1 in the address In this example the full network URL would...

Page 19: ...s used here as an example server for RTMP streaming 1 In the CH1 configuration tab click on stop to stop the current encoding session 2 Set Output Format to RTMP 3 For Dest Address type IP_Address por...

Page 20: ...eb browser in this example 192 168 0 4 8088 This will bring up the Wowza server User Interface Log in with your valid user name and password 8 Click on Applications and select the name of the app you...

Page 21: ...__________________________________________________________________ Z3 Technology LLC 100 N 8th ST STE 250 Lincoln NE 68508 1369 USA 1 402 323 0702 21 Figure 16 Viewing Content on Wowza 1 Select Adobe...

Page 22: ...interface CH1 tab and click on stop to stop the current encoding session 4 Set Output Format to RTMP 5 For Dest Address type server_url stream_key a server_url will be the value specified in your YouT...

Page 23: ...ouTube live dashboard 6 8 3 Facebook Live 1 If you haven t already ensure you have an active Facebook account and page if broadcasting for an organization 2 Point your browser to facebook s main URL f...

Page 24: ...ed on the left Figure 20 Facebook Live Streaming Dialog 4 Return to the Z3 SBE264 10 web interface and select the Ch1 tab Click Stop Ensure the Output Format is set to RTMP 5 Enter the Server URL minu...

Page 25: ...e Facebook Live Video Setting dialog box to ensure your stream is previewing properly Add a message to the video stream if desired and click Go Live at the bottom Your Stream is now active Figure 22 F...

Page 26: ...6 8 In VLC click on Tools and select Codec Information This brings up a window with four tabs Select the Statistics tab In this tab you can see the current video audio bitrate 9 In the CH1 screen chan...

Page 27: ...VLC change and the video bitrate drop 11 If you click on the status page and click Refresh you will also see the updated bitrate reflected The parameter Frame Rate Divider can also be updated dynamic...

Page 28: ...um of the video and audio bitrate For example the default value out of the factory is a value of 10Mbps corresponding to 8Mbps for the video There are times however when it is desirable to make this v...

Page 29: ...to start encoding 15 Open VLC to view your UDP stream Section 6 5 and view the Status tab Section 6 8 You will see a lower value for the overall input rate and for the content rate The value of TS Ra...

Page 30: ...n the Audio Info section set Enable to yes using the dropdown menu for each audio channel you desire 3 Using the dropdown menus for each enabled channel set Mode to a stereo for up to two audio channe...

Page 31: ...streaming using RTP will result in lower latency than streaming using TS If low latency with TS is desired there is a special TS lowlat mode that can be activated Setting this causes the TS muxer to s...

Page 32: ...2 32 6 Click Tools on the main menu and select Preferences from the dropdown Figure 31 VLC Media Player Tools Menu 7 In the Preferences window that appears change from show settings From Simple to All...

Page 33: ...e Composite In To encode with either HDMI or Composite In perform the following steps 8 Click on the CH2 tab If it is not there click on to generate this additional tab and then click on it 9 The chan...

Page 34: ...ology LLC 100 N 8th ST STE 250 Lincoln NE 68508 1369 USA 1 402 323 0702 34 11 Verify the Dest Port field is not the same port number currently entered in the CH1 tab 12 Click on start Figure 35 CH2 Ta...

Page 35: ...Caption Data The Z3 SBE264 10 supports extraction of closed caption data from Composite or SDI input This automatically occurs any time Composite or SDI input with closed caption data included is use...

Page 36: ..._______ Z3 Technology LLC 100 N 8th ST STE 250 Lincoln NE 68508 1369 USA 1 402 323 0702 36 3 Run VLC on your PC 4 Select Open Network Stream If the settings are those as shown in Figure 37 use the add...

Page 37: ...tracted and encoded You will then see the subtitles on the screen 6 Extraction of closed caption through SDI input is also possible In that case SDI In of the Z3 SBE264 10 is used The procedure for se...

Page 38: ...e field to select your USB storage location This will automatically populate if a USB is detected 4 In the File Prefix textbox enter the desired prefix for your ts file name a When saved a number will...

Page 39: ...er USB storage device to USB on the back of the encoder Note The USB drive must be formatted in either FAT32 VFAT EXT3 or EXT4 format 7 Connect and configure the encoder Output Format to output UDP Se...

Page 40: ...ce 2 Open the user interface See Section 6 3 3 In the CH1 tab change the Output Format for your SDI video source to MPTS 4 In the CH2 tab change the Output Format for your HDMI or composite video sour...

Page 41: ...used by Z3 2 1 5 10 Select Media Open Network Stream In the box type udp 225 1 2 3 6000 where 225 1 2 3 matches the values of the computer IP address or multicast address and 6000 is the value of IP...

Page 42: ...MP and ignore the sections referring to Wowza in this section Note that if multiple channels off the same input is done the total performance cannot exceed the capability of the Z3 SBE264 10 for examp...

Page 43: ...8508 1369 USA 1 402 323 0702 43 8 For Dest Address type 192 168 0 4 1935 live 720 where 192 168 0 4 is the IP address of the PC with the Wowza server 9 If necessary set Authentication to Enable and en...

Page 44: ...or RTMP Streaming 10 To create a second channel click on the to the right of the CH1 tab 11 In the CH2 Tab set the Video Resolution to 720x480 for D1 video 12 Set Video Bit Rate to 2000K 13 For Dest A...

Page 45: ...or RTMP Streaming 14 To create a third channel click on the to the right of the CH2 tab 15 In the CH3 Tab set the Video Resolution to 352x240 for CIF video 16 Set Video Bit Rate to 1000K 17 For Dest A...

Page 46: ...t the Encode 19 Click on start all at the bottom of any tab 7 8 View the Content on Wowza 20 Go to a PC that is on the same network as the Wowza server and open a web browser in this example FireFox i...

Page 47: ...ect the Adobe RTMP tab change the Stream name to 720 this value needs to exactly match one of the directories you are streaming to in the Z3 SBE264 10 and click Start You will then see the content str...

Page 48: ...d off and back on it automatically uses those settings 1 Click on the User Presets tab 2 Click on the new button 3 This brings up a text box to enter the new user preset name For this example type z3_...

Page 49: ...he Save button 9 A pop up window appears to confirm the saving of these settings is complete Click OK Note The very first time settings are saved may take up to 30 seconds This is due to some flash in...

Page 50: ...le by ZFinder To set your unit to a static IP address complete the following steps 1 The first step is to set up a custom configuration so that the manual networking setting is used the next time the...

Page 51: ...save 8 2 4 Open the GUI Using ZFinder 8 Run the ZFinder PC Utility on your Windows PC The ZFinder window appears ZFinder does a scan of the network and lists the location of all Z3 systems connected t...

Page 52: ...you to the update image screen In this screen click on Browse 4 This brings you to the File Selection Screen From here select the name of the img file to update with and click Open The image file to...

Page 53: ...d cannot be undone 2 Once you click on go the change password options appear Enter the new password twice and click change 3 Wait for the password options to disappear This indicates that the password...

Page 54: ...168 a b 192 168 1 1 Sets the network gateway to use for the Z3 SBE264 10 Note that a save of these settings and a reboot is needed for changes to this value to take effect DNS Server IP 1 a b c d 8 8...

Page 55: ...8 1369 USA 1 402 323 0702 55 download device logs Clicking this causes the Z3 SBE264 10 to extract a set of diagnostic logs that can be sent to Z3 in the event of an issue to be reported This file is...

Page 56: ...ets 9 3 The Status Tab Note May take a few seconds to load after being clicked Output Value Explanation Video Status CH The channel number 1 2 or 3 Bitrate Kbps Current target bitrate of encoder Actua...

Page 57: ...econd for that input Refresh Refresh the current status values Auto Refresh If checked causes the values in the status tab to be refreshed automatically once every five seconds 9 4 The MPTS Tab Parame...

Page 58: ...hosen for CH1 16 9 Checked Unchecked For any SD resolutions NTSC PAL checking this forces the aspect ratio to be 16 9 in the output otherwise a default value of 4 3 is used This value is ignored for H...

Page 59: ...Progressive will convert the interlaced input to a progressive picture This can be used to improve quality if playing back on a PC player Progressive HQ activates a special high quality deinterlacer S...

Page 60: ...ng above 64Kbps is recommended for best results The bitrate range for AACHE is 32Kbps 64Kbps Bitrate 12Kbps 384Kbps 128Kbps The bitrate of the audio Mode Mono Stereo Select between stereo and mono inp...

Page 61: ...t forget to check the value of TS Rate to make sure it is in line with expectation TSRTP causes streaming of TS over RTP See Section 6 16 STREAMING RTMP IN THREE DIFFERENT RESOLUTIONS on page 39 for m...

Page 62: ...m PMT PID UDP Only 0 8191 31 PID assigned to PMT in the TS stream TS Rate UDP Only 125K 20000K 8000K The rate of the transport stream Normally this value should be set to 1 25 video bitrate audio bitr...

Page 63: ...n be used to quickly copy CH1 values to CH2 for example delete Used to delete excess tabs created by Clone status IDLE STOPPED RUNNING POLLING Current status of the encoder POLLING indicates start was...

Page 64: ...erial_menu Last value saved in GUI encoder factory default Factory defaults Can also add more profiles by clicking on new in the User Presets tab Save Click on this to save preset value to what was se...

Page 65: ...TMP streaming the following steps are needed 1 Log in to the Wowza Streaming Engine Manager Home page by typing http localhost 8088 where localhost is the IP address of the server in the pictured exam...

Page 66: ...ity Click Edit and then make sure RTMP Publishing and RTSP Publishing are both set to Open and Client Restrictions is set to No client restrictions Then click Save The Wowza server is now configured t...

Page 67: ...n Dest Port equal the value entered in the URL for VLC Was included in the UDP address for VLC Is the PC fast enough for 1080p decode on VLC Does the PC have enough DDR to handle 1080p decode on VLC I...

Reviews: