7-31
Starting system
Starting system
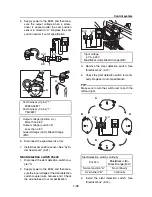
Fuse check
1.
Check the fuse for continuity. Replace if
there is no continuity.
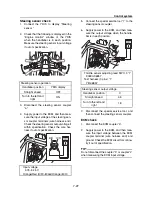
Handlebar switch (left) check
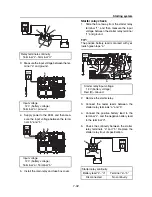
1.
Disconnect the handlebar switch (left) cou-
pler (white coupler).
2.
Check the engine start switch for continui-
ty. Replace the handlebar switch (left) if
out of specification.
3.
Connect the handlebar switch (left) cou-
pler (white coupler).
4.
Disconnect the handlebar switch (left) cou-
pler (black coupler).
5.
Check the engine stop switch for continui-
ty. Replace the handlebar switch (left) if
out of specification.
6.
Connect the handlebar switch (left) cou-
pler (black coupler).
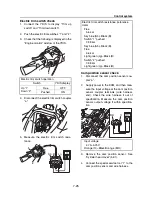
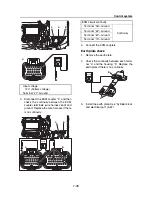
Main relay check
1.
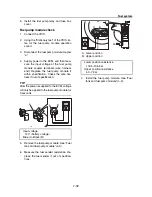
Remove the fuse box cover and main relay
“1”.
2.
Connect the positive battery lead to the
terminal “a”, and the negative battery lead
to the terminal “b”, and then check for con-
tinuity between the terminals “c” and “d”.
Replace the relay if there is no continuity.
Do not reverse the battery leads. Other-
wise, the relay may be seriously damaged.
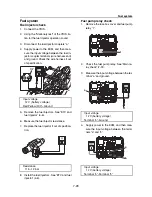
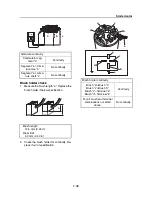
Engine start switch continuity
Clip “1”
Engine start
switch “2”
Red (R)–
Brown (Br)
Installed “A”
Free
No continuity
Pushed
Continuity
Removed
“B”
Free
No continuity
Pushed
No continuity
R
Br
1
2
A
B
2
Engine stop switch continuity
Clip “1”
Engine stop
switch “2”
White (W)–
Black (B)
Installed “A”
Free
No continuity
Pushed
Continuity
Removed
“B”
Free
Continuity
Pushed
Continuity
W
B
2
2
1
A
B
1
Summary of Contents for Waverunner VXS VX1800
Page 1: ...SERVICE MANUAL WaveRunner VXS VX1800 F2W VXR VX1800A F2W F2W 28197 ZU 11 ...
Page 12: ...How to use this manual 1 7 UP Upside YDIS Yamaha Diagnostic System Abbreviation Description ...
Page 40: ...Technical tips 1 35 MEMO ...
Page 163: ...Oil separator tank and oil pan 5 72 3 4 4 4 4 4 9 4 1 5 6 10 11 7 2 3 8 ...
Page 180: ...Crankcase connecting rod and piston 5 89 MEMO ...
Page 204: ...6 23 Intermediate housing Intermediate housing bolt 2 17 Nm 1 7 kgf m 12 5 ft lb 1 2 3 ...
Page 205: ...Intermediate housing 6 24 MEMO ...
Page 251: ...Indication system 7 44 MEMO ...
Page 278: ...8 25 Exhaust system 6 Install the band Rubber hose clamp 2 3 5 Nm 0 35 kgf m 2 58 ft lb ...
Page 290: ...Deck and hull 8 37 MEMO ...
Page 312: ...Engine unit troubleshooting 9 21 MEMO ...
Page 313: ...A Appendix Wiring diagram A 1 How to use the wiring diagram A 1 VXS VXR A 2 ...
Page 317: ......
Page 318: ...Mar 2015 CR E ...

