Crankcase, connecting rod, and piston
5-80
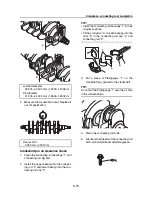
6.
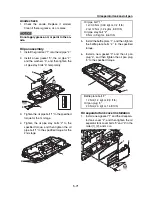
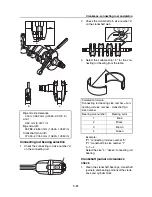
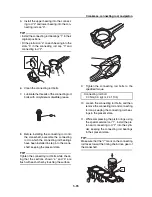
Before installing the connecting rod onto
the crankshaft, assemble the connecting
rod, which the connecting rod bearings
were installed in step 2, to the crankshaft
kept in the current condition.
TIP:
Tighten the connecting rod bolts while check-
ing that the sections shown “a” and “b” are
flush with each other by touching the surface.
7.
Tighten the connecting rod bolts to the
specified torque.
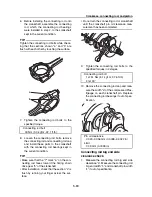
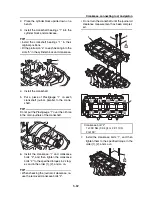
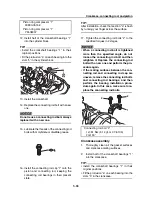
8.
Loosen the connecting rod bolts, remove
the connecting rod and connecting rod cap
and install these parts to the crankshaft
with the connecting rod bearings kept in
the current condition.
TIP:
• Make sure that the “Y” mark “a” on the con-
necting rod faces toward the timing chain
drive gear “b” of the crankshaft.
• After installation, check that the section “c” is
flush by running your finger across the sur-
face.
• Do not turn the connecting rod or crankshaft
until the crankshaft pin oil clearance mea-
surement has been completed.
9.
Tighten the connecting rod bolts to the
specified torques in 2 stages.
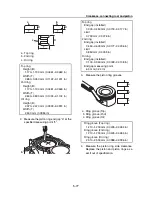
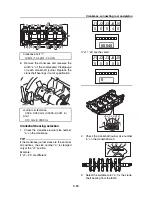
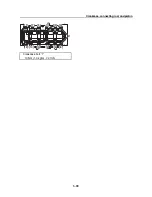
10. Remove the connecting rod cap and mea-
sure the width “a” of the compressed Plas-
tigauge on each crankshaft pin. Replace
the connecting rod bearings if out of spec-
ification.
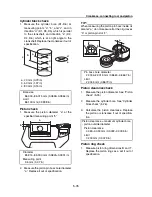
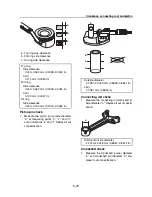
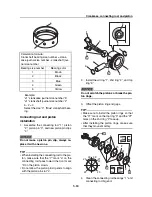
Connecting rod big end side
clearance check
1.
Measure the connecting rod big end side
clearance “a”. Measure the connecting rod
big end width “b” and crankshaft pin width
“c” if out of specification.
Connecting rod bolt
30 Nm (3.0 kgf·m, 22.1 ft·lb)
a
b
Connecting rod bolt
1st: 51 Nm (5.1 kgf·m, 37.6 ft·lb)
2nd: 90°
Pin oil clearance
0.020–0.056 mm (0.0008–0.0022 in)
Limit
0.09 mm (0.0035 in)
YH
c
b
a
a
Summary of Contents for Waverunner VXS VX1800
Page 1: ...SERVICE MANUAL WaveRunner VXS VX1800 F2W VXR VX1800A F2W F2W 28197 ZU 11 ...
Page 12: ...How to use this manual 1 7 UP Upside YDIS Yamaha Diagnostic System Abbreviation Description ...
Page 40: ...Technical tips 1 35 MEMO ...
Page 163: ...Oil separator tank and oil pan 5 72 3 4 4 4 4 4 9 4 1 5 6 10 11 7 2 3 8 ...
Page 180: ...Crankcase connecting rod and piston 5 89 MEMO ...
Page 204: ...6 23 Intermediate housing Intermediate housing bolt 2 17 Nm 1 7 kgf m 12 5 ft lb 1 2 3 ...
Page 205: ...Intermediate housing 6 24 MEMO ...
Page 251: ...Indication system 7 44 MEMO ...
Page 278: ...8 25 Exhaust system 6 Install the band Rubber hose clamp 2 3 5 Nm 0 35 kgf m 2 58 ft lb ...
Page 290: ...Deck and hull 8 37 MEMO ...
Page 312: ...Engine unit troubleshooting 9 21 MEMO ...
Page 313: ...A Appendix Wiring diagram A 1 How to use the wiring diagram A 1 VXS VXR A 2 ...
Page 317: ......
Page 318: ...Mar 2015 CR E ...

