FUEL INJECTION SYSTEM
8-69
4. Turn the main switch to “OFF” and back to
“ON”, then check that no fault code number is
displayed.
TIP
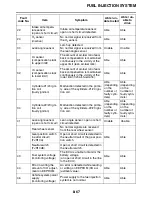
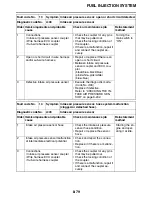
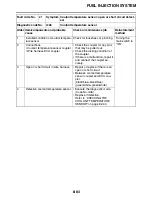
If fault codes are displayed, repeat steps (1) to
(4) until no fault code number is displayed.
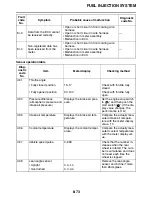
5. Erase the malfunction history in the diagnos-
tic mode. Refer to “Sensor operation table
(Diagnostic code No.d:62)”.
TIP
Turning the main switch to “OFF” will not erase
the malfunction history.
The engine operation is not normal but the
engine trouble warning light does not come
on.
1. Check the operation of following sensors and
actuators in the Diagnostic mode. Refer to
“Sensor operation table” and “Actuator oper-
ation table”.
If a malfunction is detected in the sensors or
actuators, repair or replace all faulty parts.
If no malfunction is detected in the sensors
and actuators, check and repair inner parts of
the engine.
EAS27410
DIAGNOSTIC MODE
Setting the diagnostic mode
1. Turn the main switch to “OFF”.
2. Disconnect the wire harness coupler from the fuel pump.
3. Simultaneously press and hold the “SELECT” and “RESET” buttons, turn the main switch to “ON”,
and continue to press the buttons for 8 seconds or more.
TIP
• All displays on the meter disappear except the odometer/tripmeter/fuel reserve tripmeter displays.
• “dIAG” appears on the odometer/tripmeter/fuel reserve tripmeter LCD.
4. Press the “SELECT” button to select the diagnostic mode “dIAG”.
5. After selecting “dIAG”, simultaneously press the “SELECT” and “RESET” buttons for 2 seconds or
more to activate the diagnostic mode. The diagnostic code number “d:01” appears on the clock LCD.
6. Select the diagnostic code number corresponding to the fault code number by pressing the “SE-
LECT” and “RESET” buttons.
TIP
• To decrease the selected diagnostic code number, press the “RESET” button. Press the “RESET”
button for 1 second or longer to automatically decrease the diagnostic code numbers.
• To increase the selected diagnostic code number, press the “SELECT” button. Press the “SELECT”
button for 1 second or longer to automatically increase the diagnostic code numbers.
d:01: Throttle position sensor (throttle angle)
d:30: Cylinders-#1/#4 ignition coil
d:31: Cylinders-#2/#3 ignition coil
d:36: Injector #1
d:37: Injector #2
d:38: Injector #3
d:39: Injector #4
d:48: Air induction system solenoid
“SELECT”
“RESET”
Summary of Contents for FJR13AY 2009
Page 1: ...2009 SERVICE MANUAL FJR13AY C FJR13AEY C LIT 11616 22 73 3P6 28197 12 ...
Page 6: ......
Page 8: ......
Page 80: ...LUBRICATION SYSTEM CHART AND DIAGRAMS 2 31 EAS20410 LUBRICATION DIAGRAMS 5 6 7 1 2 3 4 ...
Page 82: ...LUBRICATION SYSTEM CHART AND DIAGRAMS 2 33 1 3 2 ...
Page 83: ...LUBRICATION SYSTEM CHART AND DIAGRAMS 2 34 1 Main axle 2 Drive axle 3 Oil delivery pipe 1 ...
Page 84: ...LUBRICATION SYSTEM CHART AND DIAGRAMS 2 35 6 5 4 3 2 1 ...
Page 86: ...LUBRICATION SYSTEM CHART AND DIAGRAMS 2 37 1 2 3 4 5 6 7 8 9 ...
Page 88: ...LUBRICATION SYSTEM CHART AND DIAGRAMS 2 39 4 5 3 2 1 9 8 6 7 ...
Page 92: ...COOLING SYSTEM DIAGRAMS 2 43 A A 7 1 2 3 4 5 5 7 8 6 8 9 10 11 12 ...
Page 98: ...CABLE ROUTING FJR13A 2 49 2 3 4 5 6 7 8 9 11 10 12 13 14 15 16 A B C D E F 1 1 ...
Page 100: ...CABLE ROUTING FJR13A 2 51 1 2 3 4 5 6 7 8 A B C D E 9 10 11 12 13 ...
Page 108: ...CABLE ROUTING FJR13A 2 59 1 2 3 4 A B B C D E ...
Page 110: ...CABLE ROUTING FJR13A 2 61 A 1 A A B P O C D E F G H I J K L M N 2 3 4 5 6 7 8 9 10 A 11 ...
Page 118: ...CABLE ROUTING FJR13AE 2 69 2 3 4 5 6 7 8 9 11 12 13 14 15 16 17 A B C E D F 1 1 H 10 18 G ...
Page 120: ...CABLE ROUTING FJR13AE 2 71 1 2 3 4 5 6 7 8 A B C D E 9 10 11 12 13 ...
Page 128: ...CABLE ROUTING FJR13AE 2 79 1 4 2 5 6 A B C D D E 3 F G ...
Page 130: ...CABLE ROUTING FJR13AE 2 81 A 1 A A B P O C D E F G H I J K L M N 2 3 4 5 6 7 8 9 10 A 11 ...
Page 134: ...CABLE ROUTING FJR13AE 2 85 ...
Page 137: ......
Page 196: ...GENERAL CHASSIS 4 11 b a 1 2 ...
Page 302: ...SHAFT DRIVE 4 117 ...
Page 326: ...CAMSHAFTS 5 21 ...
Page 424: ...CONNECTING RODS AND PISTONS 5 119 ...
Page 462: ...WATER PUMP 6 15 ...
Page 473: ...THROTTLE BODIES 7 10 ...
Page 474: ...AIR INDUCTION SYSTEM 7 11 EAS27040 AIR INDUCTION SYSTEM 1 2 3 4 5 1 1 1 1 2 2 5 2 3 3 4 7 8 6 ...
Page 483: ......
Page 495: ...IGNITION SYSTEM 8 12 ...
Page 511: ...ELECTRIC STARTING SYSTEM 8 28 ...
Page 513: ...CHARGING SYSTEM 8 30 2 Rectifier regulator 3 AC magneto 8 Main fuse 10 Battery ...
Page 515: ...CHARGING SYSTEM 8 32 ...
Page 539: ...COOLING SYSTEM 8 56 ...
Page 587: ...FUEL PUMP SYSTEM 8 104 ...
Page 599: ...ACCESSORY BOX SYSTEM 8 116 ...
Page 609: ...ABS ANTI LOCK BRAKE SYSTEM 8 126 ...
Page 698: ...ELECTRICAL COMPONENTS 8 215 FJR13A 5 1 3 2 17 8 10 11 12 13 14 15 16 7 6 4 9 ...
Page 700: ...ELECTRICAL COMPONENTS 8 217 FJR13AE 13 16 18 17 2 3 4 5 6 7 8 1 9 10 11 12 15 14 19 ...
Page 702: ...ELECTRICAL COMPONENTS 8 219 FJR13AE 1 19 3 2 5 7 9 8 12 13 14 15 16 11 10 18 17 6 4 ...
Page 730: ...ELECTRICAL COMPONENTS 8 247 ...
Page 739: ......
Page 740: ...YAMAHA MOTOR CO LTD 2500 SHINGAI IWATA SHIZUOKA JAPAN ...


