CHASSIS
3-31
EAS22780
BLEEDING THE HYDRAULIC BRAKE
SYSTEM (ABS)
WARNING
EWA14000
Always bleed the brake system when the
brake related parts are removed.
NOTICE
EC3P61012
• Bleed the brake system in the following or-
der.
• 1st step: Front brake calipers
• 2nd step: Right front brake caliper (unified
brake system)
• 3rd step: Rear brake caliper
WARNING
EW3P61010
Bleed the ABS whenever:
• the system is disassembled.
• a brake hose is loosened, disconnected, or
replaced.
• the brake fluid level is very low.
• brake operation is faulty.
TIP
• Be careful not to spill any brake fluid or allow
the brake master cylinder reservoir or brake
fluid reservoir to overflow.
• When bleeding the ABS, make sure that there
is always enough brake fluid before applying
the brake. Ignoring this precaution could allow
air to enter the ABS, considerably lengthening
the bleeding procedure.
• If bleeding is difficult, it may be necessary to let
the brake fluid settle for a few hours.
• Repeat the bleeding procedure when the tiny
bubbles in the hose have disappeared.
1. Remove:
• Right side cover
Refer to “GENERAL CHASSIS” on page 4-1.
2. Bleed:
• ABS
▼▼▼
▼
▼ ▼▼▼
▼
▼ ▼▼▼
▼
▼ ▼▼▼
▼
▼ ▼▼▼
▼
▼ ▼▼▼
▼
▼▼▼
a. Fill the brake master cylinder reservoir or
brake fluid reservoir to the proper level with
the recommended brake fluid.
b. Install the diaphragm (brake master cylinder
reservoir or brake fluid reservoir).
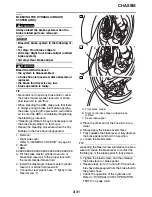
c. Connect a clear plastic hose “1” tightly to the
bleed screw “2”.
d. Place the other end of the hose into a con-
tainer.
e. Slowly apply the brake several times.
f. Fully squeeze the brake lever or fully depress
the brake pedal and hold it in position.
g. Loosen the bleed screw.
TIP
Loosening the bleed screw will release the pres-
sure and cause the brake lever to contact the
throttle grip or the brake pedal to fully extend.
h. Tighten the bleed screw, and then release
the brake lever or brake pedal.
i. Repeat steps (e) to (h) until all of the air bub-
bles have disappeared from the brake fluid in
the plastic hose.
j. Check the operation of the hydraulic unit.
Refer to “HYDRAULIC UNIT OPERATION
TESTS” on page 4-66.
A. Front brake caliper
B. Right front brake caliper (unified brake
system)
C. Rear brake caliper
2
1
A
2
1
B
2
1
C
Summary of Contents for FJR13AY 2009
Page 1: ...2009 SERVICE MANUAL FJR13AY C FJR13AEY C LIT 11616 22 73 3P6 28197 12 ...
Page 6: ......
Page 8: ......
Page 80: ...LUBRICATION SYSTEM CHART AND DIAGRAMS 2 31 EAS20410 LUBRICATION DIAGRAMS 5 6 7 1 2 3 4 ...
Page 82: ...LUBRICATION SYSTEM CHART AND DIAGRAMS 2 33 1 3 2 ...
Page 83: ...LUBRICATION SYSTEM CHART AND DIAGRAMS 2 34 1 Main axle 2 Drive axle 3 Oil delivery pipe 1 ...
Page 84: ...LUBRICATION SYSTEM CHART AND DIAGRAMS 2 35 6 5 4 3 2 1 ...
Page 86: ...LUBRICATION SYSTEM CHART AND DIAGRAMS 2 37 1 2 3 4 5 6 7 8 9 ...
Page 88: ...LUBRICATION SYSTEM CHART AND DIAGRAMS 2 39 4 5 3 2 1 9 8 6 7 ...
Page 92: ...COOLING SYSTEM DIAGRAMS 2 43 A A 7 1 2 3 4 5 5 7 8 6 8 9 10 11 12 ...
Page 98: ...CABLE ROUTING FJR13A 2 49 2 3 4 5 6 7 8 9 11 10 12 13 14 15 16 A B C D E F 1 1 ...
Page 100: ...CABLE ROUTING FJR13A 2 51 1 2 3 4 5 6 7 8 A B C D E 9 10 11 12 13 ...
Page 108: ...CABLE ROUTING FJR13A 2 59 1 2 3 4 A B B C D E ...
Page 110: ...CABLE ROUTING FJR13A 2 61 A 1 A A B P O C D E F G H I J K L M N 2 3 4 5 6 7 8 9 10 A 11 ...
Page 118: ...CABLE ROUTING FJR13AE 2 69 2 3 4 5 6 7 8 9 11 12 13 14 15 16 17 A B C E D F 1 1 H 10 18 G ...
Page 120: ...CABLE ROUTING FJR13AE 2 71 1 2 3 4 5 6 7 8 A B C D E 9 10 11 12 13 ...
Page 128: ...CABLE ROUTING FJR13AE 2 79 1 4 2 5 6 A B C D D E 3 F G ...
Page 130: ...CABLE ROUTING FJR13AE 2 81 A 1 A A B P O C D E F G H I J K L M N 2 3 4 5 6 7 8 9 10 A 11 ...
Page 134: ...CABLE ROUTING FJR13AE 2 85 ...
Page 137: ......
Page 196: ...GENERAL CHASSIS 4 11 b a 1 2 ...
Page 302: ...SHAFT DRIVE 4 117 ...
Page 326: ...CAMSHAFTS 5 21 ...
Page 424: ...CONNECTING RODS AND PISTONS 5 119 ...
Page 462: ...WATER PUMP 6 15 ...
Page 473: ...THROTTLE BODIES 7 10 ...
Page 474: ...AIR INDUCTION SYSTEM 7 11 EAS27040 AIR INDUCTION SYSTEM 1 2 3 4 5 1 1 1 1 2 2 5 2 3 3 4 7 8 6 ...
Page 483: ......
Page 495: ...IGNITION SYSTEM 8 12 ...
Page 511: ...ELECTRIC STARTING SYSTEM 8 28 ...
Page 513: ...CHARGING SYSTEM 8 30 2 Rectifier regulator 3 AC magneto 8 Main fuse 10 Battery ...
Page 515: ...CHARGING SYSTEM 8 32 ...
Page 539: ...COOLING SYSTEM 8 56 ...
Page 587: ...FUEL PUMP SYSTEM 8 104 ...
Page 599: ...ACCESSORY BOX SYSTEM 8 116 ...
Page 609: ...ABS ANTI LOCK BRAKE SYSTEM 8 126 ...
Page 698: ...ELECTRICAL COMPONENTS 8 215 FJR13A 5 1 3 2 17 8 10 11 12 13 14 15 16 7 6 4 9 ...
Page 700: ...ELECTRICAL COMPONENTS 8 217 FJR13AE 13 16 18 17 2 3 4 5 6 7 8 1 9 10 11 12 15 14 19 ...
Page 702: ...ELECTRICAL COMPONENTS 8 219 FJR13AE 1 19 3 2 5 7 9 8 12 13 14 15 16 11 10 18 17 6 4 ...
Page 730: ...ELECTRICAL COMPONENTS 8 247 ...
Page 739: ......
Page 740: ...YAMAHA MOTOR CO LTD 2500 SHINGAI IWATA SHIZUOKA JAPAN ...


