background image

Page 7-10

 Xerox WorkCentre PE120i System Administration Guide 

Loc

al

 Con

nec

ti

on

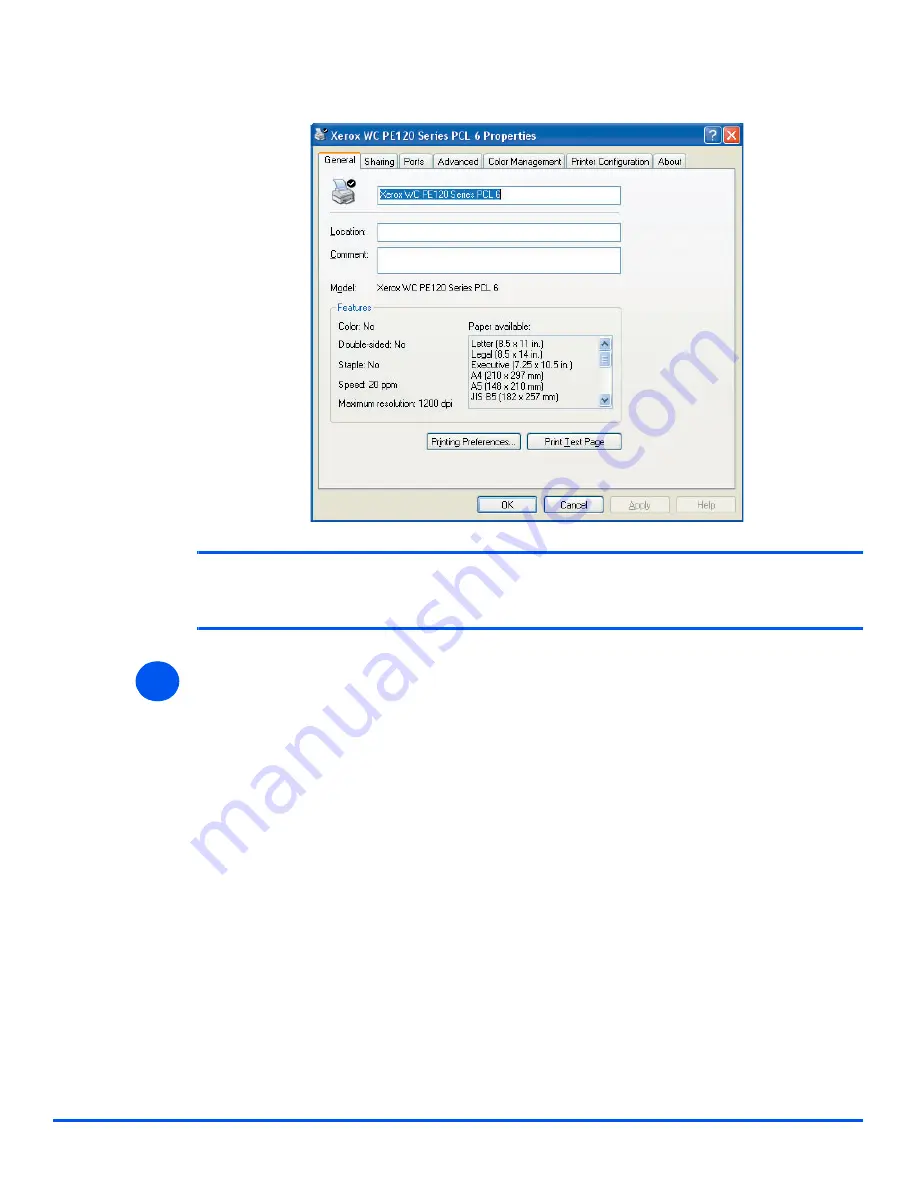
A properties window will be displayed.

NOTE: 

This window will have a different appearance according to the operating 

system of the workstation 

and

 the type of driver installed. The window displayed is 

from a Windows XP operating system.

¾

Click on the Ports tab.

3

Summary of Contents for WorkCentre PE120i

Page 1: ...WorkCentre PE120i System Administration Guide 538N00042...

Page 2: ...ion now allowed by statutory or judicial law or hereinafter granted including without limitations material generated from the software programs which are displayed on the screen such as icons screen d...

Page 3: ...Regulations Europe 1 14 Certification to 1999 5 EC Radio Equipment Telecommunications Terminal Equipment Directive 1 14 Regulations USA 1 15 Fax Send Header Requirements 1 15 Data Coupler Information...

Page 4: ...Internet Printing Protocol 4 11 Windows 2000 Internet Printing Protocol 4 12 Apple Mac OSX with Rendezvous 4 13 Test Print 4 14 5 AppleTalk 5 1 Introduction 5 1 Information Checklist 5 2 AppleTalk Ins...

Page 5: ...ing 6 22 IPP 6 24 HTTP 6 26 7 Local Connection 7 1 Introduction 7 1 Information Checklist 7 2 Installation Procedure 7 3 Driver Installation 7 4 Workstation Setup 7 9 Test Print or Scan 7 12 8 Fax 8 1...

Page 6: ...Maintenance using Internet Services 9 4 Enabling Internet Services 9 4 Checking Printer Status 9 5 Printing Reports 9 6 Defining the Printer 9 7 Checking Configurations 9 8 Making General Maintenance...

Page 7: ...designed for ease of use but to use your machine to its fullest potential take some time to read the User Guide Introduction 1 2 About This Guide 1 3 Related Information Sources 1 4 Customer Support...

Page 8: ...tions available on your machine depend on the model purchased Xerox WorkCentre PE120i This model has digital copying direct scanning and faxing capabilities It also provides networked printing A Docum...

Page 9: ...o emphasise the selection of a feature mode or button Select the paper supply source required by pressing Paper Supply Notes Located in the margins and used to provide additional or useful information...

Page 10: ...PE120i System Administration Guide Welcome Related Information Sources Information available for the products consists of This System Administration Guide The Quick Start Guide The User Guide The Xer...

Page 11: ...chine serial number Use the space below to make a note of the machine serial number ____________________________________________ The serial number is located on the rear cover The Xerox Welcome Center...

Page 12: ...connect the product to a power source receptacle that lacks an earth connection terminal This product should be operated from the type of power source indicated on the marking label If you are not su...

Page 13: ...ter This product should not be placed in a built in installation unless proper ventilation is provided Never push objects of any kind into the slots of the product as they may touch dangerous voltage...

Page 14: ...Safety Standards listed Agency TUV Rheinland Standard IEC60950 3rd Edition Amendments A1 A2 A3 A4 and A11 USA CANADA This XEROX product is certified by the following Agency using the Safety Standards...

Page 15: ...the mutual recognition of their conformity A full declaration defining the relevant directives and referenced standards can be obtained from your Xerox representative or by contacting Environment Heal...

Page 16: ...with the instruction manual may cause harmful interference to radio communications Operation of this equipment in a residential area is likely to cause harmful interference in which case the user will...

Page 17: ...x Limited see page 1 13 for details for advice prior to any test implementation XEROX equipment should however be properly and regularly serviced and maintained at all times QUESTION What is the Elect...

Page 18: ...e safe This will include ensuring XEROX equipment in such premises is safe XEROX Limited s Product Safety function has prepared a guide which contains a list of tests which may be completed by your XE...

Page 19: ...as been corrected You will be advised of such action to enable such defects to be corrected PLEASE NOTE YOU MUST ENSURE THAT YOUR XEROX EQUIPMENT IS SAFE AT ALL TIMES Please contact us if you have any...

Page 20: ...of problems you should contact your local Xerox representative in the first instance This product has been tested to and is compliant with TBR21 a technical specification for terminal equipment for u...

Page 21: ...8 of the FCC rules and the requirements adopted by the Administrative Council for Terminal Attachments ACTA On the rear of this equipment is a label that contains among other information a product ide...

Page 22: ...in its facilities equipment operations or procedures that could affect the operation of the equipment If this happens the Telephone Company will provide advance notice in order for you to make necessa...

Page 23: ...the equipment Repairs to certified equipment should be made by an authorized Canadian maintenance facility designated by the supplier Any repairs or alterations made by the user to this equipment or e...

Page 24: ...al Compliance Energy Star XEROX Corporation designed this product to comply with the guidelines of the ENERGY STAR program of the Environmental Protection Agency As an ENERGY STAR Partner XEROX has de...

Page 25: ...Introduction This chapter explains how to make the basic settings to install the WorkCentre PE120i on a network The physical connection is Ethernet and the addressing protocols are provided by TCP IP...

Page 26: ...tilizing TCP IP is required these procedures are not designed to install a network Customer A suitable network cable Customer If you are going to configure TCP IP manually you need to obtain and recor...

Page 27: ...o obtain the following TCP IP Address Gateway Address Subnet Mask Address Primary DNS Server Address Installation Procedure There are three stages required to install the WorkCentre PE120i in a TCP IP...

Page 28: ...n the top line of the display 8 Network Setup Reset Network 2 Press or until Configure Network is displayed and press Enter 8 Network Setup Config Network 3 Press or until TCP IP is displayed and pres...

Page 29: ...a sheet to check the addresses see Printing a System Data2 6 1 Press Menu until you see Network Setup on the top line of the display 8 Network Setup Reset Network 2 Press or until Configure Network is...

Page 30: ...em Administration Guide Basic Network Installation Printing a System Data 1 Press Menu until you see Report on the top line of the display 7 Report Phone Book 2 Press or until System Data is displayed...

Page 31: ...rnet Services chapter for instructions When manually making the TCP IP settings you will need to know the following information The IP address The subnet mask if required The Gateway address if requir...

Page 32: ...ion Setup on page 2 9 4 Press or until Manual is displayed and press Enter TCP IP Manual 5 For each address press or until the required setting is displayed and press Enter Manual IP Address 6 Enter t...

Page 33: ...nstallation Workstation Setup To enable the workstation environment to communicate with the WorkCentre PE120i perform the following steps At the client workstation install print drivers and map to the...

Page 34: ...a client workstation Perform the following steps Open a document on a client workstation Select the WorkCentre PE120i as the printer for sending documents to Print the document on the device and veri...

Page 35: ...ge 3 1 3 NetWare Introduction This chapter explains how to install the WorkCentre PE120i on the various NetWare networks The following information is provided Information Checklist 3 2 NetWare Environ...

Page 36: ...n existing operational NetWare network is required these procedures are not designed to install a NetWare network Customer NetWare client server and operating system software version 4 x 5 x and 6 x C...

Page 37: ...ows NetWare Versions supported NetWare 4 x 5 x and 6 x Network Protocols supported The WorkCentre PE120i settings which require configuring vary depending on the NetWare version being used Identify wh...

Page 38: ...te the installation for IPX environments Using NetWare Utilities This method requires use of the NetWare utilities for example NWADMIN to configure the network The device will require configuring usin...

Page 39: ...rint A print job should be submitted to ensure the WorkCentre PE120i has been installed and configured correctly If running NLSP ensure that RIP SAP compatibility is configured on the same segment as...

Page 40: ...until Configure Network is displayed and press Enter 8 Network Setup Config Network 4 Press or until Netware is displayed and press Enter Config Network Netware 5 Press or until the appropriate framet...

Page 41: ...rkCentre PE120i using the appropriate Netware utility PCONSOLE or NWADMIN for example Record the following information for use during setup at the WorkCentre PE120i NDS Tree not Bindery NDS Context no...

Page 42: ...workstation Perform the following steps Open a document on a client workstation Select the WorkCentre PE120i as the printer for sending documents to Print the document on the device and verify that it...

Page 43: ...n Guide Page 4 1 4 Print Driver Installation for Networked Printers Introduction This chapter explains how to install the print drivers for networked printers The following information is provided Inf...

Page 44: ...for Networked Printers Information Checklist Before starting the Driver installation procedures please ensure the following items are available or have been performed Item By The printer has been inst...

Page 45: ...vironments Locate and perform the workstation setup procedures for the workstation environment Choose from Windows XP TCP IP see 4 4 Windows 2000 TCP IP see 4 6 Windows NT V4 0 2000 TCP IP see 4 8 Win...

Page 46: ...he IP Address of the printer in the Name or address of printer field you can optionally enter a friendly name for the printer port you are creating or use the default name created Then select Next to...

Page 47: ...uired language The driver is identified by the file extension inf Select Next and select Next again and the WorkCentre PE120i driver will be loaded onto the workstation Enter the Printer Name and sele...

Page 48: ...IP Address of the printer in the Name or address of printer field you can optionally enter a friendly name for the printer port you are creating or use the default name created Then select Next to co...

Page 49: ...quired language The driver is identified by the file extension inf Select Next and select Next again and the WorkCentre PE120i driver will be loaded onto the workstation Enter the Printer Name and sel...

Page 50: ...elect My Computer and then select Next to display the dialog box listing available ports Select Add Port to display the Printer Ports dialog box Select LPR Port and select New Port to display the Add...

Page 51: ...driver is identified by the file extension inf Select Next and select Next again and the WorkCentre PE120i driver will be loaded onto the workstation Enter the Printer Name and select Next Select Sha...

Page 52: ...to www office xerox com and in the search textbox enter PE120i In the search results you will see the WorkCentre PE120i listed beneath that click the Download Drivers link You will arrive at the Down...

Page 53: ...b ccc ddd or http printer host name where aaa bbb ccc ddd is the IP address of the WorkCentre PE120i and printer host name is the host name of the WorkCentre PE120i registered with a DNS server The Ad...

Page 54: ...ame where aaa bbb ccc ddd is the IP address of the WorkCentre PE120i and printer host name is the host name of the WorkCentre PE120i registered with a DNS server The Add Printer Wizard will then ask i...

Page 55: ...be enabled on the WorkCentre PE120i Choose Print Center and click the Add button Choose Rendezvous from the drop down list All IP printers on the subnet will be listed Choose the WorkCentre PE120i Ch...

Page 56: ...mitted from a client workstation Perform the following steps Open a document on a client workstation Select the WorkCentre PE120i as the printer for sending documents to Print the document on the devi...

Page 57: ...This chapter explains how to install the WorkCentre PE120i on an AppleTalk network The following information is provided Information Checklist 5 2 AppleTalk Installation 5 3 Printer Driver Installati...

Page 58: ...An existing operational AppleTalk network with Macintosh workstation computers equipped with Ethernet network interface cards are required These procedures are not designed to install an AppleTalk net...

Page 59: ...submitted to ensure the WorkCentre PE120i has been installed and configured correctly Network Communication Setup This procedure is used to setup the network communication parameters of the WorkCentre...

Page 60: ...nter Driver Installation Mac OS 8x 9x only on page 5 5 3 Press or until Configure Network is displayed and press Enter 8 Network Setup Config Network 4 Press or until Configure Network is displayed an...

Page 61: ...ling the Apple printer driver Insert the driver CD ROM in the CD ROM drive The driver icon appears on the desktop Double click the icon Double click the WorkCentre PE120i folder and then the installer...

Page 62: ...choose the Appletalk Zone where the printer is installed and click the Setup button Click the Auto Setup button then click OK The Xerox WCPE120i ppd should be displayed Click the OK button Alternative...

Page 63: ...ation Procedure This section describes the procedures for installing the Apple printer driver Choose Print Center and click the Add button Choose Appletalk from the drop down list All IP printers on t...

Page 64: ...hine to the printer driver The printer driver controls the functions of this machine based on the information in the PPD file Make sure that the printer is on and that Ethertalk has been enabled see N...

Page 65: ...workstation Perform the following steps Open a document on a client workstation Select the WorkCentre PE120i as the printer for sending documents to Print the document on the device and verify that i...

Page 66: ...Page 5 10 Xerox WorkCentre PE120i System Administration Guide AppleTalk...

Page 67: ...Services Introduction This chapter explains how to enable and use the Internet Services to install the WorkCentre PE120i on the network The following information is provided Information Checklist 6 2...

Page 68: ...perational workstation with TCP IP Internet or Intranet accessibility is required These procedures are not intended to install the TCP IP stack itself Customer Obtain and record the following informat...

Page 69: ...ections and settings needed to install WorkCentre PE120i on a network can be made using Internet Services eliminating steps that would otherwise need to be performed at the WorkCentre PE120i Control P...

Page 70: ...Using Internet Services Network Communication Setup Network Communication Setup requires that the WorkCentre PE120i is connected to the network and that the TCP IP address settings are made see Basic...

Page 71: ...ervices At a client workstation on the network launch the Internet Browser Access CentreWare Internet Services In the URL field enter http followed by the IP Address of the WorkCentre PE120i Then sele...

Page 72: ...evice settings in order to successfully complete installation on a network Instructions are provided for configuring the device for the following network environments Refer to the appropriate instruct...

Page 73: ...ices Home Page for the WorkCentre PE120i select the Properties tab Select the plus symbol to the left of the Connectivity folder in the Properties frame and then select the symbol to the left of the P...

Page 74: ...complete the installation of the WorkCentre PE120i perform these steps Enable CentreWare Internet Services see Enabling Internet Services on page 6 5 At the CentreWare Internet Services Home Page for...

Page 75: ...twork Installation Using Internet Services NOTE Click the Undo button to cancel any changes made and return to the previous values Select the Status tab and then select Reset Network Controller to ena...

Page 76: ...steps Open a document on a client workstation Select the WorkCentre PE120i in the Chooser as the printer to which the selected document will be sent Print the document on the device and verify that i...

Page 77: ...NWADMIN utility Configure the WorkCentre PE120i This procedure explains how to use CentreWare Internet Services to configure the WorkCentre PE120i Test Print A print job should be submitted to ensure...

Page 78: ...kCentre PE120i select the Properties tab Select the plus symbol to the left of the Connectivity folder in the Properties frame and then select the symbol to the left of the Protocols folder In the Pro...

Page 79: ...to enable the selections to take effect Continue with Test Print Test Print To ensure the device has been installed on the network correctly a test print should be submitted from a client workstation...

Page 80: ...settings for the device will have been setup when completing the Enabling CentreWare Internet Services section To complete the installation of the device perform these steps Enable CentreWare Internet...

Page 81: ...e Subnet Mask Enter the Gateway Address Check the DNS Settings details and if necessary enter the correct information required Scroll down the screen and check the SLP Configuration details and if nec...

Page 82: ...on Perform the following steps Open a document on a client workstation Select the device as the printer to which the selected document will be sent Print the document on the device and verify that it...

Page 83: ...rrect information Make the following selections and settings in the SNMP Properties section of the frame Select the checkbox to enable the SNMP Protocol Click the Edit button to configure SNMP You can...

Page 84: ...Number In the Traps section enter the Trap Community Name and check the boxes corresponding to the required Traps to be Received Click the Apply button to implement any changes and return to the first...

Page 85: ...to the left of the Connectivity folder in the Properties frame and then select the symbol to the left of the Protocols folder Select SSPD and check the Protocol Configuration details are correct If a...

Page 86: ...the installation of the device perform these steps Enable CentreWare Internet Services see Enabling Internet Services on page 6 5 At the CentreWare Internet Services Home Page for the WorkCentre PE12...

Page 87: ...ntinue with Test Print Test Print To ensure the device has been installed on the network correctly a test print should be submitted from a client workstation Perform the following steps Open a documen...

Page 88: ...lation of the WorkCentre PE120i perform these steps Enable CentreWare Internet Services see Enabling Internet Services on page 6 5 At the CentreWare Internet Services Home Page for the WorkCentre PE12...

Page 89: ...y a test print should be submitted from a client workstation Perform the following steps Open a document on a client workstation Select the device as the printer to which the selected document will be...

Page 90: ...me Page for the WorkCentre PE120i select the Properties tab Select the plus symbol to the left of the Connectivity folder in the Properties frame and then select the symbol to the left of the Protocol...

Page 91: ...use a Browser to access the WorkCentre PE120i embedded HTTP Server Home Page In the URL field enter the IP Address of the WorkCentre PE120i Example If the IP Address is 192 168 100 100 enter the foll...

Page 92: ...re Internet Services Home Page for the WorkCentre PE120i select the Properties tab Select the plus symbol to the left of the Connectivity folder in the Properties frame and then select the symbol to t...

Page 93: ...use a Browser to access the WorkCentre PE120i embedded HTTP Server Home Page In the URL field enter the IP Address of the WorkCentre PE120i Example If the IP Address is 192 168 100 100 enter the foll...

Page 94: ...Page 6 28 Xerox WorkCentre PE120i System Administration Guide Network Installation Using Internet Services...

Page 95: ...Guide Page 7 1 7 Local Connection Introduction This chapter explains how to install the workstation drivers for local connection of the WorkCentre PE120i The following information is provided Informa...

Page 96: ...ave been performed NOTE The installation procedures will install the WorkCentre PE120i on the host workstation The procedure is not intended to connect the host workstation to other workstations Item...

Page 97: ...rk requirements The WorkCentre PE120i can be connected directly to the parallel port or USB of a host workstation A document file can be sent or received from the host workstation via the appropriate...

Page 98: ...matically is chosen Click Next The Wizard will begin to install the PCL Print driver for the PE120 The Hardware Wizard will search the CD ROM drive for the print driver and will display the following...

Page 99: ...g the Parallel cable into the PE120 and connect to your Personal Computer PC Start your PC and turn on the PE120 Insert the Xerox Drivers CD into the CD ROM drive From within Microsoft Windows click S...

Page 100: ...rkstation Setup Installing Xerox Drivers in Microsoft Windows 98 or Windows Millennium using the USB port Plug the USB cable into the PE120 and connect to your Personal Computer PC Start your PC and t...

Page 101: ...river for the PE120 is now loaded The Add New Hardware Wizard will display Click Next to install the Scan driver for the PE120 Again You must specify the location Browse to the CD ROM drive and the Dr...

Page 102: ...orkCentre PE120i System Administration Guide Local Connection Choose Yes to print a test page and click Finish The PE120 driver will now be installed and a test page should print Continue with Worksta...

Page 103: ...indow will vary according to the operating system from the Start Settings menu or directly from the Start menu The Printers and Faxes window will be displayed NOTE This window will have a different ap...

Page 104: ...Connection A properties window will be displayed NOTE This window will have a different appearance according to the operating system of the workstation and the type of driver installed The window disp...

Page 105: ...e Ports tab will be displayed Check the box appropriate to the connection For a parallel connection check LPT1 LPT2 or LPT3 depending on the configuration of the workstation This is usually LPT1 For a...

Page 106: ...tion Select the WorkCentre PE120i as the printer to which the document will be sent Print the selected document on the device and verify that it prints correctly The installation process is now comple...

Page 107: ...i System Administration Guide Page 8 1 8 Fax Introduction This chapter explains how to setup Fax Forwarding The following information is provided Information Checklist 8 2 Fax Setup using Internet Ser...

Page 108: ...e following items are available or have been performed Configuration can also be performed using Xerox CentreWare Refer to Network Installation Using Internet Services on page 6 1 Item By Ensure the W...

Page 109: ...ces At a client workstation on the network launch the Internet Browser Access CentreWare Internet Services In the URL field enter http followed by the IP Address of the WorkCentre PE120i Then select t...

Page 110: ...e Page for the WorkCentre PE120i select the Properties tab Select the plus symbol to the left of the Services folder in the Properties frame and then select the symbol to the left of the Fax Settings...

Page 111: ...an add fax numbers individually import these numbers from a comma delimited CSV file and export the number data from the WorkCentre PE120i to a comma delimited CSV file You can also delete all numbers...

Page 112: ...o the User Guide for full details of sending Faxes Place a document in the Document Feeder or on the Document Glass Select the Fax key and set any features required Follow the instructions on the disp...

Page 113: ...Page 9 1 9 Administration Tools Introduction This chapter explains how to configure or use the various administration tools found in the WorkCentre PE120i The following information is provided Networ...

Page 114: ...emented Set to Defaults restores all settings to their factory state Print Net CFG provides you with a hard copy of the network settings Reset Network To reset the network card 1 Press Menu until you...

Page 115: ...Administration Tools Set To Defaults To reset the factory defaults 1 Press Menu until you see Network Setup on the top line of the display 8 Network Setup Reset Network 2 Press or until Set To Default...

Page 116: ...rnet Services At a client workstation on the network launch the Internet Browser Access CentreWare Internet Services In the URL field enter http followed by the IP Address of the WorkCentre PE120i The...

Page 117: ...es Home Page for the WorkCentre PE120i select the Status tab Select General to view the status of the WorkCentre PE120i Click the Reset Network Controller to apply any changes made within Internet Ser...

Page 118: ...ntreWare Internet Services see Enabling Internet Services on page 9 4 At the CentreWare Internet Services Home Page for the WorkCentre PE120i select the Print tab Click the appropriate Print button to...

Page 119: ...nternet Services on page 9 4 At the CentreWare Internet Services Home Page for the WorkCentre PE120i select the Properties tab Enter the Machine Name but only if necessary Enter the Machine Location i...

Page 120: ...abling Internet Services on page 9 4 At the CentreWare Internet Services Home Page for the WorkCentre PE120i select the Properties tab Select the plus symbol to the left of the General Setup folder in...

Page 121: ...Maintenance frame select Maintenance In the Maintenance area Enter the Service Number to telephone to obtain service or advice Choose the required USB Mode UI Language Power Save time and Clock Mode f...

Page 122: ...Enable CentreWare Internet Services see Enabling Internet Services on page 9 4 At the CentreWare Internet Services Home Page for the WorkCentre PE120i select the Maintenance tab Enter your Admin User...

Page 123: ...At the CentreWare Internet Services Home Page for the WorkCentre PE120i select the Assistance tab To obtain internet assistance for Software Upgrades and Browser Software click the appropriate link in...

Page 124: ...Page 9 12 Xerox WorkCentre PE120i System Administration Guide Administration Tools...

Page 125: ...ess in the range 169 254 x x during configuration of the PC Driver Software that is loaded on the client workstation that prepares data to be sent to the WorkCentre PE120i It is also called a print dr...

Page 126: ...llowing the ISO Open Systems Interconnection OSI model Internetwork Packet Exchange See IPX IP See TCP IP IP Address See TCP IP IPX Internetwork Packet Exchange IPX is part of NetWare It routes packet...

Page 127: ...dows for Workgroups NetWare Lite and Macintosh System 7 are examples of peer to peer networking products Print driver See Driver Protocol The rules that control the transmitting and receiving of data...

Page 128: ...IP is a set of communications protocols that is supported by a variety of computer platforms TCP controls the data transfer and IP controls the routing of the data The IP Address is a unique address t...

Page 129: ...Checklist 2 2 Manually setting TCP IP Addresses 2 7 Network Communication Setup 2 5 TCP IP Enabling or Disabling 2 4 Test Print 2 10 Workstation Setup 2 9 Basic TCP IP Settings Installation Procedure...

Page 130: ...nt 7 12 Test Scan 7 12 Workstation Setup 7 9 LPR LPD Configuration 6 20 M Manually setting TCP IP Addresses 2 7 N NetWare 3 1 4 1 Information Checklist 3 2 4 2 IPX Queue Based Printing 3 4 NetWare Env...

Page 131: ...Index iii Index W Welcome 1 2 Welcome Center 1 5 Canada 1 5 US 1 5 Workstation Setup Windows 2000 IPP 4 12 4 13 Windows 2000 TCP IP 4 6 Windows 98 me 4 10 Windows NT V4 0 TCP IP 4 8 Windows XP IPP 4...

Reviews: