4.3 Configuring the Printer Drivers
86
Installing/Configuring the P
rinter
D
ri
v
ers
4
Graphics
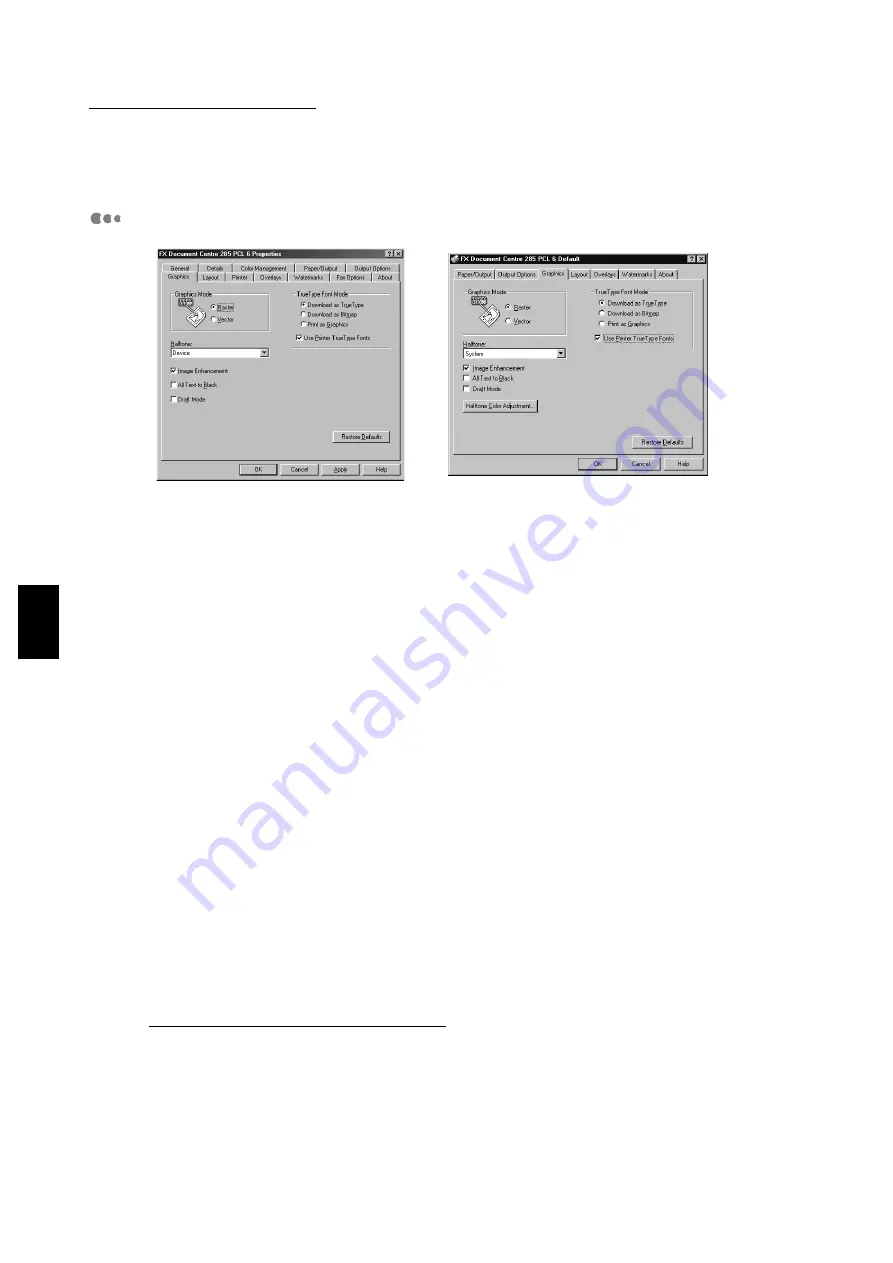
The Graphics tab has option settings that affect the quality of a printed output. Notice that
there is a visual representation of the selected graphics mode.
Clicking the image will toggle both the radio button and the image display selections.
Graphics Mode
The graphics mode option enables you to optimize graphics printing, increase speed and
improve print quality. Options include:
●
Raster
Graphics are sent to the printer as bitmap raster images (i.e. images composed of
individual dots). The printed output may appear to be a closer match to the screen
image than the other mode, but printing is slower.
●
Vector (default)
Graphics are sent to the printer as a combination of vector and raster images. This
mode enables images to be printed faster but not all graphic images can be printed
using this mode. If the printed graphic images do not appear the same way as they did
on your screen, select Raster and reprint your graphic.
Halftone
Halftone refers to a type of pattern that is applied to the printed image. By using a
combination of black dots, these patterns produce a grey appearance on the printed image.
This Halftone feature is designed to process images (e.g. photographs) but not computer
generated art (e.g. clip art). The appearance of the printed image will vary depending on the
the Halftone settings. The best way to select a Halftone setting for your graphic image is to
experiment. Print a graphic image at each setting and choose the one you like best.
Note the different options available for the different drivers.
For Windows 95/Windows 98/Windows Me:
●
Device (default)
Uses the default printer Halftone attributes to produce the image objects.
●
Line Art
Provides solid lines and sharp contrasts between shaded areas. It is usually used for
images with fine lines.
●
Fine
Provides smooth shades of grey.
Windows 95/Windows 98/Windows Me
Windows NT 4.0/Windows 2000
Summary of Contents for document centre285 series
Page 12: ...This page is intentionally left blank...
Page 37: ...2 3 Using Quick Setup Menu 25 Setting Up 2...
Page 42: ...2 5 Setting IP Address 30 Setting Up 2 Setting Subnet Mask and Gateway Address...
Page 43: ...2 5 Setting IP Address 31 Setting Up 2...
Page 47: ...2 6 Setting Port 35 Setting Up 2...
Page 52: ...This page is intentionally left blank...
Page 74: ...This page is intentionally left blank...
Page 108: ...This page is intentionally left blank...
Page 143: ...5 4 Outputting Reports Lists 131 Mode Menu and Common Menu 5...
Page 147: ...5 4 Outputting Reports Lists 135 Mode Menu and Common Menu 5...
Page 149: ...5 4 Outputting Reports Lists 137 Mode Menu and Common Menu 5...
Page 151: ...5 4 Outputting Reports Lists 139 Mode Menu and Common Menu 5...
Page 153: ...5 4 Outputting Reports Lists 141 Mode Menu and Common Menu 5...
Page 155: ...5 4 Outputting Reports Lists 143 Mode Menu and Common Menu 5...
Page 157: ...5 4 Outputting Reports Lists 145 Mode Menu and Common Menu 5...
Page 159: ...5 4 Outputting Reports Lists 147 Mode Menu and Common Menu 5...
Page 168: ...This page is intentionally left blank...
Page 169: ...6Precautions and Limitations 6 1 In General 158 6 2 On Using TCP IP 160...
Page 174: ...This page is intentionally left blank...
Page 194: ...This page is intentionally left blank...


